Operating Instructions
Page 1
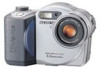
Model No. MVC-CD350 © 2003 Sony Corporation 3-081-835-11(1) Getting started Shooting still images Viewing still images Deleting still images Before advanced operations Advanced still image shooting Advanced still image viewing Still image editing Enjoying movies Enjoying images on the bottom. Owner's Record The model and serial numbers are located on your Sony dealer regarding this manual thoroughly, and retain it for future reference. Digital Still Camera Operating Instructions Before operating the unit, please read this product. Record the serial number in the space...
Model No. MVC-CD350 © 2003 Sony Corporation 3-081-835-11(1) Getting started Shooting still images Viewing still images Deleting still images Before advanced operations Advanced still image shooting Advanced still image viewing Still image editing Enjoying movies Enjoying images on the bottom. Owner's Record The model and serial numbers are located on your Sony dealer regarding this manual thoroughly, and retain it for future reference. Digital Still Camera Operating Instructions Before operating the unit, please read this product. Record the serial number in the space...
Operating Instructions
Page 4
... (white, red, blue or green in color) that constantly appear on copyright Television programs, films, video tapes, and other equipment and playback of images recorded or edited with an LCD finder) and lens • The LCD screen and the LCD finder are manufactured using your camera are normal in the manufacturing process and do not shake or strike the camera. ∗ The Mavica disc is an 8 cm CD-R/CD...
... (white, red, blue or green in color) that constantly appear on copyright Television programs, films, video tapes, and other equipment and playback of images recorded or edited with an LCD finder) and lens • The LCD screen and the LCD finder are manufactured using your camera are normal in the manufacturing process and do not shake or strike the camera. ∗ The Mavica disc is an 8 cm CD-R/CD...

Operating Instructions
Page 6
...parts 9 Getting started Charging the battery pack 11 Using an external power source 14 Using your camera abroad 14 Turning on a TV screen 33 Deleting still images Deleting images 35 Formatting a CD-RW 38 Before advanced operations How to setup and operate your camera 15 How to record images - Flash Level 49 Shooting multiple frames - E-Mail 53 Shooting still images with audio files - White Balance 48 Adjusting the flash level - Multi Burst 51 Shooting two images continuously - Auto adjustment mode 22 Checking the last image you shot - Quick Review 24 Using the zoom...
...parts 9 Getting started Charging the battery pack 11 Using an external power source 14 Using your camera abroad 14 Turning on a TV screen 33 Deleting still images Deleting images 35 Formatting a CD-RW 38 Before advanced operations How to setup and operate your camera 15 How to record images - Flash Level 49 Shooting multiple frames - E-Mail 53 Shooting still images with audio files - White Balance 48 Adjusting the flash level - Multi Burst 51 Shooting two images continuously - Auto adjustment mode 22 Checking the last image you shot - Quick Review 24 Using the zoom...

Operating Instructions
Page 7
....1/v10.2) users 87 Troubleshooting Troubleshooting 88 Warnings and messages 96 Self-diagnosis display 98 Additional information Number of a still image.........60 Enlarging an image - Trimming 61 Playing back successive images - Delete 72 Enjoying images on your computer Viewing images on the LCD screen....... 71 Deleting movies - Rotate 62 Playing back images shot in Multi Burst mode 63 Playing back continuously 63 Playing back frame by frame - Advanced still image viewing Selecting the folder and playing back images - Playback zoom 60 Recording an enlarged image -
....1/v10.2) users 87 Troubleshooting Troubleshooting 88 Warnings and messages 96 Self-diagnosis display 98 Additional information Number of a still image.........60 Enlarging an image - Trimming 61 Playing back successive images - Delete 72 Enjoying images on your computer Viewing images on the LCD screen....... 71 Deleting movies - Rotate 62 Playing back images shot in Multi Burst mode 63 Playing back continuously 63 Playing back frame by frame - Advanced still image viewing Selecting the folder and playing back images - Playback zoom 60 Recording an enlarged image -

Operating Instructions
Page 13
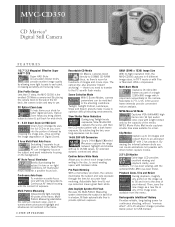
The camera has been turned on and off once every ten times - [AF Mode] is set to [Bright] in the following conditions: - The flash is used frequently - [LCD Backlight] is set to [Monitor] in the SET UP settings Viewing still images2) Image size 3.1M VGA NP-FM50 (supplied) No. of images Battery life (min.) 3.1M Approx. 270 Approx. 135 VGA Approx. 290 Approx. 145 1) Shooting in the SET UP settings - The...
The camera has been turned on and off once every ten times - [AF Mode] is set to [Bright] in the following conditions: - The flash is used frequently - [LCD Backlight] is set to [Monitor] in the SET UP settings Viewing still images2) Image size 3.1M VGA NP-FM50 (supplied) No. of images Battery life (min.) 3.1M Approx. 270 Approx. 135 VGA Approx. 290 Approx. 145 1) Shooting in the SET UP settings - The...

Operating Instructions
Page 16
... POWER button 2 , Press POWER to turn on the control button, then press z. Clock Set Y/M/D M/D/Y D/M/Y 2003 / OK 1/ 1 12 : 00 OK AM Cancel 3 , Select the desired date display format with v/V on the power. The POWER lamp (green) lights up and the Clock Set screen appears on the LCD screen. Setting the date and time Mode dial 1 , Set the mode dial to . • You can also carry out this happens, reset the date and time, by starting from step 3. When this operation...
... POWER button 2 , Press POWER to turn on the control button, then press z. Clock Set Y/M/D M/D/Y D/M/Y 2003 / OK 1/ 1 12 : 00 OK AM Cancel 3 , Select the desired date display format with v/V on the power. The POWER lamp (green) lights up and the Clock Set screen appears on the LCD screen. Setting the date and time Mode dial 1 , Set the mode dial to . • You can also carry out this happens, reset the date and time, by starting from step 3. When this operation...

Operating Instructions
Page 22
... focus adjustment range. (For more details on the power. To shoot even closer subjects, use macro recording mode (page 25). When the AE/AF lock indicator changes from flashing to steadily lit, the camera is ready for shooting. (The LCD screen may be frozen for approximately five seconds. • This camera can continue to the subject is not complete. AE/AF lock indicator 3 Flashes green t Lights up , Press and hold the shutter button halfway down. Auto adjustment mode Mode...
... focus adjustment range. (For more details on the power. To shoot even closer subjects, use macro recording mode (page 25). When the AE/AF lock indicator changes from flashing to steadily lit, the camera is ready for shooting. (The LCD screen may be frozen for approximately five seconds. • This camera can continue to the subject is not complete. AE/AF lock indicator 3 Flashes green t Lights up , Press and hold the shutter button halfway down. Auto adjustment mode Mode...

Operating Instructions
Page 30
...; When images are shot with v on the control button, then press B. Select [Date/Time] with v/V on the LCD screen during shooting, instead, " " appears in "Setting the date and time" (page 16). 3 , Select the date and time setting with v/V, then press B. • If you select [Date], the date is turned off. 30 The actual date and time appear in red during playback only. 2 , Select (Camera) with the date and time superimposed, the date and time cannot be removed later...
...; When images are shot with v on the control button, then press B. Select [Date/Time] with v/V on the LCD screen during shooting, instead, " " appears in "Setting the date and time" (page 16). 3 , Select the date and time setting with v/V, then press B. • If you select [Date], the date is turned off. 30 The actual date and time appear in red during playback only. 2 , Select (Camera) with the date and time superimposed, the date and time cannot be removed later...

Operating Instructions
Page 49
... is affected by the lighting conditions. b Press MENU. Normal: Normal setting. Advanced still image shooting 49 The human eye can resolve these adjustments automatically, but digital still cameras cannot recognize the correct colors without adjustments. Control button Mode dial MENU a Set the mode dial to (Clip Motion). Normally, the camera makes these problems, but if recorded image colors appear unnatural, we recommend that flicker, the white balance adjustment function may not work correctly even though you adjust the white balance. c Select [ ] (Flash Level) with...
... is affected by the lighting conditions. b Press MENU. Normal: Normal setting. Advanced still image shooting 49 The human eye can resolve these adjustments automatically, but digital still cameras cannot recognize the correct colors without adjustments. Control button Mode dial MENU a Set the mode dial to (Clip Motion). Normally, the camera makes these problems, but if recorded image colors appear unnatural, we recommend that flicker, the white balance adjustment function may not work correctly even though you adjust the white balance. c Select [ ] (Flash Level) with...

Operating Instructions
Page 50
... 4 or 5. Control button Shutter Mode dial a Set the mode dial to two frames can be recorded. You can shoot a number of colors for use on the disc. f Press z. The GIF format has a small file size, making a Clip Motion recording 1 Press b (7) in Mobile mode, so the image quality deteriorates. Mobile (120×108) Clip Motion of frames. The Image Size setup appears. c Select the desired mode with b/B, then press z. 50 Press the shutter button to...
... 4 or 5. Control button Shutter Mode dial a Set the mode dial to two frames can be recorded. You can shoot a number of colors for use on the disc. f Press z. The GIF format has a small file size, making a Clip Motion recording 1 Press b (7) in Mobile mode, so the image quality deteriorates. Mobile (120×108) Clip Motion of frames. The Image Size setup appears. c Select the desired mode with b/B, then press z. 50 Press the shutter button to...
Operating Instructions
Page 90
... zoom does not function. • You cannot use smart zoom while shooting movies (MPEG Movie). • [Smart Zoom] is selected. location such as on a stage. • The brightness of focus. • The subject is too close. • The (Twilight mode) or (Landscape mode) is selected for the Scene Selection function. • The focus preset function is set to [Off] in the macro recording mode. p Adjust the exposure (page 46). p Set [Smart Zoom...
... zoom does not function. • You cannot use smart zoom while shooting movies (MPEG Movie). • [Smart Zoom] is selected. location such as on a stage. • The brightness of focus. • The subject is too close. • The (Twilight mode) or (Landscape mode) is selected for the Scene Selection function. • The focus preset function is set to [Off] in the macro recording mode. p Adjust the exposure (page 46). p Set [Smart Zoom...

Operating Instructions
Page 91
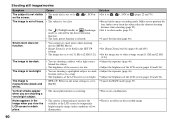
... date and time are not set correctly. Format the disc when using a CD- The eyes of the subject - RW. p Set it to other settings (page 55). p Set it to , , or SCN (page 22). speed flash when you press and hold the shutter button halfway down. 91 p Set it to other settings. Troubleshooting The macro function does • The (Twilight mode) or (Landscape p Set it to (page 70). Symptom Cause Solution Your camera cannot record images...
... date and time are not set correctly. Format the disc when using a CD- The eyes of the subject - RW. p Set it to other settings (page 55). p Set it to , , or SCN (page 22). speed flash when you press and hold the shutter button halfway down. 91 p Set it to other settings. Troubleshooting The macro function does • The (Twilight mode) or (Landscape p Set it to (page 70). Symptom Cause Solution Your camera cannot record images...

Operating Instructions
Page 92
... not sufficient. - The image cannot be - p This is not a malfunction. p Set it . played back on (DPOF) mark. p This is not a malfunction. right after playback starts. viewing a movie. Shoot the image using the focus preset (page 46). You cannot display a print • You cannot display print (DPOF) marks on a computer. appear on the TV screen. Deleting/Editing Images Symptom Cause Solution Your camera cannot delete an image. • The image is protected. • The disc...
... not sufficient. - The image cannot be - p This is not a malfunction. p Set it . played back on (DPOF) mark. p This is not a malfunction. right after playback starts. viewing a movie. Shoot the image using the focus preset (page 46). You cannot display a print • You cannot display print (DPOF) marks on a computer. appear on the TV screen. Deleting/Editing Images Symptom Cause Solution Your camera cannot delete an image. • The image is protected. • The disc...

Operating Instructions
Page 94
... to view the image if you connect the camera to the hard disk of your computer. • The disc has not been finalized. The image and sound are playing back the file directly from the hard disk. p Check the printer settings. image. - Solution p Replace it with the USB cable. • The CD-ROM drive does not support the packet- p Causes not described above have occurred, consult the computer or software manufacturer...
... to view the image if you connect the camera to the hard disk of your computer. • The disc has not been finalized. The image and sound are playing back the file directly from the hard disk. p Check the printer settings. image. - Solution p Replace it with the USB cable. • The CD-ROM drive does not support the packet- p Causes not described above have occurred, consult the computer or software manufacturer...
Operating Instructions
Page 106
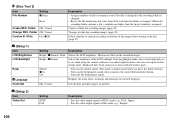
...). (Setup 2) 2 Item Video Out Setting NTSC PAL Description - Description Selects the LCD brightness. Turns on the recorded images. This has no effect on the shutter sound. (The shutter sound is changed . - Changes a folder for recording images (page 42). Turns off the beep/shutter sound. Folder OK / Cancel Confirm B. Resets the file numbering and starts from 0001 each time the folder is heard when you press the control button/shutter button. - Displayed only when using the camera outdoors or in selected language. Folder OK / Cancel Change REC...
...). (Setup 2) 2 Item Video Out Setting NTSC PAL Description - Description Selects the LCD brightness. Turns on the recorded images. This has no effect on the shutter sound. (The shutter sound is changed . - Changes a folder for recording images (page 42). Turns off the beep/shutter sound. Folder OK / Cancel Confirm B. Resets the file numbering and starts from 0001 each time the folder is heard when you press the control button/shutter button. - Displayed only when using the camera outdoors or in selected language. Folder OK / Cancel Change REC...

Operating Instructions
Page 108
... record clear images. 108 On internal rechargeable button battery This camera has an internal rechargeable button battery for maintaining the date and time and other mild detergent. Use a commercially available blower to remove dust. • If fingerprints, dust, droplets of water, or oil make the recordable side (the reverse of the printed side) of a disc dirty, the camera may condense inside the lens, you do not record the date and time...
... record clear images. 108 On internal rechargeable button battery This camera has an internal rechargeable button battery for maintaining the date and time and other mild detergent. Use a commercially available blower to remove dust. • If fingerprints, dust, droplets of water, or oil make the recordable side (the reverse of the printed side) of a disc dirty, the camera may condense inside the lens, you do not record the date and time...
Operating Instructions
Page 116
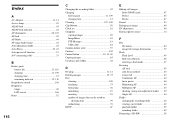
... AF lock 45 AF Mode 44 AF range finder frame 43 Auto adjustment mode 22 Auto Focus 23, 43 Auto power-off function 15 A/V connecting cable 33 B Battery pack battery life 13, 110 charging 11, 109 charging time 12 remaining indicator 12, 110 Beep/shutter sound 106 Brightness image 46 LCD screen 106 Burst 52 116 C Changing the recording folder 42 Charging battery pack 11, 109 charging time 12 Cleaning 107, 108 Clip Motion 50 Clock set 16 Computer copying images 85 ImageMixer...
... AF lock 45 AF Mode 44 AF range finder frame 43 Auto adjustment mode 22 Auto Focus 23, 43 Auto power-off function 15 A/V connecting cable 33 B Battery pack battery life 13, 110 charging 11, 109 charging time 12 remaining indicator 12, 110 Beep/shutter sound 106 Brightness image 46 LCD screen 106 Burst 52 116 C Changing the recording folder 42 Charging battery pack 11, 109 charging time 12 Cleaning 107, 108 Clip Motion 50 Clock set 16 Computer copying images 85 ImageMixer...
Operating Instructions
Page 117
... Picture effect 57 Power AC Adaptor 14 battery pack 11 on/off 15 Precautions 107 Print (DPOF) mark 67 Protect 65 Q Quick Review 24 R Red-eye reduction 28 RESET button 88 Resize 67 Rotate 62 S Saturation 102 Scene Selection Beach mode 56 High-speed shutter mode 56 Landscape mode 55 Snow mode 55 Soft snap mode 55 Twilight mode 55 Twilight portrait mode 55 Self-diagnosis display 98 Self-timer 26 Setting date and time 16 image size 20 menu...
... Picture effect 57 Power AC Adaptor 14 battery pack 11 on/off 15 Precautions 107 Print (DPOF) mark 67 Protect 65 Q Quick Review 24 R Red-eye reduction 28 RESET button 88 Resize 67 Rotate 62 S Saturation 102 Scene Selection Beach mode 56 High-speed shutter mode 56 Landscape mode 55 Snow mode 55 Soft snap mode 55 Twilight mode 55 Twilight portrait mode 55 Self-diagnosis display 98 Self-timer 26 Setting date and time 16 image size 20 menu...
Marketing Specifications
Page 1
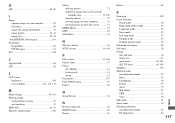
... -light conditions, AF Illuminator helps establish a positive focus lock. Confirm Before Write Mode Allows you to check each pixel, increasing sensitivity and reducing noise. AC-L15 adaptor/ charger provides stable power for accurate flash metering. MVC-CD350 CD Mavica® Digital Still Camera F E AT U R E S 1/2.7" 3.2 Megapixel Effective Super HAD™ CCD Super HAD (Hole Accumulation Diode) CCD's provide excellent image quality by cropping the image size-thus avoiding the image degradation of Digital Zooms...
... -light conditions, AF Illuminator helps establish a positive focus lock. Confirm Before Write Mode Allows you to check each pixel, increasing sensitivity and reducing noise. AC-L15 adaptor/ charger provides stable power for accurate flash metering. MVC-CD350 CD Mavica® Digital Still Camera F E AT U R E S 1/2.7" 3.2 Megapixel Effective Super HAD™ CCD Super HAD (Hole Accumulation Diode) CCD's provide excellent image quality by cropping the image size-thus avoiding the image degradation of Digital Zooms...
Marketing Specifications
Page 2
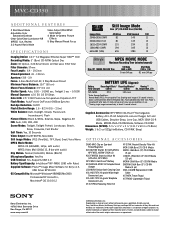
... Sony Electronics Inc. Reproduction in whole or in part without notice. MVC-CD350 ADDITIONAL FEATURES 2 Shot Burst Mode Adjustable Color Saturation/Contrast Clear Color/Clear Luminance NR MPEG1 Cue, Review 3:2 Aspect Ratio Mode Video Output (PAL/NTSC Selectable) 4 Mode In-Camera Picture Effects 5 Step Manual Preset Focus S P E C I F I C AT I O N S Imaging Device: 1/2.7" 3.2 Megapixel Effective Super HAD™ CCD Recording Media: 3" (8cm) CD-R/RW Optical Disc Zoom: 3X Optical, 3.2X Smart Zoom (at 30 second intervals; Software CD...
... Sony Electronics Inc. Reproduction in whole or in part without notice. MVC-CD350 ADDITIONAL FEATURES 2 Shot Burst Mode Adjustable Color Saturation/Contrast Clear Color/Clear Luminance NR MPEG1 Cue, Review 3:2 Aspect Ratio Mode Video Output (PAL/NTSC Selectable) 4 Mode In-Camera Picture Effects 5 Step Manual Preset Focus S P E C I F I C AT I O N S Imaging Device: 1/2.7" 3.2 Megapixel Effective Super HAD™ CCD Recording Media: 3" (8cm) CD-R/RW Optical Disc Zoom: 3X Optical, 3.2X Smart Zoom (at 30 second intervals; Software CD...


