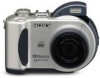
Operating Instructions
Page 2
...: SONY Model No.: MVC-CD300 Responsible Party:Sony Electronics Inc. Refer servicing to rain or moisture. Note: This equipment has been tested and found to comply with the limits for the FCC related matters only. 2 Regulatory Information Declaration of the FCC Rules. . For the Customers in accordance with this equipment. CAUTION The use of important operating and maintenance (servicing) instructions...
...: SONY Model No.: MVC-CD300 Responsible Party:Sony Electronics Inc. Refer servicing to rain or moisture. Note: This equipment has been tested and found to comply with the limits for the FCC related matters only. 2 Regulatory Information Declaration of the FCC Rules. . For the Customers in accordance with this equipment. CAUTION The use of important operating and maintenance (servicing) instructions...
Operating Instructions
Page 3
... Directive for help. no guarantee that to which can be determined by turning the equipment off and on, the user is encouraged to try to correct the interference by ASTA or BSI to BS 1362, (i.e. This ferrite core can return your unwanted lithium ion batteries to the cable of this equipment for your nearest Sony Service Center or Factory Service...
... Directive for help. no guarantee that to which can be determined by turning the equipment off and on, the user is encouraged to try to correct the interference by ASTA or BSI to BS 1362, (i.e. This ferrite core can return your unwanted lithium ion batteries to the cable of this equipment for your nearest Sony Service Center or Factory Service...
Operating Instructions
Page 4
... the lens portion. Press DISPLAY/LCD BACK LIGHT ON/OFF. However, there may be some tiny black points and/or bright points (white, red, blue or green in color) that the camera is indicated as recording media. Back up ) data to a disc. e.g. These points are shown in this manual, buttons and settings on the LCD screen and the finder. Be sure to read the following before using the camera. The instructions...
... the lens portion. Press DISPLAY/LCD BACK LIGHT ON/OFF. However, there may be some tiny black points and/or bright points (white, red, blue or green in color) that the camera is indicated as recording media. Back up ) data to a disc. e.g. These points are shown in this manual, buttons and settings on the LCD screen and the finder. Be sure to read the following before using the camera. The instructions...
Operating Instructions
Page 5
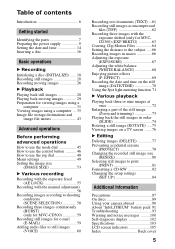
... print (PRINT 81 Formatting a CD-RW 82 Changing the setup settings (SET UP 84 Additional information Precautions 87 On discs 89 Using your camera abroad 90 About "InfoLITHIUM" battery pack 91 Troubleshooting 93 Warning and notice messages .........100 Self-diagnosis display 102 Specifications 103 LCD screen indicators 105 Index Back cover 5 Table of the still image (Zoom and trimming 73 Playing back the still images in macro 66 Adjusting the exposure (EXPOSURE 67 Adjusting the white balance (WHITE BALANCE 68 Enjoying picture...
... print (PRINT 81 Formatting a CD-RW 82 Changing the setup settings (SET UP 84 Additional information Precautions 87 On discs 89 Using your camera abroad 90 About "InfoLITHIUM" battery pack 91 Troubleshooting 93 Warning and notice messages .........100 Self-diagnosis display 102 Specifications 103 LCD screen indicators 105 Index Back cover 5 Table of the still image (Zoom and trimming 73 Playing back the still images in macro 66 Adjusting the exposure (EXPOSURE 67 Adjusting the white balance (WHITE BALANCE 68 Enjoying picture...
Operating Instructions
Page 21
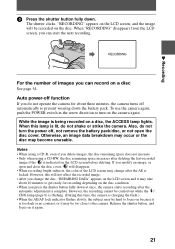
... time, the camera is locked. To use the camera again, push the POWER switch in the arrow direction to turn the power off function If you can start the next recording. When this will not affect the recorded image. • After you modify an image, or open the disc cover. When "RECORDING" disappears from the LCD screen, you press the shutter button fully down at once, the camera starts recording after the AE is charging the flash...
... time, the camera is locked. To use the camera again, push the POWER switch in the arrow direction to turn the power off function If you can start the next recording. When this will not affect the recorded image. • After you modify an image, or open the disc cover. When "RECORDING" disappears from the LCD screen, you press the shutter button fully down at once, the camera starts recording after the AE is charging the flash...
Operating Instructions
Page 22
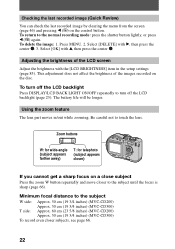
... the center z. Using the zoom feature The lens part moves in the setup settings (page 85). Press MENU. 2. To turn off the LCD backlight Press DISPLAY/LCD BACK LIGHT ON/OFF repeatedly to touch the lens. To delete the image: 1. Adjusting the brightness of the images recorded on the control button. Be careful not to turn off the LCD backlight (page 23). Select [DELETE] with B, then press the center z. 3. The battery life will be...
... the center z. Using the zoom feature The lens part moves in the setup settings (page 85). Press MENU. 2. To turn off the LCD backlight Press DISPLAY/LCD BACK LIGHT ON/OFF repeatedly to touch the lens. To delete the image: 1. Adjusting the brightness of the images recorded on the control button. Be careful not to turn off the LCD backlight (page 23). Select [DELETE] with B, then press the center z. 3. The battery life will be...
Operating Instructions
Page 35
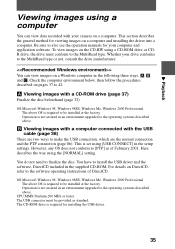
... environment upgraded to 42. However, any OS does not conform to also see the operation manuals for viewing images on a computer and installing the driver into a computer. B Playback Viewing images using a computer You can view images on a Windows computer in the following three ways, A, B, and C. Be sure to [PTP] as standard. This section describes the general method for your computer and application software. A Viewing images with the USB cable...
... environment upgraded to 42. However, any OS does not conform to also see the operation manuals for viewing images on a computer and installing the driver into a computer. B Playback Viewing images using a computer You can view images on a Windows computer in the following three ways, A, B, and C. Be sure to [PTP] as standard. This section describes the general method for your computer and application software. A Viewing images with the USB cable...
Operating Instructions
Page 38
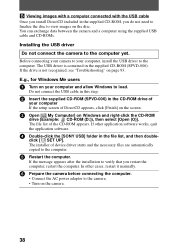
... [ SET UP]. The file list of device driver starts and the necessary files are automatically copied to load. You can exchange data between the camera and a computer using the supplied USB cable and CD-ROMs. Installing the USB driver Do not connect the camera to verify that you do not need to finalize the disc to the camera. • Turn on the camera. 38 B Viewing images with a computer connected with the USB cable Once you install...
... [ SET UP]. The file list of device driver starts and the necessary files are automatically copied to load. You can exchange data between the camera and a computer using the supplied USB cable and CD-ROMs. Installing the USB driver Do not connect the camera to verify that you do not need to finalize the disc to the camera. • Turn on the camera. 38 B Viewing images with a computer connected with the USB cable Once you install...

Operating Instructions
Page 40
... view the image using this camera, the file name format must carry out the operation for removing the disc described on Windows and double-click the newly recognized drive. (Example: [ CD Mavica (E:)]) The folders inside the disc are displayed, and the disc cover of the camera will be broken if you play back the file directly from the folder. This operation is recommended. Desired file type Double-click in "Removing...
... view the image using this camera, the file name format must carry out the operation for removing the disc described on Windows and double-click the newly recognized drive. (Example: [ CD Mavica (E:)]) The folders inside the disc are displayed, and the disc cover of the camera will be broken if you play back the file directly from the folder. This operation is recommended. Desired file type Double-click in "Removing...
Operating Instructions
Page 44
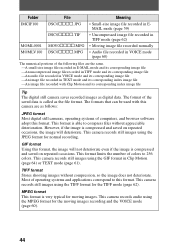
... corresponding image file -An audio file recorded in VOICE mode and its corresponding image file -An image file recorded in TEXT mode and its corresponding index image file -An image file recorded with Clip Motion and its corresponding index image file Tip The digital still camera saves recorded images as follows: JPEG format Most digital still cameras, operating systems of computers, and browser software adopt this format. This format limits the number of operating systems and applications correspond to 256 colors. TIFF format Stores shooting images...
... corresponding image file -An audio file recorded in VOICE mode and its corresponding image file -An image file recorded in TEXT mode and its corresponding index image file -An image file recorded with Clip Motion and its corresponding index image file Tip The digital still camera saves recorded images as follows: JPEG format Most digital still cameras, operating systems of computers, and browser software adopt this format. This format limits the number of operating systems and applications correspond to 256 colors. TIFF format Stores shooting images...
Operating Instructions
Page 54
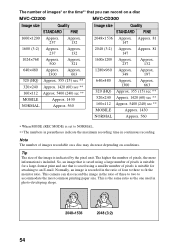
... numbers in parentheses indicate the maximum recording time in photo-developing shops. 2048×1536 2048 (3:2) 54 Approx. 81 147 1024×768 Approx. This is suitable for a large-format print and one that is saved using a smaller number of four to three to accommodate the most common printing paper size. Approx. 81 147 1600 (3:2) Approx. Tip The size of the image is recorded in...
... numbers in parentheses indicate the maximum recording time in photo-developing shops. 2048×1536 2048 (3:2) 54 Approx. 81 147 1024×768 Approx. This is suitable for a large-format print and one that is saved using a smaller number of four to three to accommodate the most common printing paper size. Approx. 81 147 1600 (3:2) Approx. Tip The size of the image is recorded in...
Operating Instructions
Page 57
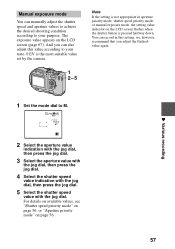
... flashedvalue again. You can also adjust this setting, we, however, recommend that you can record in aperture priority mode, shutter speed priority mode, or manual exposure mode, the setting value indicator on page 56. 57 B Various recording 1 Set the mode dial to your purpose. For details on available values, see "Shutter speed priority mode" on page 56, or "Aperture priority mode" on the LCD screen flashes when the shutter button is not appropriate in this value...
... flashedvalue again. You can also adjust this setting, we, however, recommend that you can record in aperture priority mode, shutter speed priority mode, or manual exposure mode, the setting value indicator on page 56. 57 B Various recording 1 Set the mode dial to your purpose. For details on available values, see "Shutter speed priority mode" on page 56, or "Aperture priority mode" on the LCD screen flashes when the shutter button is not appropriate in this value...
Operating Instructions
Page 59
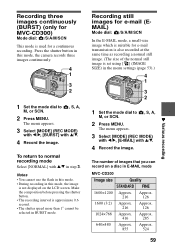
... LCD screen. The menu appears. 3 Select [MODE] (REC MODE) with b/B, [E-MAIL] with v/V in this mode, the camera records three images continuously. 4 1 3 2 1 Set the mode dial to normal recording mode Select [NORMAL] with v/V. 4 Record the image. Approx. 216 126 1024×768 Approx. Notes • You cannot use the flash in this mode. • During recording in step 3. The menu appears. 3 Select [MODE] (REC MODE) with b/B, [BURST] with v/V. 4 Record the image. Make the composition before pressing the shutter button...
... LCD screen. The menu appears. 3 Select [MODE] (REC MODE) with b/B, [E-MAIL] with v/V in this mode, the camera records three images continuously. 4 1 3 2 1 Set the mode dial to normal recording mode Select [NORMAL] with v/V. 4 Record the image. Approx. 216 126 1024×768 Approx. Notes • You cannot use the flash in this mode. • During recording in step 3. The menu appears. 3 Select [MODE] (REC MODE) with b/B, [BURST] with v/V. 4 Record the image. Make the composition before pressing the shutter button...

Operating Instructions
Page 85
... and zoom functions are not activated. • When the mode dial is set to NTSC mode (e.g., Japan, the USA). Resets the file number that the VAD-S70 adaptor ring needed to mount the conversion lens to files in sequence even if the disc is changed . Turns off the beep/shutter sound. Sets the video output signal to [ON] when using the VCL-MHG07 conversion lens (not supplied). SETUP 2 Item LCD BRIGHTNESS LCD...
... and zoom functions are not activated. • When the mode dial is set to NTSC mode (e.g., Japan, the USA). Resets the file number that the VAD-S70 adaptor ring needed to mount the conversion lens to files in sequence even if the disc is changed . Turns off the beep/shutter sound. Sets the video output signal to [ON] when using the VCL-MHG07 conversion lens (not supplied). SETUP 2 Item LCD BRIGHTNESS LCD...

Operating Instructions
Page 93
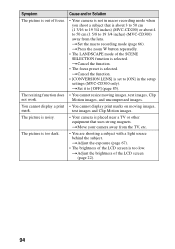
... not using an "InfoLITHIUM" battery pack. tSet it to or SET UP. If code displays (C:ss:ss) appear on the LCD screen, the self-diagnosis display function is not inserted properly. Your camera cannot record images. tUse an "InfoLITHIUM" battery pack (page 9). • The disc is working (page 102). tInsert a disc (page 16). • The disc has not been initialized. tTurn off the power, and turn on...
... not using an "InfoLITHIUM" battery pack. tSet it to or SET UP. If code displays (C:ss:ss) appear on the LCD screen, the self-diagnosis display function is not inserted properly. Your camera cannot record images. tUse an "InfoLITHIUM" battery pack (page 9). • The disc is working (page 102). tInsert a disc (page 16). • The disc has not been initialized. tTurn off the power, and turn on...
Operating Instructions
Page 94
... LENS] is set to [ON] in macro recording mode when you shoot a subject that uses strong magnets. tMove your camera away from the lens. tAdjust the exposure (page 67). • The brightness of the SCENE SELECTION function is selected. tAdjust the brightness of focus. • Your camera is not in the setup settings (MVC-CD300 only). text images and Clip Motion images. tSet the macro recording mode (page 66). The picture is...
... LENS] is set to [ON] in macro recording mode when you shoot a subject that uses strong magnets. tMove your camera away from the lens. tAdjust the exposure (page 67). • The brightness of the SCENE SELECTION function is selected. tAdjust the brightness of focus. • Your camera is not in the setup settings (MVC-CD300 only). text images and Clip Motion images. tSet the macro recording mode (page 66). The picture is...
Operating Instructions
Page 97
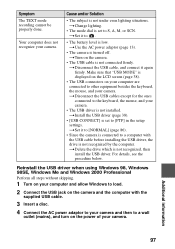
...] in the setup settings. Reinstall the USB driver when using Windows 98, Windows 98SE, Windows Me and Windows 2000 Professional Perform all steps without skipping. 1 Turn on the camera and the computer with the USB cable before installing the USB driver, the drive is not recognized, then install the USB driver. tChange lighting. • The mode dial is low. tUse the AC power adaptor (page 13). • The camera is displayed on the LCD screen (page...
...] in the setup settings. Reinstall the USB driver when using Windows 98, Windows 98SE, Windows Me and Windows 2000 Professional Perform all steps without skipping. 1 Turn on the camera and the computer with the USB cable before installing the USB driver, the drive is not recognized, then install the USB driver. tChange lighting. • The mode dial is low. tUse the AC power adaptor (page 13). • The camera is displayed on the LCD screen (page...

Operating Instructions
Page 99
... complete. •- If the function still do not work, press the reset button located on . The /CHG lamp flashes when charging a battery pack. tRemove the battery pack, then install it properly (page 9). • Charging of the battery remaining time is not proper, or the power is immediately turned off even if the battery remaining indicator indicates that the battery level is not connected. tConnect the power cord firmly to a wall outlet...
... complete. •- If the function still do not work, press the reset button located on . The /CHG lamp flashes when charging a battery pack. tRemove the battery pack, then install it properly (page 9). • Charging of the battery remaining time is not proper, or the power is immediately turned off even if the battery remaining indicator indicates that the battery level is not connected. tConnect the power cord firmly to a wall outlet...
Operating Instructions
Page 103
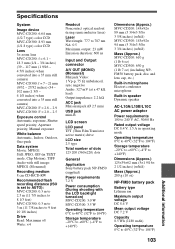
...) when converted into a 35 mm still camera) MVC-CD200: F = 2.8 - 2.9 MVC-CD300: F = 2.0 - 2.5 Exposure control Automatic exposure, Shutter speed priority, Aperture priority, Manual exposure White balance Automatic, Indoor, Outdoor, One-push Data system Movie: MPEG1 Still: JPEG, GIF (in TEXT mode, Clip Motion), TIFF Audio with still image: MPEG1 (Monaural) Recording medium 8 cm CD-R/CD-RW Recommended flash recording distance (ISO is set to AUTO): MVC-CD200: 0.3 m to 2.5 m (11 7/8 inches to 8 1/3 feet) MVC-CD300: 0.3 m to 3 m (11 7/8 inches to 9 feet...
...) when converted into a 35 mm still camera) MVC-CD200: F = 2.8 - 2.9 MVC-CD300: F = 2.0 - 2.5 Exposure control Automatic exposure, Shutter speed priority, Aperture priority, Manual exposure White balance Automatic, Indoor, Outdoor, One-push Data system Movie: MPEG1 Still: JPEG, GIF (in TEXT mode, Clip Motion), TIFF Audio with still image: MPEG1 (Monaural) Recording medium 8 cm CD-R/CD-RW Recommended flash recording distance (ISO is set to AUTO): MVC-CD200: 0.3 m to 2.5 m (11 7/8 inches to 8 1/3 feet) MVC-CD300: 0.3 m to 3 m (11 7/8 inches to 9 feet...

Operating Instructions
Page 108
... Focus preset 66 Focusing 66 FORMAT 82 Full charge 10 G , , GIF 44 61 64 I Image Deleting 77 File name 43 Print mark 81 Protect 78 Size 53 Index screen 72 Indicators on the LCD screen 105 , "InfoLITHIUM" battery pack 9 91 INITIALIZE 18 J , Jog dial 48 JPEG 20 44 M Macro recording 66 Manual focusing 66 MOBILE mode 64 Mode dial 45 Moisture condensation.....87 Moving image Playback 29 , Recording 26 MPEG 26 44 N number 11 Number of recordable images...
... Focus preset 66 Focusing 66 FORMAT 82 Full charge 10 G , , GIF 44 61 64 I Image Deleting 77 File name 43 Print mark 81 Protect 78 Size 53 Index screen 72 Indicators on the LCD screen 105 , "InfoLITHIUM" battery pack 9 91 INITIALIZE 18 J , Jog dial 48 JPEG 20 44 M Macro recording 66 Manual focusing 66 MOBILE mode 64 Mode dial 45 Moisture condensation.....87 Moving image Playback 29 , Recording 26 MPEG 26 44 N number 11 Number of recordable images...


