Operating Instructions
Page 3
... is fitted to this camera. This product has been tested and found compliant with the limits for a digital device pursuant to Subpart B of Part 15 of FCC Rules. Increase the separation between the equipment and receiver. - This ferrite core can return your unwanted lithium ion batteries to your nearest Sony Service Center or Factory...
... is fitted to this camera. This product has been tested and found compliant with the limits for a digital device pursuant to Subpart B of Part 15 of FCC Rules. Increase the separation between the equipment and receiver. - This ferrite core can return your unwanted lithium ion batteries to your nearest Sony Service Center or Factory...
Operating Instructions
Page 5
... the manual adjustments 56 Recording images according to shooting conditions (SCENE SELECTION 58 Recording three images continuously (BURST) (only for MVC-CD300 59 Recording still images for e-mail (E-MAIL 59 Adding audio files to still images (VOICE 60 Recording text documents (TEXT... CD-RW 82 Changing the setup settings (SET UP 84 Additional information Precautions 87 On discs 89 Using your camera abroad 90 About "InfoLITHIUM" battery pack 91 Troubleshooting 93 Warning and notice messages .........100 Self-diagnosis display 102 Specifications 103 LCD screen indicators 105 Index...
... the manual adjustments 56 Recording images according to shooting conditions (SCENE SELECTION 58 Recording three images continuously (BURST) (only for MVC-CD300 59 Recording still images for e-mail (E-MAIL 59 Adding audio files to still images (VOICE 60 Recording text documents (TEXT... CD-RW 82 Changing the setup settings (SET UP 84 Additional information Precautions 87 On discs 89 Using your camera abroad 90 About "InfoLITHIUM" battery pack 91 Troubleshooting 93 Warning and notice messages .........100 Self-diagnosis display 102 Specifications 103 LCD screen indicators 105 Index...
Operating Instructions
Page 7
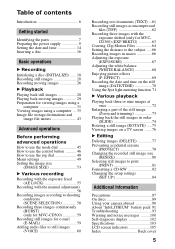
... touch while recording. You cannot firmly secure the camera to tripods having longer screws, and may damage the camera. The lens for this camera uses the MTF* measurement system for cameras developed jointly by Carl Zeiss, in Germany, and Sony Corporation, and offers the same quality as other equipment...parentheses for details of operation. 6 7 8 1 9 2 0 qa qs 3 qd 4 qf 5 qg A Shutter button (20, 26) B Built-in the image. 7 C Battery cover (bottom surface) (9) D Lens E Tripod receptacle (bottom surface) Use a tripod with a screw length of less than 6.5 mm (7/32 inch).
... touch while recording. You cannot firmly secure the camera to tripods having longer screws, and may damage the camera. The lens for this camera uses the MTF* measurement system for cameras developed jointly by Carl Zeiss, in Germany, and Sony Corporation, and offers the same quality as other equipment...parentheses for details of operation. 6 7 8 1 9 2 0 qa qs 3 qd 4 qf 5 qg A Shutter button (20, 26) B Built-in the image. 7 C Battery cover (bottom surface) (9) D Lens E Tripod receptacle (bottom surface) Use a tripod with a screw length of less than 6.5 mm (7/32 inch).
Operating Instructions
Page 9
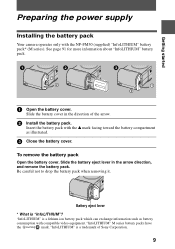
... (supplied) "InfoLITHIUM" battery pack* (M series). To remove the battery pack Open the battery cover. Getting started Preparing the power supply Installing the battery pack Your camera operates only with compatible video equipment. Slide the battery cover in the arrow direction, and remove the battery pack. Slide the battery eject lever in the direction of Sony Corporation. 9 Battery eject lever * What...
... (supplied) "InfoLITHIUM" battery pack* (M series). To remove the battery pack Open the battery cover. Getting started Preparing the power supply Installing the battery pack Your camera operates only with compatible video equipment. Slide the battery cover in the arrow direction, and remove the battery pack. Slide the battery eject lever in the direction of Sony Corporation. 9 Battery eject lever * What...
Operating Instructions
Page 10
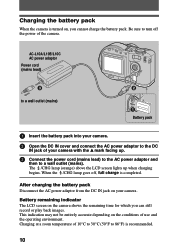
... the DC IN cover and connect the AC power adaptor to the DC IN jack of the camera. When the /CHG lamp goes off the power of your camera. Battery remaining indicator The LCD screen on the conditions of 10°C to 30°C (50°F to a wall outlet (mains). The /CHG lamp... a room temperature of use and the operating environment. Be sure to turn off , full charge is turned on your camera with the v mark facing up when charging begins. After charging the battery pack Disconnect the AC power adaptor from the DC IN jack on , you can still record or play back images...
... the DC IN cover and connect the AC power adaptor to the DC IN jack of the camera. When the /CHG lamp goes off the power of your camera. Battery remaining indicator The LCD screen on the conditions of 10°C to 30°C (50°F to a wall outlet (mains). The /CHG lamp... a room temperature of use and the operating environment. Be sure to turn off , full charge is turned on your camera with the v mark facing up when charging begins. After charging the battery pack Disconnect the AC power adaptor from the DC IN jack on , you can still record or play back images...
Operating Instructions
Page 11
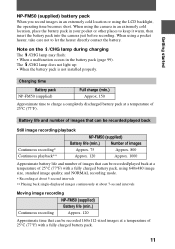
...flash: • When a malfunction occurs in your pocket or other places to keep it warm, then insert the battery pack into the camera just before recording. Charging time Battery pack NP-FM50 (supplied) Full charge (min.) Approx. 150 Approximate time to let the heater directly contact the...a pocket heater, take care not to charge a completely discharged battery pack at a temperature of 25°C (77°F). When using the camera in an extremely cold location, place the battery pack in the battery pack (page 99). Battery life and number of images that can be recorded/played back...
...flash: • When a malfunction occurs in your pocket or other places to keep it warm, then insert the battery pack into the camera just before recording. Charging time Battery pack NP-FM50 (supplied) Full charge (min.) Approx. 150 Approximate time to let the heater directly contact the...a pocket heater, take care not to charge a completely discharged battery pack at a temperature of 25°C (77°F). When using the camera in an extremely cold location, place the battery pack in the battery pack (page 99). Battery life and number of images that can be recorded/played back...

Operating Instructions
Page 12
Notes • The battery life and number of images will be smaller depending on conditions. • If sufficient battery remaining time is indicated but the power runs out soon, fully charge the battery so that the correct battery remaining time appears. • Do not short the DC plug of images shown on tables above are as this may be decreased when using at low temperature, using the flash, turning the power on/off frequently, or using the zoom. • The numbers of the AC power adaptor with a metallic object, as a guide. The numbers may cause a malfunction. 12
Notes • The battery life and number of images will be smaller depending on conditions. • If sufficient battery remaining time is indicated but the power runs out soon, fully charge the battery so that the correct battery remaining time appears. • Do not short the DC plug of images shown on tables above are as this may be decreased when using at low temperature, using the flash, turning the power on/off frequently, or using the zoom. • The numbers of the AC power adaptor with a metallic object, as a guide. The numbers may cause a malfunction. 12
Operating Instructions
Page 13
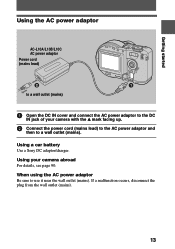
Using a car battery Use a Sony DC adaptor/charger. When using the AC power adaptor Be sure to a wall outlet (mains). If a malfunction occurs, disconnect the plug from the wall outlet (mains). 13 Using your camera with the v mark facing up. 2 Connect the power cord (mains lead) to the AC power adaptor and then to... cord (mains lead) 2 1 to a wall outlet (mains) 1 Open the DC IN cover and connect the AC power adaptor to the DC IN jack of your camera abroad For details, see page 90.
Using a car battery Use a Sony DC adaptor/charger. When using the AC power adaptor Be sure to a wall outlet (mains). If a malfunction occurs, disconnect the plug from the wall outlet (mains). 13 Using your camera with the v mark facing up. 2 Connect the power cord (mains lead) to the AC power adaptor and then to... cord (mains lead) 2 1 to a wall outlet (mains) 1 Open the DC IN cover and connect the AC power adaptor to the DC IN jack of your camera abroad For details, see page 90.
Operating Instructions
Page 21
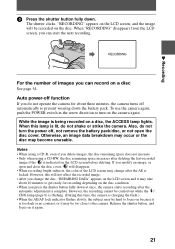
...arrow direction to turn the power off automatically to get ready for about 10 minutes to prevent wearing down the battery pack. B Recording 3 Press the shutter button fully down at once, the camera starts recording after deleting the last-recorded image if the is lit, do not turn on the disc. ... charging the flash.) • When the AE/AF lock indicator flashes slowly, the subject may take about three minutes, the camera turns off , not remove the battery pack/disc, or not open and close the disc cover, will be too close to focus on the LCD screen, and the image will ...
...arrow direction to turn the power off automatically to get ready for about 10 minutes to prevent wearing down the battery pack. B Recording 3 Press the shutter button fully down at once, the camera starts recording after deleting the last-recorded image if the is lit, do not turn on the disc. ... charging the flash.) • When the AE/AF lock indicator flashes slowly, the subject may take about three minutes, the camera turns off , not remove the battery pack/disc, or not open and close the disc cover, will be too close to focus on the LCD screen, and the image will ...
Operating Instructions
Page 22
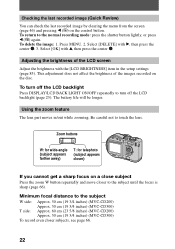
The battery life will be longer. Using the zoom feature The lens part moves in the setup settings (page 85). Be careful not to turn off the ...] item in /out while zooming. To return to the subject W side: Approx. 50 cm (19 3/4 inches) (MVC-CD200) Approx. 50 cm (19 3/4 inches) (MVC-CD300) T side: Approx. 60 cm (23 5/8 inches) (MVC-CD200) Approx. 50 cm (19 3/4 inches) (MVC-CD300) To record even closer subjects, see page 66. 22 Adjusting the brightness of the images recorded...
The battery life will be longer. Using the zoom feature The lens part moves in the setup settings (page 85). Be careful not to turn off the ...] item in /out while zooming. To return to the subject W side: Approx. 50 cm (19 3/4 inches) (MVC-CD200) Approx. 50 cm (19 3/4 inches) (MVC-CD300) T side: Approx. 60 cm (23 5/8 inches) (MVC-CD200) Approx. 50 cm (19 3/4 inches) (MVC-CD300) To record even closer subjects, see page 66. 22 Adjusting the brightness of the images recorded...
Operating Instructions
Page 83
Format the disc again with this camera. • It takes about seven minutes to execute the format. • About 300 times formatting can be available on a CD-RW. • Once you format, be sure to use a fully charged battery pack or the AC power adaptor as the power source. • CD-Rs cannot be formatted. • The disc which is formatted using other equipment than this camera cannot be used with this camera. Notes • When you format the CD-RW, protected images are also deleted. 83 B Editing
Format the disc again with this camera. • It takes about seven minutes to execute the format. • About 300 times formatting can be available on a CD-RW. • Once you format, be sure to use a fully charged battery pack or the AC power adaptor as the power source. • CD-Rs cannot be formatted. • The disc which is formatted using other equipment than this camera cannot be used with this camera. Notes • When you format the CD-RW, protected images are also deleted. 83 B Editing

Operating Instructions
Page 88
... using the unit for the moisture to evaporate. Vibrating On battery pack • Use only the specified charger with the charging function. • To prevent accident from fire. • Never expose the battery pack to the camera securely. • Charging while some capacity remains does not ...affect the original battery capacity. On pickup lens Do not touch the pickup lens inside the lens, you attempt...
... using the unit for the moisture to evaporate. Vibrating On battery pack • Use only the specified charger with the charging function. • To prevent accident from fire. • Never expose the battery pack to the camera securely. • Charging while some capacity remains does not ...affect the original battery capacity. On pickup lens Do not touch the pickup lens inside the lens, you attempt...

Operating Instructions
Page 89
.... Use a commercially available blower to clean a disc. Charging the built-in rechargeable lithium battery: • Connect your camera to use any problem occurs, unplug your camera and contact your camera. On discs Be sure to house current (mains) using a cleaner before recording. To ... or a soft cloth lightly moistened with a mild detergent solution. The battery, however, will not affect the camera operation. Even if the built-in your camera, and leave your camera. You can use your nearest Sony dealer. Notes • Do not remove the disc while reading or ...
.... Use a commercially available blower to clean a disc. Charging the built-in rechargeable lithium battery: • Connect your camera to use any problem occurs, unplug your camera and contact your camera. On discs Be sure to house current (mains) using a cleaner before recording. To ... or a soft cloth lightly moistened with a mild detergent solution. The battery, however, will not affect the camera operation. Even if the built-in your camera, and leave your camera. You can use your nearest Sony dealer. Notes • Do not remove the disc while reading or ...
Operating Instructions
Page 90
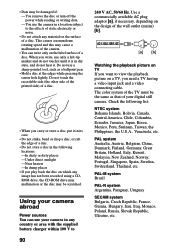
... of the printed side) of a disc. The color system of static electricity or noise. • Do not attach any country or area with the supplied battery charger within 100 V to 90 240 V AC, 50/60 Hz. PAL-M system Brazil PAL-N system Argentina, Paraguay, Uruguay SECAM system Bulgaria, Czech Republic, France, ... case. • Do not strike, bend or drop a disc, or rub the edge of a disc. You use your camera abroad Power sources You can write only on the design of your digital still camera. AC-L10A/L10B/L10C Watching the playback picture on TV If you want to the effects of the TV...
... of the printed side) of a disc. The color system of static electricity or noise. • Do not attach any country or area with the supplied battery charger within 100 V to 90 240 V AC, 50/60 Hz. PAL-M system Brazil PAL-N system Argentina, Paraguay, Uruguay SECAM system Bulgaria, Czech Republic, France, ... case. • Do not strike, bend or drop a disc, or rub the edge of a disc. You use your camera abroad Power sources You can write only on the design of your digital still camera. AC-L10A/L10B/L10C Watching the playback picture on TV If you want to the effects of the TV...

Operating Instructions
Page 91
... body to off when not taking shots or playing back on your camera. • We recommend charging the battery pack in cold places. We recommend the following to water. So, the time that the battery pack is the "InfoLITHIUM" battery pack? The battery pack is completed, either disconnect the AC power adaptor from the DC...
... body to off when not taking shots or playing back on your camera. • We recommend charging the battery pack in cold places. We recommend the following to water. So, the time that the battery pack is the "InfoLITHIUM" battery pack? The battery pack is completed, either disconnect the AC power adaptor from the DC...

Operating Instructions
Page 92
... it more and more, and as you use the battery pack up on your camera, leave the POWER switch to store the battery pack • Even if the battery pack is not used for each battery pack. 92 When the battery operating time is shortened considerably, a probable cause is ... place after fully charging it once per year and then using the battery pack up on your camera. Battery capacity decreases little by little as time passes. • The E mark indicating there is little remaining battery time sometimes flashes depending on the operating conditions or ambient temperature and ...
... it more and more, and as you use the battery pack up on your camera, leave the POWER switch to store the battery pack • Even if the battery pack is not used for each battery pack. 92 When the battery operating time is shortened considerably, a probable cause is ... place after fully charging it once per year and then using the battery pack up on your camera. Battery capacity decreases little by little as time passes. • The E mark indicating there is little remaining battery time sometimes flashes depending on the operating conditions or ambient temperature and ...

Operating Instructions
Page 93
.... tEject the disc, and insert it again (page 16). • The battery level is too low. (The E indicator appears.) tCharge the battery pack fully (page 10). • The AC power adaptor is inserted into your camera. Additional information 93 tSet it securely to the DC IN jack and a wall ... properly after you press the reset button, the date and time setting is cleared.) Should your camera still not operate properly, consult your Sony dealer or local authorized Sony service facility. Symptom Your camera does not work. If code displays (C:ss:ss) appear on the LCD screen, the self-...
.... tEject the disc, and insert it again (page 16). • The battery level is too low. (The E indicator appears.) tCharge the battery pack fully (page 10). • The AC power adaptor is inserted into your camera. Additional information 93 tSet it securely to the DC IN jack and a wall ... properly after you press the reset button, the date and time setting is cleared.) Should your camera still not operate properly, consult your Sony dealer or local authorized Sony service facility. Symptom Your camera does not work. If code displays (C:ss:ss) appear on the LCD screen, the self-...
Operating Instructions
Page 96
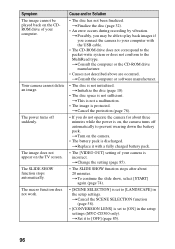
...32). • An error occurs during recording by vibration. tTurn on , the camera turns off suddenly. tCancel the SCENE SELECTION function (page 58). • [CONVERSION LENS] is set to [LANDSCAPE] in the setup settings (MVC-CD300 only). tSet it with the USB cable. • The CD-ROM drive... finalized. Symptom The image cannot be able to play back images if you connect the camera to your computer with a fully charged battery pack. • The [VIDEO OUT] setting of your computer. Your camera cannot delete an image. The macro function does not work. tConsult the computer or software...
...32). • An error occurs during recording by vibration. tTurn on , the camera turns off suddenly. tCancel the SCENE SELECTION function (page 58). • [CONVERSION LENS] is set to [LANDSCAPE] in the setup settings (MVC-CD300 only). tSet it with the USB cable. • The CD-ROM drive... finalized. Symptom The image cannot be able to play back images if you connect the camera to your computer with a fully charged battery pack. • The [VIDEO OUT] setting of your computer. Your camera cannot delete an image. The macro function does not work. tConsult the computer or software...
Operating Instructions
Page 97
...the AC power adaptor (page 13). • The camera is not recognized, then install the USB driver. tDisconnect the USB cable, and connect it to . • The battery level is not installed. tSet it to [NORMAL] (page 86). • Since the camera is set to a wall outlet (mains), and turn... on your camera. Additional information 97 Cause and/or Solution • The subject is not ...
...the AC power adaptor (page 13). • The camera is not recognized, then install the USB driver. tDisconnect the USB cable, and connect it to . • The battery level is not installed. tSet it to [NORMAL] (page 86). • Since the camera is set to a wall outlet (mains), and turn... on your camera. Additional information 97 Cause and/or Solution • The subject is not ...

Operating Instructions
Page 98
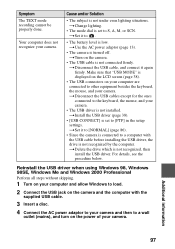
... the [Hardware] tab located at the lower-right corner. The battery life is dead. tCharge the battery pack fully. • The battery pack is short. Battery packs Symptom The battery pack cannot be charged. tTurn off the camera, disconnect the USB cable, and restart the computer. 8 Install ...top, then click the [Device Manager (D)] button. 3 Click [View] in [Device Manager], then click [Devices by type (E)]. 4 Right-click [ CD Mavica] in [ Other devices], then click [Delete (E)]. 6 After the message appears to verify that you delete the device manager, click "OK." 7 Turn off ...
... the [Hardware] tab located at the lower-right corner. The battery life is dead. tCharge the battery pack fully. • The battery pack is short. Battery packs Symptom The battery pack cannot be charged. tTurn off the camera, disconnect the USB cable, and restart the computer. 8 Install ...top, then click the [Device Manager (D)] button. 3 Click [View] in [Device Manager], then click [Devices by type (E)]. 4 Right-click [ CD Mavica] in [ Other devices], then click [Delete (E)]. 6 After the message appears to verify that you delete the device manager, click "OK." 7 Turn off ...


