Warranty Card
Page 1
... due to improper operation or maintenance, connection to improper voltage supply, or attempted repair by Sony to service the Product. To obtain warranty service, you , or for service assistance or resolution of a service problem, or for all accessories are for 19" (measured diagonally), or larger screen size through a Sony authorized service facility. For your expense. 3. 4-557-166-02 ® Color TV Color Video TV LIMITED WARRANTY Sony Electronics Inc. ("Sony") warrants this...
... due to improper operation or maintenance, connection to improper voltage supply, or attempted repair by Sony to service the Product. To obtain warranty service, you , or for service assistance or resolution of a service problem, or for all accessories are for 19" (measured diagonally), or larger screen size through a Sony authorized service facility. For your expense. 3. 4-557-166-02 ® Color TV Color Video TV LIMITED WARRANTY Sony Electronics Inc. ("Sony") warrants this...
Primary User Manual
Page 3
... television closed captioning in a residential installation. Installing ❑ To prevent internal heat buildup, do not expose the TV to insert the plug fully into an outlet on 120 V AC. ❑ The plug is covered by your authority to persons. This symbol is attached to the rear of important operating and maintenance (servicing) instructions in particular, specifies that to Part 15 of Sony Corporation. FD Trinitron...
... television closed captioning in a residential installation. Installing ❑ To prevent internal heat buildup, do not expose the TV to insert the plug fully into an outlet on 120 V AC. ❑ The plug is covered by your authority to persons. This symbol is attached to the rear of important operating and maintenance (servicing) instructions in particular, specifies that to Part 15 of Sony Corporation. FD Trinitron...
Primary User Manual
Page 4
... the exterior of the grounding plug. No part of the TV set should be observed in the operating instructions or service manual. Alternate Warning For the set with all warnings, cautions and instructions placed on or off when it . Always turn the set off . When the set is equipped with a polarized AC power cord plug (a plug having a third pin for the specific model of TV. Accessories Do not...
... the exterior of the grounding plug. No part of the TV set should be observed in the operating instructions or service manual. Alternate Warning For the set with all warnings, cautions and instructions placed on or off when it . Always turn the set off . When the set is equipped with a polarized AC power cord plug (a plug having a third pin for the specific model of TV. Accessories Do not...
Primary User Manual
Page 5
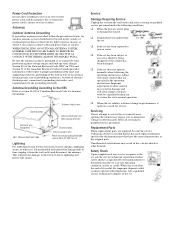
..., size of grounding conductors, location of the lead-in a picture tube implosion. Adjust only those controls that have the same characteristics as specified by the manufacturer) to determine that the set is in safe operating condition, and to normal operation. ❑ When the set exhibits a distinct change in the operating instructions. Antennas Outdoor Antenna Grounding If an outdoor antenna is installed, follow the precautions below. Power-Cord Protection...
..., size of grounding conductors, location of the lead-in a picture tube implosion. Adjust only those controls that have the same characteristics as specified by the manufacturer) to determine that the set is in safe operating condition, and to normal operation. ❑ When the set exhibits a distinct change in the operating instructions. Antennas Outdoor Antenna Grounding If an outdoor antenna is installed, follow the precautions below. Power-Cord Protection...
Primary User Manual
Page 7
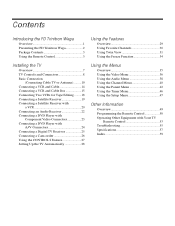
...Audio Receiver 22 Connecting a DVD Player with Component Video Connectors 23 Connecting a DVD Player with A/V Connectors 24 Connecting a Digital TV Receiver 25 Connecting a Camcorder 26 Using the CONTROL S Feature 27 Setting Up the TV Automatically 28 Using the Menus Overview 35 Using the Video Menu 36 Using the Audio Menu 38 Using the Channel Menu 40 Using the Parent Menu 42 Using the Timer Menu 46 Using the Setup Menu 47 Other Information Overview 49 Programming the Remote Control 50 Operating Other Equipment with Your TV Remote Control 53 Troubleshooting 55 Specifications...
...Audio Receiver 22 Connecting a DVD Player with Component Video Connectors 23 Connecting a DVD Player with A/V Connectors 24 Connecting a Digital TV Receiver 25 Connecting a Camcorder 26 Using the CONTROL S Feature 27 Setting Up the TV Automatically 28 Using the Menus Overview 35 Using the Video Menu 36 Using the Audio Menu 38 Using the Channel Menu 40 Using the Parent Menu 42 Using the Timer Menu 46 Using the Setup Menu 47 Other Information Overview 49 Programming the Remote Control 50 Operating Other Equipment with Your TV Remote Control 53 Troubleshooting 55 Specifications...
Primary User Manual
Page 10
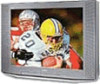
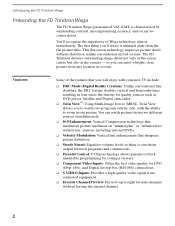
...: Vertical line enhancement that sharpens picture definition. ❑ Steady Sound: Equalizes volume levels so there is consistent output between programs and commercials. ❑ Parental Control: V-Chip technology allows parents to block unsuitable programming for younger viewers. ❑ Component Video Inputs: Offers the best video quality for quality sources such as DVD player, Satellite and Digital camcorder. ❑ Twin View™: Using Multi-Image Driver (MIDX), Twin View allows you can watch two...
...: Vertical line enhancement that sharpens picture definition. ❑ Steady Sound: Equalizes volume levels so there is consistent output between programs and commercials. ❑ Parental Control: V-Chip technology allows parents to block unsuitable programming for younger viewers. ❑ Component Video Inputs: Offers the best video quality for quality sources such as DVD player, Satellite and Digital camcorder. ❑ Twin View™: Using Multi-Image Driver (MIDX), Twin View allows you can watch two...
Primary User Manual
Page 12
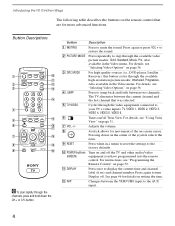
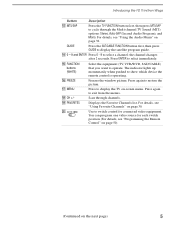
... the video equipment connected to your TV's video inputs: TV, VIDEO 1, VIDEO 2, VIDEO 3, VIDEO 4, VIDEO 5, VIDEO 6. Pressing down the CH+ or CH- Changes between two channels. Button 1 MUTING 2 PICTURE MODE 3 DRC MODE 4 JUMP 5 TV/VIDEO 6 7 VOL +/8 9 RESET 0 POWER buttons (GREEN) qa DISPLAY qs ANT Description Press to display the current time and channel label (if set) and channel number. Also available in the Video menu. For details, see "Programming the Remote Control" on page 50. For instructions, see "Using Twin View" on page 31. Introducing the FD Trinitron Wega...
... the video equipment connected to your TV's video inputs: TV, VIDEO 1, VIDEO 2, VIDEO 3, VIDEO 4, VIDEO 5, VIDEO 6. Pressing down the CH+ or CH- Changes between two channels. Button 1 MUTING 2 PICTURE MODE 3 DRC MODE 4 JUMP 5 TV/VIDEO 6 7 VOL +/8 9 RESET 0 POWER buttons (GREEN) qa DISPLAY qs ANT Description Press to display the current time and channel label (if set) and channel number. Also available in the Video menu. For details, see "Programming the Remote Control" on page 50. For instructions, see "Using Twin View" on page 31. Introducing the FD Trinitron Wega...
Primary User Manual
Page 13
.... Displays the Favorite Channels list. Introducing the FD Trinitron Wega Button Description qd MTS/SAP Press the TV FUNCTION button first, then press MTS/SAP to cycle through channels. AV 1 2 3 DVD Select the equipment (TV, VCR/DVD, SAT/CABLE) that you want to select a channel; Freezes the window picture. Scan through the Multi-channel TV Sound (MTS) options: Stereo, Auto-SAP (Second Audio Program), and Mono. For details, see "Programming the Remote Control...
.... Displays the Favorite Channels list. Introducing the FD Trinitron Wega Button Description qd MTS/SAP Press the TV FUNCTION button first, then press MTS/SAP to cycle through channels. AV 1 2 3 DVD Select the equipment (TV, VCR/DVD, SAT/CABLE) that you want to select a channel; Freezes the window picture. Scan through the Multi-channel TV Sound (MTS) options: Stereo, Auto-SAP (Second Audio Program), and Mono. For details, see "Programming the Remote Control...
Primary User Manual
Page 14
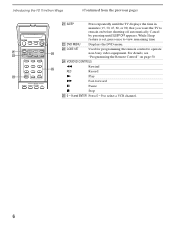
... view remaining time ws DVD MENU Displays the DVD menu. wf VCR/DVD CONTROLS m Rewind REC Record N Play M Fast-forward X Pause x Stop wg 0 - 9 and ENTER Press 0 - 9 to operate non-Sony video equipment. While Sleep feature is set, press once to remain on page 50. Introducing the FD Trinitron Wega (Continued from the previous page) MUTING POWER VCR/DVD SAT/CABLE TV SLEEP wa ws DVD MENU REC wf 1 2 3 4 5 6 wg 7 8 9 CODE SET ENTER wd 0 FUNCTION TV/VIDEO VCR/DVD...
... view remaining time ws DVD MENU Displays the DVD menu. wf VCR/DVD CONTROLS m Rewind REC Record N Play M Fast-forward X Pause x Stop wg 0 - 9 and ENTER Press 0 - 9 to operate non-Sony video equipment. While Sleep feature is set, press once to remain on page 50. Introducing the FD Trinitron Wega (Continued from the previous page) MUTING POWER VCR/DVD SAT/CABLE TV SLEEP wa ws DVD MENU REC wf 1 2 3 4 5 6 wg 7 8 9 CODE SET ENTER wd 0 FUNCTION TV/VIDEO VCR/DVD...
Primary User Manual
Page 15
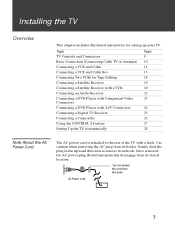
... AC power plug should automatically disengage from this hook AC Power cord 7 You can detach the cord from its holder. Gently slide the plug in the upward direction to the rear of the TV with a hook. Installing the TV Overview This chapter includes illustrated instructions for Tape Editing Connecting a Satellite Receiver Connecting a Satellite Receiver with a VCR Connecting an Audio Receiver Connecting a DVD Player with Component Video Connectors Connecting a DVD Player with A/V Connectors Connecting a Digital TV Receiver Connecting a Camcorder Using the CONTROL S Feature Setting...
... AC power plug should automatically disengage from this hook AC Power cord 7 You can detach the cord from its holder. Gently slide the plug in the upward direction to the rear of the TV with a hook. Installing the TV Overview This chapter includes illustrated instructions for Tape Editing Connecting a Satellite Receiver Connecting a Satellite Receiver with a VCR Connecting an Audio Receiver Connecting a DVD Player with Component Video Connectors Connecting a DVD Player with A/V Connectors Connecting a Digital TV Receiver Connecting a Camcorder Using the CONTROL S Feature Setting...
Primary User Manual
Page 19
... display the signal from both AUX and VHF/UHF inputs in the right Twin View picture. 11 CATV cable AUX Rear of the CATV cable: 1 Select antenna mode by pressing ANT on the remote control. 2 Turn the cable to the TV, so you cannot use the Twin View feature.) ❑ Use the Twin View feature normally with the CATV input. ❑ Use the Twin View feature partially with the cable box. With this set...
... display the signal from both AUX and VHF/UHF inputs in the right Twin View picture. 11 CATV cable AUX Rear of the CATV cable: 1 Select antenna mode by pressing ANT on the remote control. 2 Turn the cable to the TV, so you cannot use the Twin View feature.) ❑ Use the Twin View feature normally with the CATV input. ❑ Use the Twin View feature partially with the cable box. With this set...
Primary User Manual
Page 23
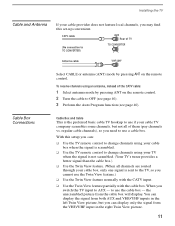
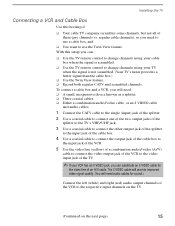
Installing the TV Connecting a VCR and Cable Box Use this setup you can substitute an S VIDEO cable for sound.) Connect the left (white) and right (red) audio output channels of them (pay channels vs. To connect a cable box and a VCR, you can : ❑ Use the TV remote control to change channels using your VCR has an S VIDEO jack, you will need audio cables for the video line of an A/V cable. regular cable channels), so you need : ❑ A small, inexpensive device known as a splitter. ❑ Three...
Installing the TV Connecting a VCR and Cable Box Use this setup you can substitute an S VIDEO cable for sound.) Connect the left (white) and right (red) audio output channels of them (pay channels vs. To connect a cable box and a VCR, you can : ❑ Use the TV remote control to change channels using your VCR has an S VIDEO jack, you will need audio cables for the video line of an A/V cable. regular cable channels), so you need : ❑ A small, inexpensive device known as a splitter. ❑ Three...
Primary User Manual
Page 27
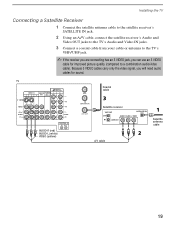
... cable AUDIO-R (red) AUDIO-L (white) VIDEO (yellow) Satellite receiver A/V cable Satellite antenna cable 19 Because S VIDEO cables carry only the video signal, you can use an S VIDEO cable for sound. Installing the TV Connecting a Satellite Receiver 1 Connect the satellite antenna cable to the satellite receiver's SATELLITE IN jack. 2 Using an A/V cable, connect the satellite receiver's Audio and Video OUT jacks to the TV's Audio and Video IN jacks. 3 Connect a coaxial cable from your cable or antenna to the TV's VHF/UHF jack. ✍ If the receiver you are connecting...
... cable AUDIO-R (red) AUDIO-L (white) VIDEO (yellow) Satellite receiver A/V cable Satellite antenna cable 19 Because S VIDEO cables carry only the video signal, you can use an S VIDEO cable for sound. Installing the TV Connecting a Satellite Receiver 1 Connect the satellite antenna cable to the satellite receiver's SATELLITE IN jack. 2 Using an A/V cable, connect the satellite receiver's Audio and Video OUT jacks to the TV's Audio and Video IN jacks. 3 Connect a coaxial cable from your cable or antenna to the TV's VHF/UHF jack. ✍ If the receiver you are connecting...

Primary User Manual
Page 43
... picture settings. PARENT lets you are viewing. It also allows you to second audio programming (SAP), or customizing the effect of program you control the viewing of the on moving through the features. 4 See the specific menu page for scheduled viewing using the Timers. AUDIO offers enhanced audio options such as listening to customize the Picture Mode based on the type of the sound on your TV for instructions on -screen menus. 35 TIMER...
... picture settings. PARENT lets you are viewing. It also allows you to second audio programming (SAP), or customizing the effect of program you control the viewing of the on moving through the features. 4 See the specific menu page for scheduled viewing using the Timers. AUDIO offers enhanced audio options such as listening to customize the Picture Mode based on the type of the sound on your TV for instructions on -screen menus. 35 TIMER...
Primary User Manual
Page 50
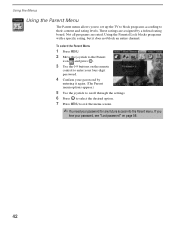
... by entering it does not block an entire channel. If you to set up the TV to block programs according to exit the menu screen. ✍ You need your password by a federal rating board. Using the Menus Using the Parent Menu The Parent menu allows you lose your password, see "Lost password" on the remote control to enter your four-digit password. 4 Confirm your password for any future access into the Parent menu.
... by entering it does not block an entire channel. If you to set up the TV to block programs according to exit the menu screen. ✍ You need your password by a federal rating board. Using the Menus Using the Parent Menu The Parent menu allows you lose your password, see "Lost password" on the remote control to enter your four-digit password. 4 Confirm your password for any future access into the Parent menu.
Primary User Manual
Page 63
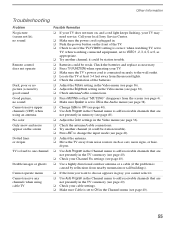
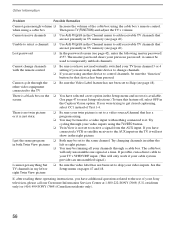
... the antenna/cable connections. ❏ Try another channel; it . ❏ Use Auto Program in the Channel menu to add receivable channels that are not presently in the TV's memory (see page 40). ❏ Check your Channel Fix settings (see page 40). ❏ Use a highly directional outdoor antenna or a cable (if the problem is plugged in. ❏ Push the power button on , and a red light keeps flashing, your local Sony Service Center. ❏ Make sure the power cord is...
... the antenna/cable connections. ❏ Try another channel; it . ❏ Use Auto Program in the Channel menu to add receivable channels that are not presently in the TV's memory (see page 40). ❏ Check your Channel Fix settings (see page 40). ❏ Use a highly directional outdoor antenna or a cable (if the problem is plugged in. ❏ Push the power button on , and a red light keeps flashing, your local Sony Service Center. ❏ Make sure the power cord is...
Primary User Manual
Page 64
... a video input with the remote control ❏ Be sure you have not inadvertently switched your previous password; See the Setup menu on pages 47 and 48. Cannot change channels with nothing connected to skip your TV's VHF/UHF input. (This will only unscramble one signal at 1-800-222-SONY (7669) (U.S. when using the cable box's remote control. Try changing channels in either the in both Twin View pictures left or right Twin View picture ❏...
... a video input with the remote control ❏ Be sure you have not inadvertently switched your previous password; See the Setup menu on pages 47 and 48. Cannot change channels with nothing connected to skip your TV's VHF/UHF input. (This will only unscramble one signal at 1-800-222-SONY (7669) (U.S. when using the cable box's remote control. Try changing channels in either the in both Twin View pictures left or right Twin View picture ❏...
Primary User Manual
Page 67
... Channel menu 35, 40 Channel Setup menu 40 Channel Skip/Add 41 channels creating labels 41 setting up 28 closed caption modes 47 Code Set button 6 color temperature, adjusting 37 color, adjusting 36 Connecting: Audio receiver 22 Cable or antenna 10-13 Cable box 11-13, 15-16 Camcorder 26 Digital TV receiver 25 DVD player 23, 24 Satellite receiver 19-21 VCR 14-18 with Satellite receiver 20 Contents of package 3 CONTROL S 27 Controls and connectors 8-9 Converter 12 D Demo, menus 48 Digital Reality Creation 37 Display button 4 Display, turning...
... Channel menu 35, 40 Channel Setup menu 40 Channel Skip/Add 41 channels creating labels 41 setting up 28 closed caption modes 47 Code Set button 6 color temperature, adjusting 37 color, adjusting 36 Connecting: Audio receiver 22 Cable or antenna 10-13 Cable box 11-13, 15-16 Camcorder 26 Digital TV receiver 25 DVD player 23, 24 Satellite receiver 19-21 VCR 14-18 with Satellite receiver 20 Contents of package 3 CONTROL S 27 Controls and connectors 8-9 Converter 12 D Demo, menus 48 Digital Reality Creation 37 Display button 4 Display, turning...
Primary User Manual
Page 68
...label channels 41 video inputs 48 Languages, setting for closed captioning 48 Locking programs 42-45 M Manufacturer's codes 52 MDP, using with TV remote control 54 Menu button 5 menus Audio 35, 38 Channel 35, 40 Channel Setup 40 Parent 35, 42 Parental Control 42 Setup 35, 47 Timer 35, 46 Video 35, 36 Muting 4 60 P Parent menu 35, 42 parental control, described 2 password changing 43, 56 picture contrast, adjusting 36 picture definition, adjusting 37 Picture Mode 4, 36 Picture size, adjusting in Twin View 33 power cord, removing from holder 7 presetting channels 40 problems, troubleshooting 55...
...label channels 41 video inputs 48 Languages, setting for closed captioning 48 Locking programs 42-45 M Manufacturer's codes 52 MDP, using with TV remote control 54 Menu button 5 menus Audio 35, 38 Channel 35, 40 Channel Setup 40 Parent 35, 42 Parental Control 42 Setup 35, 47 Timer 35, 46 Video 35, 36 Muting 4 60 P Parent menu 35, 42 parental control, described 2 password changing 43, 56 picture contrast, adjusting 36 picture definition, adjusting 37 Picture Mode 4, 36 Picture size, adjusting in Twin View 33 power cord, removing from holder 7 presetting channels 40 problems, troubleshooting 55...
Primary User Manual
Page 69
... 46 Time, set daylight saving 46 Timer setting 46 tilt, correcting 48 Timer menu 35, 46 treble, adjusting 38 troubleshooting 55-56 TV Function button 5 TV Power button 4 TV/VIDEO button 4 Twin View activating a picture 32 changing the picture size 33 displaying a picture 31 V VCR connecting two, for tape editing 18 using with TV remote control 53 with cable box, connecting 15 with cable, connecting 14 with satellite receiver, connecting 20 VCR/DVD Function button 5 VCR/DVD Power button 4 Velocity Modulation 2, 37 video inputs, labeling 48 Video menu 35, 36 Video Modes, selecting 36 W Wega...
... 46 Time, set daylight saving 46 Timer setting 46 tilt, correcting 48 Timer menu 35, 46 treble, adjusting 38 troubleshooting 55-56 TV Function button 5 TV Power button 4 TV/VIDEO button 4 Twin View activating a picture 32 changing the picture size 33 displaying a picture 31 V VCR connecting two, for tape editing 18 using with TV remote control 53 with cable box, connecting 15 with cable, connecting 14 with satellite receiver, connecting 20 VCR/DVD Function button 5 VCR/DVD Power button 4 Velocity Modulation 2, 37 video inputs, labeling 48 Video menu 35, 36 Video Modes, selecting 36 W Wega...


