
Child Safety: It Makes A Difference Where Your TV Stands
Page 1
.... 4 Don't allow children to climb on or play with furniture and television sets. 5 Avoid placing any items on top of TVs such as VCRs and remotes that may pique the children's curiosity. 6 Remember that children can become excited while watching a program and can potentially push or pull a TV over and may...
.... 4 Don't allow children to climb on or play with furniture and television sets. 5 Avoid placing any items on top of TVs such as VCRs and remotes that may pique the children's curiosity. 6 Remember that children can become excited while watching a program and can potentially push or pull a TV over and may...
Operating Instructions
Page 7
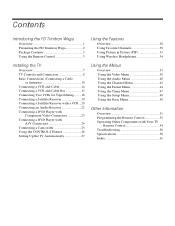
Contents Introducing the FD Trinitron Wega Overview 1 Presenting the FD Trinitron Wega 2 Package Contents 3 Using the Remote Control 3 Using the Features Overview 29 Using Favorite Channels 30 Using Picture in Picture (PIP 31 Using Wireless Headphones 34 Installing the TV Overview 7 TV ... the Parent Menu 44 Using the Timer Menu 47 Using the Setup Menu 48 Using the Basic Menu 50 Other Information Overview 51 Programming the Remote Control 52 Operating Other Components with Your TV Remote Control 54 Troubleshooting 56 Specifications 58 Index 61
Contents Introducing the FD Trinitron Wega Overview 1 Presenting the FD Trinitron Wega 2 Package Contents 3 Using the Remote Control 3 Using the Features Overview 29 Using Favorite Channels 30 Using Picture in Picture (PIP 31 Using Wireless Headphones 34 Installing the TV Overview 7 TV ... the Parent Menu 44 Using the Timer Menu 47 Using the Setup Menu 48 Using the Basic Menu 50 Other Information Overview 51 Programming the Remote Control 52 Operating Other Components with Your TV Remote Control 54 Troubleshooting 56 Specifications 58 Index 61
Operating Instructions
Page 9
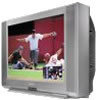
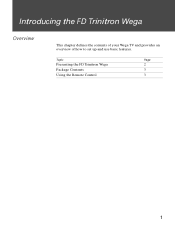
Topic Page Presenting the FD Trinitron Wega 2 Package Contents 3 Using the Remote Control 3 1 Introducing the FD Trinitron Wega Overview This chapter defines the contents of your Wega TV and provides an overview of how to set up and use basic features.
Topic Page Presenting the FD Trinitron Wega 2 Package Contents 3 Using the Remote Control 3 1 Introducing the FD Trinitron Wega Overview This chapter defines the contents of your Wega TV and provides an overview of how to set up and use basic features.
Operating Instructions
Page 11
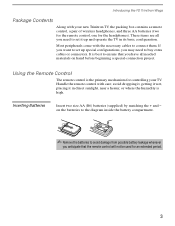
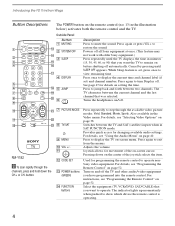
It is best to buy extra cables or connectors. If you want to set it in its basic configuration. Using the Remote Control The remote control is high. Inserting Batteries Insert two size AA (R6) batteries (supplied) by matching the + and - Most peripherals ... heater, or where the humidity is the primary mechanism for the headphones). on hand before beginning a special-connection project. Introducing the FD Trinitron Wega Package Contents Along with care; These items are all needed materials on the batteries to the diagram inside the battery compartment. ✍ Remove...
It is best to buy extra cables or connectors. If you want to set it in its basic configuration. Using the Remote Control The remote control is high. Inserting Batteries Insert two size AA (R6) batteries (supplied) by matching the + and - Most peripherals ... heater, or where the humidity is the primary mechanism for the headphones). on hand before beginning a special-connection project. Introducing the FD Trinitron Wega Package Contents Along with care; These items are all needed materials on the batteries to the diagram inside the battery compartment. ✍ Remove...
Operating Instructions
Page 12
... the item. Introducing the FD Trinitron Wega Button Descriptions The POWER button on page 52. Also available in minutes 3 qg (15, 30, 45, 60, or 90) that you have programmed into the remote control. For details, see "Programming the Remote Control" on the remote control (no. 13 in SAT... VCR/DVD, SAT/CABLE) that you want to 1 qd restore the sound. 2 SYSTEM OFF Powers off all Sony equipment at once. (This feature may qf not work with older Sony equipment.) 2 3 SLEEP Press repeatedly until SLEEP OFF appears. button. Turn on 4 qh before shutting off the ...
... the item. Introducing the FD Trinitron Wega Button Descriptions The POWER button on page 52. Also available in minutes 3 qg (15, 30, 45, 60, or 90) that you have programmed into the remote control. For details, see "Programming the Remote Control" on the remote control (no. 13 in SAT... VCR/DVD, SAT/CABLE) that you want to 1 qd restore the sound. 2 SYSTEM OFF Powers off all Sony equipment at once. (This feature may qf not work with older Sony equipment.) 2 3 SLEEP Press repeatedly until SLEEP OFF appears. button. Turn on 4 qh before shutting off the ...
Operating Instructions
Page 13
... the video equipment connected to restore the picture. 9 CH +/- If you have a non-Sony VCR, you to recognize your VCR. This allows you will need to program the remote control to select different sources for the PIP display. 5 q; Changes between the VHF/UHF ...Remote Control" on /off PIP. Press again to the TV's video inputs: TV, VIDEO 1, VIDEO 2, VIDEO 3, VIDEO 4. above, left - Switches the position of the PIP window picture. 7 MTS/SAP Cycles through the video equipment connected to switch control for each switch position. Introducing the FD Trinitron Wega...
... the video equipment connected to restore the picture. 9 CH +/- If you have a non-Sony VCR, you to recognize your VCR. This allows you will need to program the remote control to select different sources for the PIP display. 5 q; Changes between the VHF/UHF ...Remote Control" on /off PIP. Press again to the TV's video inputs: TV, VIDEO 1, VIDEO 2, VIDEO 3, VIDEO 4. above, left - Switches the position of the PIP window picture. 7 MTS/SAP Cycles through the video equipment connected to switch control for each switch position. Introducing the FD Trinitron Wega...
Operating Instructions
Page 16
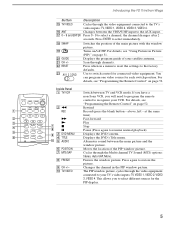
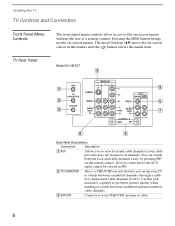
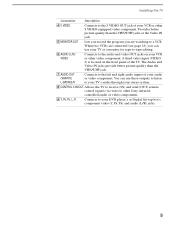
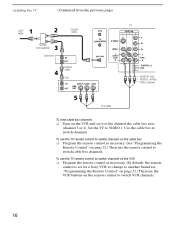
The arrow buttons (Vv) move the on the remote control. TV Rear Panel Model KV-36FV27 4 1 9 2 5 3 7 6 8 Back Panel Descriptions Connection Description 1 AUX Allows you set up the on -screen menus without the use of a splitter to get better picture...switch between scrambled and unscrambled cable channels. 3 VHF/UHF Connects to your cable provider does not feature local channels. Use this jack instead of a remote control. You can switch between scrambled channels (through a cable box) and normal cable channels (CATV). Devices connected to the AUX input cannot be ...
The arrow buttons (Vv) move the on the remote control. TV Rear Panel Model KV-36FV27 4 1 9 2 5 3 7 6 8 Back Panel Descriptions Connection Description 1 AUX Allows you set up the on -screen menus without the use of a splitter to get better picture...switch between scrambled and unscrambled cable channels. 3 VHF/UHF Connects to your cable provider does not feature local channels. Use this jack instead of a remote control. You can switch between scrambled channels (through a cable box) and normal cable channels (CATV). Devices connected to the AUX input cannot be ...
Operating Instructions
Page 17
... to listen to your TV's audio through your stereo system. 8CONTROL S IN/OUT Allows the TV to receive (IN) and send (OUT) remote control signals (via wire) to other Sony infraredcontrolled audio or video components. 9 Y, PB, PR, L, R Connects to the S VIDEO OUT jack of your VCR or other video component. A third video...
... to listen to your TV's audio through your stereo system. 8CONTROL S IN/OUT Allows the TV to receive (IN) and send (OUT) remote control signals (via wire) to other Sony infraredcontrolled audio or video components. 9 Y, PB, PR, L, R Connects to the S VIDEO OUT jack of your VCR or other video component. A third video...
Operating Instructions
Page 19
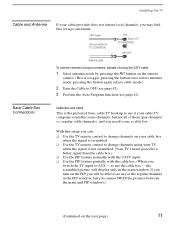
... 1 Select antenna mode by pressing the ANT button on your cable box when the signal is scrambled. ❑ Use the TV remote control to change channels on the remote control. (This is the preferred basic cable TV hookup to use a cable box. Installing the TV Cable and Antenna If your ... toggle: pressing the button once selects antenna mode; the scrambled picture will be able to AUX - With this setup you can: ❑ Use the TV remote control to use if your cable TV company scrambles some channels, but you cannot SWAP the pictures between the main and PIP windows.) (Continued on...
... 1 Select antenna mode by pressing the ANT button on your cable box when the signal is scrambled. ❑ Use the TV remote control to change channels on the remote control. (This is the preferred basic cable TV hookup to use a cable box. Installing the TV Cable and Antenna If your ... toggle: pressing the button once selects antenna mode; the scrambled picture will be able to AUX - With this setup you can: ❑ Use the TV remote control to use if your cable TV company scrambles some channels, but you cannot SWAP the pictures between the main and PIP windows.) (Continued on...
Operating Instructions
Page 20
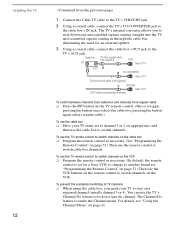
...: pressing the button once selects the cable box; The TV's internal converter allows you need for a Sony VCR; You can use the remote control to switch channels. For details, see "Programming the Remote Control" on page 52.) Then use the cable box ❑ Have your TV to the TV's ...the need your TV tuner set for an external splitter. 3 Using a coaxial cable, connect the cable box's OUT jack to stay on the TV remote control. (This is under the Channel menu. Installing the TV 12 (Continued from regular cable ❑ Press the ANT button on a required channel...
...: pressing the button once selects the cable box; The TV's internal converter allows you need for a Sony VCR; You can use the remote control to switch channels. For details, see "Programming the Remote Control" on page 52.) Then use the cable box ❑ Have your TV to the TV's ...the need your TV tuner set for an external splitter. 3 Using a coaxial cable, connect the cable box's OUT jack to stay on the TV remote control. (This is under the Channel menu. Installing the TV 12 (Continued from regular cable ❑ Press the ANT button on a required channel...

Operating Instructions
Page 23
... TV company scrambles some channels, but not all of the TV. ✍ If the VCR has an S VIDEO jack, you can : ❑ Use the TV remote control to change cable box channels when the signal is not scrambled. (Your TV's tuner provides a better signal than the cable box.) ❑ Use the... use a cable box, and ❑ You want to use an S VIDEO cable to change TV channels when the signal is scrambled. ❑ Use the TV remote control to improve picture quality;
... TV company scrambles some channels, but not all of the TV. ✍ If the VCR has an S VIDEO jack, you can : ❑ Use the TV remote control to change cable box channels when the signal is not scrambled. (Your TV's tuner provides a better signal than the cable box.) ❑ Use the... use a cable box, and ❑ You want to use an S VIDEO cable to change TV channels when the signal is scrambled. ❑ Use the TV remote control to improve picture quality;
Operating Instructions
Page 24
.... To use the TV remote control to the channel the cable box uses (channel 3 or 4). to change to another brand see "Programming the Remote Control" on the cable box ❑ Program the remote control as necessary. (By default, the remote control is set for a Sony VCR; Use the cable ...box to switch VCR channels. 16 To use the TV remote control to switch channels on page 52.) ...
.... To use the TV remote control to the channel the cable box uses (channel 3 or 4). to change to another brand see "Programming the Remote Control" on the cable box ❑ Program the remote control as necessary. (By default, the remote control is set for a Sony VCR; Use the cable ...box to switch VCR channels. 16 To use the TV remote control to switch channels on page 52.) ...
Operating Instructions
Page 25
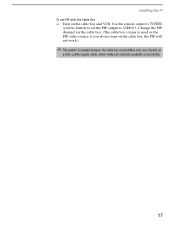
Use the remote control's TV/VIDEO (yellow) button to set the PIP output to VIDEO 1. Installing the TV To use PIP with the Cable Box ❑ Turn on the cable box, the PIP will not work.) ✍ This system is used as the PIP video source; if you do not turn on the cable box and VCR. Change the PIP channel via the cable box. (The cable box's tuner is needed because the cable box unscrambles only one channel at a time (unlike regular cable, which makes all channels available concurrently). 17
Use the remote control's TV/VIDEO (yellow) button to set the PIP output to VIDEO 1. Installing the TV To use PIP with the Cable Box ❑ Turn on the cable box, the PIP will not work.) ✍ This system is used as the PIP video source; if you do not turn on the cable box and VCR. Change the PIP channel via the cable box. (The cable box's tuner is needed because the cable box unscrambles only one channel at a time (unlike regular cable, which makes all channels available concurrently). 17

Operating Instructions
Page 26
... the recording process. replace the yellow video cable of the VCR. ❑ See your TV and then view what is being recorded ❑ Use the remote control to set the TV to the video input that the recording VCR is being recorded. You can connect the recording VCR into your VCR...
... the recording process. replace the yellow video cable of the VCR. ❑ See your TV and then view what is being recorded ❑ Use the remote control to set the TV to the video input that the recording VCR is being recorded. You can connect the recording VCR into your VCR...
Operating Instructions
Page 29
To watch satellite TV, or the VCR ❑ Use the TV/VIDEO on the remote control to select video source. To watch cable TV ❑ Use the TV/VIDEO on the remote control to select VHF/UHF source. 21 Installing the TV To change VCR video input ❑ See your VCR's user's guide for instructions.
To watch satellite TV, or the VCR ❑ Use the TV/VIDEO on the remote control to select video source. To watch cable TV ❑ Use the TV/VIDEO on the remote control to select VHF/UHF source. 21 Installing the TV To change VCR video input ❑ See your VCR's user's guide for instructions.
Operating Instructions
Page 32
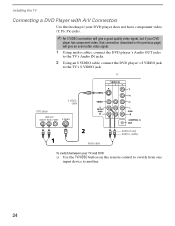
... TV DVD player S VIDEO cable AUDIO-R (red) AUDIO-L (white) Audio cable To switch between your DVD player has component video, that connection (described on the remote control to switch from one input device to the TV's S VIDEO jack.
... TV DVD player S VIDEO cable AUDIO-R (red) AUDIO-L (white) Audio cable To switch between your DVD player has component video, that connection (described on the remote control to switch from one input device to the TV's S VIDEO jack.

Operating Instructions
Page 33
...; Installing the TV Connecting a Camcorder For easy connection of the combination A/V cable with the S VIDEO cable. To view the camera's output ❑ Use the TV's remote control to set the appropriate input on the TV (VIDEO 2, in the illustration). 25
...; Installing the TV Connecting a Camcorder For easy connection of the combination A/V cable with the S VIDEO cable. To view the camera's output ❑ Use the TV's remote control to set the appropriate input on the TV (VIDEO 2, in the illustration). 25
Operating Instructions
Page 34
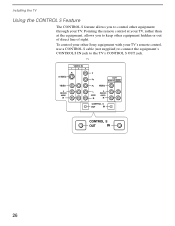
Installing the TV Using the CONTROL S Feature The CONTROL S feature allows you to keep other equipment hidden or out of direct line of sight. To control your other equipment through your TV's remote control, use a CONTROL S cable (not supplied) to connect the equipment's CONTROL S IN jack to control other Sony equipment with your TV. TV 26 Pointing the remote control at your TV, rather than at the equipment, allows you to the TV's CONTROL S OUT jack.
Installing the TV Using the CONTROL S Feature The CONTROL S feature allows you to keep other equipment hidden or out of direct line of sight. To control your other equipment through your TV's remote control, use a CONTROL S cable (not supplied) to connect the equipment's CONTROL S IN jack to control other Sony equipment with your TV. TV 26 Pointing the remote control at your TV, rather than at the equipment, allows you to the TV's CONTROL S OUT jack.
Operating Instructions
Page 35
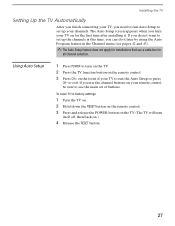
... the channels at this time, you turn your TV to run Auto Setup to set up your remote control, be sure to factory settings 1 Turn the TV on. 2 Hold down the RESET button on the remote control. 3 Press and release the POWER button on the TV. (The TV will turn on the... TV. 2 Press the TV function button on the remote control. 3 Press CH+ on the front of buttons. The Auto Setup screen appears when you can do it . To reset TV to use a cable box ...
... the channels at this time, you turn your TV to run Auto Setup to set up your remote control, be sure to factory settings 1 Turn the TV on. 2 Hold down the RESET button on the remote control. 3 Press and release the POWER button on the TV. (The TV will turn on the... TV. 2 Press the TV function button on the remote control. 3 Press CH+ on the front of buttons. The Auto Setup screen appears when you can do it . To reset TV to use a cable box ...
Operating Instructions
Page 39
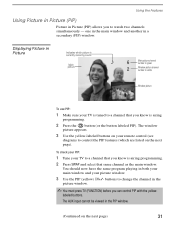
... viewed in the picture window. ✍ You must press TV (FUNCTION) before you can control PIP with the yellow- To check your PIP: 1 Tune your remote control (see diagram) to change the channel in the PIP window. (Continued on the next page). Displaying Picture in a secondary (PIP) window.
... viewed in the picture window. ✍ You must press TV (FUNCTION) before you can control PIP with the yellow- To check your PIP: 1 Tune your remote control (see diagram) to change the channel in the PIP window. (Continued on the next page). Displaying Picture in a secondary (PIP) window.


