Limited Warranty (U.S. Only)
Page 1
...of the Product, including the antenna. ACCESSORIES: Parts and labor for all accessories are for 19" (measured diagonally), or larger screen size through a Sony authorized service facility. This warranty does not cover damage due to improper operation or maintenance, connection to improper voltage supply, or attempted... BREACH OF ANY EXPRESS OR IMPLIED WARRANTY ON THIS PRODUCT. 4-557-168-03 ® LIMITED WARRANTY HDTV Color TV XBR Projection TV Sony Electronics Inc. ("Sony") warrants this Product is within 90 days of the date of sale, the limitation on how long an implied warranty lasts,...
...of the Product, including the antenna. ACCESSORIES: Parts and labor for all accessories are for 19" (measured diagonally), or larger screen size through a Sony authorized service facility. This warranty does not cover damage due to improper operation or maintenance, connection to improper voltage supply, or attempted... BREACH OF ANY EXPRESS OR IMPLIED WARRANTY ON THIS PRODUCT. 4-557-168-03 ® LIMITED WARRANTY HDTV Color TV XBR Projection TV Sony Electronics Inc. ("Sony") warrants this Product is within 90 days of the date of sale, the limitation on how long an implied warranty lasts,...
Operating Instructions
Page 2
...183; View a variety of important operating and maintenance (servicing) instructions in the spaces provided below the Sony logo, on the sticker, and also on your Sony dealer regarding this product. IMAGE RETENTION IS NOT COVERED BY YOUR WARRANTY As an ENERGY STAR® Partner... within the product's enclosure that a single image will reduce the possibility of the projection TV, below . Changing the program material viewed reduces the possibility that may be permanently imprinted onto the screen. Owner's Record The model and serial numbers are known as "image retention."
...183; View a variety of important operating and maintenance (servicing) instructions in the spaces provided below the Sony logo, on the sticker, and also on your Sony dealer regarding this product. IMAGE RETENTION IS NOT COVERED BY YOUR WARRANTY As an ENERGY STAR® Partner... within the product's enclosure that a single image will reduce the possibility of the projection TV, below . Changing the program material viewed reduces the possibility that may be permanently imprinted onto the screen. Owner's Record The model and serial numbers are known as "image retention."
Operating Instructions
Page 3
.... If you are cautioned that face the screen with the limits for a Class B digital device, pursuant to excessive dust or mechanical vibration. ❑ Avoid operating the projection TV at temperatures below . ❑ Carry the projection TV with §15.119 of the FCC...High-Definition Multimedia Interface are trademarks of Sony Corporation. Be sure to install the projection TV in a room where the floor and walls are registered trademarks of Sony Corporation. Note on Caption Vision This television receiver provides display of television closed captioning in accordance with the ...
.... If you are cautioned that face the screen with the limits for a Class B digital device, pursuant to excessive dust or mechanical vibration. ❑ Avoid operating the projection TV at temperatures below . ❑ Carry the projection TV with §15.119 of the FCC...High-Definition Multimedia Interface are trademarks of Sony Corporation. Be sure to install the projection TV in a room where the floor and walls are registered trademarks of Sony Corporation. Note on Caption Vision This television receiver provides display of television closed captioning in accordance with the ...
Operating Instructions
Page 4
...objects have fallen into your safety. Never use this apparatus during lightning storms or when unused for replacement of your TV screen. To clean the screen of the obsolete outlet. 10 Protect the power cord from being walked on or pinched particularly at plugs, convenience receptacles,... near any ventilation openings. The wide blade or the third prong are provided for your outlet, consult an electrician for long periods of the projection TV. A polarized plug has two blades with water. When a cart is required when the apparatus has been damaged in accordance with the...
...objects have fallen into your safety. Never use this apparatus during lightning storms or when unused for replacement of your TV screen. To clean the screen of the obsolete outlet. 10 Protect the power cord from being walked on or pinched particularly at plugs, convenience receptacles,... near any ventilation openings. The wide blade or the third prong are provided for your outlet, consult an electrician for long periods of the projection TV. A polarized plug has two blades with water. When a cart is required when the apparatus has been damaged in accordance with the...

Operating Instructions
Page 7
... Operating a Satellite Receiver 48 Operating a Cable Box 49 Operating a DVD Player 49 Using the F1 and F2 Buttons 49 Using the Features Overview ...51 Watching TV 52 Using Wide Mode 53 Using Wide Mode with Standard Definition (480i/480p) Sources......53 Using Wide Mode with High-Definition (720p/1080i...Function 59 Using the Menus Overview ...61 Navigating Through Menus 61 Using the Video Menu 62 Using the Audio Menu 64 Using the Screen Menu 66 Using the Channel Menu 67 Using the Parent Menu 69 Using the Setup Menu 72 Other Information Overview ...75 Glossary ...76 Contacting...
... Operating a Satellite Receiver 48 Operating a Cable Box 49 Operating a DVD Player 49 Using the F1 and F2 Buttons 49 Using the Features Overview ...51 Watching TV 52 Using Wide Mode 53 Using Wide Mode with Standard Definition (480i/480p) Sources......53 Using Wide Mode with High-Definition (720p/1080i...Function 59 Using the Menus Overview ...61 Navigating Through Menus 61 Using the Video Menu 62 Using the Audio Menu 64 Using the Screen Menu 66 Using the Channel Menu 67 Using the Parent Menu 69 Using the Setup Menu 72 Other Information Overview ...75 Glossary ...76 Contacting...
Operating Instructions
Page 8
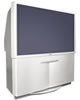
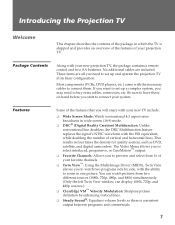
... aspect ratio broadcasts in wide screen (16:9) mode. ❑ DRC® (Digital Reality Creation) Multifunction: Unlike conventional line doublers, the DRC Multifunction feature replaces the signal's NTSC waveform with the ability to watch pictures from 16 of your new projection TV, the package contains ..., such as DVD, satellite, and digital camcorders. Package Contents Along with the necessary cables to connect your projection TV. Introducing the Projection TV Welcome This chapter describes the contents of the package in which the TV is consistent output between programs and ...
... aspect ratio broadcasts in wide screen (16:9) mode. ❑ DRC® (Digital Reality Creation) Multifunction: Unlike conventional line doublers, the DRC Multifunction feature replaces the signal's NTSC waveform with the ability to watch pictures from 16 of your new projection TV, the package contains ..., such as DVD, satellite, and digital camcorders. Package Contents Along with the necessary cables to connect your projection TV. Introducing the Projection TV Welcome This chapter describes the contents of the package in which the TV is consistent output between programs and ...

Operating Instructions
Page 9
... (HD1080i, 720p) connections. ❑ HD Detailer™: Wideband video amplifier has a high bandwidth frequency rating, which allows it to send more video information to the screen, resulting in finer picture quality, especially for HD sources. ❑ CineMotion™: Reverse 3-2 pulldown processing provides optimal picture quality for film-based sources (media originally...
... (HD1080i, 720p) connections. ❑ HD Detailer™: Wideband video amplifier has a high bandwidth frequency rating, which allows it to send more video information to the screen, resulting in finer picture quality, especially for HD sources. ❑ CineMotion™: Reverse 3-2 pulldown processing provides optimal picture quality for film-based sources (media originally...
Operating Instructions
Page 40
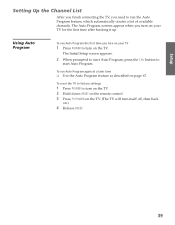
To run Auto Program the first time you turn on page 67. The Initial Setup screen appears. 2 When prompted to start Auto Program, press the CH+ button to run the Auto Program feature, which automatically creates a list of available channels. Using ... reset the TV to factory settings 1 Press POWER to turn itself off, then back on the TV. SETUP SETUP SETUP SETUP 39 The Auto Program screens appear when you turn on your TV 1 Press POWER to turn on the TV. 2 Hold down RESET on the remote control. 3 Press TV POWER on...
To run Auto Program the first time you turn on page 67. The Initial Setup screen appears. 2 When prompted to start Auto Program, press the CH+ button to run the Auto Program feature, which automatically creates a list of available channels. Using ... reset the TV to factory settings 1 Press POWER to turn itself off, then back on the TV. SETUP SETUP SETUP SETUP 39 The Auto Program screens appear when you turn on your TV 1 Press POWER to turn on the TV. 2 Hold down RESET on the remote control. 3 Press TV POWER on...
Operating Instructions
Page 41
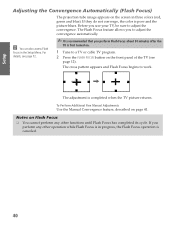
... about 30 minutes after the TV is in three colors (red, green and blue). SETUP Setup Adjusting the Convergence Automatically (Flash Focus) The projection tube image appears on the screen in progress, the Flash Focus operation is canceled. z You can also access Flash Focus in the Setup Menu. To Perform Additional Fine...
... about 30 minutes after the TV is in three colors (red, green and blue). SETUP Setup Adjusting the Convergence Automatically (Flash Focus) The projection tube image appears on the screen in progress, the Flash Focus operation is canceled. z You can also access Flash Focus in the Setup Menu. To Perform Additional Fine...
Operating Instructions
Page 42
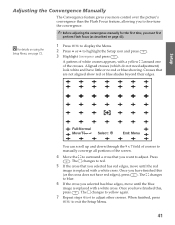
... changes to red. 5 If the cross that you selected has blue edges, move until the blue image is replaced with a yellow around one of the screen. 4 Move the to surround a cross that are not aligned show red or blue shades beyond their edges. The changes to blue. 6 If the cross you...
... changes to red. 5 If the cross that you selected has blue edges, move until the blue image is replaced with a yellow around one of the screen. 4 Move the to surround a cross that are not aligned show red or blue shades beyond their edges. The changes to blue. 6 If the cross you...
Operating Instructions
Page 43
in Twin View (see page 54); SETUP SETUP SETUP SETUP 42 Begin with the crosses in the each of the screen and, once those are adjusted, move to the crosses on the remote control. In each of these viewing modes, the cross pattern looks different, but ... and lower the Picture level settings (see page 62). ❑ You can reset the adjustments by pressing the RESET button on the edges of the screen. ❑ You can make separate adjustments in the center area of the following viewing modes: ❑ For standard-definition (480i/480p) sources: Wide Zoom, Normal...
in Twin View (see page 54); SETUP SETUP SETUP SETUP 42 Begin with the crosses in the each of the screen and, once those are adjusted, move to the crosses on the remote control. In each of these viewing modes, the cross pattern looks different, but ... and lower the Picture level settings (see page 62). ❑ You can reset the adjustments by pressing the RESET button on the edges of the screen. ❑ You can make separate adjustments in the center area of the following viewing modes: ❑ For standard-definition (480i/480p) sources: Wide Zoom, Normal...

Operating Instructions
Page 45
... the available video picture modes: Vivid, Standard, Movie, Pro. m Rewind N Play M Fast forward x Stop X Pause z Record (press together with Sony DVD Dream™ Systems SETUP SETUP SETUP 44 Press to turn on and off the DVD player or VCR. SETUP SETUP Remote Control Button Descriptions... turn on and off Twin View. buttons also function with N) Press to freeze the window picture. Also available in the Screen Menu. For details, see "Selecting Video Options" on -screen cursor. Press ENT (ENTER) to select a channel; For details, see page 59. qd FREEZE qf VOL +/- q; ...
... the available video picture modes: Vivid, Standard, Movie, Pro. m Rewind N Play M Fast forward x Stop X Pause z Record (press together with Sony DVD Dream™ Systems SETUP SETUP SETUP 44 Press to turn on and off the DVD player or VCR. SETUP SETUP Remote Control Button Descriptions... turn on and off Twin View. buttons also function with N) Press to freeze the window picture. Also available in the Screen Menu. For details, see "Selecting Video Options" on -screen cursor. Press ENT (ENTER) to select a channel; For details, see page 59. qd FREEZE qf VOL +/- q; ...

Operating Instructions
Page 54
... Description Wide Zoom enlarges the center portion of the picture are shown to fill the 16:9 screen. Full m WIDE Zoom enlarges the 4:3 picture proportionately to the 4:3 Default setting in the Screen Menu. The left and right edges of the picture proportionately. Bars are stretched to toggle through..., see page 66. To retain the current Wide Mode setting as channels and inputs are changed, set 4:3 Default to fill the 16:9 screen. SETUP SETUP SETUP Using Wide Mode z You can also access the Wide Mode settings in its original size. The Wide Mode feature lets ...
... Description Wide Zoom enlarges the center portion of the picture are shown to fill the 16:9 screen. Full m WIDE Zoom enlarges the 4:3 picture proportionately to the 4:3 Default setting in the Screen Menu. The left and right edges of the picture proportionately. Bars are stretched to toggle through..., see page 66. To retain the current Wide Mode setting as channels and inputs are changed, set 4:3 Default to fill the 16:9 screen. SETUP SETUP SETUP Using Wide Mode z You can also access the Wide Mode settings in its original size. The Wide Mode feature lets ...

Operating Instructions
Page 55
... and right edges of the picture proportionately. Zoom When you change channels or inputs, the Wide Mode settings revert to fill the 16:9 screen. SETUP SETUP Using Wide Mode with High-Definition (720p/1080i) Sources Example WIDE Description Full displays the picture at its original size. If... source is useful for watching Letterbox movies. Wide Zoom m WIDE Zoom enlarges the 4:3 picture proportionately to the 4:3 Default setting in the Screen Menu (only if the input source is a 4:3 standard-definition signal that has been upconverted, bars are stretched to fill the 16...
... and right edges of the picture proportionately. Zoom When you change channels or inputs, the Wide Mode settings revert to fill the 16:9 screen. SETUP SETUP Using Wide Mode with High-Definition (720p/1080i) Sources Example WIDE Description Full displays the picture at its original size. If... source is useful for watching Letterbox movies. Wide Zoom m WIDE Zoom enlarges the 4:3 picture proportionately to the 4:3 Default setting in the Screen Menu (only if the input source is a 4:3 standard-definition signal that has been upconverted, bars are stretched to fill the 16...
Operating Instructions
Page 56
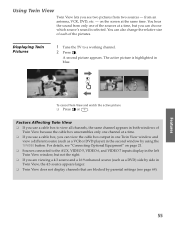
... in the left Twin View window, but you use a cable box, you can choose which source's sound is selected. Features SETUP SETUP 55 on the screen at a time, but not the right. ❑ If you see "Connecting Optional Equipment" on page 21. ❑ Sources connected to a working channel. 2 Press . You hear...
... in the left Twin View window, but you use a cable box, you can choose which source's sound is selected. Features SETUP SETUP 55 on the screen at a time, but not the right. ❑ If you see "Connecting Optional Equipment" on page 21. ❑ Sources connected to a working channel. 2 Press . You hear...

Operating Instructions
Page 59
... highlight a channel you want to 16 favorite channels that channel as shown at right, use the Channel Label feature in the upper right of the screen. Creating a List of Favorite Channels MENU z For details on using the Channel Menu, see page 68). 1 Press FAVORITES. SETUP SETUP SETUP Using Favorite Channels The...
... highlight a channel you want to 16 favorite channels that channel as shown at right, use the Channel Label feature in the upper right of the screen. Creating a List of Favorite Channels MENU z For details on using the Channel Menu, see page 68). 1 Press FAVORITES. SETUP SETUP SETUP Using Favorite Channels The...

Operating Instructions
Page 62
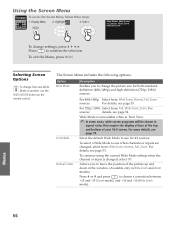
...settings Select (confirm) changed setting Exit the Menu Press MENU B b V v V v B b or B MENU 61 Allows you to make changes to the screen's vertical center. Provides options for setting up a Favorite Channels list, run the 67 Auto Program function, skip and label channels, and more. Navigating Through Menus... z Menus include navigation help text that appears at the bottom of the on-screen menus, and more . The Menu gives you access to the following features: Menu Icon Description Page Allows you to make Wide Mode ...
...settings Select (confirm) changed setting Exit the Menu Press MENU B b V v V v B b or B MENU 61 Allows you to make changes to the screen's vertical center. Provides options for setting up a Favorite Channels list, run the 67 Auto Program function, skip and label channels, and more. Navigating Through Menus... z Menus include navigation help text that appears at the bottom of the on-screen menus, and more . The Menu gives you access to the following features: Menu Icon Description Page Allows you to make Wide Mode ...
Operating Instructions
Page 67
... changed , select from: Wide Zoom, Normal, Full, Zoom. To select a Wide Mode to move the position of your 16:9 screen. The Screen Menu includes the following options: Option Wide Mode Description Enables you to use the WIDE MODE button on the remote control. To continue ...standarddefinition (480i/480p) and high-definition (720p/1080i) sources. 4:3 Default Vertical Center For 480i/480p Select from : Full, Wide Zoom, Zoom. Selecting Screen Options To change from one Wide Mode to change settings, press V v B b. Allows you to another, use when channels or inputs are changed ,...
... changed , select from: Wide Zoom, Normal, Full, Zoom. To select a Wide Mode to move the position of your 16:9 screen. The Screen Menu includes the following options: Option Wide Mode Description Enables you to use the WIDE MODE button on the remote control. To continue ...standarddefinition (480i/480p) and high-definition (720p/1080i) sources. 4:3 Default Vertical Center For 480i/480p Select from : Full, Wide Zoom, Zoom. Selecting Screen Options To change from one Wide Mode to change settings, press V v B b. Allows you to another, use when channels or inputs are changed ,...
Operating Instructions
Page 73
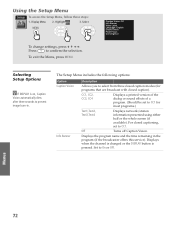
... that are broadcast with closed caption modes (for most programs.) Text1,Text2, Text3,Text4 Displays network/station information presented using either half or the whole screen (if available). Off Turns off Caption Vision. Menus SETUP Menus SETUP 72 Select MENU To change settings, press V v B b. CC1, CC2, CC3, CC4 Displays a printed version...
... that are broadcast with closed caption modes (for most programs.) Text1,Text2, Text3,Text4 Displays network/station information presented using either half or the whole screen (if available). Off Turns off Caption Vision. Menus SETUP Menus SETUP 72 Select MENU To change settings, press V v B b. CC1, CC2, CC3, CC4 Displays a printed version...
Operating Instructions
Page 74
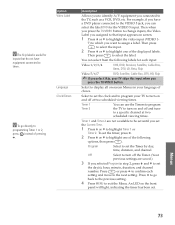
.... Timer 1 Timer 2 You can select from the following options, then press . SETUP SETUP Menus z The Skip label is useful for inputs that input appears on screen. 1 Press V or v to highlight the video input (VIDEO 1- 7) to which you connected to the TV, such as a VCR, DVD, etc. z To ... select the input. 2 Press V or v to programming Timer 1 or 2, press instead of choice. Select to set . Program Select to display all on-screen Menus in step 2, press V and v to set the clock and to program your language of pressing b. Press B to go directly to highlight one of the...
.... Timer 1 Timer 2 You can select from the following options, then press . SETUP SETUP Menus z The Skip label is useful for inputs that input appears on screen. 1 Press V or v to highlight the video input (VIDEO 1- 7) to which you connected to the TV, such as a VCR, DVD, etc. z To ... select the input. 2 Press V or v to programming Timer 1 or 2, press instead of choice. Select to set . Program Select to display all on-screen Menus in step 2, press V and v to set the clock and to program your language of pressing b. Press B to go directly to highlight one of the...


