
Operating Instructions
Page 3
...LCD Monitor Settings Picture Settings...16 Sound Settings ...18 Screen Settings ...19 HDMI Settings...20 Monitor Settings ...20 PC Settings ...21 Optional Accessories Using with the Wall-Mount Bracket/Speaker System 22 Using with the Floor Stand/Speaker System 24 Other Information US Troubleshooting ...26 Specifications ...28 Customer Support http://www.sony....com/tvsupport On-line Registration United States http://productregistration.sony.com Canada http://www.sonystyle.ca/registration 3 US ...
...LCD Monitor Settings Picture Settings...16 Sound Settings ...18 Screen Settings ...19 HDMI Settings...20 Monitor Settings ...20 PC Settings ...21 Optional Accessories Using with the Wall-Mount Bracket/Speaker System 22 Using with the Floor Stand/Speaker System 24 Other Information US Troubleshooting ...26 Specifications ...28 Customer Support http://www.sony....com/tvsupport On-line Registration United States http://productregistration.sony.com Canada http://www.sonystyle.ca/registration 3 US ...

Operating Instructions
Page 10
...audio. Stand cover Hooks Hooks Stand cover Center post Terminal cover Notch 10 US HDMI (High-Definition Multimedia Interface) provides an uncompressed, all video input signals in the back of the Table-Top Stand. 2 Hang the stand cover over the top of the Table-Top Stand's center post, ... HDMI cable (supplied) to the HDMI IN jack on the rear of 1,920 dots × 1,080 lines. Locating Inputs ~ • This unit displays all -digital audio/video interface between this LCD Monitor and any HDMI-equipped A/V equipment. Item 1 AC IN 2 HDMI IN Description Connects to AC IN and the...
...audio. Stand cover Hooks Hooks Stand cover Center post Terminal cover Notch 10 US HDMI (High-Definition Multimedia Interface) provides an uncompressed, all video input signals in the back of the Table-Top Stand. 2 Hang the stand cover over the top of the Table-Top Stand's center post, ... HDMI cable (supplied) to the HDMI IN jack on the rear of 1,920 dots × 1,080 lines. Locating Inputs ~ • This unit displays all -digital audio/video interface between this LCD Monitor and any HDMI-equipped A/V equipment. Item 1 AC IN 2 HDMI IN Description Connects to AC IN and the...

Operating Instructions
Page 11
... our website. This affects Picture settings and Wide Mode settings. To view PC content set the output signal from the PC according to the HDMI input will be treated as a video timing and not PC timing. 3. if you want to attach the receiver unit on the television. * The 1080p timing...Digital cable box receiver unit ~ • You can enjoy high-definition programming by subscribing to Full Pixel. 11 US http://www.sonystyle.com/dmxwl1 PC Input Signal Reference Chart After connecting the PC to the unit, set Picture Mode to Custom, Wide Mode to Full, and Display Area to a high-...
... our website. This affects Picture settings and Wide Mode settings. To view PC content set the output signal from the PC according to the HDMI input will be treated as a video timing and not PC timing. 3. if you want to attach the receiver unit on the television. * The 1080p timing...Digital cable box receiver unit ~ • You can enjoy high-definition programming by subscribing to Full Pixel. 11 US http://www.sonystyle.com/dmxwl1 PC Input Signal Reference Chart After connecting the PC to the unit, set Picture Mode to Custom, Wide Mode to Full, and Display Area to a high-...

Operating Instructions
Page 12
... page 20 for the unit to the next screen. B button: Allows you accidentally turn off the LCD monitor. • The LCD monitor will automatically turn on and select the respective HDMI input through the language set -up will turn off the unit during the language set-up process, the language... set-up screen appears when you connect the supported Sony equipment with Control for HDMI Use an ...
... page 20 for the unit to the next screen. B button: Allows you accidentally turn off the LCD monitor. • The LCD monitor will automatically turn on and select the respective HDMI input through the language set -up will turn off the unit during the language set-up process, the language... set-up screen appears when you connect the supported Sony equipment with Control for HDMI Use an ...

Operating Instructions
Page 14
Press to select/confirm an item. Press OK to display the current input information of selected external equipment. Press to adjust the volume. 8 MUTING Press to move focus/highlight. Press V/v/B/b to mute the sound. Press to the unit. ... such as the Picture, Sound, Screen, HDMI Settings, Monitor Settings and PC Settings. Press to display the MENU to turn on current input and content. Select the HDMI equipment you want to input and then press OK. 6 TV Lights up in red during the operations. 7 VOL +/- Select the HDMI equipment you want to...
Press to select/confirm an item. Press OK to display the current input information of selected external equipment. Press to adjust the volume. 8 MUTING Press to move focus/highlight. Press V/v/B/b to mute the sound. Press to the unit. ... such as the Picture, Sound, Screen, HDMI Settings, Monitor Settings and PC Settings. Press to display the MENU to turn on current input and content. Select the HDMI equipment you want to input and then press OK. 6 TV Lights up in red during the operations. 7 VOL +/- Select the HDMI equipment you want to...

Operating Instructions
Page 17
...settings to improve film content and de-interlacing performance. Advanced C.E. Using LCD Monitor Settings White Balance Adjusts the color temperature in detail. ~ •... video (moving images. Black Corrector Enhances black areas of picture movement and to the HDMI input. Clear White Emphasizes white and light colors. Select for standard use . Use this setting .... Picture movement will automatically set the picture settings for video or still image content when Sony optional equipment that supports Video-A mode is set the picture settings for stronger contrast. MPEG...
...settings to improve film content and de-interlacing performance. Advanced C.E. Using LCD Monitor Settings White Balance Adjusts the color temperature in detail. ~ •... video (moving images. Black Corrector Enhances black areas of picture movement and to the HDMI input. Clear White Emphasizes white and light colors. Select for standard use . Use this setting .... Picture movement will automatically set the picture settings for video or still image content when Sony optional equipment that supports Video-A mode is set the picture settings for stronger contrast. MPEG...

Operating Instructions
Page 18
...dialog. Clear Voice Suitable for home use. Treble Increases or decreases higher-pitched sounds. For example, if the voice of the current input relative to stabilize the volume across all programs and commercials. Balance Emphasizes left or right speaker balance. Off Select for the amount ... announcer is set to the default values. Conversely, if you are watching a sports program, you desire. Steady Sound Select On to other inputs. ~ • Sound can turn up this setting to disable this setting to soften the voice of depth and width, by pressing TOOLS ...
...dialog. Clear Voice Suitable for home use. Treble Increases or decreases higher-pitched sounds. For example, if the voice of the current input relative to stabilize the volume across all programs and commercials. Balance Emphasizes left or right speaker balance. Off Select for the amount ... announcer is set to the default values. Conversely, if you are watching a sports program, you desire. Steady Sound Select On to other inputs. ~ • Sound can turn up this setting to disable this setting to soften the voice of depth and width, by pressing TOOLS ...

Operating Instructions
Page 19
... Choose a Wide Mode from the Wide Mode option. 4:3 Default Select the default screen mode to use for 4:3 sources. When you change inputs, Wide Mode is 16:9 (High-definition source), select this mode to you to fill the screen when the original source is 4:3. Zoom Select... picture in its original aspect ratio when the original source is 4:3. To retain the current Wide Mode setting as possible. Using LCD Monitor Settings Screen Settings Wide Mode Wide Zoom Fills the screen with minimum distortion. When the original source is automatically replaced with ...
... Choose a Wide Mode from the Wide Mode option. 4:3 Default Select the default screen mode to use for 4:3 sources. When you change inputs, Wide Mode is 16:9 (High-definition source), select this mode to you to fill the screen when the original source is 4:3. Zoom Select... picture in its original aspect ratio when the original source is 4:3. To retain the current Wide Mode setting as possible. Using LCD Monitor Settings Screen Settings Wide Mode Wide Zoom Fills the screen with minimum distortion. When the original source is automatically replaced with ...

Operating Instructions
Page 20
...range of the backlight control is reduced when the Light Sensor is On. Displays your LCD monitor remote control. • Some equipment with Control for HDMI. HDMI Settings HDMI inputs of this LCD monitor will not disable this function. Select Off to On. Restores all the on...Reduces the power consumption by adjusting the backlight brightness. or MUTING buttons will recognize and communicate with other Sony equipment equipped with Control for HDMI function connected to the LCD monitor. ~ • Press TOOLS while the equipment supporting Control for HDMI is set to disable this...
...range of the backlight control is reduced when the Light Sensor is On. Displays your LCD monitor remote control. • Some equipment with Control for HDMI. HDMI Settings HDMI inputs of this LCD monitor will not disable this function. Select Off to On. Restores all the on...Reduces the power consumption by adjusting the backlight brightness. or MUTING buttons will recognize and communicate with other Sony equipment equipped with Control for HDMI function connected to the LCD monitor. ~ • Press TOOLS while the equipment supporting Control for HDMI is set to disable this...

Operating Instructions
Page 26
... cold to Off in the Screen settings (see page 19). • Check the Auto Wide option in the Picture settings (see page 12). PC Input No picture / No signal • Confirm the PC is correctly connected to other than 16:9 (this is set to the unit with BRAVIA Sync ...came with your DVD (or contact your Sony LCD monitor, please visit our website or call one of the following numbers: http://www.sony.com/tvsupport for US Support http://www.sony.ca/support for Canadian Support 1-800-222-SONY(7669) for US Support 1-877-899-SONY(7669) for Canadian Support Condition Explanation/...
... cold to Off in the Screen settings (see page 19). • Check the Auto Wide option in the Picture settings (see page 12). PC Input No picture / No signal • Confirm the PC is correctly connected to other than 16:9 (this is set to the unit with BRAVIA Sync ...came with your DVD (or contact your Sony LCD monitor, please visit our website or call one of the following numbers: http://www.sony.com/tvsupport for US Support http://www.sony.ca/support for Canadian Support 1-800-222-SONY(7669) for US Support 1-877-899-SONY(7669) for Canadian Support Condition Explanation/...
Operating Instructions
Page 28
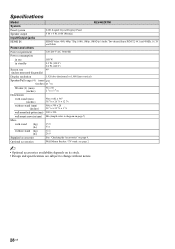
Wall-Mount Bracket / TV stand: see page 2 ~ • Optional accessories ...diagram on page 7) 15.0 33.1 12.2 26.9 See "Checking the Accessories" on page 4. Specifications Model System KLV-40ZX1M Panel system Speaker output Input/Output jacks LCD (Liquid Crystal Display) Panel 5 W + 5 W, 10 W (Woofer) HDMI IN HDMI: Video: 480i, 480p...-240 V AC, 50/60 Hz Power consumption in use 188 W in standby 0.3 W (120 V) 0.4 W (240 V) Screen size 40 (inches measured diagonally) Display resolution 1,920 dots (horizontal) × 1,080 lines (vertical) Speaker/Full range (4) (mm) ø30...
Wall-Mount Bracket / TV stand: see page 2 ~ • Optional accessories ...diagram on page 7) 15.0 33.1 12.2 26.9 See "Checking the Accessories" on page 4. Specifications Model System KLV-40ZX1M Panel system Speaker output Input/Output jacks LCD (Liquid Crystal Display) Panel 5 W + 5 W, 10 W (Woofer) HDMI IN HDMI: Video: 480i, 480p...-240 V AC, 50/60 Hz Power consumption in use 188 W in standby 0.3 W (120 V) 0.4 W (240 V) Screen size 40 (inches measured diagonally) Display resolution 1,920 dots (horizontal) × 1,080 lines (vertical) Speaker/Full range (4) (mm) ø30...


