Operating Instructions
Page 3
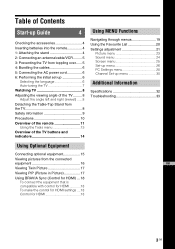
... Stand from the TV 8 Safety information 9 Precautions 10 Overview of the remote 11 Using the Tools menu 13 Overview of the TV buttons and indicators 14 15 Using Optional Equipment 19 Using MENU Functions Navigating through menus 19 Using the Favourite List 20 Settings adjustment 21 Picture menu 23 Sound menu 24 Screen menu 25 Set-up menu 26 PC Settings menu 28 Channel Set-up menu 30 32 Additional Information Specifications 32 Troubleshooting 33 Connecting optional equipment 15 Viewing pictures from the connected...
... Stand from the TV 8 Safety information 9 Precautions 10 Overview of the remote 11 Using the Tools menu 13 Overview of the TV buttons and indicators 14 15 Using Optional Equipment 19 Using MENU Functions Navigating through menus 19 Using the Favourite List 20 Settings adjustment 21 Picture menu 23 Sound menu 24 Screen menu 25 Set-up menu 26 PC Settings menu 28 Channel Set-up menu 30 32 Additional Information Specifications 32 Troubleshooting 33 Connecting optional equipment 15 Viewing pictures from the connected...
Operating Instructions
Page 4
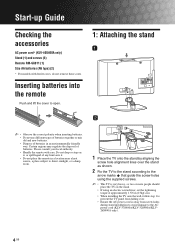
... remove these cores. Start-up Guide Checking the accessories AC power cord* (KLV-40S400A only) Stand (1) and screws (3) Remote RM-GA011 (1) Size AA batteries (R6 type) (2) * For models with care. Do not drop or step on it . • Do not place the remote in a location near a heat source, a place subject to direct sunlight, or a damp room. 1 Place the TV onto the stand by aligning the screw...
... remove these cores. Start-up Guide Checking the accessories AC power cord* (KLV-40S400A only) Stand (1) and screws (3) Remote RM-GA011 (1) Size AA batteries (R6 type) (2) * For models with care. Do not drop or step on it . • Do not place the remote in a location near a heat source, a place subject to direct sunlight, or a damp room. 1 Place the TV onto the stand by aligning the screw...
Operating Instructions
Page 8
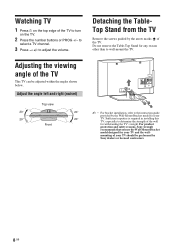
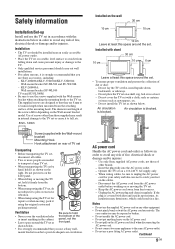
... screws guided by the Wall-Mount Bracket model for your TV and the wallmounting of the TV This TV can be performed by Sony dealers or licensed contractors. 8 GB Adjusting the viewing angle of your TV. Do not remove the Table-Top Stand for withstanding the TV's weight. Adjust the angle left and right (swivel) Top view 20 20 20 20 Front ~ • For bracket installation, refer to select a TV channel. 3 Press 2 +/- to the instruction guide...
... screws guided by the Wall-Mount Bracket model for your TV and the wallmounting of the TV This TV can be performed by Sony dealers or licensed contractors. 8 GB Adjusting the viewing angle of your TV. Do not remove the Table-Top Stand for withstanding the TV's weight. Adjust the angle left and right (swivel) Top view 20 20 20 20 Front ~ • For bracket installation, refer to select a TV channel. 3 Press 2 +/- to the instruction guide...
Operating Instructions
Page 9
.... KLV-26S400A: Wall-mount bracket SU-WL100 TV stand SU-FL300M • Be sure to use the screws supplied with a cloth, such as curtains, or items such as newspapers, etc. - Operate the TV set on the AC power cord itself when disconnecting the AC power cord. • Do not connect too many appliances to the same AC power outlet. • Do not use a poor fitting AC power outlet. Continued 9 GB Installation •...
.... KLV-26S400A: Wall-mount bracket SU-WL100 TV stand SU-FL300M • Be sure to use the screws supplied with a cloth, such as curtains, or items such as newspapers, etc. - Operate the TV set on the AC power cord itself when disconnecting the AC power cord. • Do not connect too many appliances to the same AC power outlet. • Do not use a poor fitting AC power outlet. Continued 9 GB Installation •...
Operating Instructions
Page 10
... TV set from AC power outlet and antenna during long period of light (red, blue, or green) may break by qualified service personnel. When: - Any liquid or solid object falls through openings in damage to the screen surface and cabinet material. • When adjusting the angle of children, so that they are displayed continuously. The image may be uneven or the LCD screen...
... TV set from AC power outlet and antenna during long period of light (red, blue, or green) may break by qualified service personnel. When: - Any liquid or solid object falls through openings in damage to the screen surface and cabinet material. • When adjusting the angle of children, so that they are displayed continuously. The image may be uneven or the LCD screen...
Operating Instructions
Page 11
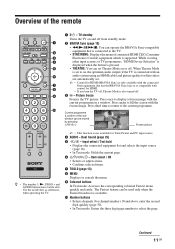
... optimum audio output (if the TV is connected with an audio system using an HDMI cable) and picture quality for film videos are automatically set Theatre Mode on and off . Item select / OK • Selects or adjusts items. • Confirms selected items. 7 TOOLS (page 13) 8 MENU Displays or cancels the menu. 9 Coloured buttons In Text mode: Accesses the corresponding coloured Fastext menu quickly and easily. Continued 11 GB When Theatre Mode is set to display a frozen image with control for HDMI...
... optimum audio output (if the TV is connected with an audio system using an HDMI cable) and picture quality for film videos are automatically set Theatre Mode on and off . Item select / OK • Selects or adjusts items. • Confirms selected items. 7 TOOLS (page 13) 8 MENU Displays or cancels the menu. 9 Coloured buttons In Text mode: Accesses the corresponding coloured Fastext menu quickly and easily. Continued 11 GB When Theatre Mode is set to display a frozen image with control for HDMI...

Operating Instructions
Page 12
... broadcast signal. For TV, Video, HD/DVD or HDMI (except PC input) Wide Zoom* Enlarges the centre portion of any displayed menu. Previous channel Returns to fill the 16:9 screen. Mute Press to the previous screen of the picture. Volume Adjusts volume. qj RETURN Returns to mute the sound. Twin Picture / PIP (page 17) Displays two pictures simultaneously. Info / Text reveal • Displays information. Press third time to select the desired wide mode...
... broadcast signal. For TV, Video, HD/DVD or HDMI (except PC input) Wide Zoom* Enlarges the centre portion of any displayed menu. Previous channel Returns to fill the 16:9 screen. Mute Press to the previous screen of the picture. Volume Adjusts volume. qj RETURN Returns to mute the sound. Twin Picture / PIP (page 17) Displays two pictures simultaneously. Info / Text reveal • Displays information. Press third time to select the desired wide mode...
Operating Instructions
Page 13
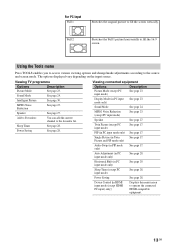
... 28. Using the Tools menu Press TOOLS enables you to access various viewing options and change/make adjustments according to the favourite list. The options displayed vary depending on the input source. Sleep Timer See page 28. mode only) Sound Mode See page 24. Power Saving See page 28. Intelligent Picture See page 30. Power Saving See page 28. Auto Adjustment (in HDMI input mode (except HDMI PC input) only] Displays the menu screen to operate the connected HDMI-compatible equipment...
... 28. Using the Tools menu Press TOOLS enables you to access various viewing options and change/make adjustments according to the favourite list. The options displayed vary depending on the input source. Sleep Timer See page 28. mode only) Sound Mode See page 24. Power Saving See page 28. Intelligent Picture See page 30. Power Saving See page 28. Auto Adjustment (in HDMI input mode (except HDMI PC input) only] Displays the menu screen to operate the connected HDMI-compatible equipment...
Operating Instructions
Page 16
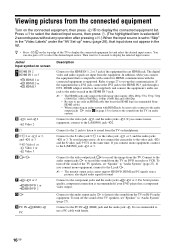
...). To turn off the sound of the TV speakers, set "Speaker" to the S video jack 1 or the video jack 1 or 3, and the audio jacks 1 or 3. For better picture quality, component connection is recommended to display the selected input source. Press F/f to select the desired input source, then press . (The highlighted item is selected if 2 seconds pass without any operation after pressing F/f.) When the input source is set -up " menu (page 26), that bears the HDMI logo (recommended Sony HDMI cable...
...). To turn off the sound of the TV speakers, set "Speaker" to the S video jack 1 or the video jack 1 or 3, and the audio jacks 1 or 3. For better picture quality, component connection is recommended to display the selected input source. Press F/f to select the desired input source, then press . (The highlighted item is selected if 2 seconds pass without any operation after pressing F/f.) When the input source is set -up " menu (page 26), that bears the HDMI logo (recommended Sony HDMI cable...
Operating Instructions
Page 18
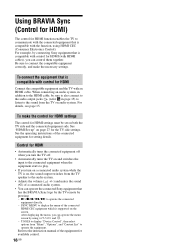
... display the menu of the connected HDMI CEC equipment which is supported on , the sound output switches from the TV speaker to the audio system. • Adjusts the volume (2 +/-) and mutes the sound (%) of a connected audio system. • You can operate the connected Sony equipment that has the BRAVIA Sync logo by the TV remote by pressing: - Using BRAVIA Sync (Control for HDMI) The control for HDMI function enables the TV to communicate with the connected equipment that is compatible with HDMI cables...
... display the menu of the connected HDMI CEC equipment which is supported on , the sound output switches from the TV speaker to the audio system. • Adjusts the volume (2 +/-) and mutes the sound (%) of a connected audio system. • You can operate the connected Sony equipment that has the BRAVIA Sync logo by the TV remote by pressing: - Using BRAVIA Sync (Control for HDMI) The control for HDMI function enables the TV to communicate with the connected equipment that is compatible with HDMI cables...
Operating Instructions
Page 22
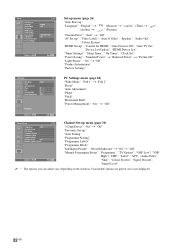
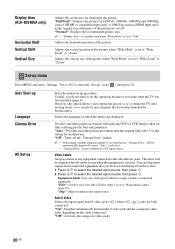
... displayed. 22 GB Set-up Auto Start-up Language Cinema Drive AV Set-up HDMI Set-up Timer Settings Power Saving Light Sensor Product Information Factory Settings TV English Off Standard Power Off Select: Set: Exit: MENU Set-up menu (page 26) "Auto Start-up" "Language": "English" t " (Arabic) t " " (Chinese) t " " (Persian) " (Thai) t " " "Cinema Drive": "Auto" t "Off" "AV Set-up": "Video Labels", "Auto S Video", "Speaker", "Audio Out", "Colour System" "HDMI Set-up": "Control for HDMI", "Auto Devices Off", "Auto TV On", "Device List Update", "HDMI Device List" "Timer Settings": "Sleep...
... displayed. 22 GB Set-up Auto Start-up Language Cinema Drive AV Set-up HDMI Set-up Timer Settings Power Saving Light Sensor Product Information Factory Settings TV English Off Standard Power Off Select: Set: Exit: MENU Set-up menu (page 26) "Auto Start-up" "Language": "English" t " (Arabic) t " " (Chinese) t " " (Persian) " (Thai) t " " "Cinema Drive": "Auto" t "Off" "AV Set-up": "Video Labels", "Auto S Video", "Speaker", "Audio Out", "Colour System" "HDMI Set-up": "Control for HDMI", "Auto Devices Off", "Auto TV On", "Device List Update", "HDMI Device List" "Timer Settings": "Sleep...
Operating Instructions
Page 23
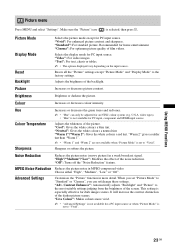
... input source or when "Picture Mode" is set /change these settings. U.S.A. video tapes). • "Hue" is especially effective for PC input source. Noise Reduction Reduces the picture noise (snowy picture) in MPEG-compressed video. "Adv. Selects the display mode for home entertainment. Adjusts the whiteness of film videos. When you can only be adjusted for PC input, component and HDMI input source. Make sure the "Picture" icon ( ) is set to the factory settings. Recommended for PC input...
... input source or when "Picture Mode" is set /change these settings. U.S.A. video tapes). • "Hue" is especially effective for PC input source. Noise Reduction Reduces the picture noise (snowy picture) in MPEG-compressed video. "Adv. Selects the display mode for home entertainment. Adjusts the whiteness of film videos. When you can only be adjusted for PC input, component and HDMI input source. Make sure the "Picture" icon ( ) is set to the factory settings. Recommended for PC input...
Operating Instructions
Page 26
... video. "Skip": Skips an unnecessary input source. Follow steps 2 to select the desired option below, then press . "Off": Turns off the "Cinema Drive" feature. ~ • If the image contains irregular signals or too much noise, "Cinema Drive" will be automatically turned off . Provides smoother picture movement when playing DVD or VCR images taken on the cable connection. "Off": Activates the composite video jacks. 26 GB Adjusts the vertical size...
... video. "Skip": Skips an unnecessary input source. Follow steps 2 to select the desired option below, then press . "Off": Turns off the "Cinema Drive" feature. ~ • If the image contains irregular signals or too much noise, "Cinema Drive" will be automatically turned off . Provides smoother picture movement when playing DVD or VCR images taken on the cable connection. "Off": Activates the composite video jacks. 26 GB Adjusts the vertical size...
Operating Instructions
Page 27
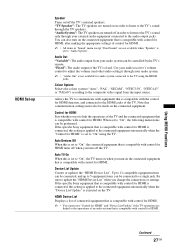
... audio output jacks. "Audio System": The TV speakers are turned on in order to listen to the TV's sound only through your audio system can be made on the TV. Use your audio receiver's volume control to "On", the following menu items can be controlled by the TV's remote. When set to adjust the volume (and other audio settings) through your external audio equipment connected to update the "HDMI Device List" when you turn off in order to listen to the TV's sound through the TV speakers. Auto...
... audio output jacks. "Audio System": The TV speakers are turned on in order to listen to the TV's sound only through your audio system can be made on the TV. Use your audio receiver's volume control to "On", the following menu items can be controlled by the TV's remote. When set to adjust the volume (and other audio settings) through your external audio equipment connected to update the "HDMI Device List" when you turn off in order to listen to the TV's sound through the TV speakers. Auto...
Operating Instructions
Page 28
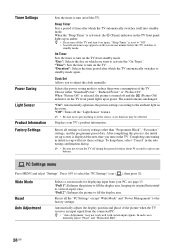
... the TV. Timer Settings Power Saving Light Sensor Product Information Factory Settings Sets the timer to reduce the power consumption of the TV. On Timer Sets the timer to standby mode. "Duration": Selects the time period after which you turn on the TV. Selects the power saving mode to turn on the TV from the connected PC. The sound remains unchanged. After completing this period (it on the TV front panel lights up will reset these settings. PC Settings menu Press MENU and select "Settings". z • "Auto Adjustment" may...
... the TV. Timer Settings Power Saving Light Sensor Product Information Factory Settings Sets the timer to reduce the power consumption of the TV. On Timer Sets the timer to standby mode. "Duration": Selects the time period after which you turn on the TV. Selects the power saving mode to turn on the TV from the connected PC. The sound remains unchanged. After completing this period (it on the TV front panel lights up will reset these settings. PC Settings menu Press MENU and select "Settings". z • "Auto Adjustment" may...

Operating Instructions
Page 30
... two digits using one preset number button (0 - 9) on the remote. ~ • When "1 Digit Direct" is changed from being watched. 1 Press F/f to select the channel you want to name, then press . 2 Press F/f to select the desired letter or number ("_" for new channels that have been launched by assigning the desired channel numbers. 1 Press F/f to select your favourite channel number, then press . 2 Press F/f to select your choice up menu Press MENU and select "Settings". To...
... two digits using one preset number button (0 - 9) on the remote. ~ • When "1 Digit Direct" is changed from being watched. 1 Press F/f to select the channel you want to name, then press . 2 Press F/f to select the desired letter or number ("_" for new channels that have been launched by assigning the desired channel numbers. 1 Press F/f to select your favourite channel number, then press . 2 Press F/f to select your choice up menu Press MENU and select "Settings". To...

Operating Instructions
Page 32
... ohms/HD: 1-5 Vp-p/VD: 1-5 Vp-p PC audio input (minijack) Audio output (phono jacks) i Headphones jack Power and others Power Requirements 110-240 V AC, 50/60 Hz Screen Size (inches) 40 37 32 26 Display Resolution Power Consumption 1,920 pixels (horizontal) × 1,080 lines (vertical) Indicated on the rear of the TV. 1,366 pixels (horizontal) × 768 lines (vertical) Dimensions (w × h × d)* with stand (mm) without stand (mm) 997 × 691 × 279...
... ohms/HD: 1-5 Vp-p/VD: 1-5 Vp-p PC audio input (minijack) Audio output (phono jacks) i Headphones jack Power and others Power Requirements 110-240 V AC, 50/60 Hz Screen Size (inches) 40 37 32 26 Display Resolution Power Consumption 1,920 pixels (horizontal) × 1,080 lines (vertical) Indicated on the rear of the TV. 1,366 pixels (horizontal) × 768 lines (vertical) Dimensions (w × h × d)* with stand (mm) without stand (mm) 997 × 691 × 279...
Operating Instructions
Page 33
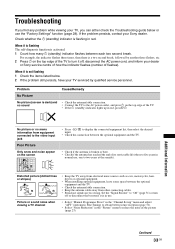
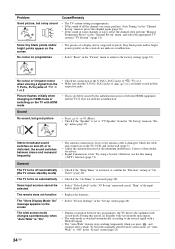
... in normal use the "Factory Settings" function (page 28). If the problem persists, contact your Sony dealer. Check whether the 1 (standby) indicator is not flashing 1 Check the items listed below or use , one to five years in the picture (page 23). no menu information from other connecting cables. • Broadcast signals are too strong. No picture or no sound • Connect the TV to the AC power outlet...
... in normal use the "Factory Settings" function (page 28). If the problem persists, contact your Sony dealer. Check whether the 1 (standby) indicator is not flashing 1 Check the items listed below or use , one to five years in the picture (page 23). no menu information from other connecting cables. • Broadcast signals are too strong. No picture or no sound • Connect the TV to the AC power outlet...
Operating Instructions
Page 34
... sound switches on the wall (page 5). • Adjust the antenna direction for advice. • Signal transmission is noisy, select the channel, then perform "Manual Programme Preset" in the "Set-up " menu, and select the appropriate TV system ("TV System") (page 31). Contact a Sony dealer for the minimum interference. Tiny black points and/or bright points (pixels) on the screen The wide screen mode changes spontaneously when "Auto Wide" is "On" • Select "Factory Settings" in the "Channel Set-up " menu...
... sound switches on the wall (page 5). • Adjust the antenna direction for advice. • Signal transmission is noisy, select the channel, then perform "Manual Programme Preset" in the "Set-up " menu, and select the appropriate TV system ("TV System") (page 31). Contact a Sony dealer for the minimum interference. Tiny black points and/or bright points (pixels) on the screen The wide screen mode changes spontaneously when "Auto Wide" is "On" • Select "Factory Settings" in the "Channel Set-up " menu...
Operating Instructions
Page 35
... instruction manual supplied with an electronic gun or rifle cannot be able to minimize the time gap between the audio and video output. This does not indicate a malfunction. • Check the antenna/cable connection. • Set the "Signal Booster" to "Auto" (page 31) or try using a booster. • Using the fine tuning ("AFT") function may not be used with your TV. Problem Text display is incomplete or garbled Cannot play...
... instruction manual supplied with an electronic gun or rifle cannot be able to minimize the time gap between the audio and video output. This does not indicate a malfunction. • Check the antenna/cable connection. • Set the "Signal Booster" to "Auto" (page 31) or try using a booster. • Using the fine tuning ("AFT") function may not be used with your TV. Problem Text display is incomplete or garbled Cannot play...


