Operating Instructions
Page 34
..., not the speakers. WARNING Owner's Record The model and serial numbers are located on a circuit different from that to which can be easily accessible. To reduce the risk of fire or electric shock, do not expose this equipment does cause 2 GB harmful interference to radio or television reception, which the receiver is encouraged to try to Part 15 of the...
..., not the speakers. WARNING Owner's Record The model and serial numbers are located on a circuit different from that to which can be easily accessible. To reduce the risk of fire or electric shock, do not expose this equipment does cause 2 GB harmful interference to radio or television reception, which the receiver is encouraged to try to Part 15 of the...
Operating Instructions
Page 35
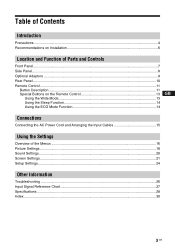
... 6 Location and Function of Parts and Controls Front Panel...7 Side Panel...8 Optional Adaptors ...9 Rear Panel ...10 Remote Control ...11 Button Description...11 Special Buttons on the Remote Control 13 GB Using the Wide Mode...13 Using the Sleep Function 14 Using the ECO Mode Function 14 Connections Connecting the AC Power Cord and Arranging the Input Cables 15 Using the Settings Overview of the Menus ...16 Picture Settings ...18 Sound Settings...20 Screen Settings...21 Setup Settings...24 Other Information Troubleshooting ...26 Input Signal Reference Chart 27 Specifications ...28...
... 6 Location and Function of Parts and Controls Front Panel...7 Side Panel...8 Optional Adaptors ...9 Rear Panel ...10 Remote Control ...11 Button Description...11 Special Buttons on the Remote Control 13 GB Using the Wide Mode...13 Using the Sleep Function 14 Using the ECO Mode Function 14 Connections Connecting the AC Power Cord and Arranging the Input Cables 15 Using the Settings Overview of the Menus ...16 Picture Settings ...18 Sound Settings...20 Screen Settings...21 Setup Settings...24 Other Information Troubleshooting ...26 Input Signal Reference Chart 27 Specifications ...28...
Operating Instructions
Page 36
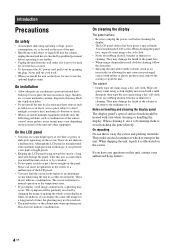
... during use the optional display stand. The screen will be treated with volatile solvents (such as the temperature rises. • If you have any questions on the rear of red, blue or green, or dark spots appearing on the screen. They may damage the finish of the remote control, noisy picture, noisy sound, may remove the coating or spoil the unit. On installation •...
... during use the optional display stand. The screen will be treated with volatile solvents (such as the temperature rises. • If you have any questions on the rear of red, blue or green, or dark spots appearing on the screen. They may damage the finish of the remote control, noisy picture, noisy sound, may remove the coating or spoil the unit. On installation •...
Operating Instructions
Page 39
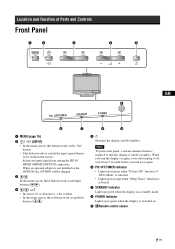
.../TIMER indicator • Lights up in green when "Picture Off" function of "ECO Mode" is selected. • Lights up in orange when "Sleep Timer" function is activated. 7 STANDBY indicator Lights up in red when the display is in standby mode. 8 POWER indicator Lights up /down buttons ( / ). 51 Switches the display on/off (standby). Location and Function of Parts and Controls Front Panel MENU GB PIC OFF/TIMER STANDBY POWER 1 MENU (page 16) 2 / (INPUT) • In the menu screen, this button works as up in green...
.../TIMER indicator • Lights up in green when "Picture Off" function of "ECO Mode" is selected. • Lights up in orange when "Sleep Timer" function is activated. 7 STANDBY indicator Lights up in red when the display is in standby mode. 8 POWER indicator Lights up /down buttons ( / ). 51 Switches the display on/off (standby). Location and Function of Parts and Controls Front Panel MENU GB PIC OFF/TIMER STANDBY POWER 1 MENU (page 16) 2 / (INPUT) • In the menu screen, this button works as up in green...
Operating Instructions
Page 40
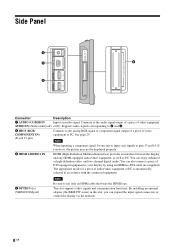
... video, and two-channel digital audio. Connects to the audio signal output of a piece of audio/video equipment or PC is automatically selected in this slot, you do so, the picture may not be sure not to input sync signals to use only an HDMI cable that bears the HDMI logo. Side Panel RGB/COMPONENT IN AUDIO IN COM MON AUDIO OPTION (VIDEO/COM) HD 15 1 IN 2 IN Connector Description 1 AUDIO (COMMON Inputs an audio signal...
... video, and two-channel digital audio. Connects to the audio signal output of a piece of audio/video equipment or PC is automatically selected in this slot, you do so, the picture may not be sure not to input sync signals to use only an HDMI cable that bears the HDMI logo. Side Panel RGB/COMPONENT IN AUDIO IN COM MON AUDIO OPTION (VIDEO/COM) HD 15 1 IN 2 IN Connector Description 1 AUDIO (COMMON Inputs an audio signal...
Operating Instructions
Page 41
... the standby mode, no signal is not connected to the component signal output or analog RGB signal output of a piece of video equipment or PC. For details on inputting a component signal to pins 13 and 14. Note When inputting a component signal, be sure not to input sync signals to the connector, see each instruction manual. 9 GB If you do so, the picture may not be installed with any of video equipment or PC. 3 AUDIO IN...
... the standby mode, no signal is not connected to the component signal output or analog RGB signal output of a piece of video equipment or PC. For details on inputting a component signal to pins 13 and 14. Note When inputting a component signal, be sure not to input sync signals to the connector, see each instruction manual. 9 GB If you do so, the picture may not be installed with any of video equipment or PC. 3 AUDIO IN...
Operating Instructions
Page 43
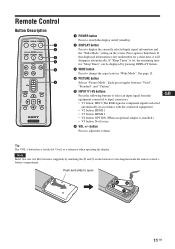
... size AA (R6) batteries (supplied) by pressing DISPLAY button. 3 WIDE button Press to input connectors. • V1 button: HD15 (The RGB signal or component signal is set, the remaining time for "Sleep Timer" can be displayed by matching the 3 and # on the batteries to the diagram inside the remote control's battery compartment. Remote Control Button Description MUTING DISPLAY POWER MODE SOUND PICTURE WIDE INPUT V1 V2 V3 V4 V5 VOL POWER SAVING MENU FREEZE SLEEP 1 POWER button Press to switch the display on/off (standby). 2 DISPLAY button...
... size AA (R6) batteries (supplied) by pressing DISPLAY button. 3 WIDE button Press to input connectors. • V1 button: HD15 (The RGB signal or component signal is set, the remaining time for "Sleep Timer" can be displayed by matching the 3 and # on the batteries to the diagram inside the remote control's battery compartment. Remote Control Button Description MUTING DISPLAY POWER MODE SOUND PICTURE WIDE INPUT V1 V2 V3 V4 V5 VOL POWER SAVING MENU FREEZE SLEEP 1 POWER button Press to switch the display on/off (standby). 2 DISPLAY button...

Operating Instructions
Page 44
... 120) that you want the display to save the power consumption by changing the backlight brightness. qd MUTING button Press to show menus. Each press toggles between "Dynamic", "Standard", "SRS WOW", and "Custom". Select from "Off", "Low", "High" or "Picture Off". MUTING DISPLAY POWER MODE SOUND PICTURE WIDE INPUT V1 V2 V3 V4 V5 VOL POWER SAVING MENU FREEZE SLEEP 7 MENU button Press to mute the...
... 120) that you want the display to save the power consumption by changing the backlight brightness. qd MUTING button Press to show menus. Each press toggles between "Dynamic", "Standard", "SRS WOW", and "Custom". Select from "Off", "Low", "High" or "Picture Off". MUTING DISPLAY POWER MODE SOUND PICTURE WIDE INPUT V1 V2 V3 V4 V5 VOL POWER SAVING MENU FREEZE SLEEP 7 MENU button Press to mute the...
Operating Instructions
Page 46
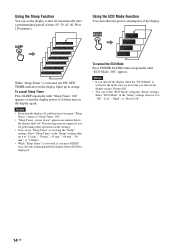
... will be displayed. Select "Sleep Timer" in orange. To cancel Sleep Timer Press SLEEP repeatedly until "Sleep Timer : Off" appears or turn the display power to off then turn it on the display lights up in the "Setup" settings, then set it to "Off", "Low", "High", or "Picture Off". 14 GB This message may not appear if you press SLEEP once, the time remaining until "ECO Mode : Off" appears. Using the Sleep Function...
... will be displayed. Select "Sleep Timer" in orange. To cancel Sleep Timer Press SLEEP repeatedly until "Sleep Timer : Off" appears or turn the display power to off then turn it on the display lights up in the "Setup" settings, then set it to "Off", "Low", "High", or "Picture Off". 14 GB This message may not appear if you press SLEEP once, the time remaining until "ECO Mode : Off" appears. Using the Sleep Function...

Operating Instructions
Page 50
... remote control instead. • You can alter the "Picture" settings ("Picture", "Brightness", "Color", etc.) for enhanced picture contrast and sharpness. Picture Adjust to store preferred settings. Brightness Adjust to reduce the noise level of connected equipment. Sharpness Adjusts the color tones of video signal is not NTSC. Noise Reduction Select to brighten or darken the picture. Select from one "Picture Mode" option to the default setting (except for standard picture settings. Picture Mode Reset Resets all settings and adjustments...
... remote control instead. • You can alter the "Picture" settings ("Picture", "Brightness", "Color", etc.) for enhanced picture contrast and sharpness. Picture Adjust to store preferred settings. Brightness Adjust to reduce the noise level of connected equipment. Sharpness Adjusts the color tones of video signal is not NTSC. Noise Reduction Select to brighten or darken the picture. Select from one "Picture Mode" option to the default setting (except for standard picture settings. Picture Mode Reset Resets all settings and adjustments...

Operating Instructions
Page 51
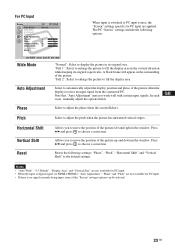
.... The PC "Picture" settings include the following options: : : : Picture Mode "Vivid": Select for standard picture settings. "Custom": Allows you to the default setting (except for PC input. • If there is switched to a PC input source, the "Picture" settings specific to give the white colors a red tint. Color Temp. Picture Mode Reset Resets all settings and adjustments currently selected in "Picture Mode" ("Vivid", "Standard", "Custom") to store preferred settings. For PC Input When input is no signal currently being input, none of...
.... The PC "Picture" settings include the following options: : : : Picture Mode "Vivid": Select for standard picture settings. "Custom": Allows you to the default setting (except for PC input. • If there is switched to a PC input source, the "Picture" settings specific to give the white colors a red tint. Color Temp. Picture Mode Reset Resets all settings and adjustments currently selected in "Picture Mode" ("Vivid", "Standard", "Custom") to store preferred settings. For PC Input When input is no signal currently being input, none of...
Operating Instructions
Page 52
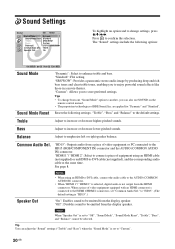
... "HD15". (The default setting is not output from the display speaker. "Off": Disables sound to be emitted from the HDMI connectors. are applied for "Dynamic" and "Standard". "Treble", "Bass" and "Balance" to the AUDIO (COMMON AUDIO IN) connector. • When "HDMI 1"/ "HDMI 2" is selected, digital audio is "HD15".) Speaker Out "On": Enables sound to be selected. Notes • When using an HDMI cable (not supplied) or an HDMI-to "Off", "Sound Mode", "Sound Mode Reset", "Treble...
... "HD15". (The default setting is not output from the display speaker. "Off": Disables sound to be emitted from the HDMI connectors. are applied for "Dynamic" and "Standard". "Treble", "Bass" and "Balance" to the AUDIO (COMMON AUDIO IN) connector. • When "HDMI 1"/ "HDMI 2" is selected, digital audio is "HD15".) Speaker Out "On": Enables sound to be selected. Notes • When using an HDMI cable (not supplied) or an HDMI-to "Off", "Sound Mode", "Sound Mode Reset", "Treble...

Operating Instructions
Page 53
... component or HDMI connectors. The "Screen" settings include the following options: : : Wide Mode Auto Wide : : "Wide Zoom": Select to enlarge to fill screen with black bands, using the entire viewable area of the screen. • For "Wide Zoom" and "Zoom" modes, you can adjust "Horizontal Shift", "Vertical Shift", and "Vertical Size" of the picture. See page 22. Screen Settings For Video Input To highlight an option and to change...
... component or HDMI connectors. The "Screen" settings include the following options: : : Wide Mode Auto Wide : : "Wide Zoom": Select to enlarge to fill screen with black bands, using the entire viewable area of the screen. • For "Wide Zoom" and "Zoom" modes, you can adjust "Horizontal Shift", "Vertical Shift", and "Vertical Size" of the picture. See page 22. Screen Settings For Video Input To highlight an option and to change...
Operating Instructions
Page 55
... to adjust the phase when the screen flickers. The PC "Screen" settings include the following settings; Resets the following options: : : Wide Mode : : "Normal": Select to display the picture in the vertical direction while keeping its original size. Notes • "Auto Wide", "4:3 Default", "Display Area" and "Vertical Size" are applied. For PC Input When input is switched to PC input source, the "Screen" settings specific for PC input. • If there is digital signal via HDMI 1/HDMI 2, "Auto Adjustment", "Phase...
... to adjust the phase when the screen flickers. The PC "Screen" settings include the following settings; Resets the following options: : : Wide Mode : : "Normal": Select to display the picture in the vertical direction while keeping its original size. Notes • "Auto Wide", "4:3 Default", "Display Area" and "Vertical Size" are applied. For PC Input When input is switched to PC input source, the "Screen" settings specific for PC input. • If there is digital signal via HDMI 1/HDMI 2, "Auto Adjustment", "Phase...
Operating Instructions
Page 56
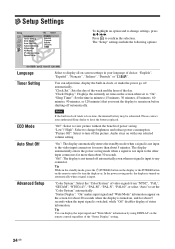
... on -screen settings in minutes (15 minutes, 30 minutes, 45 minutes, 60 minutes, 90 minutes, or 120 minutes) that you want the display to change settings, press V/v/B/b. The "Setup" settings include the following options: : : : Language Timer Setting ECO Mode Auto Shut Off Advanced Setup : Select to turn off automatically. Tip While in the standby mode, press the 1 (POWER) button on the display or the POWER button on the remote control to display all...
... on -screen settings in minutes (15 minutes, 30 minutes, 45 minutes, 60 minutes, 90 minutes, or 120 minutes) that you want the display to change settings, press V/v/B/b. The "Setup" settings include the following options: : : : Language Timer Setting ECO Mode Auto Shut Off Advanced Setup : Select to turn off automatically. Tip While in the standby mode, press the 1 (POWER) button on the display or the POWER button on the remote control to display all...

Operating Instructions
Page 57
Information All Reset IP Address Setup Speed Setup Displays the "Model Name", "Serial Number", "Operation Time", "Software Version" and "IP Address" of the four boxes and press . 4 Select the next item to be set manually with V/v and repeat the same procedure and press . 5 After values are not available if the optional adaptor with communication functions is not installed. Note The items included in the "Information...
Information All Reset IP Address Setup Speed Setup Displays the "Model Name", "Serial Number", "Operation Time", "Software Version" and "IP Address" of the four boxes and press . 4 Select the next item to be set manually with V/v and repeat the same procedure and press . 5 After values are not available if the optional adaptor with communication functions is not installed. Note The items included in the "Information...
Operating Instructions
Page 58
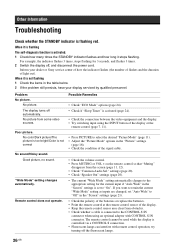
... the display. • Try switching input using an optional adaptor with remote control operation; If you want to retain the current "Wide Mode" setting as inputs are changed, set to select the desired "Picture Mode" (page 11). • Adjust the "Picture Mode" options in the table below. 2 If the problem still persists, have your dealer or Sony service center of how the indicator flashes (the number of flashes and the duration of the signal cable. •...
... the display. • Try switching input using an optional adaptor with remote control operation; If you want to retain the current "Wide Mode" setting as inputs are changed, set to select the desired "Picture Mode" (page 11). • Adjust the "Picture Mode" options in the table below. 2 If the problem still persists, have your dealer or Sony service center of how the indicator flashes (the number of flashes and the duration of the signal cable. •...
Operating Instructions
Page 60
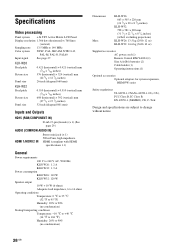
... AC power cord (1) Remote Control RM-YA004 (1) Size AA (R6) batteries (2) Cable holder (1) Operating instructions (1) Optional accessories Optional adaptors for system expansion, BKM-FW series Safety regulations UL 60950-1, CSA No. 60950-1-03 (c-UL), FCC Class B, IC Class B, EN 60950-1 (NEMKO), CE, C-Tick Design and specifications are subject to 140 MHz Color system NTSC, PAL, SECAM, NTSC4.43, PAL-M, PAL-N, PAL60 Input signal...
... AC power cord (1) Remote Control RM-YA004 (1) Size AA (R6) batteries (2) Cable holder (1) Operating instructions (1) Optional accessories Optional adaptors for system expansion, BKM-FW series Safety regulations UL 60950-1, CSA No. 60950-1-03 (c-UL), FCC Class B, IC Class B, EN 60950-1 (NEMKO), CE, C-Tick Design and specifications are subject to 140 MHz Color system NTSC, PAL, SECAM, NTSC4.43, PAL-M, PAL-N, PAL60 Input signal...
Operating Instructions
Page 62
... Pitch 23 POWER button 7, 11 POWER POWER indicator 7 SAVING button 12, 14 R RReemseot t2e2c,on2t3rol sensor 7 RGB/COMPONENT ACTIVE THROUGH Adaptor 9 S SSectrueepnSSetettitninggs s1177, ,2241 SSSlhLeaEerpEpnPTeibsmsuet1tro8n141,22,414 SOUND button 12 Sound Mode 20 Sound Sound MSeottdinegRse1se6t, 20 20 Speaker Out 20 Speed Setup 25 SRS WOW 20 SSttaannddaartdta1ch8m, 1en9t, hole 20 10 STANDBY indicator 7 Status Display 24 T Timer Setting 24 Treble 20 V Vertical Shift 22, 23 Vertical Size 22 VVVIiOvDLidEbO1u8tIt...
... Pitch 23 POWER button 7, 11 POWER POWER indicator 7 SAVING button 12, 14 R RReemseot t2e2c,on2t3rol sensor 7 RGB/COMPONENT ACTIVE THROUGH Adaptor 9 S SSectrueepnSSetettitninggs s1177, ,2241 SSSlhLeaEerpEpnPTeibsmsuet1tro8n141,22,414 SOUND button 12 Sound Mode 20 Sound Sound MSeottdinegRse1se6t, 20 20 Speaker Out 20 Speed Setup 25 SRS WOW 20 SSttaannddaartdta1ch8m, 1en9t, hole 20 10 STANDBY indicator 7 Status Display 24 T Timer Setting 24 Treble 20 V Vertical Shift 22, 23 Vertical Size 22 VVVIiOvDLidEbO1u8tIt...
Operating Instructions
Page 212
..., 14 POWER 指示灯 7 R Reset 22, 23 RGB 9 S SScerteuepn设设定定117,7,2241 SSSLlhEeaEerPppn键Teisms1e21r,81144, 24 Sound Mode 20 Sound Mode Reset 20 SOUND Sound 键设定1216, 20 Speaker Out 20 Speed Setup 25 SStRaSndWaOrWd2018, 19, 20 STANDBY 指示灯 7 Status Display 24 9 27 T Timer Setting 24 Treble 20 V Vertical Shift 22, 23 Vertical Vivid 18, Size 19...
..., 14 POWER 指示灯 7 R Reset 22, 23 RGB 9 S SScerteuepn设设定定117,7,2241 SSSLlhEeaEerPppn键Teisms1e21r,81144, 24 Sound Mode 20 Sound Mode Reset 20 SOUND Sound 键设定1216, 20 Speaker Out 20 Speed Setup 25 SStRaSndWaOrWd2018, 19, 20 STANDBY 指示灯 7 Status Display 24 9 27 T Timer Setting 24 Treble 20 V Vertical Shift 22, 23 Vertical Vivid 18, Size 19...

