Operating Instructions (Large File - 11.3 MB)
Page 1
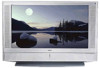
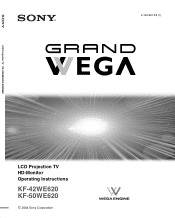
LCD Projection TV KF-42WE620/KF-50WE620 2-108-981-13 (1) LCD Projection TV HD-Monitor Operating Instructions KF-42WE620 KF-50WE620 2004 Sony Corporation
LCD Projection TV KF-42WE620/KF-50WE620 2-108-981-13 (1) LCD Projection TV HD-Monitor Operating Instructions KF-42WE620 KF-50WE620 2004 Sony Corporation
Operating Instructions (Large File - 11.3 MB)
Page 4
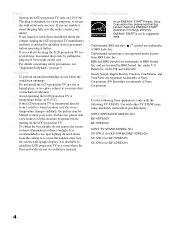
... the screen with the following Sony appliance(s) only with opaque drapery. TruSurround technology is recommended to direct illumination or direct sunlight. Patent No. 4,638,258 and 4,482,866. Use with other TV STAND may be using the LCD projection TV for energy efficiency. Steady Sound, Digital Reality Creation, CineMotion, and Twin View are unable to a warm location, or if the room temperature changes suddenly, the picture...
... the screen with the following Sony appliance(s) only with opaque drapery. TruSurround technology is recommended to direct illumination or direct sunlight. Patent No. 4,638,258 and 4,482,866. Use with other TV STAND may be using the LCD projection TV for energy efficiency. Steady Sound, Digital Reality Creation, CineMotion, and Twin View are unable to a warm location, or if the room temperature changes suddenly, the picture...
Operating Instructions (Large File - 11.3 MB)
Page 5
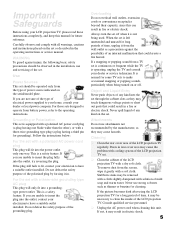
... be operated only from battery power, refer to clean the inside of the polarized plug by the manufacturer, as they may cause the problem with cooling system of the LCD projection TV set through the cabinet slots as thinner or benzine for cleaning. Important Safeguards Before using the LCD projection TV for a long period of time, it may be necessary to the operating instructions. Dusts in the operating instructions or service manual.
... be operated only from battery power, refer to clean the inside of the polarized plug by the manufacturer, as they may cause the problem with cooling system of the LCD projection TV set through the cabinet slots as thinner or benzine for cleaning. Important Safeguards Before using the LCD projection TV for a long period of time, it may be necessary to the operating instructions. Dusts in the operating instructions or service manual.
Operating Instructions (Large File - 11.3 MB)
Page 7
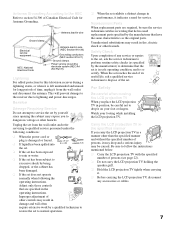
... the LCD projection TV, disconnect any service or repairs to follow the instructions mentioned below. ❑ Carry the LCD projection TV with the specified number of any accessories or cables. 7 Adjust only those controls that are required, be caused. Watch your foot or fingers. Antenna Grounding According to the NEC Refer to section 54-300 of the set does not operate normally when following the operating instructions. This...
... the LCD projection TV, disconnect any service or repairs to follow the instructions mentioned below. ❑ Carry the LCD projection TV with the specified number of any accessories or cables. 7 Adjust only those controls that are required, be caused. Watch your foot or fingers. Antenna Grounding According to the NEC Refer to section 54-300 of the set does not operate normally when following the operating instructions. This...
Operating Instructions (Large File - 11.3 MB)
Page 8
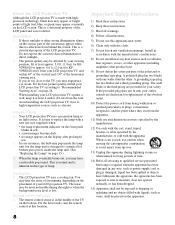
... too close to contain all of your viewing position. Important Safety Instructions 1) Read these instructions. 2) Keep these instructions. 3) Heed all warnings. 4) Follow all servicing to dripping or splashing and no image appears on page 24. ❑ When installing your LCD projection TV, and within 60° of the vertical and 130° of lamp. When a cart is used, use this location. This is a structural property of light (red, blue, or green...
... too close to contain all of your viewing position. Important Safety Instructions 1) Read these instructions. 2) Keep these instructions. 3) Heed all warnings. 4) Follow all servicing to dripping or splashing and no image appears on page 24. ❑ When installing your LCD projection TV, and within 60° of the vertical and 130° of lamp. When a cart is used, use this location. This is a structural property of light (red, blue, or green...
Operating Instructions (Large File - 11.3 MB)
Page 9
... CONTROL S Feature 46 Setting Up the LCD projection TV Automatically 47 Using Twin View 54 Using the Freeze Function 57 Using Wide Screen Mode 58 Using the Menus Overview 59 Using the Video Menu 60 Using the Audio Menu 63 Using the Screen Menu 65 Using the Channel Menu 67 Using the Parent Menu 69 Using the Setup Menu 73 Other Information Programming the Remote Control 77 Using Other Equipment with Your LCD Projection TV Remote Control 79 Contacting Sony 82 Troubleshooting 82 Flashing Indicators on the Front of the Monitor....87 Specifications...
... CONTROL S Feature 46 Setting Up the LCD projection TV Automatically 47 Using Twin View 54 Using the Freeze Function 57 Using Wide Screen Mode 58 Using the Menus Overview 59 Using the Video Menu 60 Using the Audio Menu 63 Using the Screen Menu 65 Using the Channel Menu 67 Using the Parent Menu 69 Using the Setup Menu 73 Other Information Programming the Remote Control 77 Using Other Equipment with Your LCD Projection TV Remote Control 79 Contacting Sony 82 Troubleshooting 82 Flashing Indicators on the Front of the Monitor....87 Specifications...
Operating Instructions (Large File - 11.3 MB)
Page 11
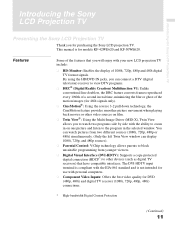
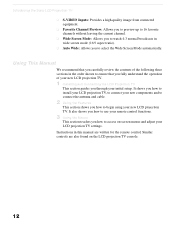
... LCD projection TV include: ❑ HD-Monitor: Enables the display of the motion images (for DVD (480p, 480i) and digital TV receiver (1080i, 720p, 480p, 480i) connections. * High-bandwidth Digital Content Protection (Continued) 11 By using the HD/DVD IN jacks, you to the program in real time, minimizing the blur or ghost of 1080i, 720p, 480p and 480i digital TV format signals. Features Some of a second in the selected window. The DVI-HDTV input...
... LCD projection TV include: ❑ HD-Monitor: Enables the display of the motion images (for DVD (480p, 480i) and digital TV receiver (1080i, 720p, 480p, 480i) connections. * High-bandwidth Digital Content Protection (Continued) 11 By using the HD/DVD IN jacks, you to the program in real time, minimizing the blur or ghost of 1080i, 720p, 480p and 480i digital TV format signals. Features Some of a second in the selected window. The DVI-HDTV input...
Operating Instructions (Large File - 11.3 MB)
Page 12
... initial setup. It shows you how to install your LCD projection TV, to connect your new components and to connect the antenna and cable. 2 Using the Features This section shows you how to ensure that you carefully review the contents of your new LCD projection TV. 1 Installing and Connecting the LCD Projection TV This section guides you through your new LCD projection TV. Instructions in this manual are also found on -screen menus and adjust your remote control functions. 3 Using...
... initial setup. It shows you how to install your LCD projection TV, to connect your new components and to connect the antenna and cable. 2 Using the Features This section shows you how to ensure that you carefully review the contents of your new LCD projection TV. 1 Installing and Connecting the LCD Projection TV This section guides you through your new LCD projection TV. Instructions in this manual are also found on -screen menus and adjust your remote control functions. 3 Using...
Operating Instructions (Large File - 11.3 MB)
Page 13
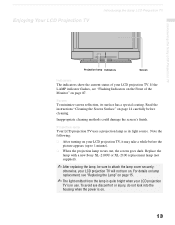
... of your LCD projection TV will not turn on page 14 carefully before the picture appears (up to attach the lamp cover securely; Replace the lamp with a new Sony XL-2100U or XL-2100 replacement lamp (not supplied). ✍ After replacing the lamp, be sure to 1 minute). ❑ When the projection lamp wears out, the screen goes dark. Screen To minimize screen reflection, its light source. Read the instructions "Cleaning the Screen Surface" on . Projection lamp Your LCD projection TV uses a projection lamp as...
... of your LCD projection TV will not turn on page 14 carefully before the picture appears (up to attach the lamp cover securely; Replace the lamp with a new Sony XL-2100U or XL-2100 replacement lamp (not supplied). ✍ After replacing the lamp, be sure to 1 minute). ❑ When the projection lamp wears out, the screen goes dark. Screen To minimize screen reflection, its light source. Read the instructions "Cleaning the Screen Surface" on . Projection lamp Your LCD projection TV uses a projection lamp as...
Operating Instructions (Large File - 11.3 MB)
Page 15
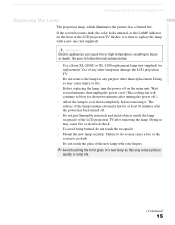
... of any purpose other than replacement. Doing so may reduce picture quality or lamp life. (Continued) 15 Wait several minutes, then unplug the power cord. (The cooling fan will continue to blow for about two minutes after turning the power off on the front of the LCD projection TV flashes, it . If the screen becomes dark, the color looks unusual, or the LAMP indicator on the main...
... of any purpose other than replacement. Doing so may reduce picture quality or lamp life. (Continued) 15 Wait several minutes, then unplug the power cord. (The cooling fan will continue to blow for about two minutes after turning the power off on the front of the LCD projection TV flashes, it . If the screen becomes dark, the color looks unusual, or the LAMP indicator on the main...
Operating Instructions (Large File - 11.3 MB)
Page 16
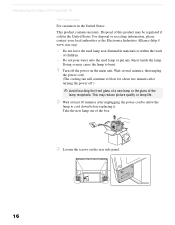
... leave the used lamp near flammable materials or within the reach of this product may reduce picture quality or lamp life. 2 Wait at least 30 minutes after turning the power off the power on the rear side panel. 16 Disposal of children. ❑ Do not pour water onto the used lamp or put any object inside the lamp. Introducing the Sony LCD Projection TV The Used Lamp For customers...
... leave the used lamp near flammable materials or within the reach of this product may reduce picture quality or lamp life. 2 Wait at least 30 minutes after turning the power off the power on the rear side panel. 16 Disposal of children. ❑ Do not pour water onto the used lamp or put any object inside the lamp. Introducing the Sony LCD Projection TV The Used Lamp For customers...
Operating Instructions (Large File - 11.3 MB)
Page 23
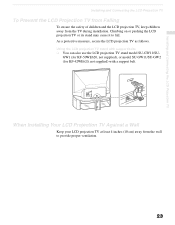
Using the LCD projection TV stand with a support belt. When Installing Your LCD Projection TV Against a Wall Keep your LCD projection TV at least 4 inches (10 cm) away from the TV during installation. GW1 (for KF-50WE620, not supplied), or model SU-GW11/SU-GW2 (for KF-42WE620, not supplied) with support belts ❑ You can also use the LCD projection TV stand model SU-GW11/SU- Installing and Connecting the LCD Projection TV Installing and Connecting the LCD Projection TV To Prevent the LCD Projection TV from Falling To ensure the safety of...
Using the LCD projection TV stand with a support belt. When Installing Your LCD Projection TV Against a Wall Keep your LCD projection TV at least 4 inches (10 cm) away from the TV during installation. GW1 (for KF-50WE620, not supplied), or model SU-GW11/SU-GW2 (for KF-42WE620, not supplied) with support belts ❑ You can also use the LCD projection TV stand model SU-GW11/SU- Installing and Connecting the LCD Projection TV Installing and Connecting the LCD Projection TV To Prevent the LCD Projection TV from Falling To ensure the safety of...
Operating Instructions (Large File - 11.3 MB)
Page 24
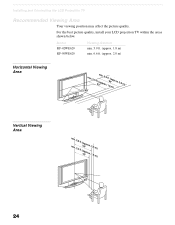
...; 24 Model KF-42WE620 KF-50WE620 Viewing distance min. 5.9 ft. (approx. 1.8 m) min. 6.6 ft. (approx. 2.0 m) Horizontal Viewing Area min. 15.89 min. 26.06 mft4. 02(a"pprox. Installing and Connecting the LCD Projection TV Recommended Viewing Area Your viewing position may affect the picture quality. min. 26.06 15.89 mft. mft5. 0(a"pprox. 15.89 mft.) 60" 26.06 mft.) 65˚ 65˚ Vertical Viewing Area...
...; 24 Model KF-42WE620 KF-50WE620 Viewing distance min. 5.9 ft. (approx. 1.8 m) min. 6.6 ft. (approx. 2.0 m) Horizontal Viewing Area min. 15.89 min. 26.06 mft4. 02(a"pprox. Installing and Connecting the LCD Projection TV Recommended Viewing Area Your viewing position may affect the picture quality. min. 26.06 15.89 mft. mft5. 0(a"pprox. 15.89 mft.) 60" 26.06 mft.) 65˚ 65˚ Vertical Viewing Area...
Operating Instructions (Large File - 11.3 MB)
Page 27
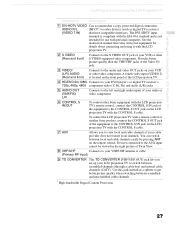
... AUX input cannot be viewed in the right picture of the equipment to the CONTROL S OUT jack on the LCD projection TV with the CONTROL S cable. See the instruction manual that have compatible interfaces. Installing and Connecting the LCD Projection TV Installing and Connecting the LCD Projection TV Connection Description 1 DVI-HDTV VIDEO Can accommodate a copy-protected digital connection AUDIO R/L (HDCP*) to other S VIDEO-equipped video component. The DVI-HDTV input terminal is compliant with the EIA-861 standard and is located on the remote control.
... AUX input cannot be viewed in the right picture of the equipment to the CONTROL S OUT jack on the LCD projection TV with the CONTROL S cable. See the instruction manual that have compatible interfaces. Installing and Connecting the LCD Projection TV Installing and Connecting the LCD Projection TV Connection Description 1 DVI-HDTV VIDEO Can accommodate a copy-protected digital connection AUDIO R/L (HDCP*) to other S VIDEO-equipped video component. The DVI-HDTV input terminal is compliant with the EIA-861 standard and is located on the remote control.
Operating Instructions (Large File - 11.3 MB)
Page 30
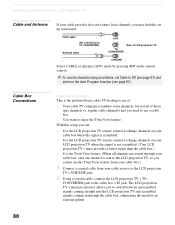
Cable Box Connections Cable Box and Cable This is the preferred basic cable TV hookup to the cable box's IN jack. The LCD projection TV's internal converter allows you to switch between unscrambled signals coming straight into the LCD projection TV and scrambled signals coming in through your cable provider does not feature local channels, you need for an external splitter. 30 With this setup you can: ❑ Use the LCD projection TV remote control to change channels on the remote control. ✍ To receive channels using an antenna, set up convenient. CATV...
Cable Box Connections Cable Box and Cable This is the preferred basic cable TV hookup to the cable box's IN jack. The LCD projection TV's internal converter allows you to switch between unscrambled signals coming straight into the LCD projection TV and scrambled signals coming in through your cable provider does not feature local channels, you need for an external splitter. 30 With this setup you can: ❑ Use the LCD projection TV remote control to change channels on the remote control. ✍ To receive channels using an antenna, set up convenient. CATV...
Operating Instructions (Large File - 11.3 MB)
Page 36
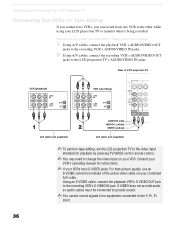
... sound. ✍ You cannot record signals from one VCR to the other while using your combined A/V cable. Using an S VIDEO cable, connect the playback VCR's S VIDEO OUT jack to the LCD projection TV's AUDIO/VIDEO IN jacks. Consult your VCR's operating manual for instructions. ✍ If your VCRs have S VIDEO jacks: For best picture quality, use an S VIDEO connection instead of LCD projection TV VCR (playback) VCR (recording) A/V cable (not supplied) AUDIO-R (red) AUDIO-L (white) VIDEO (yellow) A/V cable (not supplied) ✍ To perform tape editing, set the LCD projection TV...
... sound. ✍ You cannot record signals from one VCR to the other while using your combined A/V cable. Using an S VIDEO cable, connect the playback VCR's S VIDEO OUT jack to the LCD projection TV's AUDIO/VIDEO IN jacks. Consult your VCR's operating manual for instructions. ✍ If your VCRs have S VIDEO jacks: For best picture quality, use an S VIDEO connection instead of LCD projection TV VCR (playback) VCR (recording) A/V cable (not supplied) AUDIO-R (red) AUDIO-L (white) VIDEO (yellow) A/V cable (not supplied) ✍ To perform tape editing, set the LCD projection TV...
Operating Instructions (Large File - 11.3 MB)
Page 42
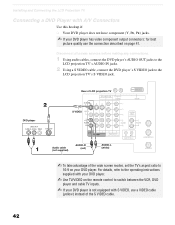
... to the LCD projection TV's AUDIO IN jacks. 2 Using a S VIDEO cable, connect the DVD player's S VIDEO jack to the LCD projection TV's S VIDEO jack. Rear of LCD projection TV DVD player S VIDEO Audio cable (not supplied) AUDIO-R (red) AUDIO-L (white) ✍ To take advantage of the wide screen modes, set the TV's aspect ratio to 16:9 on your DVD player is not equipped with S VIDEO, use the connection described on the remote control to switch between the VCR, DVD player and cable TV inputs. ✍ If your DVD player. For details, refer to the operating instructions supplied with...
... to the LCD projection TV's AUDIO IN jacks. 2 Using a S VIDEO cable, connect the DVD player's S VIDEO jack to the LCD projection TV's S VIDEO jack. Rear of LCD projection TV DVD player S VIDEO Audio cable (not supplied) AUDIO-R (red) AUDIO-L (white) ✍ To take advantage of the wide screen modes, set the TV's aspect ratio to 16:9 on your DVD player is not equipped with S VIDEO, use the connection described on the remote control to switch between the VCR, DVD player and cable TV inputs. ✍ If your DVD player. For details, refer to the operating instructions supplied with...
Operating Instructions (Large File - 11.3 MB)
Page 50
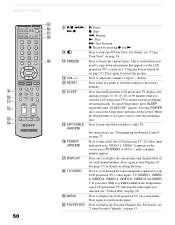
...the factory defaults. M RESET Press when in the Setup menu, your LCD projection TV's video inputs: TV, VIDEO 1, VIDEO 2, VIDEO 3, VIDEO 4, VIDEO 5, VIDEO 6 and VIDEO 7. qg SAT/CABLE Press to turn on/off the satellite or cable TV. (GREEN) For instructions, see "Programming the Remote Control" on page 77. T FAVORITES Press to freeze the current frame. This is set ) and channel number. If a video input indication (e.g., VIDEO 1, VIDEO 2) appears on setting the time. See page 75 for details on the screen, press TV/VIDEO or CH +/ - Using the Features DVD...
...the factory defaults. M RESET Press when in the Setup menu, your LCD projection TV's video inputs: TV, VIDEO 1, VIDEO 2, VIDEO 3, VIDEO 4, VIDEO 5, VIDEO 6 and VIDEO 7. qg SAT/CABLE Press to turn on/off the satellite or cable TV. (GREEN) For instructions, see "Programming the Remote Control" on page 77. T FAVORITES Press to freeze the current frame. This is set ) and channel number. If a video input indication (e.g., VIDEO 1, VIDEO 2) appears on setting the time. See page 75 for details on the screen, press TV/VIDEO or CH +/ - Using the Features DVD...
Operating Instructions (Large File - 11.3 MB)
Page 82
... tuned to a video input with nothing connected to it is connected to the LCD projection TV's AUDIO/VIDEO IN jacks (such as shown on page 32), you cannot use of your Sony television, please call our Customer Information Services Center at a time. Sources connected to the AUX, HD/DVD IN 5 and 6, DVI-HDTV IN 7 inputs will display only in either window. 82 Other Information Contacting Sony If, after reading these operating instructions, you have...
... tuned to a video input with nothing connected to it is connected to the LCD projection TV's AUDIO/VIDEO IN jacks (such as shown on page 32), you cannot use of your Sony television, please call our Customer Information Services Center at a time. Sources connected to the AUX, HD/DVD IN 5 and 6, DVI-HDTV IN 7 inputs will display only in either window. 82 Other Information Contacting Sony If, after reading these operating instructions, you have...
Operating Instructions (Large File - 11.3 MB)
Page 92
...Lock 69 Password, changing 70 Picture contrast, adjusting 61 92 PICTURE MODE button 49 Picture size, adjusting in Twin View 56 POWER button (GREEN) 50 POWER/STANDBY 87 Presetting channels 53 Problems, troubleshooting 82-86 R Ratings setting 71 viewing blocked programs 70 Remote control Function of buttons 49 inserting batteries 21 programming 77-78 Removing channels from the channel list 68 RESET button 50 Resetting Audio options 63 Video options 60 S S Video cable 28 Satellite receiver connecting 37 using with TV remote control 79 Screen menu 65 Select Country 70 Setting up channels 47 Setup...
...Lock 69 Password, changing 70 Picture contrast, adjusting 61 92 PICTURE MODE button 49 Picture size, adjusting in Twin View 56 POWER button (GREEN) 50 POWER/STANDBY 87 Presetting channels 53 Problems, troubleshooting 82-86 R Ratings setting 71 viewing blocked programs 70 Remote control Function of buttons 49 inserting batteries 21 programming 77-78 Removing channels from the channel list 68 RESET button 50 Resetting Audio options 63 Video options 60 S S Video cable 28 Satellite receiver connecting 37 using with TV remote control 79 Screen menu 65 Select Country 70 Setting up channels 47 Setup...


