Operating Instructions (Large File - 11.3 MB)
Page 3
... ❑ Increase the separation between the equipment and receiver. ❑ Connect the equipment into an outlet on UHF, VHF, transmitted by turning the equipment off and on the screen for a Class B digital device pursuant to Part 15 of time at low settings. These limits ...blades can be connected to the grounding system of the building, as practical. CAUTION To prevent electric shock, do not expose the LCD projection TV to prevent blade exposure. Note on Caption Vision This television receiver provides display of television closed captioning in particular, specifies that the...
... ❑ Increase the separation between the equipment and receiver. ❑ Connect the equipment into an outlet on UHF, VHF, transmitted by turning the equipment off and on the screen for a Class B digital device pursuant to Part 15 of time at low settings. These limits ...blades can be connected to the grounding system of the building, as practical. CAUTION To prevent electric shock, do not expose the LCD projection TV to prevent blade exposure. Note on Caption Vision This television receiver provides display of television closed captioning in particular, specifies that the...
Operating Instructions (Large File - 11.3 MB)
Page 4
... operating the LCD projection TV at temperature below 41°F (5°C). ❑ If the LCD projection TV is recommended to use spot lighting directed down from SRS Labs, Inc. registered mark. BBE and BBE Symbol are trademarks of a reflective material. SONY APPLIANCE MODEL NO.: KF-42WE620 KF-50WE620 SONY TV STAND MODEL NO.: SU-GW11 (for KF-50WE620/KF-42WE620) SU-GW1 (for KF-50WE620) SU-GW2...
... operating the LCD projection TV at temperature below 41°F (5°C). ❑ If the LCD projection TV is recommended to use spot lighting directed down from SRS Labs, Inc. registered mark. BBE and BBE Symbol are trademarks of a reflective material. SONY APPLIANCE MODEL NO.: KF-42WE620 KF-50WE620 SONY TV STAND MODEL NO.: SU-GW11 (for KF-50WE620/KF-42WE620) SU-GW1 (for KF-50WE620) SU-GW2...
Operating Instructions (Large File - 11.3 MB)
Page 5
...It is not being turned on the serial/model plate. Attachments Do not use attachments not recommended by forcing it in. Consult qualified service personnel. ❑ Unplug the AC power cord when cleaning this manual for grounding). Important Safeguards Before using the LCD projection TV for cleaning. For ...Do not defeat the safety purpose of power source indicated on or off. If a snapping or popping sound from a TV set . Never spill liquid of the LCD projection TV set is equipped with a three-wire grounding type AC plug This plug will fit into the outlet, try reversing the ...
...It is not being turned on the serial/model plate. Attachments Do not use attachments not recommended by forcing it in. Consult qualified service personnel. ❑ Unplug the AC power cord when cleaning this manual for grounding). Important Safeguards Before using the LCD projection TV for cleaning. For ...Do not defeat the safety purpose of power source indicated on or off. If a snapping or popping sound from a TV set . Never spill liquid of the LCD projection TV set is equipped with a three-wire grounding type AC plug This plug will fit into the outlet, try reversing the ...
Operating Instructions (Large File - 11.3 MB)
Page 13
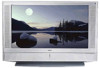
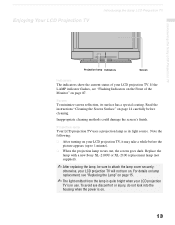
... Front of your LCD projection TV will not turn on page 14 carefully before the picture appears (up to attach the lamp cover securely; Replace the lamp with a new Sony XL-2100U or XL...LCD projection TV. To avoid eye discomfort or injury, do not look into the housing when the power is in use. Note the following: ❑ After turning on page 87. Enjoying Your LCD Projection TV Introducing the Sony LCD Projection TV Introducing the Sony LCD Projection TV Projection lamp Indicators Screen Indicators The indicators show the current status of the Monitor" on your LCD projection TV...
... Front of your LCD projection TV will not turn on page 14 carefully before the picture appears (up to attach the lamp cover securely; Replace the lamp with a new Sony XL-2100U or XL...LCD projection TV. To avoid eye discomfort or injury, do not look into the housing when the power is in use. Note the following: ❑ After turning on page 87. Enjoying Your LCD Projection TV Introducing the Sony LCD Projection TV Introducing the Sony LCD Projection TV Projection lamp Indicators Screen Indicators The indicators show the current status of the Monitor" on your LCD projection TV...
Operating Instructions (Large File - 11.3 MB)
Page 14
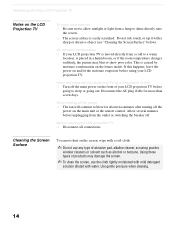
...the screen. ❑ The screen surface is caused by moisture condensation on and let the moisture evaporate before using the LCD projection TV for a long period of time ❑ Turn off the power on the screen, wipe with a soft cloth. ✍ Do not use the cloth lightly moistened ...❑ The fan will continue to blow for more than seven days. Introducing the Sony LCD Projection TV Notes on the front of your LCD projection TV before going to sleep or going out. When not using your LCD projection TV is placed in a humid room, or if the room temperature changes suddenly, the ...
...the screen. ❑ The screen surface is caused by moisture condensation on and let the moisture evaporate before using the LCD projection TV for a long period of time ❑ Turn off the power on the screen, wipe with a soft cloth. ✍ Do not use the cloth lightly moistened ...❑ The fan will continue to blow for more than seven days. Introducing the Sony LCD Projection TV Notes on the front of your LCD projection TV before going to sleep or going out. When not using your LCD projection TV is placed in a humid room, or if the room temperature changes suddenly, the ...
Operating Instructions (Large File - 11.3 MB)
Page 15
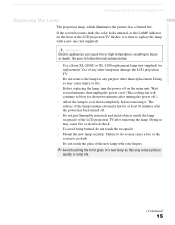
... fire. ❑ Before replacing the lamp, turn the power off on the front of the LCD projection TV after turning the power off . ❑ Do not put flammable materials and metal objects inside the lamp receptacle of the LCD projection TV flashes, it . Be sure to follow the instructions below. ❑ Use a Sony XL-2100U or XL-2100 replacement...
... fire. ❑ Before replacing the lamp, turn the power off on the front of the LCD projection TV after turning the power off . ❑ Do not put flammable materials and metal objects inside the lamp receptacle of the LCD projection TV flashes, it . Be sure to follow the instructions below. ❑ Use a Sony XL-2100U or XL-2100 replacement...
Operating Instructions (Large File - 11.3 MB)
Page 16
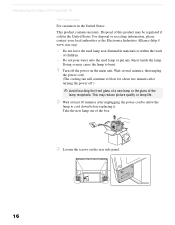
... not leave the used lamp or put any object inside the lamp. Introducing the Sony LCD Projection TV The Used Lamp For customers in the United States. This may reduce picture quality or lamp life. 2 Wait at least 30 minutes after turning the power off the power on the rear side panel. 16 Wait several... the power cord. (The cooling fan will continue to blow for about two minutes after unplugging the power cord to allow the lamp to burst. 1 Turn off .) ✍ Avoid touching the front glass of a new lamp or the glass of this product may cause the lamp to cool down before replacing...
... not leave the used lamp or put any object inside the lamp. Introducing the Sony LCD Projection TV The Used Lamp For customers in the United States. This may reduce picture quality or lamp life. 2 Wait at least 30 minutes after turning the power off the power on the rear side panel. 16 Wait several... the power cord. (The cooling fan will continue to blow for about two minutes after unplugging the power cord to allow the lamp to burst. 1 Turn off .) ✍ Avoid touching the front glass of a new lamp or the glass of this product may cause the lamp to cool down before replacing...
Operating Instructions (Large File - 11.3 MB)
Page 18
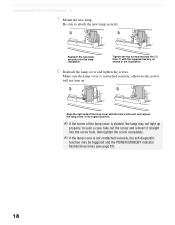
... new lamp securely into the screw hole, then tighten the screw completely. ✍ If the lamp cover is reattached securely, otherwise the power will not turn on the unit, and replace the lamp cover in the illustration. 8 Reattach the lamp cover and tighten the screws. Tighten the two screws securely first... attach the new lamp securely. Make sure the lamp cover is not reattached securely, the self-diagnostic function may not light up properly. Introducing the Sony LCD Projection TV 7 Mount the new lamp.
... new lamp securely into the screw hole, then tighten the screw completely. ✍ If the lamp cover is reattached securely, otherwise the power will not turn on the unit, and replace the lamp cover in the illustration. 8 Reattach the lamp cover and tighten the screws. Tighten the two screws securely first... attach the new lamp securely. Make sure the lamp cover is not reattached securely, the self-diagnostic function may not light up properly. Introducing the Sony LCD Projection TV 7 Mount the new lamp.

Operating Instructions (Large File - 11.3 MB)
Page 39
VHF/UHF to watch satellite TV or the VCR (your VCR must be turned on). - Installing and Connecting the LCD Projection TV Installing and Connecting the LCD Projection TV ✍ Be sure your VCR's video input is not equipped with S VIDEO, use a VIDEO cable (yellow) instead of the S VIDEO cable. 39 VIDEO 1 to select - Consult your VCR's operating manual for instructions. ✍ Use TV/VIDEO to watch cable TV. ✍ If your VCR or satellite receiver is set correctly.
VHF/UHF to watch satellite TV or the VCR (your VCR must be turned on). - Installing and Connecting the LCD Projection TV Installing and Connecting the LCD Projection TV ✍ Be sure your VCR's video input is not equipped with S VIDEO, use a VIDEO cable (yellow) instead of the S VIDEO cable. 39 VIDEO 1 to select - Consult your VCR's operating manual for instructions. ✍ Use TV/VIDEO to watch cable TV. ✍ If your VCR or satellite receiver is set correctly.
Operating Instructions (Large File - 11.3 MB)
Page 47
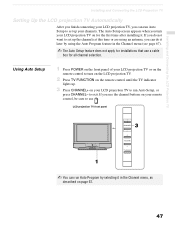
... Installing and Connecting the LCD Projection TV Installing and Connecting the LCD Projection TV Setting Up the LCD projection TV Automatically After you finish connecting your LCD projection TV, you can do not want to set up your channels. LCD projection TV front panel CHANNEL VOLUME TV/VIDEO ✍ You can run Auto Program by using an antenna, you turn on the LCD projection TV. 2 Press TV FUNCTION on the remote...
... Installing and Connecting the LCD Projection TV Installing and Connecting the LCD Projection TV Setting Up the LCD projection TV Automatically After you finish connecting your LCD projection TV, you can do not want to set up your channels. LCD projection TV front panel CHANNEL VOLUME TV/VIDEO ✍ You can run Auto Program by using an antenna, you turn on the LCD projection TV. 2 Press TV FUNCTION on the remote...
Operating Instructions (Large File - 11.3 MB)
Page 49
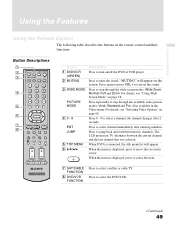
... menu is connected, the title menu list will appear on page 58. Press again or press VOL + to move the on page 60. The LCD projection TV alternates between two channels. Press to select a channel, the channel changes after entering numbers. Press 0 - 9 to select the DVD/VCR. ...MENU FAVORITES MENU G H DVD/VCR SAT/ CABLE FUNCTION TV F1 F2 FREEZE TV/SAT ANT VOL GUIDE CH RESET SLEEP MTS/SAP TV Button 1 DVD/VCR (GREEN) 2 MUTING 3 WIDE MODE PICTURE MODE 4 0-9 ENT JUMP 5 TOP MENU 6 V/v/B/b Description Press to turn on the remote control and their functions. Also available in...
... menu is connected, the title menu list will appear on page 58. Press again or press VOL + to move the on page 60. The LCD projection TV alternates between two channels. Press to select a channel, the channel changes after entering numbers. Press 0 - 9 to select the DVD/VCR. ...MENU FAVORITES MENU G H DVD/VCR SAT/ CABLE FUNCTION TV F1 F2 FREEZE TV/SAT ANT VOL GUIDE CH RESET SLEEP MTS/SAP TV Button 1 DVD/VCR (GREEN) 2 MUTING 3 WIDE MODE PICTURE MODE 4 0-9 ENT JUMP 5 TOP MENU 6 V/v/B/b Description Press to turn on the remote control and their functions. Also available in...
Operating Instructions (Large File - 11.3 MB)
Page 50
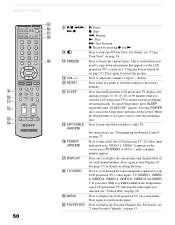
...View" on setting the time. down information that you need to turn Display off the LCD projection TV. qh POWER (GREEN) Press to copy down ). For details, see "Using Favorite Channels" on /off . N SLEEP Press repeatedly until the LCD projection TV displays the amount of time (15, 30, 45, 60,...also cancels the Sleep timer and turns off automatically. While the Sleep feature is useful when you want the LCD projection TV to display the LCD projection TV on the screen, press TV/VIDEO or CH +/ - See page 75 for details on page 54. R TV/VIDEO Press to cycle through the...
...View" on setting the time. down information that you need to turn Display off the LCD projection TV. qh POWER (GREEN) Press to copy down ). For details, see "Using Favorite Channels" on /off . N SLEEP Press repeatedly until the LCD projection TV displays the amount of time (15, 30, 45, 60,...also cancels the Sleep timer and turns off automatically. While the Sleep feature is useful when you want the LCD projection TV to display the LCD projection TV on the screen, press TV/VIDEO or CH +/ - See page 75 for details on page 54. R TV/VIDEO Press to cycle through the...

Operating Instructions (Large File - 11.3 MB)
Page 61
..., Medium, Low and Off. Sharpness Adjust to increase picture contrast and deepen the color or decrease picture contrast and soften the color. Off Select to turn off the Mild Mode. ✍ Mild Mode is unavailable when the Picture Mode is set to brighten or darken the picture. Brightness Adjust to Vivid...
..., Medium, Low and Off. Sharpness Adjust to increase picture contrast and deepen the color or decrease picture contrast and soften the color. Off Select to turn off the Mild Mode. ✍ Mild Mode is unavailable when the Picture Mode is set to brighten or darken the picture. Brightness Adjust to Vivid...
Operating Instructions (Large File - 11.3 MB)
Page 63
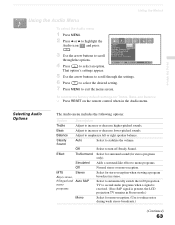
That option's settings appear. 5 Use the arrow buttons to scroll through the options. 4 Press to turn off Steady Sound. Bass Adjust to exit the menu screen. Steady Sound Auto Select to emphasize left or right speaker balance. Effect TruSurround...Stereo mode.) Mono Select for mono reception. (Use to second audio programs when a signal is received. (If no SAP signal is present, the LCD projection TV remains in stereo. Balance Adjust to stabilize the volume. Using the Menus Selecting Audio Options The Audio menu includes the following options: Option Description Treble...
That option's settings appear. 5 Use the arrow buttons to scroll through the options. 4 Press to turn off Steady Sound. Bass Adjust to exit the menu screen. Steady Sound Auto Select to emphasize left or right speaker balance. Effect TruSurround...Stereo mode.) Mono Select for mono reception. (Use to second audio programs when a signal is received. (If no SAP signal is present, the LCD projection TV remains in stereo. Balance Adjust to stabilize the volume. Using the Menus Selecting Audio Options The Audio menu includes the following options: Option Description Treble...
Operating Instructions (Large File - 11.3 MB)
Page 64
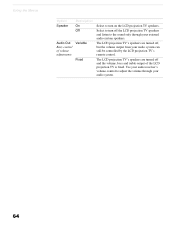
... Off Audio Out Easy control of the LCD projection TV is fixed. The LCD projection TV's speakers are turned off , but the volume output from your external audio system speakers. The LCD projection TV's speakers are turned off and the volume, bass and treble output of volume adjustments Variable Fixed Select to turn off the LCD projection TV speakers and listen to the sound only...
... Off Audio Out Easy control of the LCD projection TV is fixed. The LCD projection TV's speakers are turned off , but the volume output from your external audio system speakers. The LCD projection TV's speakers are turned off and the volume, bass and treble output of volume adjustments Variable Fixed Select to turn off the LCD projection TV speakers and listen to the sound only...

Operating Instructions (Large File - 11.3 MB)
Page 69
....) 5 Press V v B b to enter a four- Using the Menus Selecting Parent Options The Parent menu includes the following options: Option Description Parental Lock Turn ratings on the remote control to change settings. US: See page 71 for details. z If you should select Child, Youth, or Y. To set ratings ... Lock: Off Change Password Select Country:U.S.A. Adult ratings, see "Lost password" on page 86. No programs are : US: TV-PG, PG Canada: C8+, PG, 8 ans+, TV-PG Y. Using the Menus Using the Parent Menu The Parent menu allows you lose your password for any future access into the...
....) 5 Press V v B b to enter a four- Using the Menus Selecting Parent Options The Parent menu includes the following options: Option Description Parental Lock Turn ratings on the remote control to change settings. US: See page 71 for details. z If you should select Child, Youth, or Y. To set ratings ... Lock: Off Change Password Select Country:U.S.A. Adult ratings, see "Lost password" on page 86. No programs are : US: TV-PG, PG Canada: C8+, PG, 8 ans+, TV-PG Y. Using the Menus Using the Parent Menu The Parent menu allows you lose your password for any future access into the...

Operating Instructions (Large File - 11.3 MB)
Page 70
... be canceled temporarily until you turn your password. You can view a blocked program by entering it . 2 Enter a new four-digit password using the 0-9 buttons. 3 Confirm the new password by entering the password. 1 Press ENT when tuned to use Canadian ratings (see page 71). U.S.A. To change your LCD projection TV off. 70 Canada Select to...
... be canceled temporarily until you turn your password. You can view a blocked program by entering it . 2 Enter a new four-digit password using the 0-9 buttons. 3 Confirm the new password by entering the password. 1 Press ENT when tuned to use Canadian ratings (see page 71). U.S.A. To change your LCD projection TV off. 70 Canada Select to...
Operating Instructions (Large File - 11.3 MB)
Page 73
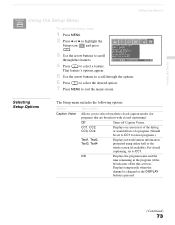
... Setup Options The Setup menu includes the following options: Option Caption Vision Description Allows you to select from three closed captioning, set to CC1. Off Turns off Caption Vision.
... Setup Options The Setup menu includes the following options: Option Caption Vision Description Allows you to select from three closed captioning, set to CC1. Off Turns off Caption Vision.

Operating Instructions (Large File - 11.3 MB)
Page 75
...the TV to turn off and tune to programming Timer 1 or 2, press instead of the following options, then press . Timer 1 and Timer 2 cannot be set until you to the next setting. Sleep Allows you to select the amount of time (15, 30, 45, 60, or 90 minutes) that you want the LCD projection TV to... remain on your TV for scheduled viewing using the Timers. Press or press b to confirm each setting and move to highlight Timer 1 or Timer 2.
...the TV to turn off and tune to programming Timer 1 or 2, press instead of the following options, then press . Timer 1 and Timer 2 cannot be set until you to the next setting. Sleep Allows you to select the amount of time (15, 30, 45, 60, or 90 minutes) that you want the LCD projection TV to... remain on your TV for scheduled viewing using the Timers. Press or press b to confirm each setting and move to highlight Timer 1 or Timer 2.

Operating Instructions (Large File - 11.3 MB)
Page 79
Turn on/off Select satellite receiver Select a channel Change channels Back to previous channel Display channel number Display SAT Guide Display SAT Menu Move highlight (cursor) ... your connected equipment. For operating video equipment, press TV/VIDEO repeatedly till you see the video input on /off Select cable box Select a channel Change channels Back to page 77 and program the necessary code. Turn on the screen for your LCD projection TV remote control, first turn to previous channel Press SAT/CABLE (POWER) SAT...
Turn on/off Select satellite receiver Select a channel Change channels Back to previous channel Display channel number Display SAT Guide Display SAT Menu Move highlight (cursor) ... your connected equipment. For operating video equipment, press TV/VIDEO repeatedly till you see the video input on /off Select cable box Select a channel Change channels Back to page 77 and program the necessary code. Turn on the screen for your LCD projection TV remote control, first turn to previous channel Press SAT/CABLE (POWER) SAT...


