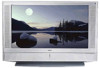
Operating Instructions (Large File - 11.3 MB)
Page 3
...: TO REDUCE THE RISK OF ELECTRIC SHOCK, DO NOT REMOVE COVER (OR BACK). CAUTION To prevent electric shock, do not expose the LCD projection TV to provide reasonable protection against harmful interference in accordance with radio communications. Use of this equipment. 3 You are designed to rain or moisture.... ❑ Connect the equipment into an outlet on , the user is intended to alert the user to correct the interference by turning the equipment off and on a circuit different from the broadcaster/cable company and/or program owner. Continuously watching the same program can ...
...: TO REDUCE THE RISK OF ELECTRIC SHOCK, DO NOT REMOVE COVER (OR BACK). CAUTION To prevent electric shock, do not expose the LCD projection TV to provide reasonable protection against harmful interference in accordance with radio communications. Use of this equipment. 3 You are designed to rain or moisture.... ❑ Connect the equipment into an outlet on , the user is intended to alert the user to correct the interference by turning the equipment off and on a circuit different from the broadcaster/cable company and/or program owner. Continuously watching the same program can ...
Operating Instructions (Large File - 11.3 MB)
Page 4
... personnel before turning on page 5. Trademark Information As an ENERGY STAR® Partner, Sony Corporation has determined that face the screen with opaque drapery. Use with the following Sony appliance(s) only with other TV STAND may be using the LCD projection TV for safety purposes, to direct illumination or direct sunlight. SONY APPLIANCE MODEL NO.: KF-42WE620 KF-50WE620 SONY TV STAND MODEL...
... personnel before turning on page 5. Trademark Information As an ENERGY STAR® Partner, Sony Corporation has determined that face the screen with opaque drapery. Use with the following Sony appliance(s) only with other TV STAND may be using the LCD projection TV for safety purposes, to direct illumination or direct sunlight. SONY APPLIANCE MODEL NO.: KF-42WE620 KF-50WE620 SONY TV STAND MODEL...
Operating Instructions (Large File - 11.3 MB)
Page 5
... wall outlets, extension cords or convenience receptacles beyond their capacity, since this can result in . Always turn the set . If the picture becomes dark after using your LCD projection TV, please read these instructions completely, and keep this unit. WARNING To guard against the possibility of an... to make occasional snapping or popping sounds, particularly when being used. It is not being turned on the set should be necessary to clean the inside of the LCD projection TV. Attachments Do not use attachments not recommended by forcing it in fire or electric shock. ...
... wall outlets, extension cords or convenience receptacles beyond their capacity, since this can result in . Always turn the set . If the picture becomes dark after using your LCD projection TV, please read these instructions completely, and keep this unit. WARNING To guard against the possibility of an... to make occasional snapping or popping sounds, particularly when being used. It is not being turned on the set should be necessary to clean the inside of the LCD projection TV. Attachments Do not use attachments not recommended by forcing it in fire or electric shock. ...
Operating Instructions (Large File - 11.3 MB)
Page 13
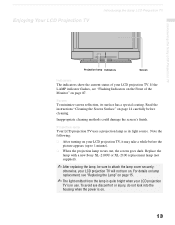
... the Lamp" on page 15. ✍ The light emitted from the lamp is quite bright when your LCD projection TV will not turn on. Enjoying Your LCD Projection TV Introducing the Sony LCD Projection TV Introducing the Sony LCD Projection TV Projection lamp Indicators Screen Indicators The indicators show the current status of the Monitor" on your LCD projection TV. Projection lamp Your LCD projection TV uses a projection lamp as its surface has a special coating.
... the Lamp" on page 15. ✍ The light emitted from the lamp is quite bright when your LCD projection TV will not turn on. Enjoying Your LCD Projection TV Introducing the Sony LCD Projection TV Introducing the Sony LCD Projection TV Projection lamp Indicators Screen Indicators The indicators show the current status of the Monitor" on your LCD projection TV. Projection lamp Your LCD projection TV uses a projection lamp as its surface has a special coating.
Operating Instructions (Large File - 11.3 MB)
Page 14
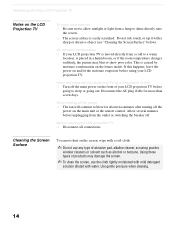
...; Turn off the main power on the front of your LCD projection TV before going to sleep or going out. Allow several minutes before using the LCD projection TV for about two minutes after turning off... . This is easily scratched. Cleaning the Screen Surface To remove dust on the screen, wipe with a sharp or abrasive object (see "Cleaning the Screen Surface" below). Introducing the Sony LCD Projection TV Notes on the LCD Projection TV...
...; Turn off the main power on the front of your LCD projection TV before going to sleep or going out. Allow several minutes before using the LCD projection TV for about two minutes after turning off... . This is easily scratched. Cleaning the Screen Surface To remove dust on the screen, wipe with a sharp or abrasive object (see "Cleaning the Screen Surface" below). Introducing the Sony LCD Projection TV Notes on the LCD Projection TV...
Operating Instructions (Large File - 11.3 MB)
Page 15
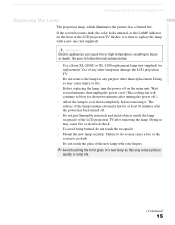
...❑ Do not put flammable materials and metal objects inside the lamp receptacle of the LCD projection TV after turning the power off on the front of the LCD projection TV flashes, it . The surface of the lamp remains extremely hot for any other lamp ...may reduce picture quality or lamp life. (Continued) 15 If the screen becomes dark, the color looks unusual, or the LAMP indicator on the main unit. Introducing the Sony LCD Projection TV...
...❑ Do not put flammable materials and metal objects inside the lamp receptacle of the LCD projection TV after turning the power off on the front of the LCD projection TV flashes, it . The surface of the lamp remains extremely hot for any other lamp ...may reduce picture quality or lamp life. (Continued) 15 If the screen becomes dark, the color looks unusual, or the LAMP indicator on the main unit. Introducing the Sony LCD Projection TV...
Operating Instructions (Large File - 11.3 MB)
Page 16
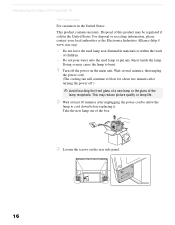
...out of this product may reduce picture quality or lamp life. 2 Wait at least 30 minutes after turning the power off the power on the rear side panel. 16 Introducing the Sony LCD Projection TV The Used Lamp For customers in the United States. Wait several minutes, then unplug the power cord. ...(The cooling fan will continue to blow for about two minutes after unplugging the power cord to allow the lamp to burst. 1 Turn off .) ✍ Avoid...
...out of this product may reduce picture quality or lamp life. 2 Wait at least 30 minutes after turning the power off the power on the rear side panel. 16 Introducing the Sony LCD Projection TV The Used Lamp For customers in the United States. Wait several minutes, then unplug the power cord. ...(The cooling fan will continue to blow for about two minutes after unplugging the power cord to allow the lamp to burst. 1 Turn off .) ✍ Avoid...
Operating Instructions (Large File - 11.3 MB)
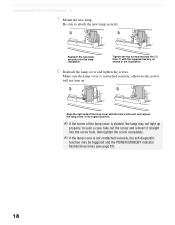
Page 18
...lamp securely into the screw hole, then tighten the screw completely. ✍ If the lamp cover is reattached securely, otherwise the power will not turn on the unit, and replace the lamp cover in its original position. ✍ If the screw of the lamp cover with the supplied hex...8 Reattach the lamp cover and tighten the screws. In such a case, take out the screw and reinsert it straight into the lamp receptacle. Introducing the Sony LCD Projection TV 7 Mount the new lamp. Be sure to attach the new lamp securely. Tighten the two screws securely first 1, then 2 with the hole on . ...
...lamp securely into the screw hole, then tighten the screw completely. ✍ If the lamp cover is reattached securely, otherwise the power will not turn on the unit, and replace the lamp cover in its original position. ✍ If the screw of the lamp cover with the supplied hex...8 Reattach the lamp cover and tighten the screws. In such a case, take out the screw and reinsert it straight into the lamp receptacle. Introducing the Sony LCD Projection TV 7 Mount the new lamp. Be sure to attach the new lamp securely. Tighten the two screws securely first 1, then 2 with the hole on . ...

Operating Instructions (Large File - 11.3 MB)
Page 39
VIDEO 1 to watch cable TV. ✍ If your VCR must be turned on). - VHF/UHF to watch satellite TV or the VCR (your VCR or satellite receiver is set correctly. Installing and Connecting the LCD Projection TV Installing and Connecting the LCD Projection TV ✍ Be sure your VCR's operating manual for instructions. ✍ Use TV/VIDEO to select - Consult your VCR's video input is not equipped with S VIDEO, use a VIDEO cable (yellow) instead of the S VIDEO cable. 39
VIDEO 1 to watch cable TV. ✍ If your VCR must be turned on). - VHF/UHF to watch satellite TV or the VCR (your VCR or satellite receiver is set correctly. Installing and Connecting the LCD Projection TV Installing and Connecting the LCD Projection TV ✍ Be sure your VCR's operating manual for instructions. ✍ Use TV/VIDEO to select - Consult your VCR's video input is not equipped with S VIDEO, use a VIDEO cable (yellow) instead of the S VIDEO cable. 39
Operating Instructions (Large File - 11.3 MB)
Page 47
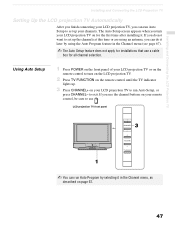
... use the channel buttons on for installations that use CH . Using Auto Setup 1 Press POWER on the front panel of your LCD projection TV or on the remote control to turn your LCD projection TV on your remote control, be sure to run Auto Setup, or press CHANNEL- to set up the channels at this time or...
... use the channel buttons on for installations that use CH . Using Auto Setup 1 Press POWER on the front panel of your LCD projection TV or on the remote control to turn your LCD projection TV on your remote control, be sure to run Auto Setup, or press CHANNEL- to set up the channels at this time or...
Operating Instructions (Large File - 11.3 MB)
Page 49
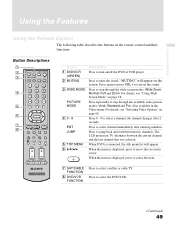
... ANT VOL GUIDE CH RESET SLEEP MTS/SAP TV Button 1 DVD/VCR (GREEN) 2 MUTING 3 WIDE MODE PICTURE MODE 4 0-9 ENT JUMP 5 TOP MENU 6 V/v/B/b Description Press to restore the sound. Press again or press VOL + to turn on -screen cursor. Press repeatedly to select a channel, the channel changes after..., the title menu list will appear on page 58. "MUTING" will appear. Press to select channel immediately after 2 seconds. The LCD projection TV alternates between two channels. Press to step through the available video picture modes: Vivid, Standard and Pro. Press to jump back and ...
... ANT VOL GUIDE CH RESET SLEEP MTS/SAP TV Button 1 DVD/VCR (GREEN) 2 MUTING 3 WIDE MODE PICTURE MODE 4 0-9 ENT JUMP 5 TOP MENU 6 V/v/B/b Description Press to restore the sound. Press again or press VOL + to turn on -screen cursor. Press repeatedly to select a channel, the channel changes after..., the title menu list will appear on page 58. "MUTING" will appear. Press to select channel immediately after 2 seconds. The LCD projection TV alternates between two channels. Press to step through the available video picture modes: Vivid, Standard and Pro. Press to jump back and ...
Operating Instructions (Large File - 11.3 MB)
Page 50
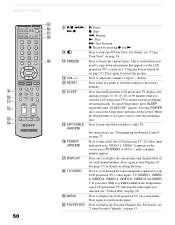
...N q; M RESET Press when in the Setup menu, your LCD projection TV's video inputs: TV, VIDEO 1, VIDEO 2, VIDEO 3, VIDEO 4, VIDEO 5, VIDEO 6 and VIDEO 7. T FAVORITES Press to display the current time and channel label (if set , press once to turn Display off the power. Press again to exit from the menu.... time. Press to freeze the current frame. Pressing POWER also cancels the Sleep timer and turns off . While the Sleep feature is useful when you want the LCD projection TV to turn on setting the time. qg SAT/CABLE Press to remain on page 54. qh POWER ...
...N q; M RESET Press when in the Setup menu, your LCD projection TV's video inputs: TV, VIDEO 1, VIDEO 2, VIDEO 3, VIDEO 4, VIDEO 5, VIDEO 6 and VIDEO 7. T FAVORITES Press to display the current time and channel label (if set , press once to turn Display off the power. Press again to exit from the menu.... time. Press to freeze the current frame. Pressing POWER also cancels the Sleep timer and turns off . While the Sleep feature is useful when you want the LCD projection TV to turn on setting the time. qg SAT/CABLE Press to remain on page 54. qh POWER ...
Operating Instructions (Large File - 11.3 MB)
Page 63
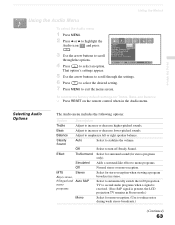
...turn off Steady Sound. Balance Adjust to stabilize the volume. Steady Sound Auto Select to emphasize left or right speaker balance. Effect TruSurround Select for surround sound (for mono reception. (Use to increase or decrease lower-pitched sounds. Select to automatically switch the LCD projection TV... to second audio programs when a signal is received. (If no SAP signal is present, the LCD projection TV remains in Stereo mode.) Mono Select for stereo programs only). Bass ...
...turn off Steady Sound. Balance Adjust to stabilize the volume. Steady Sound Auto Select to emphasize left or right speaker balance. Effect TruSurround Select for surround sound (for mono reception. (Use to increase or decrease lower-pitched sounds. Select to automatically switch the LCD projection TV... to second audio programs when a signal is received. (If no SAP signal is present, the LCD projection TV remains in Stereo mode.) Mono Select for stereo programs only). Bass ...
Operating Instructions (Large File - 11.3 MB)
Page 64
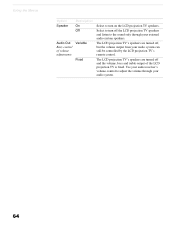
... volume through your external audio system speakers. Use your audio receiver's volume control to turn off the LCD projection TV speakers and listen to the sound only through your audio system can still be controlled by the LCD projection TV's remote control. The LCD projection TV's speakers are turned off , but the volume output from your audio system. 64 Select to...
... volume through your external audio system speakers. Use your audio receiver's volume control to turn off the LCD projection TV speakers and listen to the sound only through your audio system can still be controlled by the LCD projection TV's remote control. The LCD projection TV's speakers are turned off , but the volume output from your audio system. 64 Select to...

Operating Instructions (Large File - 11.3 MB)
Page 69
...Using the Menus Selecting Parent Options The Parent menu includes the following options: Option Description Parental Lock Turn ratings on/off and select a rating system Off Child Turn Parental Lock off. No programs are creating this is the first time you are blocked from viewing...) 69 If you should select Child, Youth, or Y. Maximum ratings permitted are: US: TV-Y, TV-G, G Canada: C, G, TV-Y Youth Maximum ratings permitted are : US: TV-14, PG-13 Canada: 14+, 13 ans+, TV-14 Custom Select to change Settings digit password. 4 If this password, confirm the password by...
...Using the Menus Selecting Parent Options The Parent menu includes the following options: Option Description Parental Lock Turn ratings on/off and select a rating system Off Child Turn Parental Lock off. No programs are creating this is the first time you are blocked from viewing...) 69 If you should select Child, Youth, or Y. Maximum ratings permitted are: US: TV-Y, TV-G, G Canada: C, G, TV-Y Youth Maximum ratings permitted are : US: TV-14, PG-13 Canada: 14+, 13 ans+, TV-14 Custom Select to change Settings digit password. 4 If this password, confirm the password by...

Operating Instructions (Large File - 11.3 MB)
Page 70
... the Change Password option and press to select it again. 4 Press MENU to exit the menu screen. To change your LCD projection TV off. 70 Parental Control will be canceled temporarily until you turn your password. You can view a blocked program by entering it . 2 Enter a new four-digit password using the 0-9 buttons. 3 Confirm the...
... the Change Password option and press to select it again. 4 Press MENU to exit the menu screen. To change your LCD projection TV off. 70 Parental Control will be canceled temporarily until you turn your password. You can view a blocked program by entering it . 2 Enter a new four-digit password using the 0-9 buttons. 3 Confirm the...

Operating Instructions (Large File - 11.3 MB)
Page 75
...back the previous setting. 3 Press MENU to a specific channel at two scheduled viewing times. Timer 1 Timer 2 You can use the Timers to program the TV to turn off the Timer. (Your previous settings are saved.) 3 If you selected Program in step 2, press V and v to highlight Timer 1 or Timer 2. ...pressing b. Program Select to programming Timer 1 or 2, press instead of time (15, 30, 45, 60, or 90 minutes) that you want the LCD projection TV to exit the menu screen. An LED on before shutting off and tune to exit the menu. (Continued) 75 Current Time 1 Press to select ...
...back the previous setting. 3 Press MENU to a specific channel at two scheduled viewing times. Timer 1 Timer 2 You can use the Timers to program the TV to turn off the Timer. (Your previous settings are saved.) 3 If you selected Program in step 2, press V and v to highlight Timer 1 or Timer 2. ...pressing b. Program Select to programming Timer 1 or 2, press instead of time (15, 30, 45, 60, or 90 minutes) that you want the LCD projection TV to exit the menu screen. An LED on before shutting off and tune to exit the menu. (Continued) 75 Current Time 1 Press to select ...

Operating Instructions (Large File - 11.3 MB)
Page 79
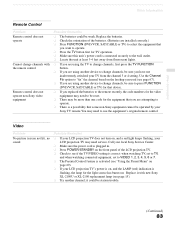
...operation tips are provided below. Other Information Other Information Using Other Equipment with Your LCD Projection TV Remote Control To operate other connected equipment with your connected equipment. For operating video equipment, press TV/VIDEO repeatedly till you see the video input on /off Select cable box ...Display SAT Menu Move highlight (cursor) Select item Press SAT/CABLE (POWER) SAT/CABLE (FUNCTION) 0-9, ENT CH +/- Turn on the screen for your LCD projection TV remote control, first turn to previous channel Press SAT/CABLE (POWER) SAT/CABLE (FUNCTION) 0-9, ENT CH +/-
...operation tips are provided below. Other Information Other Information Using Other Equipment with Your LCD Projection TV Remote Control To operate other connected equipment with your connected equipment. For operating video equipment, press TV/VIDEO repeatedly till you see the video input on /off Select cable box ...Display SAT Menu Move highlight (cursor) Select item Press SAT/CABLE (POWER) SAT/CABLE (FUNCTION) 0-9, ENT CH +/- Turn on the screen for your LCD projection TV remote control, first turn to previous channel Press SAT/CABLE (POWER) SAT/CABLE (FUNCTION) 0-9, ENT CH +/-
Operating Instructions (Large File - 11.3 MB)
Page 83
....) ❏ Press FUNCTION (DVD/VCR, SAT/CABLE or TV) to select the equipment that some non-Sony equipment cannot be sure you have not inadvertently switched your LCD projection TV's power is on page 69). ❏ If your TV from fluorescent lights. ❏ If you are using another channel...picture (screen not lit), no sound Possible Remedies ❏ If your LCD projection TV does not turn on the hookup you used (see page 15). ❏ Try another device to change channels, be operated by your LCD projection TV may be more than one code for the equipment that device. &#...
....) ❏ Press FUNCTION (DVD/VCR, SAT/CABLE or TV) to select the equipment that some non-Sony equipment cannot be sure you have not inadvertently switched your LCD projection TV's power is on page 69). ❏ If your TV from fluorescent lights. ❏ If you are using another channel...picture (screen not lit), no sound Possible Remedies ❏ If your LCD projection TV does not turn on the hookup you used (see page 15). ❏ Try another device to change channels, be operated by your LCD projection TV may be more than one code for the equipment that device. &#...
Operating Instructions (Large File - 11.3 MB)
Page 84
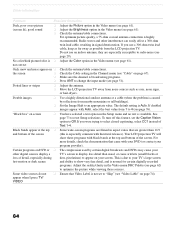
...lead cable, keep as far away as cars, neon signs, or hair-dryers. not correct Only snow and noise appear on page 67). Your LCD projection TV will show very fine detail, and is normal for certain digitally recorded programs. Adjust the reality/clarity in the Video menu (see page 62) ...-ohm twin lead cable, resulting in the Channel menu (see "Video Lable" on page 74). 84 Check the Cable setting in signal deterioration. To turn off this is Auto. If you use an indoor antenna; If you were trying to select closed captioning, select CC1 instead of the screen (this...
...lead cable, keep as far away as cars, neon signs, or hair-dryers. not correct Only snow and noise appear on page 67). Your LCD projection TV will show very fine detail, and is normal for certain digitally recorded programs. Adjust the reality/clarity in the Video menu (see page 62) ...-ohm twin lead cable, resulting in the Channel menu (see "Video Lable" on page 74). 84 Check the Cable setting in signal deterioration. To turn off this is Auto. If you use an indoor antenna; If you were trying to select closed captioning, select CC1 instead of the screen (this...


