Sony KDL-55NX720 Research

Related Manual Pages


Related Videos

Sony BRAVIA KDL55NX720 55-inch 1080p 3D LED HDTV with Built-in WiFi Review
Duration: 2:45
Total Views: 25,209
Duration: 2:45
Total Views: 25,209
LCD-TV SONY KDL-55NX720 55.avi
Duration: 4:05
Total Views: 36,432
Duration: 4:05
Total Views: 36,432
3198. Sony BRAVIA KDL55NX720 55-inch 1080p 3D LED HDTV Black Review | Sony BRAVIA KDL55NX720
Duration: 2:45
Total Views: 338
Duration: 2:45
Total Views: 338
Sony Bravia KDL-55NX720 Review
Duration: 2:59
Total Views: 7,424
Duration: 2:59
Total Views: 7,424
Review Sony Internet LED HDTV - KDL-55NX720, KDL-46NX720, KDL-40NX720
Duration: 1:59
Total Views: 16
Duration: 1:59
Total Views: 16
Similar Questions

Www.sony-asia.com/support-model Bravia-kdl-55/46/40/32ex720
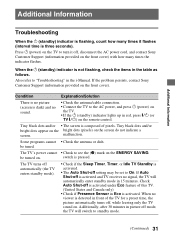
when i switch on the above model standby indicator is flashing 4 time (4 second duration).please giv...
when i switch on the above model standby indicator is flashing 4 time (4 second duration).please giv...
(Posted by shan31548 8 years ago)

Why Does My Tv Periodically Loses Power And The Screen Turns Black? I
My TV is losing power,the power saver light comes on the screen and I have it on the off modeThe scr...
My TV is losing power,the power saver light comes on the screen and I have it on the off modeThe scr...
(Posted by mmarkus 8 years ago)

Sony Kdl-55nx720 Led Flashing 5 Times
Red LED flashing five times, pausing and then repeating, what fault does this indicate?
Red LED flashing five times, pausing and then repeating, what fault does this indicate?
(Posted by mattyj22 9 years ago)


Code For 4blinks Of Standby Light In Led Sony Kdl-55nx720
(Posted by anita11637 11 years ago)