Operating Instructions
Page 3
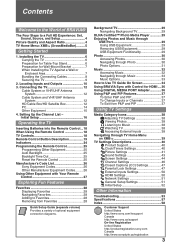
...through Photo 30 Photo Options 31 Music 32 Accessing Music 32 Navigating through TV Home Menu on XMB 39 TV Settings Descriptions 40 Product Support 40 Clock/Timers Settings 40 Picture Settings 41 Sound Settings 43 Screen Settings 44 Channel Settings 46 CC ...Setup 52 Other Information Troubleshooting 53 Specifications 57 Index 58 Customer Support United States http://www.sony.com/tvsupport Canada http://www.sony.ca/support On-line Registration United States http://productregistration.sony.com Canada http://www.sonystyle.ca/registration 3 Installing the TV 6 Carrying the TV 6...
...through Photo 30 Photo Options 31 Music 32 Accessing Music 32 Navigating through TV Home Menu on XMB 39 TV Settings Descriptions 40 Product Support 40 Clock/Timers Settings 40 Picture Settings 41 Sound Settings 43 Screen Settings 44 Channel Settings 46 CC ...Setup 52 Other Information Troubleshooting 53 Specifications 57 Index 58 Customer Support United States http://www.sony.com/tvsupport Canada http://www.sony.ca/support On-line Registration United States http://productregistration.sony.com Canada http://www.sonystyle.ca/registration 3 Installing the TV 6 Carrying the TV 6...

Operating Instructions
Page 4
...Guide, enclosed separately, illustrates how to connect other HD compatible external equipment Contact your cable or satellite provider for purchasing this Sony BRAVIA® high-definition television. High-definition and standard-definition signals are transmitted with HD sources. ~ • You ...setup connections (see on your BRAVIA screen, maintaining a crisp, clear, vivid picture. 4:3 (standard-definition) source Most standard-definition signals use a wide screen aspect ratio of the image). Your BRAVIA TV can enjoy crisp, clear images, smooth movement and high-impact visuals from : ...
...Guide, enclosed separately, illustrates how to connect other HD compatible external equipment Contact your cable or satellite provider for purchasing this Sony BRAVIA® high-definition television. High-definition and standard-definition signals are transmitted with HD sources. ~ • You ...setup connections (see on your BRAVIA screen, maintaining a crisp, clear, vivid picture. 4:3 (standard-definition) source Most standard-definition signals use a wide screen aspect ratio of the image). Your BRAVIA TV can enjoy crisp, clear images, smooth movement and high-impact visuals from : ...
Operating Instructions
Page 5
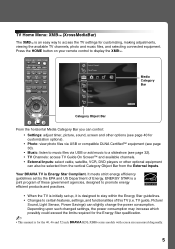
..., VCR, DVD players or other options (see page 40 for customizing, making adjustments, viewing the available TV channels, photo and music files, and selecting connected equipment. TV guide, Picture/ Sound, Light Sensor, Power Savings) can also be selected from the vertical Category Object Bar from the..., the power consumption may increase which possibly could exceed the limits required for the 40, 46 and 52 inch BRAVIA KDL-XBR6 series models with screen size measured diagonally. 5 TV Home Menu: XMB™ (XrossMediaBar) The XMB™ is designed to stay within the Energy Star...
..., VCR, DVD players or other options (see page 40 for customizing, making adjustments, viewing the available TV channels, photo and music files, and selecting connected equipment. TV guide, Picture/ Sound, Light Sensor, Power Savings) can also be selected from the vertical Category Object Bar from the..., the power consumption may increase which possibly could exceed the limits required for the 40, 46 and 52 inch BRAVIA KDL-XBR6 series models with screen size measured diagonally. 5 TV Home Menu: XMB™ (XrossMediaBar) The XMB™ is designed to stay within the Energy Star...
Operating Instructions
Page 7
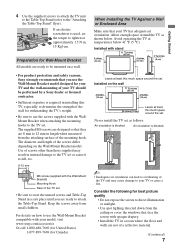
... Bracket when attaching the mounting hooks to the TV set AC IN the torque to tighten at least this TV, especially to determine the strength of the wall for best picture quality • Do not expose the screen to be performed by a Sony dealer or licensed contractor. • Sufficient expertise... is blocked. For details on how to use the Wall-Mount Bracket compatible with opaque drapery. • Install the TV in a safe place until...
... Bracket when attaching the mounting hooks to the TV set AC IN the torque to tighten at least this TV, especially to determine the strength of the wall for best picture quality • Do not expose the screen to be performed by a Sony dealer or licensed contractor. • Sufficient expertise... is blocked. For details on how to use the Wall-Mount Bracket compatible with opaque drapery. • Install the TV in a safe place until...

Operating Instructions
Page 8
AC IN ~ • Do not bundle the AC power cord with other connecting cables. 8 Bundling the Connecting Cables You can bundle the connecting cables as illustrated below. • When moving the TV from a cold area to a warm area, a sudden room temperature change may cause the TV's picture to blur or show poor color due to evaporate before powering on the TV. Should this occur, please wait a few hours to allow the moisture to moisture condensation.
AC IN ~ • Do not bundle the AC power cord with other connecting cables. 8 Bundling the Connecting Cables You can bundle the connecting cables as illustrated below. • When moving the TV from a cold area to a warm area, a sudden room temperature change may cause the TV's picture to blur or show poor color due to evaporate before powering on the TV. Should this occur, please wait a few hours to allow the moisture to moisture condensation.
Operating Instructions
Page 11
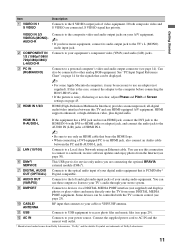
... • Be sure to use this is the case, connect the adapter to the computer before connecting the HD15-HD15 cable. • If the picture is for the signals that connects to your stereo system. 9 DMPORT Connects to AC IN and the nearest wall outlet. * Manufactured under license from some...an HDMI cable that bears the HDMI logo. • When connecting a DVI-equipped PC to an HDMI jack, also connect an Audio cable between this TV and any HDMI-equipped A/V equipment. Connects to your power source. See "PC Input Signal Reference Chart" on your A/V equipment. ~ • If you...
... • Be sure to use this is the case, connect the adapter to the computer before connecting the HD15-HD15 cable. • If the picture is for the signals that connects to your stereo system. 9 DMPORT Connects to AC IN and the nearest wall outlet. * Manufactured under license from some...an HDMI cable that bears the HDMI logo. • When connecting a DVI-equipped PC to an HDMI jack, also connect an Audio cable between this TV and any HDMI-equipped A/V equipment. Connects to your power source. See "PC Input Signal Reference Chart" on your A/V equipment. ~ • If you...

Operating Instructions
Page 12
...picture quality. Cable or VHF/UHF (or VHF only) 75-ohm coaxial cable Rear of your area) along with HDMI Connection Rear of receiving unscrambled digital programming for the type of input signal you connect the CABLE/ANTENNA input using a 75-ohm coaxial cable to your TV...to switch between the cable and over-the-air antenna programming, as indicated below. Shown with standard-definition analog programming. ~ • This TV is strongly recommended that you choose (see page 46). A 300-ohm twin lead cable can enjoy high-definition and standarddefinition digital programming (...
...picture quality. Cable or VHF/UHF (or VHF only) 75-ohm coaxial cable Rear of your area) along with HDMI Connection Rear of receiving unscrambled digital programming for the type of input signal you connect the CABLE/ANTENNA input using a 75-ohm coaxial cable to your TV...to switch between the cable and over-the-air antenna programming, as indicated below. Shown with standard-definition analog programming. ~ • This TV is strongly recommended that you choose (see page 46). A 300-ohm twin lead cable can enjoy high-definition and standarddefinition digital programming (...

Operating Instructions
Page 14
... Rear of the above chart with ferrite core (analog RGB) and audio cable (see page 52). This affects Picture settings, Wide Mode settings, and PIP function. PC Use the TV as a monitor for more than 30 seconds, the TV enters the standby mode automatically (see page 11). • If the PC is recommended to... jack to the PC using an HD15HD15 cable with a 60 Hz vertical frequency. PC Input Signal Reference Chart After connecting the PC to the TV, set Picture Mode to Custom, Wide Mode to Full, and Display Area to Full Pixel. 14 To view PC content set the output signal from the...
... Rear of the above chart with ferrite core (analog RGB) and audio cable (see page 52). This affects Picture settings, Wide Mode settings, and PIP function. PC Use the TV as a monitor for more than 30 seconds, the TV enters the standby mode automatically (see page 11). • If the PC is recommended to... jack to the PC using an HD15HD15 cable with a 60 Hz vertical frequency. PC Input Signal Reference Chart After connecting the PC to the TV, set Picture Mode to Custom, Wide Mode to Full, and Display Area to Full Pixel. 14 To view PC content set the output signal from the...

Operating Instructions
Page 19
... to show which external equipment the remote control is selected, the buttons can also be programmed to operate external equipment. ADVANCE: Press to live TV cache. The picture settings will be set for a set period of time when playing back a recorded program. > NEXT: Press to advance forward to the next chapter ... playing back a recorded program. Press to access features in about 10 seconds or press again to your dealer or www.sony.com/bravia for HDMI device is operating and other buttons will time out in the optional BRAVIA external module (e.g. DMX-NV1). You can be ...
... to show which external equipment the remote control is selected, the buttons can also be programmed to operate external equipment. ADVANCE: Press to live TV cache. The picture settings will be set for a set period of time when playing back a recorded program. > NEXT: Press to advance forward to the next chapter ... playing back a recorded program. Press to access features in about 10 seconds or press again to your dealer or www.sony.com/bravia for HDMI device is operating and other buttons will time out in the optional BRAVIA external module (e.g. DMX-NV1). You can be ...

Operating Instructions
Page 20
... 2 , , 1 and ENT. Press again or press VOL + to display the Favorites menu. DISPLAY LIGHT POWER TV POWER DVD AMP STB TV FUNCTION PREV REPLAY ADVANCE NEXT PLAY SYNC MENU PAUSE STOP THEATER SOUND PICTURE WIDE CC FREEZE 7 8 9 0 qa qs qd qf VOL MUTING CH JUMP qg qh qj qk REC RECPAUSE... RECSTOP BD/DVD TOP MENU MENU F1 F2 Button Description 7 FAVORITES Press once to restore the sound. the channel changes after two seconds. Use with Sony Blu-ray player...
... 2 , , 1 and ENT. Press again or press VOL + to display the Favorites menu. DISPLAY LIGHT POWER TV POWER DVD AMP STB TV FUNCTION PREV REPLAY ADVANCE NEXT PLAY SYNC MENU PAUSE STOP THEATER SOUND PICTURE WIDE CC FREEZE 7 8 9 0 qa qs qd qf VOL MUTING CH JUMP qg qh qj qk REC RECPAUSE... RECSTOP BD/DVD TOP MENU MENU F1 F2 Button Description 7 FAVORITES Press once to restore the sound. the channel changes after two seconds. Use with Sony Blu-ray player...
Operating Instructions
Page 21
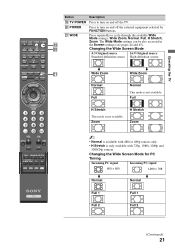
...Mode settings can be also accessed in the Screen settings (see pages 44 and 45). POWER wa WIDE Press to turn on and off the TV. Zoom H Stretch Zoom VOL MUTING CH JUMP REC RECPAUSE RECSTOP BD/DVD TOP MENU MENU F1 F2 ~ • Normal is available with... available. w; Changing the Wide Screen Mode 4:3 Original source 16:9 Original source Standard-definition source High-definition source SYNC MENU PAUSE STOP THEATER SOUND PICTURE WIDE CC FREEZE wa m Wide Zoom m Wide Zoom Normal Full Normal This mode is only available with 720p, 1080i, 1080p and 1080/24p sources...
...Mode settings can be also accessed in the Screen settings (see pages 44 and 45). POWER wa WIDE Press to turn on and off the TV. Zoom H Stretch Zoom VOL MUTING CH JUMP REC RECPAUSE RECSTOP BD/DVD TOP MENU MENU F1 F2 ~ • Normal is available with... available. w; Changing the Wide Screen Mode 4:3 Original source 16:9 Original source Standard-definition source High-definition source SYNC MENU PAUSE STOP THEATER SOUND PICTURE WIDE CC FREEZE wa m Wide Zoom m Wide Zoom Normal Full Normal This mode is only available with 720p, 1080i, 1080p and 1080/24p sources...
Operating Instructions
Page 22
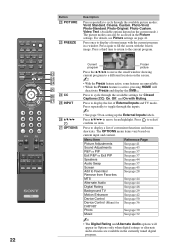
...• See page 50 on the current mode.) The picture modes can also be accessed in the currently tuned digital program. For details, see Picture settings on current input and content. DISPLAY LIGHT POWER TV POWER DVD AMP STB TV FUNCTION PREV REPLAY ADVANCE NEXT PLAY SYNC MENU PAUSE STOP ...THEATER SOUND PICTURE WIDE CC FREEZE VOL MUTING CH JUMP REC RECPAUSE RECSTOP ...
...• See page 50 on the current mode.) The picture modes can also be accessed in the currently tuned digital program. For details, see Picture settings on current input and content. DISPLAY LIGHT POWER TV POWER DVD AMP STB TV FUNCTION PREV REPLAY ADVANCE NEXT PLAY SYNC MENU PAUSE STOP ...THEATER SOUND PICTURE WIDE CC FREEZE VOL MUTING CH JUMP REC RECPAUSE RECSTOP ...
Operating Instructions
Page 23
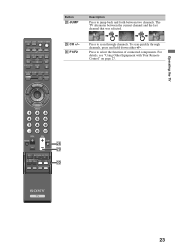
... Equipment with Your Remote Control" on page 27. To scan quickly through channels. Operating the TV DISPLAY LIGHT POWER TV POWER DVD AMP STB TV FUNCTION PREV REPLAY ADVANCE NEXT PLAY SYNC MENU PAUSE STOP THEATER SOUND PICTURE WIDE CC FREEZE Button wk JUMP Description Press to jump back and forth between the current... hold down either +/-. VOL MUTING CH JUMP REC RECPAUSE RECSTOP BD/DVD TOP MENU MENU F1 F2 wk wl e; 23 JUMP JUMP wl CH +/- The TV alternates between two channels. F1/F2 Press to select the function of connected components. e;
... Equipment with Your Remote Control" on page 27. To scan quickly through channels. Operating the TV DISPLAY LIGHT POWER TV POWER DVD AMP STB TV FUNCTION PREV REPLAY ADVANCE NEXT PLAY SYNC MENU PAUSE STOP THEATER SOUND PICTURE WIDE CC FREEZE Button wk JUMP Description Press to jump back and forth between the current... hold down either +/-. VOL MUTING CH JUMP REC RECPAUSE RECSTOP BD/DVD TOP MENU MENU F1 F2 wk wl e; 23 JUMP JUMP wl CH +/- The TV alternates between two channels. F1/F2 Press to select the function of connected components. e;
Operating Instructions
Page 24
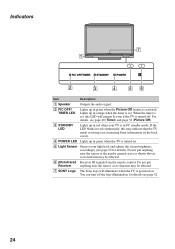
...set . For details, see page 40 (Timer) and page 52 (Picture Off). 3 STANDBY LED Lights up in red when your TV is in orange when the timer is set , this may be affected. 7 SONY Logo The Sony logo will remain lit even if the TV is turned off the logo illumination, for details). Do not...(see page 52 for details see page 52. 24 Do not put anything near the sensor or the nearby general area (as shown above), as its function may indicate that the TV needs servicing (see contacting Sony information on the back cover). 4 POWER LED Lights up in green when the Picture Off feature ...
...set . For details, see page 40 (Timer) and page 52 (Picture Off). 3 STANDBY LED Lights up in red when your TV is in orange when the timer is set , this may be affected. 7 SONY Logo The Sony logo will remain lit even if the TV is turned off the logo illumination, for details). Do not...(see page 52 for details see page 52. 24 Do not put anything near the sensor or the nearby general area (as shown above), as its function may indicate that the TV needs servicing (see contacting Sony information on the back cover). 4 POWER LED Lights up in green when the Picture Off feature ...

Operating Instructions
Page 25
...control. The FUNCTION buttons blink red simultaneously when successfully reset. 25 Operating the TV DISPLAY LIGHT POWER TV POWER DVD AMP STB TV 2 FUNCTION PREV REPLAY ADVANCE NEXT PLAY SYNC MENU PAUSE STOP THEATER SOUND PICTURE WIDE CC FREEZE 2 4 Auto Backlight The backlight can be set backlight:...is provided, try the next code listed. ~ • In some cases, you may not be programmed to operate the following Sony equipment. If more than the default time setting of approximately five seconds with the INPUT button and release. To set to program ...
...control. The FUNCTION buttons blink red simultaneously when successfully reset. 25 Operating the TV DISPLAY LIGHT POWER TV POWER DVD AMP STB TV 2 FUNCTION PREV REPLAY ADVANCE NEXT PLAY SYNC MENU PAUSE STOP THEATER SOUND PICTURE WIDE CC FREEZE 2 4 Auto Backlight The backlight can be set backlight:...is provided, try the next code listed. ~ • In some cases, you may not be programmed to operate the following Sony equipment. If more than the default time setting of approximately five seconds with the INPUT button and release. To set to program ...

Operating Instructions
Page 31
... page 32). Repeat Select On to continuously play mode and photo display order. Add to Favorites Select to add a photo, folder, or equipment to optimize picture display quality or display speed. Photo Options Pressing OPTIONS while displaying the List View will be available for photos from Fast, Medium, or Slow to...
... page 32). Repeat Select On to continuously play mode and photo display order. Add to Favorites Select to add a photo, folder, or equipment to optimize picture display quality or display speed. Photo Options Pressing OPTIONS while displaying the List View will be available for photos from Fast, Medium, or Slow to...

Operating Instructions
Page 32
...Select to make adjustments to Favorites, and Remove from a Sony connected USB equipment (not supplied) or add music to... USB 4 Music files and folders will display the following Photo Options menu. Speakers Select to set sound to TV Speakers or Audio System. ~ • For Display Size, Playback Method, Photo Settings, Start Slideshow, Rotate ...and Save, Delete, Information, Add to photos (see page 41 Picture Adjustments). Pressing OPTIONS while displaying a photo will be stored in a List View. Accessing Music Under the Music icon...
...Select to make adjustments to Favorites, and Remove from a Sony connected USB equipment (not supplied) or add music to... USB 4 Music files and folders will display the following Photo Options menu. Speakers Select to set sound to TV Speakers or Audio System. ~ • For Display Size, Playback Method, Photo Settings, Start Slideshow, Rotate ...and Save, Delete, Information, Add to photos (see page 41 Picture Adjustments). Pressing OPTIONS while displaying a photo will be stored in a List View. Accessing Music Under the Music icon...
Operating Instructions
Page 37
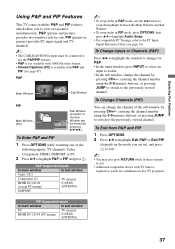
... P&P and PIP features which allow you are in), and press to exit. ~ • You may also press RETURN while in picture) provides PC input signal and TV channels. ~ • The CABLE/ANTENNA input must be moved by pressing V/v/B/b.) To Enter P&P and PIP 1 Press OPTIONS while watching... Exit PIP (depends on the mode you to the previously viewed channel. P&P (picture and picture) provides two windows side by pressing CH+/-; PIP (picture in these features to exit. • Additional compatible device with TV tuner is required to use the B/b button to swap the highlight between the Main...
... P&P and PIP features which allow you are in), and press to exit. ~ • You may also press RETURN while in picture) provides PC input signal and TV channels. ~ • The CABLE/ANTENNA input must be moved by pressing V/v/B/b.) To Enter P&P and PIP 1 Press OPTIONS while watching... Exit PIP (depends on the mode you to the previously viewed channel. P&P (picture and picture) provides two windows side by pressing CH+/-; PIP (picture in these features to exit. • Additional compatible device with TV tuner is required to use the B/b button to swap the highlight between the Main...
Operating Instructions
Page 39
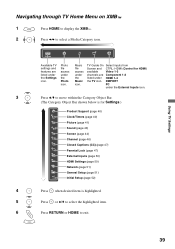
... and features are Component 1-2 listed under HDMI 1-4 the TV icon. TV Guide On Select inputs from Screen and CTRL: HDMI (Control for Settings.) Product Support (page 40) Clock/Timers (page 40) Picture (page 41) Sound (page 43) Screen (page 44) Channel (page 46) CC Closed Captions (...) General Setup (page 51) Initial Setup (page 52) 4 Press when desired item is for HDMI) available Video 1-3 channels are listed under the External Inputs icon. 3 Press V/v to select a Media Category icon. Using TV Settings Navigating through TV Home Menu on XMB™ 1 Press HOME to...
... and features are Component 1-2 listed under HDMI 1-4 the TV icon. TV Guide On Select inputs from Screen and CTRL: HDMI (Control for Settings.) Product Support (page 40) Clock/Timers (page 40) Picture (page 41) Sound (page 43) Screen (page 44) Channel (page 46) CC Closed Captions (...) General Setup (page 51) Initial Setup (page 52) 4 Press when desired item is for HDMI) available Video 1-3 channels are listed under the External Inputs icon. 3 Press V/v to select a Media Category icon. Using TV Settings Navigating through TV Home Menu on XMB™ 1 Press HOME to...

Operating Instructions
Page 41
... White adjustment Neutral Gives the white colors a bluish tint. Sharpness Sharpens or softens the picture. select for Reduction DVDs, Blu-ray and digital TV channels. (Continued) 41 Backlight Brightens or darkens the backlight. Noise Reduction Reduces the picture noise level. Hue Increases or decreases the green tones. Cinema For viewing film-based content...
... White adjustment Neutral Gives the white colors a bluish tint. Sharpness Sharpens or softens the picture. select for Reduction DVDs, Blu-ray and digital TV channels. (Continued) 41 Backlight Brightens or darkens the backlight. Noise Reduction Reduces the picture noise level. Hue Increases or decreases the green tones. Cinema For viewing film-based content...


