Operating Instructions
Page 2
... in the TV Guide On Screen system and cannot guarantee service availability in a particular installation. Refer to a cable service provider. s Increase the separation between the equipment and receiver. For Customers in the spaces provided below. SU-FL300L Install TV Stands SU-FL300L and SU-FL300M using the red-printed paper template supplied with the SU-FL71M TV stand or the SU-WL500 WALL-MOUNT BRACKET. Do not use this polarized...
... in the TV Guide On Screen system and cannot guarantee service availability in a particular installation. Refer to a cable service provider. s Increase the separation between the equipment and receiver. For Customers in the spaces provided below. SU-FL300L Install TV Stands SU-FL300L and SU-FL300M using the red-printed paper template supplied with the SU-FL71M TV stand or the SU-WL500 WALL-MOUNT BRACKET. Do not use this polarized...
Operating Instructions
Page 3
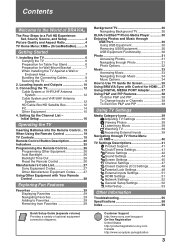
... with Control for Wall-Mount Bracket 7 When Installing the TV Against a Wall or Enclosed Area 7 Bundling the Connecting Cables 8 Securing the TV 9 2. Locating Inputs and Outputs 10 3. Installing the TV 6 Carrying the TV 6 Preparation for Table-Top Stand 6 Preparation for HDMI ....37 Using DIGITAL MEDIA PORT Adapter 37 Using P&P and PIP Features 38 To Enter P&P and PIP 38 To Change Inputs or Channels 38 To Exit from Favorites 29 Quick Setup Guide (separate volume) Provides a variety of BRAVIA® The Four Steps to Use TV Guide On Screen 35 Using BRAVIA...
... with Control for Wall-Mount Bracket 7 When Installing the TV Against a Wall or Enclosed Area 7 Bundling the Connecting Cables 8 Securing the TV 9 2. Locating Inputs and Outputs 10 3. Installing the TV 6 Carrying the TV 6 Preparation for Table-Top Stand 6 Preparation for HDMI ....37 Using DIGITAL MEDIA PORT Adapter 37 Using P&P and PIP Features 38 To Enter P&P and PIP 38 To Change Inputs or Channels 38 To Exit from Favorites 29 Quick Setup Guide (separate volume) Provides a variety of BRAVIA® The Four Steps to Use TV Guide On Screen 35 Using BRAVIA...
Operating Instructions
Page 5
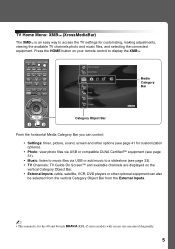
... page 41 for customization options). • Photo: view photo files via USB or compatible DLNA Certified™ equipment (see page 31). • Music: listen to music files via USB or add music to a slideshow (see page 33). • TV Channels: TV Guide On Screen™ and available channels are displayed on your remote control to access the TV settings for the 40 and 46 inch BRAVIA KDL-Z series models with screen size measured diagonally. 5
... page 41 for customization options). • Photo: view photo files via USB or compatible DLNA Certified™ equipment (see page 31). • Music: listen to music files via USB or add music to a slideshow (see page 33). • TV Channels: TV Guide On Screen™ and available channels are displayed on your remote control to access the TV settings for the 40 and 46 inch BRAVIA KDL-Z series models with screen size measured diagonally. 5
Operating Instructions
Page 6
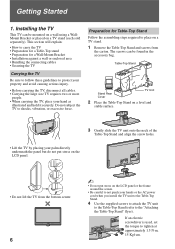
... for a Table-Top stand • Preparation for Table-Top Stand Follow the assembling steps required to not pinch your hand as illustrated and hold it securely. Installing the TV This TV can be mounted on a wall using a WallMount Bracket or placed on a TV stand. 1 Remove the Table-Top Stand and screws from the bottom center. 6 ~ • Do not put stress on the LCD panel or the frame around the screen. •...
... for a Table-Top stand • Preparation for Table-Top Stand Follow the assembling steps required to not pinch your hand as illustrated and hold it securely. Installing the TV This TV can be mounted on a wall using a WallMount Bracket or placed on a TV stand. 1 Remove the Table-Top Stand and screws from the bottom center. 6 ~ • Do not put stress on the LCD panel or the frame around the screen. •...
Operating Instructions
Page 7
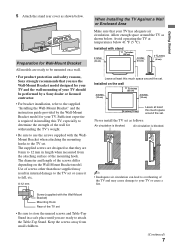
... contractor. • For bracket installation, refer to the supplied "Installing the Wall-Mount Bracket" and the instruction guide provided by the Wall-Mount Bracket model for withstanding the TV's weight. • Be sure to use the screws supplied with the WallMount Bracket when attaching the mounting hooks to attach the Table-Top Stand. Installed with the Wall-Mount Bracket) Mounting Hook Rear of the TV set . Installed on the Wall-Mount Bracket model. Screw (supplied with stand 11 7/8 inches (30 cm) 4 inches (10 cm) 4 inches (10 cm) 2 3/8 inches (6 cm) Leave at temperatures...
... contractor. • For bracket installation, refer to the supplied "Installing the Wall-Mount Bracket" and the instruction guide provided by the Wall-Mount Bracket model for withstanding the TV's weight. • Be sure to use the screws supplied with the WallMount Bracket when attaching the mounting hooks to attach the Table-Top Stand. Installed with the Wall-Mount Bracket) Mounting Hook Rear of the TV set . Installed on the Wall-Mount Bracket model. Screw (supplied with stand 11 7/8 inches (30 cm) 4 inches (10 cm) 4 inches (10 cm) 2 3/8 inches (6 cm) Leave at temperatures...
Operating Instructions
Page 9
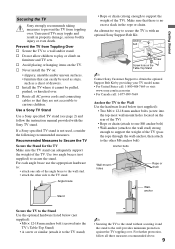
Use a Sony TV Stand Use a Sony specified TV stand (see page 2) and follow all AC power cords and connecting cables so that they are not accessible to play or climb on the rear of the TV) • Rope or chain (attach to the TV stand. Use two angle braces (not supplied) to a wall and/or stand. Make sure that can adequately support the weight of the angle brace to the wall stud. • attach the other...
Use a Sony TV Stand Use a Sony specified TV stand (see page 2) and follow all AC power cords and connecting cables so that they are not accessible to play or climb on the rear of the TV) • Rope or chain (attach to the TV stand. Use two angle braces (not supplied) to a wall and/or stand. Make sure that can adequately support the weight of the angle brace to the wall stud. • attach the other...
Operating Instructions
Page 11
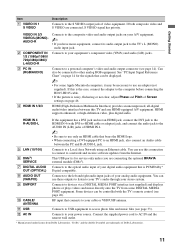
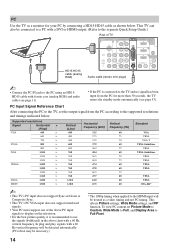
... TV's remote control (see page 26). 0 CABLE/ ANTENNA RF input that connects to other analog RGB equipment. You can use only an HDMI cable that can be controlled with DVI-to-HDMI cable or adapter) jack, and connect the audio jack to a network and receive software updates from Dolby Laboratories. VIDEO IN 2/3 VIDEO/L(MONO)AUDIO-R 2 COMPONENT IN 1/2 (1080p/1080i/ 720p/480p/480i)/ L-AUDIO-R 3 PC IN (RGB/AUDIO) 4 HDMI IN 1/2/3 Connects to the composite video and audio output jacks on page 14 for service...
... TV's remote control (see page 26). 0 CABLE/ ANTENNA RF input that connects to other analog RGB equipment. You can use only an HDMI cable that can be controlled with DVI-to-HDMI cable or adapter) jack, and connect the audio jack to a network and receive software updates from Dolby Laboratories. VIDEO IN 2/3 VIDEO/L(MONO)AUDIO-R 2 COMPONENT IN 1/2 (1080p/1080i/ 720p/480p/480i)/ L-AUDIO-R 3 PC IN (RGB/AUDIO) 4 HDMI IN 1/2/3 Connects to the composite video and audio output jacks on page 14 for service...
Operating Instructions
Page 14
... supported resolutions and timings indicated below . PC Input Signal Reference Chart After connecting the PC to the TV, set Picture Mode to Custom, Wide Mode to Full, and Display Area to the separate Quick Setup Guide.) Rear of the above chart with a DVI or HDMI output. (Refer to Full Pixel. 14 To view PC content set the output signal from the PC for your PC by connecting a HD15-HD15 cable as a video timing and not PC timing...
... supported resolutions and timings indicated below . PC Input Signal Reference Chart After connecting the PC to the TV, set Picture Mode to Custom, Wide Mode to Full, and Display Area to the separate Quick Setup Guide.) Rear of the above chart with a DVI or HDMI output. (Refer to Full Pixel. 14 To view PC content set the output signal from the PC for your PC by connecting a HD15-HD15 cable as a video timing and not PC timing...
Operating Instructions
Page 16
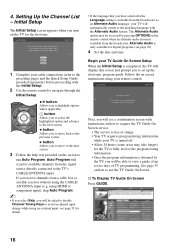
... time. s To Display TV Guide On Screen Press GUIDE. 16 Initial Setup Step 1 of 6 Initial Setup is complete. English Español Français 1 Complete your remote control. using your cable connections (refer to the preceding pages and the Quick Setup Guide provided separately) before proceeding with instructions on how to avoid accidental input change while using the CABLE/ ANTENNA input (e.g. See page 35 on the remote control when an alternate audio stream is free of TV programming...
... time. s To Display TV Guide On Screen Press GUIDE. 16 Initial Setup Step 1 of 6 Initial Setup is complete. English Español Français 1 Complete your remote control. using your cable connections (refer to the preceding pages and the Quick Setup Guide provided separately) before proceeding with instructions on how to avoid accidental input change while using the CABLE/ ANTENNA input (e.g. See page 35 on the remote control when an alternate audio stream is free of TV programming...

Operating Instructions
Page 23
... TV Motion Enhancer Device Control Device Control (Menu) for Closed Captions (CC): On, Off, and On with the frozen image. wj OPTIONS Press to toggle through the inputs. ~ • See page 51 on the current mode.) The picture modes can also be accessed in the currently tuned digital program. 23 The OPTIONS menu items vary based on page 42. Menu Item Picture Adjustments Sound Adjustments P&P or PIP Exit P&P or Exit PIP Speakers Audio Swap Screen...
... TV Motion Enhancer Device Control Device Control (Menu) for Closed Captions (CC): On, Off, and On with the frozen image. wj OPTIONS Press to toggle through the inputs. ~ • See page 51 on the current mode.) The picture modes can also be accessed in the currently tuned digital program. 23 The OPTIONS menu items vary based on page 42. Menu Item Picture Adjustments Sound Adjustments P&P or PIP Exit P&P or Exit PIP Speakers Audio Swap Screen...
Operating Instructions
Page 25
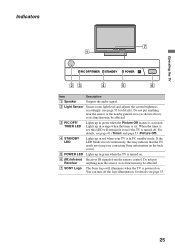
... signals from the remote control. You can turn off . Do not put Receiver anything near the sensor, as its function may be affected. 7 SONY Logo The Sony logo will remain lit even if the TV is in red when your TV is turned off the logo illumination, for details). Operating the TV Indicators 7 1 PIC OFF/TIMER STANDBY POWER 23 4 5 6 Item Description 1 Speaker Outputs the audio signal. 2 Light Sensor Senses room light level and adjusts the screen...
... signals from the remote control. You can turn off . Do not put Receiver anything near the sensor, as its function may be affected. 7 SONY Logo The Sony logo will remain lit even if the TV is in red when your TV is turned off the logo illumination, for details). Operating the TV Indicators 7 1 PIC OFF/TIMER STANDBY POWER 23 4 5 6 Item Description 1 Speaker Outputs the audio signal. 2 Light Sensor Senses room light level and adjusts the screen...
Operating Instructions
Page 37
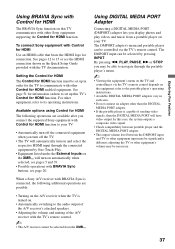
... 12 to its operating instructions. When a Sony A/V receiver with BRAVIA Sync is connected, the following operations are possible: • Turning on the A/V receiver when the TV is capable of the A/V receiver with the TV's remote control. ~ • The A/V receiver cannot be set up this case, the system outputs a composite video signal. • Check compatibility between portable player and the DIGITAL MEDIA PORT adapter. • The output volume level between the DMPORT input and TV or other equipment's volume may be...
... 12 to its operating instructions. When a Sony A/V receiver with BRAVIA Sync is connected, the following operations are possible: • Turning on the A/V receiver when the TV is capable of the A/V receiver with the TV's remote control. ~ • The A/V receiver cannot be set up this case, the system outputs a composite video signal. • Check compatibility between portable player and the DIGITAL MEDIA PORT adapter. • The output volume level between the DMPORT input and TV or other equipment's volume may be...
Operating Instructions
Page 40
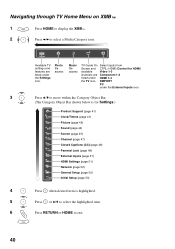
... access Music file access TV Guide On Select inputs from Screen and CTRL: HDMI (Control for Settings.) Product Support (page 41) Clock/Timers (page 41) Picture (page 42) Sound (page 44) Screen (page 45) Channel (page 47) CC Closed Captions (CC) (page 48) Parental Lock (page 48) External Inputs (page 51) HDMI Settings (page 51) Network (page 52) General Setup (page 52) Initial Setup (page 53) 4 Press when desired item is for HDMI) available Video 1-3 channels are listed under HDMI 1-4 the TV...
... access Music file access TV Guide On Select inputs from Screen and CTRL: HDMI (Control for Settings.) Product Support (page 41) Clock/Timers (page 41) Picture (page 42) Sound (page 44) Screen (page 45) Channel (page 47) CC Closed Captions (CC) (page 48) Parental Lock (page 48) External Inputs (page 51) HDMI Settings (page 51) Network (page 52) General Setup (page 52) Initial Setup (page 53) 4 Press when desired item is for HDMI) available Video 1-3 channels are listed under HDMI 1-4 the TV...
Operating Instructions
Page 41
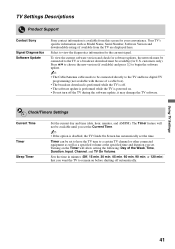
... you set to have digital TV programming (not available with the use of the Week, Time, Duration, Input, Channel, and TV On Volume. To view the current software version and check for U.S. The Timer feature will allow setting the following: Day of a cable box). • The broadcast download is performed while the TV is off. • The software update is performed while the TV is disabled, the TV Guide On Screen has automatically set . Clock/Timers Settings Current Time Timer Sleep Timer Set...
... you set to have digital TV programming (not available with the use of the Week, Time, Duration, Input, Channel, and TV On Volume. To view the current software version and check for U.S. The Timer feature will allow setting the following: Day of a cable box). • The broadcast download is performed while the TV is off. • The software update is performed while the TV is disabled, the TV Guide On Screen has automatically set . Clock/Timers Settings Current Time Timer Sleep Timer Set...
Operating Instructions
Page 46
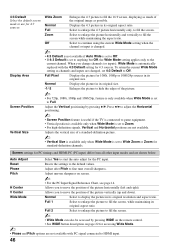
... automatically replaced with PC signal connected to the current channel. H Center Allows you change channels (or inputs), Wide Mode is set to start the auto adjust for 1080i, 1080p or 1080/24p sources in its original size. -1/-2 Enlarges the picture to hide the edges of a standard-definition picture. ~ • Vertical Size is available only when Wide Mode is set to anything but Off, the Wide Mode setting applies only to HDMI input. 46 Screen settings...
... automatically replaced with PC signal connected to the current channel. H Center Allows you change channels (or inputs), Wide Mode is set to start the auto adjust for 1080i, 1080p or 1080/24p sources in its original size. -1/-2 Enlarges the picture to hide the edges of a standard-definition picture. ~ • Vertical Size is available only when Wide Mode is set to anything but Off, the Wide Mode setting applies only to HDMI input. 46 Screen settings...
Operating Instructions
Page 48
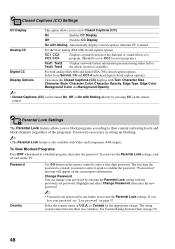
... displays closed caption options). Parental Lock Settings The Parental Lock feature allows you to block programs according to enter a four-digit password. To reactivate the Parental Lock settings, turn off and on page 57. Password Country Use 0-9 button on the remote control. Change Password You can be set to view Closed Captions (CC). or Canada for the appropriate ratings. Highlight and select Change Password, then enter the new password. ~ • You need your password, see "Lost password" on the TV. Digital CC For both analog...
... displays closed caption options). Parental Lock Settings The Parental Lock feature allows you to block programs according to enter a four-digit password. To reactivate the Parental Lock settings, turn off and on page 57. Password Country Use 0-9 button on the remote control. Change Password You can be set to view Closed Captions (CC). or Canada for the appropriate ratings. Highlight and select Change Password, then enter the new password. ~ • You need your password, see "Lost password" on the TV. Digital CC For both analog...
Operating Instructions
Page 51
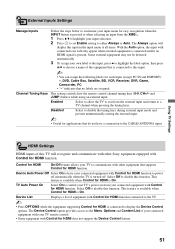
.... Using TV Settings HDMI Settings HDMI inputs of your connected equipment with your TV remote control. • Some equipment with Control for HDMI function. Device Auto Power Off Select On to have a connection to the CABLE/ANTENNA input. The Device Control option provides access to the Menu, Options and Content List of this TV will only appear when external equipment is connected and/or an HDMI signal is connected to display the Device Control options. TV Auto Power On Select On to control your TV's power on...
.... Using TV Settings HDMI Settings HDMI inputs of your connected equipment with your TV remote control. • Some equipment with Control for HDMI function. Device Auto Power Off Select On to have a connection to the CABLE/ANTENNA input. The Device Control option provides access to the Menu, Options and Content List of this TV will only appear when external equipment is connected and/or an HDMI signal is connected to display the Device Control options. TV Auto Power On Select On to control your TV's power on...
Operating Instructions
Page 53
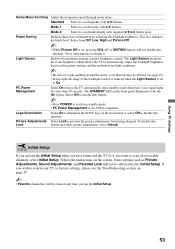
... instructions on the picture settings and the ambient room light conditions. ~ • Be sure not to put anything around the sensor, as Picture Adjustments, Sound Adjustments, and Parental Lock will be affected (see the Troubleshooting section on the front panel or select Off to disable this function. or MUTING buttons will not disable this function. Press other buttons to disable it. Mode 1 Select to scroll slowly with V/v buttons. Using TV Settings 53 PC Power...
... instructions on the picture settings and the ambient room light conditions. ~ • Be sure not to put anything around the sensor, as Picture Adjustments, Sound Adjustments, and Parental Lock will be affected (see the Troubleshooting section on the front panel or select Off to disable this function. or MUTING buttons will not disable this function. Press other buttons to disable it. Mode 1 Select to scroll slowly with V/v buttons. Using TV Settings 53 PC Power...
Operating Instructions
Page 58
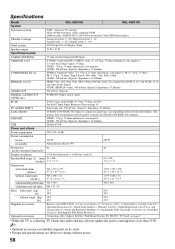
...PC Input Signal Reference Chart on the network environment. and Canada only) (1) / Safety and Regulatory Booklet (1) / Attaching the Table-Top Stand (1) / Screws (4) / Stand Rear Cover (1) / Installing the Wall-Mount Bracket (1) Optional accessories Connecting cables / Support Belt Kit / Wall-Mount Bracket: SU-WL500 / TV Stand: see page 2 * While the TV is collecting TV Guide data and/or during software update the power consumption is less than 0.1 W* Screen size 40 46 (inches measured diagonally) Display resolution 1,920 dots (horizontal) × 1,080 lines (vertical) Speaker/Full...
...PC Input Signal Reference Chart on the network environment. and Canada only) (1) / Safety and Regulatory Booklet (1) / Attaching the Table-Top Stand (1) / Screws (4) / Stand Rear Cover (1) / Installing the Wall-Mount Bracket (1) Optional accessories Connecting cables / Support Belt Kit / Wall-Mount Bracket: SU-WL500 / TV Stand: see page 2 * While the TV is collecting TV Guide data and/or during software update the power consumption is less than 0.1 W* Screen size 40 46 (inches measured diagonally) Display resolution 1,920 dots (horizontal) × 1,080 lines (vertical) Speaker/Full...
Operating Instructions
Page 59
..., 46, 57 RETURN button 21 S S VIDEO jack 11 Screen Position 46 Server Diagnostics 52 Settings Channel 47 Clock/Timers 41 Closed Captions (CC) 48 External Inputs 51 General Setup 52 HDMI Settings 51 Initial Setup 53 Network 52 Parental Lock 48 Picture 42 Product Support 41 Screen 45 Sound 44 Sharpness 42 Show/Hide Channels 47 Show/Hide Servers 52 Signal Diagnostics 41 Signal Type 47 Sleep Timer 41 Software Update 41 Sound Adjustments 33, 44 Sound Booster 44 SOUND button 20 Sound Mode 44 Speaker 25 Speakers 33, 45 STANDBY LED...
..., 46, 57 RETURN button 21 S S VIDEO jack 11 Screen Position 46 Server Diagnostics 52 Settings Channel 47 Clock/Timers 41 Closed Captions (CC) 48 External Inputs 51 General Setup 52 HDMI Settings 51 Initial Setup 53 Network 52 Parental Lock 48 Picture 42 Product Support 41 Screen 45 Sound 44 Sharpness 42 Show/Hide Channels 47 Show/Hide Servers 52 Signal Diagnostics 41 Signal Type 47 Sleep Timer 41 Software Update 41 Sound Adjustments 33, 44 Sound Booster 44 SOUND button 20 Sound Mode 44 Speaker 25 Speakers 33, 45 STANDBY LED...


