Sony KDL-46HX820 Research
Related Manual Pages


Related Videos

Picture & picture on Sony KDL-46HX820 3D 1080p LED HDTV
Duration: 1:31
Total Views: 4,243
Duration: 1:31
Total Views: 4,243
Sony Bravia KDL-46HX820 Review - How 2 Penny Auctions
Duration: 1:46
Total Views: 12,215
Duration: 1:46
Total Views: 12,215
Sony KDL-46HX820 TV
Duration: 1:02
Total Views: 1,577
Duration: 1:02
Total Views: 1,577
Sony KDL 46HX820 review
Duration: 2:41
Total Views: 10,727
Duration: 2:41
Total Views: 10,727
Review Sony LCD HDTV - KDL-55HX820, KDL-46HX820
Duration: 1:40
Total Views: 10
Duration: 1:40
Total Views: 10
Similar Questions

Www.sony-asia.com/support-model Bravia-kdl-55/46/40/32ex720
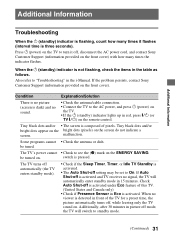
when i switch on the above model standby indicator is flashing 4 time (4 second duration).please giv...
when i switch on the above model standby indicator is flashing 4 time (4 second duration).please giv...
(Posted by shan31548 8 years ago)

Why Does My Tv Periodically Loses Power And The Screen Turns Black? I
My TV is losing power,the power saver light comes on the screen and I have it on the off modeThe scr...
My TV is losing power,the power saver light comes on the screen and I have it on the off modeThe scr...
(Posted by mmarkus 8 years ago)


Kdl-46hx820 Compared To Kdl-46hx850 And Xbr-46hx929
To whom it may concern, I will be upgrading my Sony Bravia KDL-40V4100 to a newer model. Right now ...
To whom it may concern, I will be upgrading my Sony Bravia KDL-40V4100 to a newer model. Right now ...
(Posted by UPSworker 12 years ago)

Learnign How To Set Up My Hx820
Can I connect a pionner dvd/ recorder/player on the 46 hx820?
Can I connect a pionner dvd/ recorder/player on the 46 hx820?
(Posted by cholo 12 years ago)
Related Terms
The following terms were also used when searching for Sony KDL-46HX820 Research:- 3d bravia kdl 46hx820
- 3d bravia kdl-46hx820
- best price for kdl-46hx820
- best price for sony kdl-46hx820
- bravia 46hx820
- bravia 46hx820 led
- bravia 46hx820 manual
- bravia 46hx820 netflix
- bravia kdl 46hx820 netflix
- bravia kdl-46hx820
- bravia kdl-46hx820 price
- bravia kdl46hx820
- bravia kdl46hx820 led tv
- buy kdl-46hx820
- buy kdl46hx820
- buy sony kdl-46hx820
- buy sony kdl46hx820
- cnet kdl46hx820
- factory reset kdl46hx820
- kdl 46hx800
- kdl 46hx820
- kdl 46hx820 ac
- kdl 46hx820 bravia
- kdl 46hx820 calibration
- kdl 46hx820 discount
- kdl 46hx820 manual
- kdl 46hx820 netflix
- kdl 46hx820 review
- kdl 46hx820 review cnet
- kdl 46hx820 reviews
- kdl 46hx820 setting
- kdl 46hx820 sony
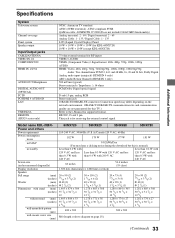
- kdl 46hx820 specifications
- kdl 46hx820 test
- kdl 46hx820 user manual
- kdl-46hx820
- kdl-46hx820 3d
- kdl-46hx820 3d glasses
- kdl-46hx820 46
- kdl-46hx820 ac
- kdl-46hx820 bundle
- kdl-46hx820 calibration
- kdl-46hx820 discount
- kdl-46hx820 factory reset
- kdl-46hx820 firmware
- kdl-46hx820 firmware update
- kdl-46hx820 input lag
- kdl-46hx820 led driver
- kdl-46hx820 mainboard
- kdl-46hx820 manual
- kdl-46hx820 netflix
- kdl-46hx820 parts
- kdl-46hx820 pdf
- kdl-46hx820 price
- kdl-46hx820 review
- kdl-46hx820 reviews
- kdl-46hx820 sale
- kdl-46hx820 screen replacement
- kdl-46hx820 service manual
- kdl-46hx820 shuts off blinks 4 times
- kdl-46hx820 sony
- kdl-46hx820 sony bravia led tv
- kdl-46hx820 specifications
- kdl-46hx820 specs
- kdl-46hx820 test
- kdl-46hx820 uk
- kdl-46hx820 update
- kdl-46hx820 xbr-46hx929
- kdl-46hx820 youtube
- kdl46hx800 manual
- kdl46hx820
- kdl46hx820 3d
- kdl46hx820 3d glasses
- kdl46hx820 4 blinks
- kdl46hx820 46
- kdl46hx820 46 bravia
- kdl46hx820 6 blinks
- kdl46hx820 amazon
- kdl46hx820 australia
- kdl46hx820 best buy
- kdl46hx820 best price
- kdl46hx820 bundle
- kdl46hx820 calibration
- kdl46hx820 calibration settings
- kdl46hx820 canada
- kdl46hx820 cnet
- kdl46hx820 cnet review
- kdl46hx820 contrast ratio
- kdl46hx820 factory reset
- kdl46hx820 firmware
- kdl46hx820 forum
- kdl46hx820 internet content troubleshooting
- kdl46hx820 led driver
- kdl46hx820 location hdmi
- kdl46hx820 manual
- kdl46hx820 media server
- kdl46hx820 owners manual
- kdl46hx820 parts
- kdl46hx820 price
- kdl46hx820 price in india
- kdl46hx820 problems
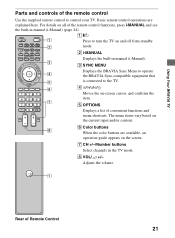
- kdl46hx820 remote
- kdl46hx820 review
- kdl46hx820 review cnet
- kdl46hx820 reviews
- kdl46hx820 sale
- kdl46hx820 screen repair
- kdl46hx820 service manual
- kdl46hx820 settings
- kdl46hx820 sony
- kdl46hx820 sony review
- kdl46hx820 spec
- kdl46hx820 specifications
- kdl46hx820 specs
- kdl46hx820 test
- kdl46hx820 tv
- kdl46hx820 tv review
- kdl46hx820 user manual
- kdl46hx820 vs kdl46nx720
- kdl46hx820 youtube
- model number kdl 46hx820
- sony bravia 46hx820
- sony bravia 46hx820 led
- sony bravia 46hx820 manual
- sony bravia 46hx820 netflix
- sony bravia kdl 46hx820
- sony bravia kdl 46hx820 manual
- sony bravia kdl 46hx820 netflix
- sony bravia kdl 46hx820 review
- sony bravia kdl-46hx820
- sony bravia kdl-46hx820 manual
- sony bravia kdl-46hx820 price
- sony bravia kdl-46hx820 review
- sony bravia kdl46hx820
- sony bravia kdl46hx820 46 inch
- sony bravia kdl46hx820 avs forums
- sony bravia kdl46hx820 led tv
- sony bravia kdl46hx820 review
- sony kdl 46hx800
- sony kdl 46hx820
- sony kdl 46hx820 bravia
- sony kdl 46hx820 calibration
- sony kdl 46hx820 manual
- sony kdl 46hx820 netflix
- sony kdl 46hx820 review
- sony kdl 46hx820 reviews
- sony kdl 46hx820 setting
- sony kdl 46hx820 specifications
- sony kdl-46hx820
- sony kdl-46hx820 46
- sony kdl-46hx820 firmware
- sony kdl-46hx820 input lag
- sony kdl-46hx820 manual
- sony kdl-46hx820 netflix
- sony kdl-46hx820 price
- sony kdl-46hx820 review
- sony kdl-46hx820 reviews
- sony kdl-46hx820 specifications
- sony kdl-46hx820 test
- sony kdl-46hx820 uk
- sony kdl-46hx820 update
- sony kdl-46hx820 youtube
- sony kdl46hx800 manual
- sony kdl46hx820
- sony kdl46hx820 46
- sony kdl46hx820 46 bravia
- sony kdl46hx820 amazon
- sony kdl46hx820 australia
- sony kdl46hx820 best buy
- sony kdl46hx820 best price
- sony kdl46hx820 bundle
- sony kdl46hx820 calibration
- sony kdl46hx820 calibration settings
- sony kdl46hx820 cnet
- sony kdl46hx820 cnet review
- sony kdl46hx820 contrast ratio
- sony kdl46hx820 factory reset
- sony kdl46hx820 forum
- sony kdl46hx820 manual
- sony kdl46hx820 owners manual
- sony kdl46hx820 price
- sony kdl46hx820 remote
- sony kdl46hx820 review
- sony kdl46hx820 review cnet
- sony kdl46hx820 reviews
- sony kdl46hx820 sale
- sony kdl46hx820 screen repair
- sony kdl46hx820 spec
- sony kdl46hx820 specs
- sony kdl46hx820 tv
- sony kdl46hx820 user manual
- sony kdl46hx820 youtube
- sony tv model kdl-46hx820
- tv kdl46hx820
- tv model kdl-46hx820
- tv sony kdl46hx820