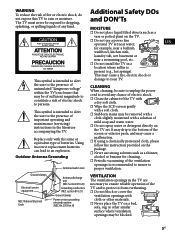
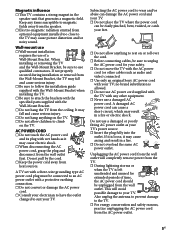
Sony KDL-40EX720 Research
Related Manual Pages

Related Videos

Sony KDL46EX720 Video Review - 10Rate, LCD TV Buying Guide Sony KDL55EX720 Sony KDL40EX720
Duration: 4:53
Total Views: 48,214
Duration: 4:53
Total Views: 48,214
Sony Bravia KDL-40EX720 Surround S-Force 3D Test
Duration: 1:47
Total Views: 9,579
Duration: 1:47
Total Views: 9,579
Sony KDL-40EX720 Full Hd 3D Internet Tv Revision
Duration: 14:39
Total Views: 68,759
Duration: 14:39
Total Views: 68,759
Sony KDL-40EX720 TV
Duration: :57
Total Views: 1,853
Duration: :57
Total Views: 1,853
Telewizor Sony KDL-40EX720 Przegl?darka internetowa / Web Browser
Duration: 2:48
Total Views: 3,185
Duration: 2:48
Total Views: 3,185
Similar Questions

Www.sony-asia.com/support-model Bravia-kdl-55/46/40/32ex720
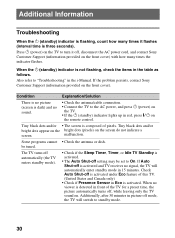
when i switch on the above model standby indicator is flashing 4 time (4 second duration).please giv...
when i switch on the above model standby indicator is flashing 4 time (4 second duration).please giv...
(Posted by shan31548 8 years ago)

Why Does My Tv Periodically Loses Power And The Screen Turns Black? I
My TV is losing power,the power saver light comes on the screen and I have it on the off modeThe scr...
My TV is losing power,the power saver light comes on the screen and I have it on the off modeThe scr...
(Posted by mmarkus 8 years ago)

No United States English Option On Setup Menu
I have a KDL-40EX720 TV I purchased from a US military base exchange while stationed in Germany. On ...
I have a KDL-40EX720 TV I purchased from a US military base exchange while stationed in Germany. On ...
(Posted by jdeann 9 years ago)

Sorry, We Could Not Find Any Additional Information For This Topic, Input Lag -
Input lag on Sony KDL-40EX720 kdl-40ex720
Input lag on Sony KDL-40EX720 kdl-40ex720
(Posted by dannyd85 12 years ago)
Related Terms
The following terms were also used when searching for Sony KDL-40EX720 Research:- 3d bravia kdl 40ex720
- 3d bravia kdl-40ex720
- amazon kdl40ex720
- bravia kdl 40ex720
- bravia kdl40ex720
- buy kdl-40ex720
- kdl 40ex520 price
- kdl 40ex710 sony
- kdl 40ex720
- kdl 40ex720 3d hdtv
- kdl 40ex720 3d led tv
- kdl 40ex720 40
- kdl 40ex720 5 blink code
- kdl 40ex720 accessories
- kdl 40ex720 best buy
- kdl 40ex720 black friday
- kdl 40ex720 calibration
- kdl 40ex720 firmware
- kdl 40ex720 manual
- kdl 40ex720 manual pdf
- kdl 40ex720 multi system
- kdl 40ex720 netflix
- kdl 40ex720 pdf
- kdl 40ex720 price
- kdl 40ex720 price in dubai
- kdl 40ex720 price in india
- kdl 40ex720 remote
- kdl 40ex720 response time
- kdl 40ex720 review
- kdl 40ex720 reviews
- kdl 40ex720 sony
- kdl 40ex720 sony bravia
- kdl 40ex720 sony review
- kdl 40ex720 tv
- kdl 40ex720 tv how to set up 3d
- kdl-40ex720
- kdl-40ex720 3d glasses
- kdl-40ex720 3d hdtv
- kdl-40ex720 3d led tv
- kdl-40ex720 3d tv 40''
- kdl-40ex720 40
- kdl-40ex720 40 3d led tv
- kdl-40ex720 accessories
- kdl-40ex720 amazon
- kdl-40ex720 best buy
- kdl-40ex720 best price
- kdl-40ex720 calibration
- kdl-40ex720 cnet
- kdl-40ex720 contrast ratio
- kdl-40ex720 costco
- kdl-40ex720 divx
- kdl-40ex720 double image
- kdl-40ex720 firmware
- kdl-40ex720 firmware update
- kdl-40ex720 forum
- kdl-40ex720 in india
- kdl-40ex720 india
- kdl-40ex720 input lag
- kdl-40ex720 kdl-40hx800
- kdl-40ex720 lcd
- kdl-40ex720 led
- kdl-40ex720 manual
- kdl-40ex720 manual pdf
- kdl-40ex720 netflix
- kdl-40ex720 netflix app
- kdl-40ex720 parts
- kdl-40ex720 pdf
- kdl-40ex720 price
- kdl-40ex720 price in dubai
- kdl-40ex720 price in india
- kdl-40ex720 price in singapore
- kdl-40ex720 response time
- kdl-40ex720 review
- kdl-40ex720 reviews
- kdl-40ex720 sales
- kdl-40ex720 service manual
- kdl-40ex720 settings
- kdl-40ex720 smart tv
- kdl-40ex720 software update
- kdl-40ex720 sony
- kdl-40ex720 sony bravia led tv
- kdl-40ex720 sony review
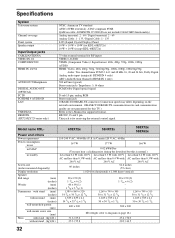
- kdl-40ex720 specification
- kdl-40ex720 specs
- kdl-40ex720 stand
- kdl-40ex720 subtitles
- kdl-40ex720 test
- kdl-40ex720 tv
- kdl-40ex720 update
- kdl-40ex720 usb video format
- kdl-40ex720 wall mount
- kdl-40ex720 widgets
- kdl-40ex720 wifi dongle
- kdl-40ex720 wireless adapter
- kdl-40ex720/bundle
- kdl40ex720
- kdl40ex720 3d
- kdl40ex720 3d glasses
- kdl40ex720 3d led
- kdl40ex720 3d review
- kdl40ex720 40
- kdl40ex720 40 1080p led 3d tv
- kdl40ex720 40 3d led hdtv
- kdl40ex720 40 3d led tv
- kdl40ex720 40 inch led tv
- kdl40ex720 40-inch
- kdl40ex720 5 blink shutdown
- kdl40ex720 amazon
- kdl40ex720 australia
- kdl40ex720 best buy
- kdl40ex720 best settings
- kdl40ex720 black friday
- kdl40ex720 calibration
- kdl40ex720 cnet
- kdl40ex720 contrast ratio
- kdl40ex720 dimensions
- kdl40ex720 firmware
- kdl40ex720 glasses
- kdl40ex720 led 3d
- kdl40ex720 main board
- kdl40ex720 manual
- kdl40ex720 manual pdf
- kdl40ex720 needs a sync transmitter
- kdl40ex720 netflix
- kdl40ex720 owners manual
- kdl40ex720 pdf
- kdl40ex720 picture setting
- kdl40ex720 picture settings
- kdl40ex720 power board
- kdl40ex720 price
- kdl40ex720 price in dubai
- kdl40ex720 price in india
- kdl40ex720 pricing
- kdl40ex720 problems
- kdl40ex720 rating
- kdl40ex720 refresh rate
- kdl40ex720 remote
- kdl40ex720 replacement lcd screen
- kdl40ex720 replacement led screen
- kdl40ex720 review
- kdl40ex720 review cnet
- kdl40ex720 reviews
- kdl40ex720 service manual
- kdl40ex720 settings
- kdl40ex720 skype
- kdl40ex720 software update
- kdl40ex720 sony
- kdl40ex720 sony review
- kdl40ex720 specification
- kdl40ex720 specifications
- kdl40ex720 specs
- kdl40ex720 stand
- kdl40ex720 television
- kdl40ex720 tv reviews
- kdl40ex720 user manual
- kdl40ex720 vesa
- kdl40ex720 wall mount
- kdl40ex720 wall mount kit
- kdl40ex720 wifi
- kdl40ex720 wifi adapter
- kdl40ex720 with keyboard
- rear view of kdl 40ex720
- rear view of kdl-40ex720
- review kdl 40ex720
- review sony kdl 40ex720
- sony 40 kdl40ex720
- sony bravia kdl 40ex720
- sony bravia kdl 40ex720 on sale
- sony bravia kdl-40ex720
- sony bravia kdl-40ex720 japan
- sony bravia kdl-40ex720 on sale
- sony bravia kdl40ex720
- sony bravia kdl40ex720 40 inch 1080p 3d led hdtv
- sony bravia kdl40ex720 40-inch 1080p 3d led hdtv
- sony bravia kdl40ex720 review
- sony kdl 40ex720
- sony kdl 40ex720 3d led tv
- sony kdl 40ex720 40
- sony kdl 40ex720 calibration
- sony kdl 40ex720 manual
- sony kdl 40ex720 manual pdf
- sony kdl 40ex720 price
- sony kdl 40ex720 price in india
- sony kdl 40ex720 review
- sony kdl 40ex720 reviews
- sony kdl 40ex720 tv
- sony kdl 40ex720 tv how to set up 3d
- sony kdl-40ex720
- sony kdl-40ex720 3d led tv
- sony kdl-40ex720 3d tv 40''
- sony kdl-40ex720 40 3d led tv
- sony kdl-40ex720 best price
- sony kdl-40ex720 calibration
- sony kdl-40ex720 contrast ratio
- sony kdl-40ex720 firmware
- sony kdl-40ex720 firmware update
- sony kdl-40ex720 forum
- sony kdl-40ex720 led
- sony kdl-40ex720 manual
- sony kdl-40ex720 manual pdf
- sony kdl-40ex720 netflix
- sony kdl-40ex720 netflix app
- sony kdl-40ex720 price
- sony kdl-40ex720 price in dubai
- sony kdl-40ex720 price in india
- sony kdl-40ex720 price in singapore
- sony kdl-40ex720 review
- sony kdl-40ex720 reviews
- sony kdl-40ex720 sales
- sony kdl-40ex720 service manual
- sony kdl-40ex720 smart tv
- sony kdl-40ex720 software update
- sony kdl-40ex720 specification
- sony kdl-40ex720 specs
- sony kdl-40ex720 subtitles
- sony kdl-40ex720 test
- sony kdl-40ex720 tv
- sony kdl-40ex720 usb video format
- sony kdl-40ex720 wall mount
- sony kdl-40ex720 wifi dongle
- sony kdl-40ex720 wireless adapter
- sony kdl40ex720
- sony kdl40ex720 3d
- sony kdl40ex720 3d glasses
- sony kdl40ex720 3d led
- sony kdl40ex720 40
- sony kdl40ex720 40 1080p led 3d tv
- sony kdl40ex720 40 3d led hdtv
- sony kdl40ex720 40 3d led tv
- sony kdl40ex720 40 inch led tv
- sony kdl40ex720 40 led tv
- sony kdl40ex720 amazon
- sony kdl40ex720 best buy
- sony kdl40ex720 calibration
- sony kdl40ex720 cnet
- sony kdl40ex720 contrast ratio
- sony kdl40ex720 firmware
- sony kdl40ex720 led 3d
- sony kdl40ex720 manual
- sony kdl40ex720 manual pdf
- sony kdl40ex720 pdf
- sony kdl40ex720 picture setting
- sony kdl40ex720 price
- sony kdl40ex720 price in india
- sony kdl40ex720 pricing
- sony kdl40ex720 rating
- sony kdl40ex720 refresh rate
- sony kdl40ex720 replacement lcd screen
- sony kdl40ex720 replacement led screen
- sony kdl40ex720 review
- sony kdl40ex720 review cnet
- sony kdl40ex720 reviews
- sony kdl40ex720 specification
- sony kdl40ex720 specifications
- sony kdl40ex720 specs
- sony kdl40ex720 television
- sony kdl40ex720 tv reviews
- sony kdl40ex720 user manual
- sony kdl40ex720 wifi
- sony kdl40ex720 with keyboard
- sony led kdl40ex720
- sony tv kdl 40ex720
- tv kdl 40ex720