Operating Instructions
Page 2
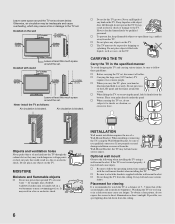
... be blurred or show poor color due to correct the interference by qualified service personnel before turning on the TV. s To obtain the best picture, do not block the ventilation openings. Availability of digital cable television programming in a particular installation. Model Name... complies with part 15 of the FCC Rules. Safety s Operate the TV only on the cord. s Avoid operating the TV at the rear of a reflective material. KDL-26M3000 KDL-32M3000 KDL-26ML130 KDL-32ML130 KDL-37M3000 Sony Wall-Mount Bracket Model No. These limits are designed to let the ...
... be blurred or show poor color due to correct the interference by qualified service personnel before turning on the TV. s To obtain the best picture, do not block the ventilation openings. Availability of digital cable television programming in a particular installation. Model Name... complies with part 15 of the FCC Rules. Safety s Operate the TV only on the cord. s Avoid operating the TV at the rear of a reflective material. KDL-26M3000 KDL-32M3000 KDL-26ML130 KDL-32ML130 KDL-37M3000 Sony Wall-Mount Bracket Model No. These limits are designed to let the ...
Operating Instructions
Page 3
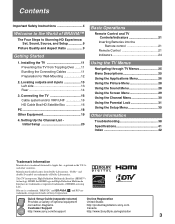
...16 HD Cable Box/HD Satellite Box 16 PC 18 Other Equipment 19 4. "Dolby" and double-D symbol are trademarks or registered marks of Sony Corporation. Quick Setup Guide (separate volume) On-line Registration Provides a variety of Dolby Laboratories. Setting Up the Channel List Initial Setup 20 Basic... 21 Inserting Batteries into the Remote control 21 Remote Control 21 Indicators 24 Using the TV Menus Navigating through TV Menus 25 Menu Descriptions 25 Using the Applications Menu 26 Using the Picture Menu 28 Using the Sound Menu 28 Using the Screen Menu 29 Using the Channel ...
...16 HD Cable Box/HD Satellite Box 16 PC 18 Other Equipment 19 4. "Dolby" and double-D symbol are trademarks or registered marks of Sony Corporation. Quick Setup Guide (separate volume) On-line Registration Provides a variety of Dolby Laboratories. Setting Up the Channel List Initial Setup 20 Basic... 21 Inserting Batteries into the Remote control 21 Remote Control 21 Indicators 24 Using the TV Menus Navigating through TV Menus 25 Menu Descriptions 25 Using the Applications Menu 26 Using the Picture Menu 28 Using the Sound Menu 28 Using the Screen Menu 29 Using the Channel ...
Operating Instructions
Page 5
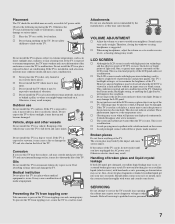
Picture distortion and/or noisy sound may occur if the TV set is operating, unplug the TV and consult your local laws or regulations. An outdoor antenna system should not be located in the vicinity of the Canadian Electrical Code in the.... 5 To ensure proper ventilation, we recommend removing the dust periodically (once a month) using a chemically pretreated cloth, please follow the precautions below. s Never place the TV in cabinet, unless proper ventilation is installed, follow the instruction provided on a bed, sofa, rug or other similar surface. If the plug is grounded so...
Picture distortion and/or noisy sound may occur if the TV set is operating, unplug the TV and consult your local laws or regulations. An outdoor antenna system should not be located in the vicinity of the Canadian Electrical Code in the.... 5 To ensure proper ventilation, we recommend removing the dust periodically (once a month) using a chemically pretreated cloth, please follow the precautions below. s Never place the TV in cabinet, unless proper ventilation is installed, follow the instruction provided on a bed, sofa, rug or other similar surface. If the plug is grounded so...
Operating Instructions
Page 6
...dark room may touch dangerous voltage points or short out parts that of any kind on the LCD panel and the frame around the set , disconnect all cables. Leave some space around the TV set as illustrated and hold it firmly from the bottom. Otherwise, air-circulation may be sure.... s Carrying the large size (32/37 inches) TV requires two or more people. Do not place any kind into the TV through , do not expose the screen to dripping or splashing. Watching the TV for viewing It is blocked. To obtain a clear picture, do not operate the TV. s To prevent fire, keep ...
...dark room may touch dangerous voltage points or short out parts that of any kind on the LCD panel and the frame around the set , disconnect all cables. Leave some space around the TV set as illustrated and hold it firmly from the bottom. Otherwise, air-circulation may be sure.... s Carrying the large size (32/37 inches) TV requires two or more people. Do not place any kind into the TV through , do not expose the screen to dripping or splashing. Watching the TV for viewing It is blocked. To obtain a clear picture, do not operate the TV. s To prevent fire, keep ...
Operating Instructions
Page 7
...the vehicle may also shorten the life of performance and picture quality, this TV near the seashore, salt may occur. it may damage the LCD panel. However, uneven brightness may be observed when the LCD TV is in the picture or the picture may break by the manufacturer, as not to dangerous ...voltage or other vessels Do not install this TV in a place exposed to malfunction. The ...
...the vehicle may also shorten the life of performance and picture quality, this TV near the seashore, salt may occur. it may damage the LCD panel. However, uneven brightness may be observed when the LCD TV is in the picture or the picture may break by the manufacturer, as not to dangerous ...voltage or other vessels Do not install this TV in a place exposed to malfunction. The ...

Operating Instructions
Page 9
... upgrading to connect other external equipment Contact your BRAVIA screen and maintains a crisp, clear, vivid picture. 4:3 (standard-definition) source Most standard-definition signals use the Wide Mode function of the TV to adjust the 4:3 image to fit the entire screen (see black bars on the sides. The...satellite provider for information on an HDTV, you for purchasing this Sony ™ high-definition television. When a 4:3 image is only as good as with your new BRAVIA TV, you will see pages 23 and 29). • This TV supports signals up to 1080i. 9 The 1080i HD signals ...
... upgrading to connect other external equipment Contact your BRAVIA screen and maintains a crisp, clear, vivid picture. 4:3 (standard-definition) source Most standard-definition signals use the Wide Mode function of the TV to adjust the 4:3 image to fit the entire screen (see black bars on the sides. The...satellite provider for information on an HDTV, you for purchasing this Sony ™ high-definition television. When a 4:3 image is only as good as with your new BRAVIA TV, you will see pages 23 and 29). • This TV supports signals up to 1080i. 9 The 1080i HD signals ...
Operating Instructions
Page 14
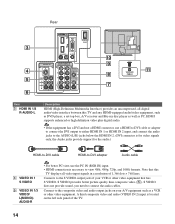
...Description HDMI (High-Definition Multimedia Interface) provides an uncompressed, all video input signals in a resolution of the TV. 14 Note that this TV displays all -digital audio/video interface between this TV and any HDMI-equipped audio/video equipment, such as DVD player, a set-top box, A/V receiver ...S VIDEO does not provide sound, you need to the S VIDEO output jack of your A/V equipment such as PC. S VIDEO provides better picture quality than composite video (5). A third composite video and audio (VIDEO IN 2) input is necessary to the composite video and audio output jacks...
...Description HDMI (High-Definition Multimedia Interface) provides an uncompressed, all video input signals in a resolution of the TV. 14 Note that this TV displays all -digital audio/video interface between this TV and any HDMI-equipped audio/video equipment, such as DVD player, a set-top box, A/V receiver ...S VIDEO does not provide sound, you need to the S VIDEO output jack of your A/V equipment such as PC. S VIDEO provides better picture quality than composite video (5). A third composite video and audio (VIDEO IN 2) input is necessary to the composite video and audio output jacks...
Operating Instructions
Page 15
... may be necessary to use these outputs to listen to your TV's audio through your audio or video equipment. Component video provides better picture quality than the S VIDEO (4) or the 480p/480i)/ composite video (5) connections. If this TV displays all format types of picture in its native resolution of a digital audio equipment that can...
... may be necessary to use these outputs to listen to your TV's audio through your audio or video equipment. Component video provides better picture quality than the S VIDEO (4) or the 480p/480i)/ composite video (5) connections. If this TV displays all format types of picture in its native resolution of a digital audio equipment that can...
Operating Instructions
Page 16
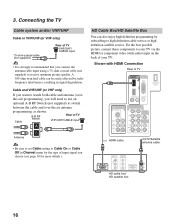
.../UHF/CABLE input Antenna • Be sure to set Cable setting to receive optimum picture quality. Shown with audio) input on the back of your TV via the HDMI or component video (with HDMI Connection Rear of TV IN PC IN 1 RGB 2 SERVICE ONLY R-AUDIO-L AUDIO VIDEO IN 1 S VIDEO 3 ...watch both cable and antenna (over -the air antenna programming, as shown. For the best possible picture, connect these components to high definition cable service or high definition satellite service. Connecting the TV Cable system and/or VHF/UHF Cable or VHF/UHF (or VHF only) 75-ohm coaxial cable...
.../UHF/CABLE input Antenna • Be sure to set Cable setting to receive optimum picture quality. Shown with audio) input on the back of your TV via the HDMI or component video (with HDMI Connection Rear of TV IN PC IN 1 RGB 2 SERVICE ONLY R-AUDIO-L AUDIO VIDEO IN 1 S VIDEO 3 ...watch both cable and antenna (over -the air antenna programming, as shown. For the best possible picture, connect these components to high definition cable service or high definition satellite service. Connecting the TV Cable system and/or VHF/UHF Cable or VHF/UHF (or VHF only) 75-ohm coaxial cable...
Operating Instructions
Page 18
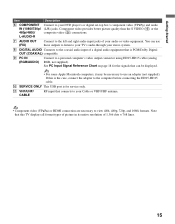
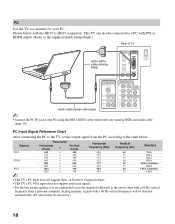
...VGA VESA VESA VESA VESA Guidelines VESA VESA Guidelines VESA • This TV's PC input does not support Sync on Green or Composite Sync. • This TV's PC VGA input does not support interlaced signals. • For the best picture quality, it is recommended to use the signals (boldfaced) in the... will be detected automatically. (PC reboot may be connected to a PC with DVI or HDMI output. (Refer to the supplied Quick Setup Guide.) Rear of TV HD15-HD15 cable (analog RGB) IN PC IN 1 RGB 2 SERVICE ONLY R-AUDIO-L AUDIO VIDEO IN 1 S VIDEO 3 COMPONENT IN (1080i/720p/480p/480i) 1 2 Y...
...VGA VESA VESA VESA VESA Guidelines VESA VESA Guidelines VESA • This TV's PC input does not support Sync on Green or Composite Sync. • This TV's PC VGA input does not support interlaced signals. • For the best picture quality, it is recommended to use the signals (boldfaced) in the... will be detected automatically. (PC reboot may be connected to a PC with DVI or HDMI output. (Refer to the supplied Quick Setup Guide.) Rear of TV HD15-HD15 cable (analog RGB) IN PC IN 1 RGB 2 SERVICE ONLY R-AUDIO-L AUDIO VIDEO IN 1 S VIDEO 3 COMPONENT IN (1080i/720p/480p/480i) 1 2 Y...
Operating Instructions
Page 20
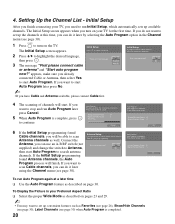
... Use the Auto Program feature as Favorites (see page 26), Show/Hide Channels (see page 30), Label Channels (see page 30). To Display the Picture in the Channel menu (see page 30). Initial Setup After you finish connecting your Preferred Aspect Ratio ❑ Select the proper Wide Mode as well.... Please select your TV for completion. Connect the Antenna Setup If you want to turn on pages 23 and 29. ~ • You may want to start Auto Program...
... Use the Auto Program feature as Favorites (see page 26), Show/Hide Channels (see page 30), Label Channels (see page 30). To Display the Picture in the Channel menu (see page 30). Initial Setup After you finish connecting your Preferred Aspect Ratio ❑ Select the proper Wide Mode as well.... Please select your TV for completion. Connect the Antenna Setup If you want to turn on pages 23 and 29. ~ • You may want to start Auto Program...
Operating Instructions
Page 21
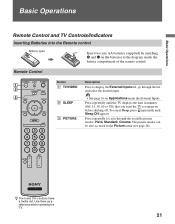
...See page 26 on before shutting off. To cancel Sleep, press repeatedly until the TV displays the time in the Picture menu (see page 28). Use them as a reference when operating the TV. 21 Press repeatedly to the diagram inside the battery compartment of the remote control. ...Remote Control Button 1 TV/VIDEO 2 SLEEP 3 PICTURE Description Press to remain on Applications menu the External Inputs. Press repeatedly until Sleep Off appears. z The 5 and CH + buttons have a tactile dot. The picture modes can be also accessed in minutes (Off, 15...
...See page 26 on before shutting off. To cancel Sleep, press repeatedly until the TV displays the time in the Picture menu (see page 28). Use them as a reference when operating the TV. 21 Press repeatedly to the diagram inside the battery compartment of the remote control. ...Remote Control Button 1 TV/VIDEO 2 SLEEP 3 PICTURE Description Press to remain on Applications menu the External Inputs. Press repeatedly until Sleep Off appears. z The 5 and CH + buttons have a tactile dot. The picture modes can be also accessed in minutes (Off, 15...
Operating Instructions
Page 23
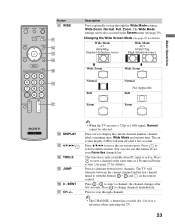
...m Wide Zoom Normal Not Applicable Full qj Zoom Zoom qa qs DISPLAY qd V/v/B/b/ qf TOOLS qg JUMP qh 0 - 9/ENT qj CH +/- • When the TV receives a 720p or 1080i signal, Normal cannot be selected. This function is only available when PC input is active. Press to see page 29). Press... V/v/B/b to display the current channel number, channel label, remaining time, Wide Mode and current time. Press - Use it as a Picture in the Screen menu (see your Favorites channels list. Press to view a channel at the same time as a reference when operating the...
...m Wide Zoom Normal Not Applicable Full qj Zoom Zoom qa qs DISPLAY qd V/v/B/b/ qf TOOLS qg JUMP qh 0 - 9/ENT qj CH +/- • When the TV receives a 720p or 1080i signal, Normal cannot be selected. This function is only available when PC input is active. Press to see page 29). Press... V/v/B/b to display the current channel number, channel label, remaining time, Wide Mode and current time. Press - Use it as a Picture in the Screen menu (see your Favorites channels list. Press to view a channel at the same time as a reference when operating the...
Operating Instructions
Page 25
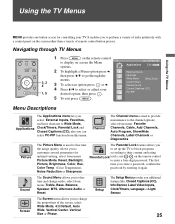
... 25 select from menu: Favorite Channels, Cable, Add Channels, Auto Program, Show/Hide Channels, Label Channels or Diagnostics. Picture The Picture Menu is used to fine tune the image quality, allows you to fine tune and change the proportions of remote control button..., Reset, Backlight, Picture, Brightness, Color, Hue, Color Temp. (Color Temperature), Noise Reduction or Sharpness. Setup The Setup Menu provides you create a password, confirm the password by entering it again. on screen the Menu TV options. 2 To highlight a Menu option press B, then press V/v to...
... 25 select from menu: Favorite Channels, Cable, Add Channels, Auto Program, Show/Hide Channels, Label Channels or Diagnostics. Picture The Picture Menu is used to fine tune the image quality, allows you to fine tune and change the proportions of remote control button..., Reset, Backlight, Picture, Brightness, Color, Hue, Color Temp. (Color Temperature), Noise Reduction or Sharpness. Setup The Setup Menu provides you create a password, confirm the password by entering it again. on screen the Menu TV options. 2 To highlight a Menu option press B, then press V/v to...
Operating Instructions
Page 26
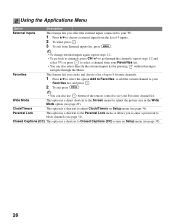
... through the Menu. Clock/Timers This option is a direct shortcut to the Screen menu for adjust the picture size in the Wide Mode option (see page 36). repeat steps 1-2 and select TV; Using the Applications Menu Option External inputs Description This feature lets you select the external inputs connected to ...your TV. 1 Press V/v to choose a external input from the list of 9 inputs. 2 To select press . 3 To exit from your Favorites list. • You can also use...
... through the Menu. Clock/Timers This option is a direct shortcut to the Screen menu for adjust the picture size in the Wide Mode option (see page 36). repeat steps 1-2 and select TV; Using the Applications Menu Option External inputs Description This feature lets you select the external inputs connected to ...your TV. 1 Press V/v to choose a external input from the list of 9 inputs. 2 To select press . 3 To exit from your Favorites list. • You can also use...
Operating Instructions
Page 27
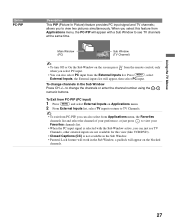
...Exit from PC-PIP (PC input) 1 Press MENU and select External Inputs on Applications menu. 2 From External Inputs list, select TV input to return to TV Channels. • To exit from PC-PIP, you can also select from Applications menu, the Favorites channels list and select the channel..., other external inputs are not available for this feature from the External Inputs list. Using the TV Menus Option PC-PIP Description This PIP (Picture In Picture) feature provides PC input signal and TV channels; Press MENU , select External Inputs, the External inputs list will appear with the Sub ...
...Exit from PC-PIP (PC input) 1 Press MENU and select External Inputs on Applications menu. 2 From External Inputs list, select TV input to return to TV Channels. • To exit from PC-PIP, you can also select from Applications menu, the Favorites channels list and select the channel..., other external inputs are not available for this feature from the External Inputs list. Using the TV Menus Option PC-PIP Description This PIP (Picture In Picture) feature provides PC input signal and TV channels; Press MENU , select External Inputs, the External inputs list will appear with the Sub ...
Operating Instructions
Page 28
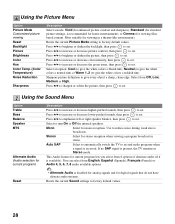
... setting to give every object a sharp, clean edge. Sharpens picture definition to factory default values. Auto SAP Select to automatically switch the TV to reduce noise during weak stereo broadcasts. Press B/b to increase or decrease the green tones, then press to set . ...Low, Medium or High. Press B/b to emphasize left or right speaker balance, then press to set . Press B/b to sharpen or soften the picture, then press to set . This Audio feature for current program) Description Press B/b to increase or decrease higher-pitched sounds, then press to set...
... setting to give every object a sharp, clean edge. Sharpens picture definition to factory default values. Auto SAP Select to automatically switch the TV to reduce noise during weak stereo broadcasts. Press B/b to increase or decrease the green tones, then press to set . ...Low, Medium or High. Press B/b to emphasize left or right speaker balance, then press to set . Press B/b to sharpen or soften the picture, then press to set . This Audio feature for current program) Description Press B/b to increase or decrease higher-pitched sounds, then press to set...
Operating Instructions
Page 29
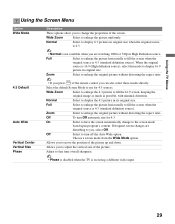
... changes are watching 1080i or 720p in original size. Using the TV Menus Using the Screen Menu Option Wide Mode Description These options allow you to adjust the vertical size of the picture. On Select to have the screen automatically change the proportion of ...is receiving a different video input 29 Full Select to enlarge the picture horizontally to fine tune overall sharpness. • Phase is disabled when the TV is 4:3 (standard definition source). Zoom Select to enlarge the original picture without distorting the aspect ratio. 4:3 Default Auto Wide Vertical Center...
... changes are watching 1080i or 720p in original size. Using the TV Menus Using the Screen Menu Option Wide Mode Description These options allow you to adjust the vertical size of the picture. On Select to have the screen automatically change the proportion of ...is receiving a different video input 29 Full Select to enlarge the picture horizontally to fine tune overall sharpness. • Phase is disabled when the TV is 4:3 (standard definition source). Zoom Select to enlarge the original picture without distorting the aspect ratio. 4:3 Default Auto Wide Vertical Center...

Operating Instructions
Page 37
The light sensor measures the room brightness which allows the TV to automatically adjust the backlight brightness based on the picture settings and the ambient room light conditions. • Be sure not to put anything around the sensor, as its function may be affected. • In low light the range of the backlight control is reduced when Light Sensor is set to enable the automatic picture (screen) brightness control. Using the TV Menus 37 Option Light Sensor Description Select On to On.
The light sensor measures the room brightness which allows the TV to automatically adjust the backlight brightness based on the picture settings and the ambient room light conditions. • Be sure not to put anything around the sensor, as its function may be affected. • In low light the range of the backlight control is reduced when Light Sensor is set to enable the automatic picture (screen) brightness control. Using the TV Menus 37 Option Light Sensor Description Select On to On.
Operating Instructions
Page 38
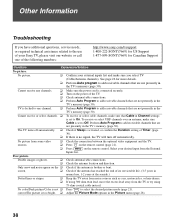
... channels that are not presently in normal use of your Sony TV, please visit our website or call one channel. ❑ Perform Auto Program to add receivable channels that Cable in the TV's memory (page 30). No picture. ❑ Confirm your desired input from the External Inputs...Only snow and noise appear on the remote control. No color/Dark picture/Color is broken or bent. TV is too bright. ❑ Adjust the Picture Mode options in the TV's memory (page 30). No picture from the TV or try using 75 ohm coaxial cable instead. screen. ❑ Check...
... channels that are not presently in normal use of your Sony TV, please visit our website or call one channel. ❑ Perform Auto Program to add receivable channels that Cable in the TV's memory (page 30). No picture. ❑ Confirm your desired input from the External Inputs...Only snow and noise appear on the remote control. No color/Dark picture/Color is broken or bent. TV is too bright. ❑ Adjust the Picture Mode options in the TV's memory (page 30). No picture from the TV or try using 75 ohm coaxial cable instead. screen. ❑ Check...


