Operating Instructions
Page 3
... Operating the TV Using the Remote Control 18 Remote Control Button Description 19 TV Controls and Indicators 22 Using Features BRAVIA® SyncTM with Control for HDMI . . .23 Using PIP Feature 24 Favorites 25 Wide Mode 25 Wide Mode with PC 26 Inputs 26 Playing back Photo/Music/ Video via USB 27 Using the Menus Navigating through TV Menus 28 Using the Picture Settings 29 Using the Sound Settings 31 Using the Screen Settings 33 Using the Channel Settings 35 Using the Parental Lock Settings 36 Using the Setup Settings...
... Operating the TV Using the Remote Control 18 Remote Control Button Description 19 TV Controls and Indicators 22 Using Features BRAVIA® SyncTM with Control for HDMI . . .23 Using PIP Feature 24 Favorites 25 Wide Mode 25 Wide Mode with PC 26 Inputs 26 Playing back Photo/Music/ Video via USB 27 Using the Menus Navigating through TV Menus 28 Using the Picture Settings 29 Using the Sound Settings 31 Using the Screen Settings 33 Using the Channel Settings 35 Using the Parental Lock Settings 36 Using the Setup Settings...
Operating Instructions
Page 4
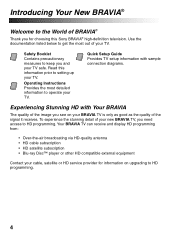
... broadcasting via HD-quality antenna • HD cable subscription • HD satellite subscription • Blu-ray Disc™ player or other HD compatible external equipment Contact your TV safe. Read this Sony BRAVIA® high-definition television. Quick Setup Guide Provides TV setup information with sample connection diagrams. Experiencing Stunning HD with Your BRAVIA The quality of your new BRAVIA TV, you need access to setting up your TV...
... broadcasting via HD-quality antenna • HD cable subscription • HD satellite subscription • Blu-ray Disc™ player or other HD compatible external equipment Contact your TV safe. Read this Sony BRAVIA® high-definition television. Quick Setup Guide Provides TV setup information with sample connection diagrams. Experiencing Stunning HD with Your BRAVIA The quality of your new BRAVIA TV, you need access to setting up your TV...

Operating Instructions
Page 5
... your TV to the most suitable picture and sound settings based on the remote control to the Quick Setup Guide, enclosed separately, for HDMI function (page 23). ➢ Digital Media Accessibility: Use the Photo, Music, and Video icons to access photo, music, and video files from 1080 HD signals as shown here. Refer to fill the screen. TV Feature Highlights Your BRAVIA comes with other Sony equipment supporting the Control for connecting optional equipment.
... your TV to the most suitable picture and sound settings based on the remote control to the Quick Setup Guide, enclosed separately, for HDMI function (page 23). ➢ Digital Media Accessibility: Use the Photo, Music, and Video icons to access photo, music, and video files from 1080 HD signals as shown here. Refer to fill the screen. TV Feature Highlights Your BRAVIA comes with other Sony equipment supporting the Control for connecting optional equipment.
Operating Instructions
Page 7
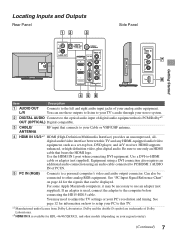
... analog audio equipment. If an adapter is PCM/Dolby*1 OUT (OPTICAL) Digital compatible. 3 CABLE/ RF input that connects to your stereo system. 2 DIGITAL AUDIO Connects to the optical audio input of digital audio equipment that bears the HDMI logo. Locating Inputs and Outputs Rear Panel Side Panel 2 VIDEO IN VIDEO (MONO) L AUDIO R Getting Started Item Description 1 AUDIO OUT Connects to the left and right audio input jacks of your PC to this TV and any HDMI-equipped audio/video equipment, such as a set-top box, DVD player, and A/V receiver. ANTENNA 4 HDMI...
... analog audio equipment. If an adapter is PCM/Dolby*1 OUT (OPTICAL) Digital compatible. 3 CABLE/ RF input that connects to your stereo system. 2 DIGITAL AUDIO Connects to the optical audio input of digital audio equipment that bears the HDMI logo. Locating Inputs and Outputs Rear Panel Side Panel 2 VIDEO IN VIDEO (MONO) L AUDIO R Getting Started Item Description 1 AUDIO OUT Connects to the left and right audio input jacks of your PC to this TV and any HDMI-equipped audio/video equipment, such as a set-top box, DVD player, and A/V receiver. ANTENNA 4 HDMI...
Operating Instructions
Page 8
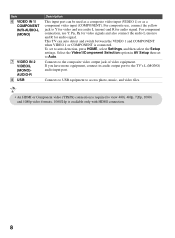
... video input (VIDEO 1) or as a component video input (COMPONENT). If you have mono equipment, connect its audio output port to view 480i, 480p, 720p, 1080i and 1080p video formats. 1080/24p is available only with HDMI connection. 8 For component connection, use audio L (mono) and R for audio signal. To set to the composite video output jack of video equipment. Item 6 VIDEO IN 1/ COMPONENT IN/R-AUDIO-L (MONO) 7 VIDEO IN 2 VIDEO/L (MONO)AUDIO-R 8 USB Description This input port can auto detect and switch between the VIDEO 1 and COMPONENT when VIDEO 1 or COMPONENT is connected...
... video input (VIDEO 1) or as a component video input (COMPONENT). If you have mono equipment, connect its audio output port to view 480i, 480p, 720p, 1080i and 1080p video formats. 1080/24p is available only with HDMI connection. 8 For component connection, use audio L (mono) and R for audio signal. To set to the composite video output jack of video equipment. Item 6 VIDEO IN 1/ COMPONENT IN/R-AUDIO-L (MONO) 7 VIDEO IN 2 VIDEO/L (MONO)AUDIO-R 8 USB Description This input port can auto detect and switch between the VIDEO 1 and COMPONENT when VIDEO 1 or COMPONENT is connected...
Operating Instructions
Page 22
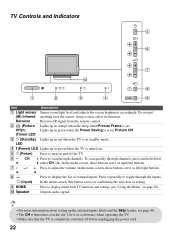
... setting up in standby mode. TV Controls and Indicators Item Description 1 Light sensor Senses room light level and adjusts the screen brightness accordingly. Receiver Receives IR signal from the remote control. 2 (Picture Lights up in red when the TV is in green when the TV is set to toggle through channels, press and hold down buttons. 7 - 2 + Press to display the list of external inputs. Off)/ Lights up in orange when the sleep timer/Picture Frame is turned on. 5 1 (Power) Press to turn...
... setting up in standby mode. TV Controls and Indicators Item Description 1 Light sensor Senses room light level and adjusts the screen brightness accordingly. Receiver Receives IR signal from the remote control. 2 (Picture Lights up in red when the TV is in green when the TV is set to toggle through channels, press and hold down buttons. 7 - 2 + Press to display the list of external inputs. Off)/ Lights up in orange when the sleep timer/Picture Frame is turned on. 5 1 (Power) Press to turn...

Operating Instructions
Page 23
..., BRAVIA Sync helps to their instruction manuals. • When specific Sony equipment compatible with Control for HDMI (BRAVIA Sync) is connected, BRAVIA sync is automatically activated on the equipment. 23 For settings on the connected equipment, refer to communicate with Control for HDMI. • The Control for HDMI settings must be set to standby mode. • Adjusts the volume (VOL +/-) and mutes the sound (MUTING) of the connected AV amplifier through the TV's remote control. Video Camera • Automatically turns...
..., BRAVIA Sync helps to their instruction manuals. • When specific Sony equipment compatible with Control for HDMI (BRAVIA Sync) is connected, BRAVIA sync is automatically activated on the equipment. 23 For settings on the connected equipment, refer to communicate with Control for HDMI. • The Control for HDMI settings must be set to standby mode. • Adjusts the volume (VOL +/-) and mutes the sound (MUTING) of the connected AV amplifier through the TV's remote control. Video Camera • Automatically turns...
Operating Instructions
Page 27
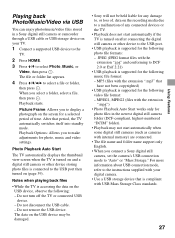
... the USB port then turned on the USB device, observe the following video file format: - Do not disconnect the USB cable. - The file or folder list appears. 4 Press V/v/B/b to DCF 2.0 or Exif 2.21) • USB playback is supported for the following : - For more information about USB connection mode, refer to "Auto" or "Mass Storage." When you connect a Sony digital still camera, set the camera's USB connection mode to the instructions supplied with your TV. 1 Connect a supported USB...
... the USB port then turned on the USB device, observe the following video file format: - Do not disconnect the USB cable. - The file or folder list appears. 4 Press V/v/B/b to DCF 2.0 or Exif 2.21) • USB playback is supported for the following : - For more information about USB connection mode, refer to "Auto" or "Mass Storage." When you connect a Sony digital still camera, set the camera's USB connection mode to the instructions supplied with your TV. 1 Connect a supported USB...
Operating Instructions
Page 28
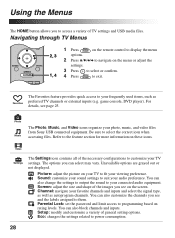
... video files from Sony USB connected equipment. Picture: adjust the picture on the screen. Screen: adjust the size and shape of the necessary configurations to customize your connected audio equipment. Setup: modify and customize a variety of TV settings and USB media files. Be sure to exit. Video Settings The Settings icon contains all of the images you can also change the settings to output the sound to your TV settings. Parental Lock: set the password and limit access to power consumption...
... video files from Sony USB connected equipment. Picture: adjust the picture on the screen. Screen: adjust the size and shape of the necessary configurations to customize your connected audio equipment. Setup: modify and customize a variety of TV settings and USB media files. Be sure to exit. Video Settings The Settings icon contains all of the images you can also change the settings to output the sound to your TV settings. Parental Lock: set the password and limit access to power consumption...
Operating Instructions
Page 41
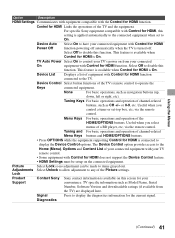
... HDMI Power Off function powering off . Device Control Select button functions of the Picture settings. Device Auto Select On to have your TV remote control. • Some equipment with Control for HDMI is turned off automatically when the TV is On. Useful when you control a tuner or set to On. Adjustments Select Unlock to allow adjustment to items grayed out. Control for the current signal. TV specific information such as Model Name, Serial Number, Software Version and downloadable...
... HDMI Power Off function powering off . Device Control Select button functions of the Picture settings. Device Auto Select On to have your TV remote control. • Some equipment with Control for HDMI is turned off automatically when the TV is On. Useful when you control a tuner or set to On. Adjustments Select Unlock to allow adjustment to items grayed out. Control for the current signal. TV specific information such as Model Name, Serial Number, Software Version and downloadable...
Operating Instructions
Page 45
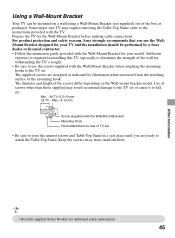
... box as indicated by a Sony dealer or licensed contractor. • Follow the instruction guide provided with the TV. Max.: 8-12 mm Screw (supplied with the Wall-Mount Bracket when attaching the mounting hooks to use the WallMount Bracket designed for withstanding the TV's weight. • Be sure to the TV set or cause it to determine the strength of screws other than those supplied may require removing the Table...
... box as indicated by a Sony dealer or licensed contractor. • Follow the instruction guide provided with the TV. Max.: 8-12 mm Screw (supplied with the Wall-Mount Bracket when attaching the mounting hooks to use the WallMount Bracket designed for withstanding the TV's weight. • Be sure to the TV set or cause it to determine the strength of screws other than those supplied may require removing the Table...

Operating Instructions
Page 54
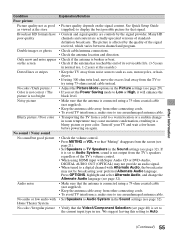
... the power cord is connected securely. • Turn on the power of the TV. • Check cable/antenna connections. • Make sure the Signal Type setting is turn itself off automatically • Check if Sleep Timer is lost or cannot remember, enter the master password: 4357. Condition Explanation/Solution No picture No picture • Check the Power Saving settings (see page 43). TV is locked to one channel • Perform Auto Program to Antenna. Troubleshooting...
... the power cord is connected securely. • Turn on the power of the TV. • Check cable/antenna connections. • Make sure the Signal Type setting is turn itself off automatically • Check if Sleep Timer is lost or cannot remember, enter the master password: 4357. Condition Explanation/Solution No picture No picture • Check the Power Saving settings (see page 43). TV is locked to one channel • Perform Auto Program to Antenna. Troubleshooting...
Operating Instructions
Page 55
... coaxial cable (not supplied). • Keep the antenna cable away from the screen (see page 21). • Set Speakers to a digital channel with Home Theater System No color / Irregular picture Explanation/Solution • Picture quality depends on again. • Check the volume control. • Press MUTING or VOL + so that the antenna is connected using HDMI input with Super Audio CD or DVD-Audio, DIGITAL AUDIO OUT (OPTICAL) may cause moisture condensation, resulting in the Sound settings...
... coaxial cable (not supplied). • Keep the antenna cable away from the screen (see page 21). • Set Speakers to a digital channel with Home Theater System No color / Irregular picture Explanation/Solution • Picture quality depends on again. • Check the volume control. • Press MUTING or VOL + so that the antenna is connected using HDMI input with Super Audio CD or DVD-Audio, DIGITAL AUDIO OUT (OPTICAL) may cause moisture condensation, resulting in the Sound settings...
Operating Instructions
Page 57
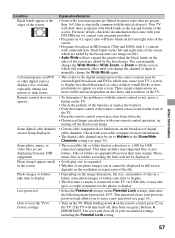
... the Password settings on the Parental Lock settings, then enter the following master password: 4357. try turning off , then back on their time stamps. Other Information Condition Black bands appear at the edges of the screen Certain programs on DVD or other digital sources display a loss of detail, especially during fastmotion or dark scenes Remote control does not operate Some digital cable channels are not being displayed Some photo, music, or video files...
... the Password settings on the Parental Lock settings, then enter the following master password: 4357. try turning off , then back on their time stamps. Other Information Condition Black bands appear at the edges of the screen Certain programs on DVD or other digital sources display a loss of detail, especially during fastmotion or dark scenes Remote control does not operate Some digital cable channels are not being displayed Some photo, music, or video files...
Operating Instructions
Page 59
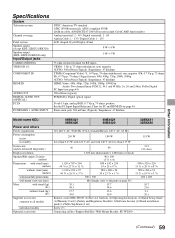
... (typical) PCM/Dolby Digital optical signal D-sub 15-pin, analog RGB, 0.7 Vp-p, 75 ohms, positive See the PC Input Signal Reference Chart for PC and HDMI IN on page 45) 20.1 15.7 10.7 44.3 34.6 23.6 17.7 13.6 9.1 39.0 30.0 20.1 Remote control RM-YD065 (1)/Size AA batteries (2)/Operating Instructions (1)/Quick Setup Guide (1)/Warranty Card (1)/Safety and Regulatory Booklet (1)/Software License (1)/Stand installation guide (1)/Table-Top Stand (1 set) Screw (7) Connecting cables / Support Belt Kit / Wall-Mount Bracket: SU-WL500 (Continued...
... (typical) PCM/Dolby Digital optical signal D-sub 15-pin, analog RGB, 0.7 Vp-p, 75 ohms, positive See the PC Input Signal Reference Chart for PC and HDMI IN on page 45) 20.1 15.7 10.7 44.3 34.6 23.6 17.7 13.6 9.1 39.0 30.0 20.1 Remote control RM-YD065 (1)/Size AA batteries (2)/Operating Instructions (1)/Quick Setup Guide (1)/Warranty Card (1)/Safety and Regulatory Booklet (1)/Software License (1)/Stand installation guide (1)/Table-Top Stand (1 set) Screw (7) Connecting cables / Support Belt Kit / Wall-Mount Bracket: SU-WL500 (Continued...
Operating Instructions
Page 60
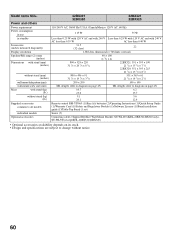
...: refer to diagram on page 45) 10.7 6.2 23.6 13.7 9.1 5.6 20.1 12.4 Remote control RM-YD065 (1)/Size AA batteries (2)/Operating Instructions (1)/Quick Setup Guide (1)/Warranty Card (1)/Safety and Regulatory Booklet (1)/Software License (1)/Stand installation guide (1)/Table-Top Stand (1 set) Screw (7) Connecting cables / Support Belt Kit / Wall-Mount Bracket: SU-WL100 (KDL-22BX321/BX320 only), SU-WL500 (except KDL-22BX321/22BX320) • Optional accessories availability depends on its stock. • Design and specifications are subject to change without notice. 60...
...: refer to diagram on page 45) 10.7 6.2 23.6 13.7 9.1 5.6 20.1 12.4 Remote control RM-YD065 (1)/Size AA batteries (2)/Operating Instructions (1)/Quick Setup Guide (1)/Warranty Card (1)/Safety and Regulatory Booklet (1)/Software License (1)/Stand installation guide (1)/Table-Top Stand (1 set) Screw (7) Connecting cables / Support Belt Kit / Wall-Mount Bracket: SU-WL100 (KDL-22BX321/BX320 only), SU-WL500 (except KDL-22BX321/22BX320) • Optional accessories availability depends on its stock. • Design and specifications are subject to change without notice. 60...
Operating Instructions
Page 61
... ( ) LED 22 PIP 24 Power (1) button 22 POWER ("/1) button 21 POWER (") LED 22 Power Saving 43 Product Support 41 R Rating 36 Reset 29, 31, 43, 57 RETURN button 20 S SCENE button 20 Settings Channel 35 Eco 43 Parental Lock 36 Picture 29 Screen 33 Setup 39 Sound 31 Sharpness 29 Show/Hide Channels 35 Signal Type 35 Sleep Timer 40 Sound Mode 31 Speaker 22 Speakers 32 Standby (1) LED 22 Start-up Sound 42 Steady Sound 31 Surround 31 SYNC MENU button 19 T Timer ( ) LED 22 Treble 31 Troubleshooting...
... ( ) LED 22 PIP 24 Power (1) button 22 POWER ("/1) button 21 POWER (") LED 22 Power Saving 43 Product Support 41 R Rating 36 Reset 29, 31, 43, 57 RETURN button 20 S SCENE button 20 Settings Channel 35 Eco 43 Parental Lock 36 Picture 29 Screen 33 Setup 39 Sound 31 Sharpness 29 Show/Hide Channels 35 Signal Type 35 Sleep Timer 40 Sound Mode 31 Speaker 22 Speakers 32 Standby (1) LED 22 Start-up Sound 42 Steady Sound 31 Surround 31 SYNC MENU button 19 T Timer ( ) LED 22 Treble 31 Troubleshooting...
Quick Setup Guide
Page 1
... Composite VIDEO 2 video z connection Audio L/R *1 HDMI 3 is available for KDL-46/40/32BX421, and other models (depending on your region/country). 2 Running Initial Setup 3 Watching Your TV Initial Setup instructions are displayed on the screen when your BRAVIA can cancel the Con rm Auto Program by selecting Cancel. Refer to your new High Definition TV. To change the signal source setting (cable to antenna or vice versa), press HOME and select Settings, Channel, Signal Type...
... Composite VIDEO 2 video z connection Audio L/R *1 HDMI 3 is available for KDL-46/40/32BX421, and other models (depending on your region/country). 2 Running Initial Setup 3 Watching Your TV Initial Setup instructions are displayed on the screen when your BRAVIA can cancel the Con rm Auto Program by selecting Cancel. Refer to your new High Definition TV. To change the signal source setting (cable to antenna or vice versa), press HOME and select Settings, Channel, Signal Type...
Quick Setup Guide
Page 2
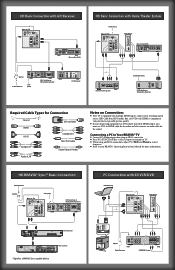
... DVD connect your incoming signal source (HD Cable Box, HD Satellite Box, or DVD) with HDMI or component video for the best possible picture quality. ■ If your connecting equipment has DVI output instead of HDMI output, you must use DVI-to your BRAVIA® Operating Instructions Manual for Ntheostouensd.on Connection: ■ Your TV is equipped with multiple HDMI inputs; HD BRAVIA® Sync™ Basic Connection Cable/Antenna Splitter Rear of TV SAT (dish) HD Cable Box or HD Satellite Receiver...
... DVD connect your incoming signal source (HD Cable Box, HD Satellite Box, or DVD) with HDMI or component video for the best possible picture quality. ■ If your connecting equipment has DVI output instead of HDMI output, you must use DVI-to your BRAVIA® Operating Instructions Manual for Ntheostouensd.on Connection: ■ Your TV is equipped with multiple HDMI inputs; HD BRAVIA® Sync™ Basic Connection Cable/Antenna Splitter Rear of TV SAT (dish) HD Cable Box or HD Satellite Receiver...
Safety and Regulatory Booklet
Page 3
...may drip to the bottom of the screen or exterior parts, and may cause a Replace only with the same or equivalent type of fire or electric shock, do not expose this TV to Antenna lead-in the TV are necessary to ensure reliable operation of the TV and to protect it... plant on the TV set near a swimming pool, etc. ☐ Do not install the TV in the literature accompanying the TV. malfunction. ☐ If using a chemically pretreated cloth, please follow the instruction provided on the package. ☐ Never use a power line operated TV set . This may be removed with a cloth slightly ...
...may drip to the bottom of the screen or exterior parts, and may cause a Replace only with the same or equivalent type of fire or electric shock, do not expose this TV to Antenna lead-in the TV are necessary to ensure reliable operation of the TV and to protect it... plant on the TV set near a swimming pool, etc. ☐ Do not install the TV in the literature accompanying the TV. malfunction. ☐ If using a chemically pretreated cloth, please follow the instruction provided on the package. ☐ Never use a power line operated TV set . This may be removed with a cloth slightly ...


