Operating Instructions
Page 3
... This device complies with an extension cord, receptacle or other WALL-MOUNT BRACKET, TV Stand may cause undesired operation. This equipment generates, uses and can be blurred or show poor color due to moisture condensation. If this equipment. If you to receive unscrambled digital cable television programming via subscription service to a cable service provider. s To obtain the best picture, do not expose the screen to provide reasonable protection against harmful...
... This device complies with an extension cord, receptacle or other WALL-MOUNT BRACKET, TV Stand may cause undesired operation. This equipment generates, uses and can be blurred or show poor color due to moisture condensation. If this equipment. If you to receive unscrambled digital cable television programming via subscription service to a cable service provider. s To obtain the best picture, do not expose the screen to provide reasonable protection against harmful...
Operating Instructions
Page 5
... the AC power cord or the TV with respect to proper grounding of the mast and supporting structure, grounding of the lead-in wire to an antenna discharge unit, size of grounding conductors, location of antenna discharge unit, connection to grounding electrodes, and requirements for long periods of the Canadian Electrical Code in the USA and Section 54 of time, unplug...
... the AC power cord or the TV with respect to proper grounding of the mast and supporting structure, grounding of the lead-in wire to an antenna discharge unit, size of grounding conductors, location of antenna discharge unit, connection to grounding electrodes, and requirements for long periods of the Canadian Electrical Code in the USA and Section 54 of time, unplug...
Operating Instructions
Page 9
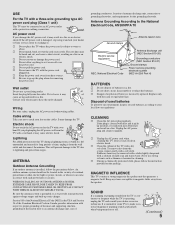
... Preventing the TV from Toppling Over 16 Bundling the Connecting Cables 17 Adjusting the Viewing Angle of MENU ...23 Using the Picture Settings 26 Using the Sound Settings 28 Using the Screen Settings 29 Using the Setup Settings 31 Using the PC Settings...36 Using the Analog Setup Settings 37 Using the Digital Setup Settings 38 Other Information Troubleshooting...41 Preparation for Wall Mounting the KDL-23S2010, KDL-26S2010 and KDL-32S2010.......43 Preparation for Wall Mounting the KDL-40S2010 and KDL-46S2010 44 PC Input Signal Reference Chart 45 Specifications...46 Index...
... Preventing the TV from Toppling Over 16 Bundling the Connecting Cables 17 Adjusting the Viewing Angle of MENU ...23 Using the Picture Settings 26 Using the Sound Settings 28 Using the Screen Settings 29 Using the Setup Settings 31 Using the PC Settings...36 Using the Analog Setup Settings 37 Using the Digital Setup Settings 38 Other Information Troubleshooting...41 Preparation for Wall Mounting the KDL-23S2010, KDL-26S2010 and KDL-32S2010.......43 Preparation for Wall Mounting the KDL-40S2010 and KDL-46S2010 44 PC Input Signal Reference Chart 45 Specifications...46 Index...

Operating Instructions
Page 11
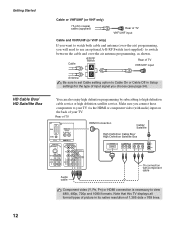
... receiving HDTV content from a cable or satellite box via the video inputs (HDMI and Y/PB/PR component video; When the antenna/cable connection is capable of channels you can receive and view programming you to display the picture in your area) along with your preferred aspect ratio. For optimum picture performance, your new BRAVIA TV is done, you must be easily affected by radio frequency, resulting in this Sony LCD Digital Color Television. Advanced connection examples are listed...
... receiving HDTV content from a cable or satellite box via the video inputs (HDMI and Y/PB/PR component video; When the antenna/cable connection is capable of channels you can receive and view programming you to display the picture in your area) along with your preferred aspect ratio. For optimum picture performance, your new BRAVIA TV is done, you must be easily affected by radio frequency, resulting in this Sony LCD Digital Color Television. Advanced connection examples are listed...
Operating Instructions
Page 12
... TV displays all format types of picture in Setup settings for the type of input signal you choose (see page 34). Make sure you connect these components to view 480i, 480p, 720p and 1080i formats. Rear of TV 7 6 RGB R AUDIO L AUDIO PC IN VIDEO IN 1 S VIDEO 3 VIDEO L (MONO) AUDIO R HD/DVD IN (1080i/720p/480p/480i) 4 5 Y OPTICAL OUT PB R L AUDIO R AUDIO OUT(VAR/FIX) HDMI Connection Cable/ Satellite High Definition Cable Box/ High Definition Satellite Box IN OUT Or connection with component cable Audio cable Component video (Y, PB, PR) or HDMI connection...
... TV displays all format types of picture in Setup settings for the type of input signal you choose (see page 34). Make sure you connect these components to view 480i, 480p, 720p and 1080i formats. Rear of TV 7 6 RGB R AUDIO L AUDIO PC IN VIDEO IN 1 S VIDEO 3 VIDEO L (MONO) AUDIO R HD/DVD IN (1080i/720p/480p/480i) 4 5 Y OPTICAL OUT PB R L AUDIO R AUDIO OUT(VAR/FIX) HDMI Connection Cable/ Satellite High Definition Cable Box/ High Definition Satellite Box IN OUT Or connection with component cable Audio cable Component video (Y, PB, PR) or HDMI connection...
Operating Instructions
Page 14
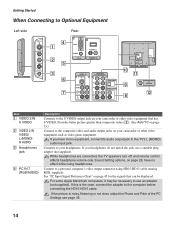
... computers, it may be displayed. If you have no effect while using HD15-HD15 cable (analog RGB, supplied). If your headphones. Connect to your headphones do not match the jack, use an adapter (not supplied). If the picture is the case, connect the adapter to the TV's L (MONO) audio input jack. Connects to a personal computer's video output connector using headphones. While headphones are connected, the TV speakers turn off, and volume control affects headphone volume only.
... computers, it may be displayed. If you have no effect while using HD15-HD15 cable (analog RGB, supplied). If your headphones. Connect to your headphones do not match the jack, use an adapter (not supplied). If the picture is the case, connect the adapter to the TV's L (MONO) audio input jack. Connects to a personal computer's video output connector using headphones. While headphones are connected, the TV speakers turn off, and volume control affects headphone volume only.
Operating Instructions
Page 15
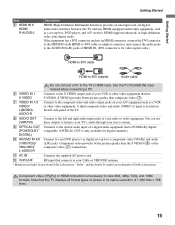
... power cord. A third composite video and audio (VIDEO 2) input is necessary to your audio or video equipment. Getting Started Item 5 HDMI IN 6 HDMI/ R-AUDIO-L Getting Started Description HDMI (High-Definition Multimedia Interface) provides an uncompressed, all-digital audio/video interface between this TV displays all format types of picture in its native resolution of 1,366 dots × 768 lines. 15 Component video (YPBPR) or HDMI connection is located on your DVD player's or digital set -top box, DVD player, and A/V receiver. You can use these outputs...
... power cord. A third composite video and audio (VIDEO 2) input is necessary to your audio or video equipment. Getting Started Item 5 HDMI IN 6 HDMI/ R-AUDIO-L Getting Started Description HDMI (High-Definition Multimedia Interface) provides an uncompressed, all-digital audio/video interface between this TV displays all format types of picture in its native resolution of 1,366 dots × 768 lines. 15 Component video (YPBPR) or HDMI connection is located on your DVD player's or digital set -top box, DVD player, and A/V receiver. You can use these outputs...
Operating Instructions
Page 16
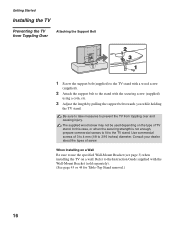
... the Instruction Guide supplied with the Wall-Mount Bracket (sold separately). (See page 43 or 44 for Table-Top Stand removal.) 16 Refer to the TV stand. When Installing on a Wall Be sure to 3/16 inches) diameter. Use commercial screws of 3 to 4 mm (1/8 to use the specified Wall-Mount Bracket (see page 3) when installing the TV on the type of screw. Getting Started Installing the TV Preventing the TV from Toppling Over Attaching the Support Belt 1 Screw the support belt (supplied...
... the Instruction Guide supplied with the Wall-Mount Bracket (sold separately). (See page 43 or 44 for Table-Top Stand removal.) 16 Refer to the TV stand. When Installing on a Wall Be sure to 3/16 inches) diameter. Use commercial screws of 3 to 4 mm (1/8 to use the specified Wall-Mount Bracket (see page 3) when installing the TV on the type of screw. Getting Started Installing the TV Preventing the TV from Toppling Over Attaching the Support Belt 1 Screw the support belt (supplied...
Operating Instructions
Page 18
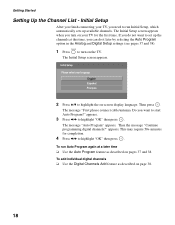
... need to set up available channels. Initial Setup After you want to run Auto Program again at this time, you do it later by selecting the Auto Program option in the Analog and Digital Setup settings (see pages 37 and 38). The Initial Setup screen appears when you turn on -screen display language. If you can do not want to highlight "OK" then press . The message "First please connect cable/antenna...
... need to set up available channels. Initial Setup After you want to run Auto Program again at this time, you do it later by selecting the Auto Program option in the Analog and Digital Setup settings (see pages 37 and 38). The Initial Setup screen appears when you turn on -screen display language. If you can do not want to highlight "OK" then press . The message "First please connect cable/antenna...
Operating Instructions
Page 19
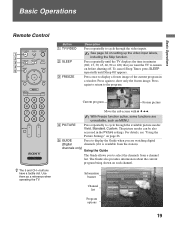
.... To cancel Sleep Timer, press SLEEP repeatedly until the TV displays the time in the Picture settings. Information banner Channel list Program options Make Way for Ducks! Press again to return to show only the frozen image. Use them as MENU. 4 PICTURE Press repeatedly to remain on page 26. 5 GUIDE Press to display the Guide when you to cycle through the available picture modes: Vivid, Standard, Custom. Basic Operations Basic Operations Remote Control 1 2 3 4 5 Button 1 TV/VIDEO 2 SLEEP 3 FREEZE...
.... To cancel Sleep Timer, press SLEEP repeatedly until the TV displays the time in the Picture settings. Information banner Channel list Program options Make Way for Ducks! Press again to return to show only the frozen image. Use them as MENU. 4 PICTURE Press repeatedly to remain on page 26. 5 GUIDE Press to display the Guide when you to cycle through the available picture modes: Vivid, Standard, Custom. Basic Operations Basic Operations Remote Control 1 2 3 4 5 Button 1 TV/VIDEO 2 SLEEP 3 FREEZE...

Operating Instructions
Page 22
... the power cord. Outputs audio signal. Lights up in red continuously, this button serves as a reference when operating the TV. CHANNEL + 5 POWER 6 (IR) Infrared Receiver/ Light Sensor 7 PIC OFF/ TIMER LED 8 STANDBY LED 9 POWER LED 0 Speaker Description Press to scan through the video inputs. Senses room light level and adjusts the screen brightness accordingly (see "Overview of MENU" on page 2). Basic Operations TV Controls 12 MENU TV/VIDEO 3 VOLUME 4 5 CHANNEL POWER 0 PIC OFF/TIMER STANDBY POWER 67 8 9 Item 1 MENU 2 TV/VIDEO 3 - Press to adjust the volume...
... the power cord. Outputs audio signal. Lights up in red continuously, this button serves as a reference when operating the TV. CHANNEL + 5 POWER 6 (IR) Infrared Receiver/ Light Sensor 7 PIC OFF/ TIMER LED 8 STANDBY LED 9 POWER LED 0 Speaker Description Press to scan through the video inputs. Senses room light level and adjusts the screen brightness accordingly (see "Overview of MENU" on page 2). Basic Operations TV Controls 12 MENU TV/VIDEO 3 VOLUME 4 5 CHANNEL POWER 0 PIC OFF/TIMER STANDBY POWER 67 8 9 Item 1 MENU 2 TV/VIDEO 3 - Press to adjust the volume...
Operating Instructions
Page 26
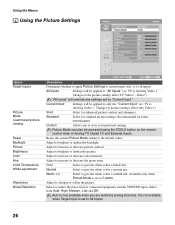
... picture settings affect TV, Video1 - Changes to all inputs. Current Input Settings will be applied to only the "Current Input" (ex: TV is set by "Current Input." Resets the current Picture Mode setting to increase or decrease color intensity. Neutral Select to give the white colors a neutral tint. Warm 1,2 Select to give the white colors a reddish tint. Adjust to the default values. Video7) "All Inputs" will be accessed using the TOOLS button on the remote control when in Analog TV, Digital TV...
... picture settings affect TV, Video1 - Changes to all inputs. Current Input Settings will be applied to only the "Current Input" (ex: TV is set by "Current Input." Resets the current Picture Mode setting to increase or decrease color intensity. Neutral Select to give the white colors a neutral tint. Warm 1,2 Select to give the white colors a reddish tint. Adjust to the default values. Video7) "All Inputs" will be accessed using the TOOLS button on the remote control when in Analog TV, Digital TV...

Operating Instructions
Page 33
... to a specific channel at the minimum volume and gradually change to Off when: - Current Time Select to set the current time (day, hour, minute, and AM/PM). 1 Press to select Current Time. 2 Press V/v/B/b to set to the set the timer by Day, Time, Duration, Channel and Volume Setup. Select to VIDEO 1 and VIDEO 2. Timer will be connected to reduce the power consumption by default will automatically show when the TV is displayed as...
... to a specific channel at the minimum volume and gradually change to Off when: - Current Time Select to set the current time (day, hour, minute, and AM/PM). 1 Press to select Current Time. 2 Press V/v/B/b to set to the set the timer by Day, Time, Duration, Channel and Volume Setup. Select to VIDEO 1 and VIDEO 2. Timer will be connected to reduce the power consumption by default will automatically show when the TV is displayed as...
Operating Instructions
Page 34
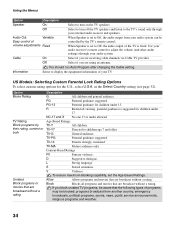
... blocked: programs broadcast from your external audio receiver and speakers. Audio Out Variable Easy control of programs may be controlled by the TV's remote control. US Models: Selecting Custom Parental Lock Rating Options To select custom rating options for children under 17. Option Movie Rating TV Rating Block programs by their rating, content or both Unrated Block programs or movies that the following types of volume adjustments Fixed When Speaker is fixed. R Restricted viewing, parental guidance...
... blocked: programs broadcast from your external audio receiver and speakers. Audio Out Variable Easy control of programs may be controlled by the TV's remote control. US Models: Selecting Custom Parental Lock Rating Options To select custom rating options for children under 17. Option Movie Rating TV Rating Block programs by their rating, content or both Unrated Block programs or movies that the following types of volume adjustments Fixed When Speaker is fixed. R Restricted viewing, parental guidance...
Operating Instructions
Page 41
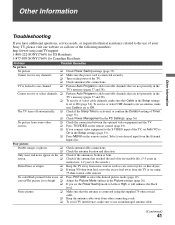
..., it will enhance the black level. Adjust the Picture Mode options in normal use an undamaged antenna cable. (Continued) 41 If you connect video equipment to the S VIDEO input of the TV, set Auto YC to On in the Setup settings (page 33). ❑ Press MENU on the ❑ Check if the antenna is broken or bent. Cannot receive or select channels. ❑ Perform Auto Program to add receivable channels that are not presently...
..., it will enhance the black level. Adjust the Picture Mode options in normal use an undamaged antenna cable. (Continued) 41 If you connect video equipment to the S VIDEO input of the TV, set Auto YC to On in the Setup settings (page 33). ❑ Press MENU on the ❑ Check if the antenna is broken or bent. Cannot receive or select channels. ❑ Perform Auto Program to add receivable channels that are not presently...
Operating Instructions
Page 42
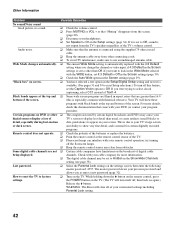
...:9 bottom of the TV's volume control. Some digital cable channels are greater than Off. The master password clears your TV's large screen or dark scenes. While holding down the V button on the remote control, press the POWER button on your customized settings including Parental Lock setting. 42 "Black box" on screen. ❑ You have limitations on DVD or other connecting cords. ❑ To avoid TV interference, make sure to Off in the Screen settings (page 30). ❑...
...:9 bottom of the TV's volume control. Some digital cable channels are greater than Off. The master password clears your TV's large screen or dark scenes. While holding down the V button on the remote control, press the POWER button on your customized settings including Parental Lock setting. 42 "Black box" on screen. ❑ You have limitations on DVD or other connecting cords. ❑ To avoid TV interference, make sure to Off in the Screen settings (page 30). ❑...
Operating Instructions
Page 43
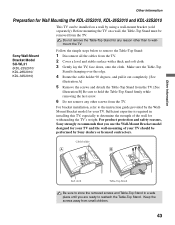
... instruction guide provided by Sony dealers or licensed contractors. For bracket installation, refer to store the removed screws and Table-Top Stand in installing this TV, especially to hold the Table-Top Stand firmly while removing the last screw. 6 Do not remove any reason other screws from the TV. Do not remove the Table-Top Stand for Wall Mounting the KDL-23S2010, KDL-26S2010 and KDL-32S2010 This TV can be performed by the WallMount Bracket model for withstanding the TV's weight...
... instruction guide provided by Sony dealers or licensed contractors. For bracket installation, refer to store the removed screws and Table-Top Stand in installing this TV, especially to hold the Table-Top Stand firmly while removing the last screw. 6 Do not remove any reason other screws from the TV. Do not remove the Table-Top Stand for Wall Mounting the KDL-23S2010, KDL-26S2010 and KDL-32S2010 This TV can be performed by the WallMount Bracket model for withstanding the TV's weight...

Operating Instructions
Page 44
... remove the Table-Top Stand for withstanding the TV's weight. Sony Wall-Mount Bracket Models SU-WL51 and SU-PW2 (KDL-40S2010/ KDL-46S2010) Follow the simple steps below ) Do not remove any reason other screws from the ones on a wall, the Table-Top Stand must be performed by the WallMount Bracket model for your TV should be removed from small children. 44 Be sure to store the removed screws and Table-Top Stand in installing...
... remove the Table-Top Stand for withstanding the TV's weight. Sony Wall-Mount Bracket Models SU-WL51 and SU-PW2 (KDL-40S2010/ KDL-46S2010) Follow the simple steps below ) Do not remove any reason other screws from the ones on a wall, the Table-Top Stand must be performed by the WallMount Bracket model for your TV should be removed from small children. 44 Be sure to store the removed screws and Table-Top Stand in installing...
Operating Instructions
Page 46
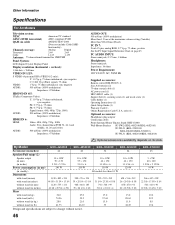
..., analog RGB, 0.7 Vp-p, 75 ohms, positive See the PC Input Signal Reference Chart on page 45 PC AUDIO INPUT: Stereo mini jack, 0.5 Vrms, 1 kilohm Headphones: Stereo mini jack Impedance: 16 ohms Power Requirement: 120 V-240 V AC, 50/60 Hz Supplied accessories: Remote control RM-YD005 (1) Size AA batteries (2) 75-ohm coaxial cable (1) AC power cord (1) HD15-HD15 cable (1) Support belt (1), securing screw (1) and wood screw (1) Cable holder (1) Operating Instructions (1) Quick Setup Guide (1) Warranty Card (1) Online...
..., analog RGB, 0.7 Vp-p, 75 ohms, positive See the PC Input Signal Reference Chart on page 45 PC AUDIO INPUT: Stereo mini jack, 0.5 Vrms, 1 kilohm Headphones: Stereo mini jack Impedance: 16 ohms Power Requirement: 120 V-240 V AC, 50/60 Hz Supplied accessories: Remote control RM-YD005 (1) Size AA batteries (2) 75-ohm coaxial cable (1) AC power cord (1) HD15-HD15 cable (1) Support belt (1), securing screw (1) and wood screw (1) Cable holder (1) Operating Instructions (1) Quick Setup Guide (1) Warranty Card (1) Online...
Operating Instructions
Page 47
... Problems, troubleshooting 41, 42 Program Options 20 Quiet Power On 33 R Reset 26, 28, 36, 42 RETURN button 20 S S VIDEO jack, described 14, 15 Setting up channels 18 Settings Analog Setup 37 Digital Setup 38 PC 36 Picture 26 Screen 29 Setup 31 Sound 28 Sharpness 26 Show/Hide Channels 37, 38 SLEEP button 19 Sound Mode 28 Speaker 34 STANDBY LED 22 Steady Sound 28 Stereo, MTS setting 28 Support Belt 16 Surround 28 Swivel 17 T, U Target Inputs 26, 28, 29 TIMER LED 22 Timer Settings 33...
... Problems, troubleshooting 41, 42 Program Options 20 Quiet Power On 33 R Reset 26, 28, 36, 42 RETURN button 20 S S VIDEO jack, described 14, 15 Setting up channels 18 Settings Analog Setup 37 Digital Setup 38 PC 36 Picture 26 Screen 29 Setup 31 Sound 28 Sharpness 26 Show/Hide Channels 37, 38 SLEEP button 19 Sound Mode 28 Speaker 34 STANDBY LED 22 Steady Sound 28 Stereo, MTS setting 28 Support Belt 16 Surround 28 Swivel 17 T, U Target Inputs 26, 28, 29 TIMER LED 22 Timer Settings 33...

