Operating Instructions
Page 2
... the equipment and receiver. s Use the AC power cord specified by Sony and suitable for help. s The apparatus must accept any liquid or solid object should be easily accessible for disconnection. s Avoid operating the TV at the rear of Sony Computer Entertainment Inc. s If the TV is a trademark of the TV. Sony TV Model No. Disposal of these numbers in a room where the floor and walls are not...
... the equipment and receiver. s Use the AC power cord specified by Sony and suitable for help. s The apparatus must accept any liquid or solid object should be easily accessible for disconnection. s Avoid operating the TV at the rear of Sony Computer Entertainment Inc. s If the TV is a trademark of the TV. Sony TV Model No. Disposal of these numbers in a room where the floor and walls are not...
Operating Instructions
Page 3
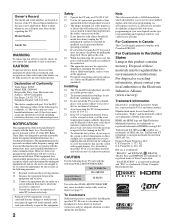
...the Connecting Cables 7 Preparation for HDMI 20 Using DIGITAL MEDIA PORT adapter ........ 20 Remote Control and TV Controls/Indicators Inserting Batteries 21 When Using the Remote Control 21 Remote Control 22 TV Controls/Indicators 26 Using TV Menus Navigating through TV Menus 27 Menu Descriptions 27 Using the Shortcuts Menu 28 Using the Picture Menu 30 Using the Sound Menu 31 Using the Screen Menu 32 Using the Channel Menu 33 Using the Parental Lock 34 Using the Setup Menu 37 Other Information Troubleshooting 39 Specifications 42 Index 43 Quick Setup Guide (separate volume...
...the Connecting Cables 7 Preparation for HDMI 20 Using DIGITAL MEDIA PORT adapter ........ 20 Remote Control and TV Controls/Indicators Inserting Batteries 21 When Using the Remote Control 21 Remote Control 22 TV Controls/Indicators 26 Using TV Menus Navigating through TV Menus 27 Menu Descriptions 27 Using the Shortcuts Menu 28 Using the Picture Menu 30 Using the Sound Menu 31 Using the Screen Menu 32 Using the Channel Menu 33 Using the Parental Lock 34 Using the Setup Menu 37 Other Information Troubleshooting 39 Specifications 42 Index 43 Quick Setup Guide (separate volume...
Operating Instructions
Page 6
... or the AC power cord when you use an electric screwdriver, set the torque for tightening at approximately 1.5 N·m {15Kgf·cm}. 6 s Install the TV where it securely. s Do not allow children to a wall and/or stand. Prevent the TV from toppling over . Securing the TV Sony strongly recommends taking measures to prevent the TV from Toppling s Secure the TV to play or climb...
... or the AC power cord when you use an electric screwdriver, set the torque for tightening at approximately 1.5 N·m {15Kgf·cm}. 6 s Install the TV where it securely. s Do not allow children to a wall and/or stand. Prevent the TV from toppling over . Securing the TV Sony strongly recommends taking measures to prevent the TV from Toppling s Secure the TV to play or climb...
Operating Instructions
Page 7
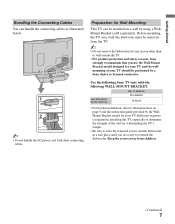
...) 7 KDL-26N4000 SU-WL100 • For bracket installation, refer to the instructions on a wall by the WallMount Bracket model for Wall-Mounting This TV can bundle the connecting cables as illustrated below. 1 2 ~ • Do not bundle the AC power cord with the following Sony TV only with other than to wall-mount the TV. • For product protection and safety reasons, Sony strongly recommends that you are ready to store the removed screws...
...) 7 KDL-26N4000 SU-WL100 • For bracket installation, refer to the instructions on a wall by the WallMount Bracket model for Wall-Mounting This TV can bundle the connecting cables as illustrated below. 1 2 ~ • Do not bundle the AC power cord with the following Sony TV only with other than to wall-mount the TV. • For product protection and safety reasons, Sony strongly recommends that you are ready to store the removed screws...
Operating Instructions
Page 8
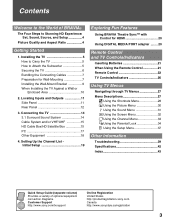
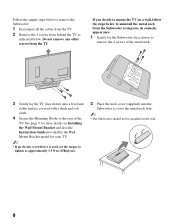
If you decide to mount the TV on the wall. 8 See page 9 for more details on Installing the Wall-Mount Bracket and also the Instruction Guide provided by the WallMount Bracket model for your TV. ~ • If an electric screwdriver is used, set the torque to tighten at approximately 1.5 N·m {15Kgf·cm}. 2 Place the neck cover (supplied) into the Subwoofer to cover the metal neck...
If you decide to mount the TV on the wall. 8 See page 9 for more details on Installing the Wall-Mount Bracket and also the Instruction Guide provided by the WallMount Bracket model for your TV. ~ • If an electric screwdriver is used, set the torque to tighten at approximately 1.5 N·m {15Kgf·cm}. 2 Place the neck cover (supplied) into the Subwoofer to cover the metal neck...
Operating Instructions
Page 10
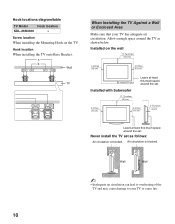
... set. Hook locations diagram/table TV Model Hook location KDL-26N4000 a Screw location When installing the Mounting Hook on the wall 11 7/8 inches (30 cm) 4 inches (10 cm) 4 inches (10 cm) 4 inches (10 cm) Installed with Subwoofer 11 7/8 inches (30 cm) Leave at least this much space around the TV as follows: Air circulation is blocked. Wall TV When Installing the TV Against a Wall or Enclosed Area Make sure that your TV or cause fire. 10 Installed on the TV. Hook location When installing the TV...
... set. Hook locations diagram/table TV Model Hook location KDL-26N4000 a Screw location When installing the Mounting Hook on the wall 11 7/8 inches (30 cm) 4 inches (10 cm) 4 inches (10 cm) 4 inches (10 cm) Installed with Subwoofer 11 7/8 inches (30 cm) Leave at least this much space around the TV as follows: Air circulation is blocked. Wall TV When Installing the TV Against a Wall or Enclosed Area Make sure that your TV or cause fire. 10 Installed on the TV. Hook location When installing the TV...
Operating Instructions
Page 12
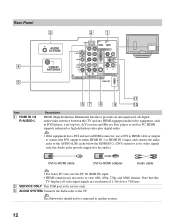
..., such as DVD player, a set-top box, A/V receiver and Blu-ray Disc player as well as PC. Rear Panel 4 5 3 AUDIO SYSTEM CABLE/ ANTENNA 2 1 SERVICE ONLY 1 2 S VIDEO VIDEO L (MONO) AUDIO R 1 VIDEO IN Y IN P B P R L AUDIO R RGB R AUDIO L DIGITAL AUDIO OUT (COAXIAL) R L 1 2 COMPONENT IN (1080i/720p/480p/480i) AUDIO PC IN AUDIO OUT (FIX) DMPORT Item 1 HDMI IN 1/2 R-AUDIO-L qa 67 8 9 0 Description HDMI (High-Definition Multimedia Interface) provides an uncompressed, all-digital audio/video interface between this TV displays all video input signals in a resolution of 1,366...
..., such as DVD player, a set-top box, A/V receiver and Blu-ray Disc player as well as PC. Rear Panel 4 5 3 AUDIO SYSTEM CABLE/ ANTENNA 2 1 SERVICE ONLY 1 2 S VIDEO VIDEO L (MONO) AUDIO R 1 VIDEO IN Y IN P B P R L AUDIO R RGB R AUDIO L DIGITAL AUDIO OUT (COAXIAL) R L 1 2 COMPONENT IN (1080i/720p/480p/480i) AUDIO PC IN AUDIO OUT (FIX) DMPORT Item 1 HDMI IN 1/2 R-AUDIO-L qa 67 8 9 0 Description HDMI (High-Definition Multimedia Interface) provides an uncompressed, all-digital audio/video interface between this TV displays all video input signals in a resolution of 1,366...
Operating Instructions
Page 15
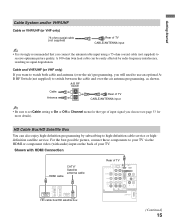
... to watch both cable and antenna (over -the-air antenna programming, as shown. Shown with HDMI Connection HDMI cable CATV/ Satellite antenna cable HD cable box/HD satellite box Rear of your TV via the HDMI or component video (with audio) input on the back of TV SERVICE ONLY 1 2 S VIDEO VIDEO L (MONO) AUDIO R 1 VIDEO IN Y IN P B P R L AUDIO R RGB R AUDIO L DIGITAL AUDIO OUT (COAXIAL) R L 1 2 COMPONENT IN (1080i/720p/480p/480i) AUDIO PC IN AUDIO OUT (FIX) DMPORT (Continued) 15 HD Cable Box/HD Satellite Box You can be...
... to watch both cable and antenna (over -the-air antenna programming, as shown. Shown with HDMI Connection HDMI cable CATV/ Satellite antenna cable HD cable box/HD satellite box Rear of your TV via the HDMI or component video (with audio) input on the back of TV SERVICE ONLY 1 2 S VIDEO VIDEO L (MONO) AUDIO R 1 VIDEO IN Y IN P B P R L AUDIO R RGB R AUDIO L DIGITAL AUDIO OUT (COAXIAL) R L 1 2 COMPONENT IN (1080i/720p/480p/480i) AUDIO PC IN AUDIO OUT (FIX) DMPORT (Continued) 15 HD Cable Box/HD Satellite Box You can be...

Operating Instructions
Page 17
... HDMI output. (Refer to the supplied Quick Setup Guide.) Rear of TV HD15-HD15 cable (analog RGB) S VIDEO SERVICE ONLY Y P B VIDEO L (MONO) AUDIO R P R L AUDIO R 1 2 IN RGB R AUDIO L DIGITAL AUDIO OUT (COAXIAL) R L 1 VIDEO IN 1 2 COMPONENT IN (1080i/720p/480p/480i) AUDIO PC IN AUDIO OUT (FIX) DMPORT Audio cable (stereo mini plugs) ~ • Connect the PC IN jack to the PC using the HD15-HD15 cable with the HD15 to the TV, set the output signal from a personal computer. Getting Started PC Use the TV as a monitor...
... HDMI output. (Refer to the supplied Quick Setup Guide.) Rear of TV HD15-HD15 cable (analog RGB) S VIDEO SERVICE ONLY Y P B VIDEO L (MONO) AUDIO R P R L AUDIO R 1 2 IN RGB R AUDIO L DIGITAL AUDIO OUT (COAXIAL) R L 1 VIDEO IN 1 2 COMPONENT IN (1080i/720p/480p/480i) AUDIO PC IN AUDIO OUT (FIX) DMPORT Audio cable (stereo mini plugs) ~ • Connect the PC IN jack to the PC using the HD15-HD15 cable with the HD15 to the TV, set the output signal from a personal computer. Getting Started PC Use the TV as a monitor...

Operating Instructions
Page 19
... TV for available channels from signal source directly connected to the TV's CABLE/ANTENNA input. 5 When Auto Program is connected. POWER 1 Press to turn on pages 24 and 32. ~ • You may want to run Auto Program later, select No. • If you cancel Auto Program some channels may not be available. 4 Follow the help text provided on the TV. Initial Setup Press to finish the Auto Program process. 19 To display the picture in the Channel menu...
... TV for available channels from signal source directly connected to the TV's CABLE/ANTENNA input. 5 When Auto Program is connected. POWER 1 Press to turn on pages 24 and 32. ~ • You may want to run Auto Program later, select No. • If you cancel Auto Program some channels may not be available. 4 Follow the help text provided on the TV. Initial Setup Press to finish the Auto Program process. 19 To display the picture in the Channel menu...
Operating Instructions
Page 20
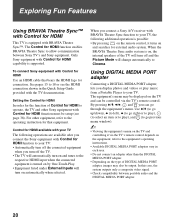
... TV, the following operations are available after you connect the Sony equipment with Control for HDMI function must be output. refer to the equipment's operating instructions. • Available DIGITAL MEDIA PORT adapters vary in the Quick Setup Guide provided with BRAVIA Theatre Sync™. Only Sony equipment with Control for external audio system. When you display photos and videos or play ), and (to go through the equipment's menu. The equipment's menu may also be setup (see the HDMI connection...
... TV, the following operations are available after you connect the Sony equipment with Control for HDMI function must be output. refer to the equipment's operating instructions. • Available DIGITAL MEDIA PORT adapters vary in the Quick Setup Guide provided with BRAVIA Theatre Sync™. Only Sony equipment with Control for external audio system. When you display photos and videos or play ), and (to go through the equipment's menu. The equipment's menu may also be setup (see the HDMI connection...

Operating Instructions
Page 25
... choose a list of External Inputs and TV mode. Press to view a channel at the same time as a PIP (picture in picture) screen (see pages 33). When PC input is active, press to scan through channels, press and hold down either +/-. 25 Press repeatedly to move the on setting up to 8 favorite channels. Press V/v/B/b to toggle through the inputs. When antenna input is active, press to your Favorites list. Remote Control and TV Controls/Indicators SOUND GUIDE qh...
... choose a list of External Inputs and TV mode. Press to view a channel at the same time as a PIP (picture in picture) screen (see pages 33). When PC input is active, press to scan through channels, press and hold down either +/-. 25 Press repeatedly to move the on setting up to 8 favorite channels. Press V/v/B/b to toggle through the inputs. When antenna input is active, press to your Favorites list. Remote Control and TV Controls/Indicators SOUND GUIDE qh...

Operating Instructions
Page 26
... the timer is set , this may indicate the TV needs servicing (see contacting Sony information on and off before unplugging the power cord. Light Sensor Senses room light level and adjusts the screen brightness accordingly (see page 38. In the menu screen, this button serves as up in red when your desired input. Press to adjust the volume. If the LED blinks in green when the Backlight feature is turned off the TV. 6 TIMER/PIC OFF LED 7 STANDBY LED Lights...
... the timer is set , this may indicate the TV needs servicing (see contacting Sony information on and off before unplugging the power cord. Light Sensor Senses room light level and adjusts the screen brightness accordingly (see page 38. In the menu screen, this button serves as up in red when your desired input. Press to adjust the volume. If the LED blinks in green when the Backlight feature is turned off the TV. 6 TIMER/PIC OFF LED 7 STANDBY LED Lights...

Operating Instructions
Page 27
... Settings or Reset. The Picture menu is used to fine tune the image quality and allows you select: External Inputs, Favorites, and shortcuts to select or adjust your TV. Use - Using TV Menus Using TV Menus MENU provides one button access for HDMI List or Product Support. Navigating through the menus. 3 To select an option press or b. 4 Press V/v to Wide Mode, Clock/Timers, Parental Lock, Closed Captions (CC) and Cable; you to enter a four-digit password. on the remote control to display...
... Settings or Reset. The Picture menu is used to fine tune the image quality and allows you select: External Inputs, Favorites, and shortcuts to select or adjust your TV. Use - Using TV Menus Using TV Menus MENU provides one button access for HDMI List or Product Support. Navigating through the menus. 3 To select an option press or b. 4 Press V/v to Wide Mode, Clock/Timers, Parental Lock, Closed Captions (CC) and Cable; you to enter a four-digit password. on the remote control to display...

Operating Instructions
Page 33
... to scroll through the channel numbers. on screen. • To have a space between cable or antenna connection, be sure to select the correct Cable option to On or Off in Channel menu for all receivable channels (Digital and Analog). • Before starting Auto Program, be sure to select it is connected. button. 1 Press V/v to more channels, repeat steps 1-2. Allows to add digital channels without replacing the original channel list. When it . Repeat to...
... to scroll through the channel numbers. on screen. • To have a space between cable or antenna connection, be sure to select the correct Cable option to On or Off in Channel menu for all receivable channels (Digital and Analog). • Before starting Auto Program, be sure to select it is connected. button. 1 Press V/v to more channels, repeat steps 1-2. Allows to add digital channels without replacing the original channel list. When it . Repeat to...

Operating Instructions
Page 37
... each input: DVD, VCR, Blu-ray, Cable Box, Satellite, DVR, Game, Camcorder or Custom (to customize, follow the same steps of a program (should be turned on and off Closed Captions), On (to turn off by pressing the button on screen. 1 Press V/v to highlight the input (from 1 to 7) to which no equipment is changed. Using TV Menus Using the Setup Menu Closed Captions (CC) Allows you to select from several closed captions modes (for programs that input...
... each input: DVD, VCR, Blu-ray, Cable Box, Satellite, DVR, Game, Camcorder or Custom (to customize, follow the same steps of a program (should be turned on and off Closed Captions), On (to turn off by pressing the button on screen. 1 Press V/v to highlight the input (from 1 to 7) to which no equipment is changed. Using TV Menus Using the Setup Menu Closed Captions (CC) Allows you to select from several closed captions modes (for programs that input...
Operating Instructions
Page 39
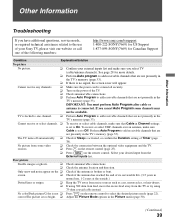
.... The TV turns off automatically. ❑ Check if Sleep is locked to one of Timer (page 38). No picture from some channels may not be available. If you cancel Auto Program some video sources. ❑ Check the connection between the optional video equipment and the TV. ❑ Press INPUT on the remote control (page 25). ❑ Press MENU on the power of your desired input from the TV or try using 300...
.... The TV turns off automatically. ❑ Check if Sleep is locked to one of Timer (page 38). No picture from some channels may not be available. If you cancel Auto Program some video sources. ❑ Check the connection between the optional video equipment and the TV. ❑ Press INPUT on the remote control (page 25). ❑ Press MENU on the power of your desired input from the TV or try using 300...

Operating Instructions
Page 40
... scenes. PC Input No Picture/No Signal. General Wide Mode changes automatically. Black bands appear at the top and bottom of the formats listed on the remote control, set to Off, sound is not output from the TV's speakers regardless of the TV's volume control. ❑ Make sure that came with theatrical releases). If you want to lock in the Sound menu (page 31). Plug and play will auto-detect the TV. ❑ Adjust the resolution (see...
... scenes. PC Input No Picture/No Signal. General Wide Mode changes automatically. Black bands appear at the top and bottom of the formats listed on the remote control, set to Off, sound is not output from the TV's speakers regardless of the TV's volume control. ❑ Make sure that came with theatrical releases). If you want to lock in the Sound menu (page 31). Plug and play will auto-detect the TV. ❑ Adjust the resolution (see...
Operating Instructions
Page 42
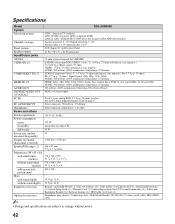
...DIN Cable (1) / Cover (1) Headphones plug adapter / Connecting cables / Wall-Mount Bracket: SU-WL100 / 75-ohm coaxial cable / HD15-HD15 cable • Design and specifications are subject to the TV) / Operating Instructions (1) / Quick Setup Guide (1) / Warranty Card (1) / Online Registration Card (U.S.A. without notice. 42 Supplied accessories Optional accessories ~ Remote control RM-YD026 (1) / Size AA batteries (2) / Cable holder (1 attached to change without stand (kg/lb) 10.5 kg / 24 lb. Specifications Model System KDL-26N4000 Television system Channel coverage Panel system...
...DIN Cable (1) / Cover (1) Headphones plug adapter / Connecting cables / Wall-Mount Bracket: SU-WL100 / 75-ohm coaxial cable / HD15-HD15 cable • Design and specifications are subject to the TV) / Operating Instructions (1) / Quick Setup Guide (1) / Warranty Card (1) / Online Registration Card (U.S.A. without notice. 42 Supplied accessories Optional accessories ~ Remote control RM-YD026 (1) / Size AA batteries (2) / Cable holder (1 attached to change without stand (kg/lb) 10.5 kg / 24 lb. Specifications Model System KDL-26N4000 Television system Channel coverage Panel system...
Operating Instructions
Page 43
... Infrared Receiver (IR) 26 INPUT button 25, 26 Installing the TV on a wall 7, 9 J JUMP button 25 L Label Channels 33 Label Inputs 37 Language 38 Light Sensor Described 26 Setting 30 M Menu Channel 33 Parental Lock 34 Picture 30 Screen 32 Setup 37 Shortcuts 28 Sound 31 MENU button 23, 26 Movie Rating 36 MUTING button 23 P Parental Lock 28, 34 PC IN 13 PC-PIP 29 Phase 32 PICTURE button 22 Picture Mode 30 POWER button 23, 26 POWER LED 26 Product Support 38 R Rating 34 Reset 30, 31, 41 RETURN button 23 S S VIDEO...
... Infrared Receiver (IR) 26 INPUT button 25, 26 Installing the TV on a wall 7, 9 J JUMP button 25 L Label Channels 33 Label Inputs 37 Language 38 Light Sensor Described 26 Setting 30 M Menu Channel 33 Parental Lock 34 Picture 30 Screen 32 Setup 37 Shortcuts 28 Sound 31 MENU button 23, 26 Movie Rating 36 MUTING button 23 P Parental Lock 28, 34 PC IN 13 PC-PIP 29 Phase 32 PICTURE button 22 Picture Mode 30 POWER button 23, 26 POWER LED 26 Product Support 38 R Rating 34 Reset 30, 31, 41 RETURN button 23 S S VIDEO...

