Operation Guide
Page 4
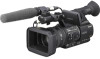
... be provided, even if recording or playback is beyond the safely operable range. Change the screen language before using a digital still camera, and therefore may be used for the contents of recordings cannot be assigned to an ASSIGN button. To view your camcorder if necessary (p. 20). • Design and specifications of recording media and other devices A tape recorded in the HDV format cannot be played back on a device that can be notable in...
... be provided, even if recording or playback is beyond the safely operable range. Change the screen language before using a digital still camera, and therefore may be used for the contents of recordings cannot be assigned to an ASSIGN button. To view your camcorder if necessary (p. 20). • Design and specifications of recording media and other devices A tape recorded in the HDV format cannot be played back on a device that can be notable in...
Operation Guide
Page 6
.../OUT REC) menu 83 Recording settings, input and output settings (REC FORMAT/HDV PROGRE./ VIDEO OUT/EXT REC CTRL, etc.) (TC/UB SET) menu 86 (TC PRESET/UB PRESET/TC LINK, etc.) (MEMORY SET) menu 88 Settings for the "Memory Stick Duo" (ALL ERASE/FORMAT, etc.) (OTHERS) menu 90 Settings while recording on a tape or other basic settings (QUICK REC/BEEP, etc.) Dubbing/Editing Dubbing to VCR, DVD/HDD device, etc 93 Recording pictures from a VCR 97 Copying movies on a tape to a computer 99 Copying still images to a computer 102 Troubleshooting Troubleshooting...
.../OUT REC) menu 83 Recording settings, input and output settings (REC FORMAT/HDV PROGRE./ VIDEO OUT/EXT REC CTRL, etc.) (TC/UB SET) menu 86 (TC PRESET/UB PRESET/TC LINK, etc.) (MEMORY SET) menu 88 Settings for the "Memory Stick Duo" (ALL ERASE/FORMAT, etc.) (OTHERS) menu 90 Settings while recording on a tape or other basic settings (QUICK REC/BEEP, etc.) Dubbing/Editing Dubbing to VCR, DVD/HDD device, etc 93 Recording pictures from a VCR 97 Copying movies on a tape to a computer 99 Copying still images to a computer 102 Troubleshooting Troubleshooting...
Operation Guide
Page 29
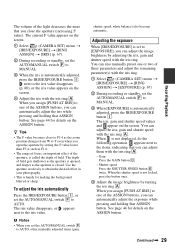
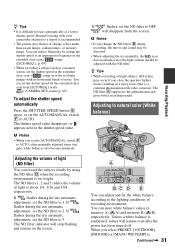
... displayed, do the following operation. Adjusting the exposure When [IRIS/EXPOSURE] is set the AUTO/MANUAL switch F to MANUAL. 3 When [EXPOSURE] is automatically adjusted, press the IRIS/EXPOSURE button I . Shutter speed Press the SHUTTER SPEED button E twice. See page 44 for details on the screen. 4 Adjust the iris with the iris ring. 1 Select (CAMERA SET) menu t [IRIS/EXPOSURE] t [RING ASSIGN] t [EXPOSURE] (p. 67) 2 During recording or standby, set the AUTO/MANUAL switch F to AUTO, other manually adjusted items (gain, shutter speed, white balance...
... displayed, do the following operation. Adjusting the exposure When [IRIS/EXPOSURE] is set the AUTO/MANUAL switch F to MANUAL. 3 When [EXPOSURE] is automatically adjusted, press the IRIS/EXPOSURE button I . Shutter speed Press the SHUTTER SPEED button E twice. See page 44 for details on the screen. 4 Adjust the iris with the iris ring. 1 Select (CAMERA SET) menu t [IRIS/EXPOSURE] t [RING ASSIGN] t [EXPOSURE] (p. 67) 2 During recording or standby, set the AUTO/MANUAL switch F to AUTO, other manually adjusted items (gain, shutter speed, white balance...
Operation Guide
Page 31
..., values will stop flashing and remain on the screen. If flashes during recording, the movie and sound may occur if you set the shutter speed in the extended clear scan ( ) range in the (CAMERA SET) menu (p. 69). will disappear from [ECS FREQ.] in order to AUTO, other manually adjusted items (iris, gain, white balance) also become automatic. . Manual focusing with the ND filter. You can adjust and fix the white balance according to 1. The...
..., values will stop flashing and remain on the screen. If flashes during recording, the movie and sound may occur if you set the shutter speed in the extended clear scan ( ) range in the (CAMERA SET) menu (p. 69). will disappear from [ECS FREQ.] in order to AUTO, other manually adjusted items (iris, gain, white balance) also become automatic. . Manual focusing with the ND filter. You can adjust and fix the white balance according to 1. The...

Operation Guide
Page 46
... the camcorder goes standby at the end of focus, zoom, iris, gain, shutter speed and white balance, and smoothly shift from closer objects to farther objects, or change the depth of the most recent recording will be played back for the last scene of the most recent recording (End search) 1 Assign [END SEARCH] to the stored settings (shot transition). Press the REC REVIEW button or...
... the camcorder goes standby at the end of focus, zoom, iris, gain, shutter speed and white balance, and smoothly shift from closer objects to farther objects, or change the depth of the most recent recording will be played back for the last scene of the most recent recording (End search) 1 Assign [END SEARCH] to the stored settings (shot transition). Press the REC REVIEW button or...
Operation Guide
Page 70
... MENU button t select the (CAMERA SET) with the data code, the shutter speed value is provided for a wide conversion lens (optional), and especially effective for Sony VCL-HG0872A wide conversion lens. BACK LIGHT When you set to make the movies look natural. B STANDARD Reduces camera shakes at least two of a subject under a light source such as they are adjusted manually. • [BACK LIGHT] is set this function to [ON] ( ), you set in movies...
... MENU button t select the (CAMERA SET) with the data code, the shutter speed value is provided for a wide conversion lens (optional), and especially effective for Sony VCL-HG0872A wide conversion lens. BACK LIGHT When you set to make the movies look natural. B STANDARD Reduces camera shakes at least two of a subject under a light source such as they are adjusted manually. • [BACK LIGHT] is set this function to [ON] ( ), you set in movies...

Operation Guide
Page 72
... recording time increases. x REC TIMING You can also start [SMTH SLW REC]. • The recording time may not work properly. The picture quality deteriorates as a slow-motion movie. The [ TRIG] setting is canceled when you turn the power off and back on the [SMTH SLW REC] screen. Press the MENU button t select the (CAMERA SET) with an ASSIGN button, you can select the sound level at regular intervals. Select [EXECUTE], and press the REC START/STOP button...
... recording time increases. x REC TIMING You can also start [SMTH SLW REC]. • The recording time may not work properly. The picture quality deteriorates as a slow-motion movie. The [ TRIG] setting is canceled when you turn the power off and back on the [SMTH SLW REC] screen. Press the MENU button t select the (CAMERA SET) with an ASSIGN button, you can select the sound level at regular intervals. Select [EXECUTE], and press the REC START/STOP button...

Operation Guide
Page 83
... setting when you connect your camcorder to and from an external device via the HDV/DV jack. (IN/OUT REC) menu Recording settings, input and output settings (REC FORMAT/HDV PROGRE./ VIDEO OUT/EXT REC CTRL, etc.) The default settings are selected. See page 62 for recording or playback. VCR HDV/DV You can select a recording format. x REC TYPE You can record or play back a movie reproduced by the selected type of input and output signals to your computer. B AUTO Automatically switches...
... setting when you connect your camcorder to and from an external device via the HDV/DV jack. (IN/OUT REC) menu Recording settings, input and output settings (REC FORMAT/HDV PROGRE./ VIDEO OUT/EXT REC CTRL, etc.) The default settings are selected. See page 62 for recording or playback. VCR HDV/DV You can select a recording format. x REC TYPE You can record or play back a movie reproduced by the selected type of input and output signals to your computer. B AUTO Automatically switches...

Operation Guide
Page 84
...]. B ON Records a movie in HDV format. Press the MENU button t select the (IN/OUT REC) with a component input jack that supports playback of [REC TYPE]. - [INTERLACE]: [50], [25] - [PROGRESSIVE]: [25] • You can select [576i] or [1080i/576i] depending on the setting of a tape recoded by another device. • Image may be distorted or time code may not be fixed to 16:9 and you cannot set to connect for recording in...
...]. B ON Records a movie in HDV format. Press the MENU button t select the (IN/OUT REC) with a component input jack that supports playback of [REC TYPE]. - [INTERLACE]: [50], [25] - [PROGRESSIVE]: [25] • You can select [576i] or [1080i/576i] depending on the setting of a tape recoded by another device. • Image may be distorted or time code may not be fixed to 16:9 and you cannot set to connect for recording in...
Operation Guide
Page 85
.... Use this function to [ON], you can output DV format signals without any format conversion. S Video - Refer also to the instruction manuals supplied with black bars added to the top and bottom of the original image by cropping its original height. i.LINK SET x HDV t DV CONV When you set this function for signals outputting from your camcorder to an HDV/DVCAM/DV compatible device (digital HD video camera recorder, digital video camera recorder, hard disc recorder, etc.) with black...
.... Use this function to [ON], you can output DV format signals without any format conversion. S Video - Refer also to the instruction manuals supplied with black bars added to the top and bottom of the original image by cropping its original height. i.LINK SET x HDV t DV CONV When you set this function for signals outputting from your camcorder to an HDV/DVCAM/DV compatible device (digital HD video camera recorder, digital video camera recorder, hard disc recorder, etc.) with black...
Operation Guide
Page 86
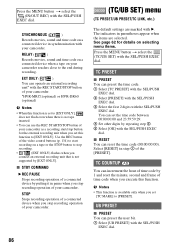
... ( ) Records movies, sound and time code on a tape or the STOP button to [EXT ONLY]. RELAY ( ) Records movies, sound and time code on a connected device when a tape on selecting menu items. Press the MENU button t select the (TC/UB SET) with your camcorder as a recording start recording on a connected device in pause when you set this function to stop recording operation of a connected device by [EXT ONLY]. EXT ONLY ( ) You can operate an external recording unit* with the SEL/PUSH EXEC dial. 86 STOP Stops recording operation of a connected device when you set...
... ( ) Records movies, sound and time code on a tape or the STOP button to [EXT ONLY]. RELAY ( ) Records movies, sound and time code on a connected device when a tape on selecting menu items. Press the MENU button t select the (TC/UB SET) with your camcorder as a recording start recording on a connected device in pause when you set this function to stop recording operation of a connected device by [EXT ONLY]. EXT ONLY ( ) You can operate an external recording unit* with the SEL/PUSH EXEC dial. 86 STOP Stops recording operation of a connected device when you set...
Operation Guide
Page 87
... user bit (00 00 00 00). PRESET Records the newly set time code on . Set the sub camcorders as follows: • Set [TC RUN] to [FREE RUN] (p. 87). • Set [TC MAKE] to [PRESET] (p. 87). ON Saves the actual time in the time code. UB-DATE/TC-TIME You can save the date and time set [TC LINK] again. B REC RUN Advances the time code only during the backspace editing. Continued , 87 Using the Menu x RESET...
... user bit (00 00 00 00). PRESET Records the newly set time code on . Set the sub camcorders as follows: • Set [TC RUN] to [FREE RUN] (p. 87). • Set [TC MAKE] to [PRESET] (p. 87). ON Saves the actual time in the time code. UB-DATE/TC-TIME You can save the date and time set [TC LINK] again. B REC RUN Advances the time code only during the backspace editing. Continued , 87 Using the Menu x RESET...

Operation Guide
Page 102
... hard disk of your computer. 1 2 3 A Folder containing image files recorded by your camcorder when no new folders have been created, only [101MSDCF] is displayed. C Folder containing movie data recorded by other camcorders without the folder creation function (for playback only). 102 Copying the pictures For Windows users You can copy still images stored on a "Memory Stick Duo" to your computer via the "Memory Stick Duo" slot of your computer. 1 Turn on precautions and compatible application software...
... hard disk of your computer. 1 2 3 A Folder containing image files recorded by your camcorder when no new folders have been created, only [101MSDCF] is displayed. C Folder containing movie data recorded by other camcorders without the folder creation function (for playback only). 102 Copying the pictures For Windows users You can copy still images stored on a "Memory Stick Duo" to your computer via the "Memory Stick Duo" slot of your computer. 1 Turn on precautions and compatible application software...

Operation Guide
Page 105
... "Memory Stick Duo" (p. 21). • You cannot record still images on your camcorder for at least 1 hour, then re-insert the cassette (p. 123). • Set [REC CTL MODE] of the ASSIGN buttons. You cannot record on the same tape. • Perform End search (p. 46). • Do not remove the cassette (the picture will be recorded continuously without a break even when you turn the power off). • Do not record pictures...
... "Memory Stick Duo" (p. 21). • You cannot record still images on your camcorder for at least 1 hour, then re-insert the cassette (p. 123). • Set [REC CTL MODE] of the ASSIGN buttons. You cannot record on the same tape. • Perform End search (p. 46). • Do not remove the cassette (the picture will be recorded continuously without a break even when you turn the power off). • Do not record pictures...
Operation Guide
Page 106
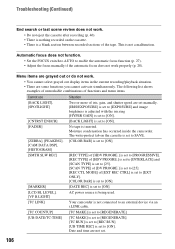
...]. [REC CTL MODE] of [EXT REC CTRL] is set to [EXT ONLY]. [COLOR BAR] is set to [ON]. [MARKER] [DATE REC] is set to [ON]. [LCD BL LEVEL], [VF B.LIGHT] AC power source is being used. [TC LINK] Your camcorder is not connected to an external device via an i.LINK cable. [TC COUNTUP] [TC MAKE] is set to [REGENERATE]. [UB-DATE/TC-TIME] [TC MAKE] is set to [REGENERATE]. [TC RUN] is set to [REC...
...]. [REC CTL MODE] of [EXT REC CTRL] is set to [EXT ONLY]. [COLOR BAR] is set to [ON]. [MARKER] [DATE REC] is set to [ON]. [LCD BL LEVEL], [VF B.LIGHT] AC power source is being used. [TC LINK] Your camcorder is not connected to an external device via an i.LINK cable. [TC COUNTUP] [TC MAKE] is set to [REGENERATE]. [UB-DATE/TC-TIME] [TC MAKE] is set to [REGENERATE]. [TC RUN] is set to [REC...

Operation Guide
Page 109
... , 109 Troubleshooting The picture or sound breaks off . • This occurs if the tape or video head is dirty (p. 124). • Use the Sony mini DV cassette tape. The movies freeze for a while, or the sound breaks off . • The tape was recorded without setting the date and time. • A blank section on the tape is being played back. • The data code on other than 2 minutes after the date changed. "---" is displayed on the screen...
... , 109 Troubleshooting The picture or sound breaks off . • This occurs if the tape or video head is dirty (p. 124). • Use the Sony mini DV cassette tape. The movies freeze for a while, or the sound breaks off . • The tape was recorded without setting the date and time. • A blank section on the tape is being played back. • The data code on other than 2 minutes after the date changed. "---" is displayed on the screen...
Operation Guide
Page 116
... If the cassette you play back on your camcorder. Your camcorder does not record copyright control signals on the tape when it . If you select [MIX], the sounds of software. [Cannot record due to use a cassette with the Cassette Memory function. i.LINK is adopted for a long time Remove the cassette and store it records. x FS48K (16-bit) mode The original sound can be indicated on the LCD screen or in MPEG2 format, which is...
... If the cassette you play back on your camcorder. Your camcorder does not record copyright control signals on the tape when it . If you select [MIX], the sounds of software. [Cannot record due to use a cassette with the Cassette Memory function. i.LINK is adopted for a long time Remove the cassette and store it records. x FS48K (16-bit) mode The original sound can be indicated on the LCD screen or in MPEG2 format, which is...

Operation Guide
Page 118
... mini DV cassettes is connected to the recorder's format as described below . The time code format will be partly misadjusted. 3) Some mini DV video equipment may be limited depending on models.) DV DV 1) When using mini DVCAM video equipment to perform DV dubbing of the picture is defined according to other digital video equipment using an i.LINK cable, the recording format of the playback cannot be guaranteed. Playback or editing using DV jacks When this camcorder...
... mini DV cassettes is connected to the recorder's format as described below . The time code format will be partly misadjusted. 3) Some mini DV video equipment may be limited depending on models.) DV DV 1) When using mini DVCAM video equipment to perform DV dubbing of the picture is defined according to other digital video equipment using an i.LINK cable, the recording format of the playback cannot be guaranteed. Playback or editing using DV jacks When this camcorder...

Operation Guide
Page 119
... of "Memory Stick" Recording /Playback "Memory Stick Duo" a (with MagicGate) "Memory Stick PRO Duo" a "Memory Stick PRO-HG Duo" a • This product does not support high speed data transfer via a parallel interface. • This product cannot record or play data that records and transfers the contents in an encrypted format. • This product is lit or flashing). - Places subject to the difference in track pitch, you cannot record or edit on DV-formatted tapes using mini DVCAM video equipment...
... of "Memory Stick" Recording /Playback "Memory Stick Duo" a (with MagicGate) "Memory Stick PRO Duo" a "Memory Stick PRO-HG Duo" a • This product does not support high speed data transfer via a parallel interface. • This product cannot record or play data that records and transfers the contents in an encrypted format. • This product is lit or flashing). - Places subject to the difference in track pitch, you cannot record or edit on DV-formatted tapes using mini DVCAM video equipment...

Operation Guide
Page 141
... 21 MEMORY/DELETE button 51 MEMORY/INDEX button ...49 MEMORY/PLAY button .....49 Menu AUDIO SET menu ........75 CAMERA SET menu....67 DISPLAY SET menu ....78 IN/OUT REC menu.......83 MEMORY SET menu 88 OTHERS menu 90 TC/UB SET menu .........86 Using the menu 62 MENU button 19 Menu items 64 Microphone 9 Microphone fixing clamper 9 Microphone holder 9 MIC+48V 42 MIX 77 Moisture condensation........123 MPEG2 101 N ND filter 31 NEW FOLDER 89 NORMAL 79 NTSC 115 NUMBER 80 O One push button 32 OPEN/EJECT lever 21 OPERATION 92 OTHERS menu...
... 21 MEMORY/DELETE button 51 MEMORY/INDEX button ...49 MEMORY/PLAY button .....49 Menu AUDIO SET menu ........75 CAMERA SET menu....67 DISPLAY SET menu ....78 IN/OUT REC menu.......83 MEMORY SET menu 88 OTHERS menu 90 TC/UB SET menu .........86 Using the menu 62 MENU button 19 Menu items 64 Microphone 9 Microphone fixing clamper 9 Microphone holder 9 MIC+48V 42 MIX 77 Moisture condensation........123 MPEG2 101 N ND filter 31 NEW FOLDER 89 NORMAL 79 NTSC 115 NUMBER 80 O One push button 32 OPEN/EJECT lever 21 OPERATION 92 OTHERS menu...


