Operating Guide
Page 6
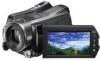
... are normal results of the manufacturing process and do not affect the recording in the viewfinder (p. 30). • Do not turn on the LCD screen. However, there may not be some type of external media first, and then perform [MEDIA FORMAT]*. • Fasten the grip belt.... • Connect cables to the connectors of the Handycam Station when using the Remote Commander. Do not connect the cables to both the Handycam Station and your camcorder. • Do not apply shock or vibration to your camcorder attached to the Handycam Station. If the drop sensor catches a drop repeatedly,...
... are normal results of the manufacturing process and do not affect the recording in the viewfinder (p. 30). • Do not turn on the LCD screen. However, there may not be some type of external media first, and then perform [MEDIA FORMAT]*. • Fasten the grip belt.... • Connect cables to the connectors of the Handycam Station when using the Remote Commander. Do not connect the cables to both the Handycam Station and your camcorder. • Do not apply shock or vibration to your camcorder attached to the Handycam Station. If the drop sensor catches a drop repeatedly,...
Operating Guide
Page 7
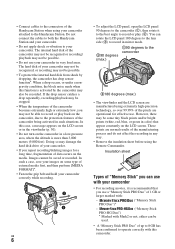
... need an NTSC system-based TV. • Television programs, films, video tapes, and other devices • Your camcorder is connected to a computer • Do not try to "Handycam Handbook" (PDF) and "PMB Guide." • See page 12 for the recordable time of a "Memory Stick PRO Duo." • "Memory ...laws. Change the screen language before using your image data from the hard disk completely. About this manual • The images of the LCD screen used in each local language are captured using a digital still camera, and therefore may be provided, even if recording or playback is...
... need an NTSC system-based TV. • Television programs, films, video tapes, and other devices • Your camcorder is connected to a computer • Do not try to "Handycam Handbook" (PDF) and "PMB Guide." • See page 12 for the recordable time of a "Memory Stick PRO Duo." • "Memory ...laws. Change the screen language before using your image data from the hard disk completely. About this manual • The images of the LCD screen used in each local language are captured using a digital still camera, and therefore may be provided, even if recording or playback is...
Operating Guide
Page 10
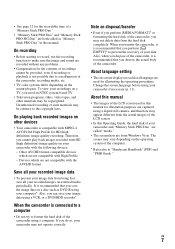
...wall socket) immediately if any metallic objects. On the charging/recording/playback time • Times measured when using the camcorder at 25°C (77°F) (10°C to 30°C (50°F to 86°F) is... as long as between a wall and furniture. • Do not short-circuit the DC plug of your camcorder or the Handycam Station, even when the power cord (mains lead) is connected to OFF (CHG) and make sure that ... US 10 40 50 40 50 130 130 140 140 *1 [REC MODE]: SP *2 When the LCD backlight is still supplied to it while connected to the DC IN jack on the right DC plug ...
...wall socket) immediately if any metallic objects. On the charging/recording/playback time • Times measured when using the camcorder at 25°C (77°F) (10°C to 30°C (50°F to 86°F) is... as long as between a wall and furniture. • Do not short-circuit the DC plug of your camcorder or the Handycam Station, even when the power cord (mains lead) is connected to OFF (CHG) and make sure that ... US 10 40 50 40 50 130 130 140 140 *1 [REC MODE]: SP *2 When the LCD backlight is still supplied to it while connected to the DC IN jack on the right DC plug ...
Operating Guide
Page 11
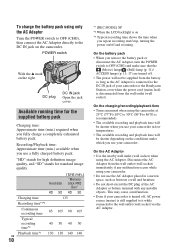
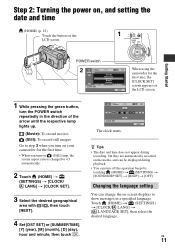
...AREA SET Chicago Mexico City New York Bogota Santiago JAN 1 2008 CLOCK SET 12:00:00AM NEXT When using the camcorder for the first time, the [CLOCK SET] screen appears on the LCD screen. 1 While pressing the green button, turn the POWER switch repeatedly in the direction of the arrow until the... respective lamp lights up. (Movie): To record movies (Still): To record still images Go to step 3 when you turn on your camcorder for the first time. &#...
...AREA SET Chicago Mexico City New York Bogota Santiago JAN 1 2008 CLOCK SET 12:00:00AM NEXT When using the camcorder for the first time, the [CLOCK SET] screen appears on the LCD screen. 1 While pressing the green button, turn the POWER switch repeatedly in the direction of the arrow until the... respective lamp lights up. (Movie): To record movies (Still): To record still images Go to step 3 when you turn on your camcorder for the first time. &#...
Operating Guide
Page 12
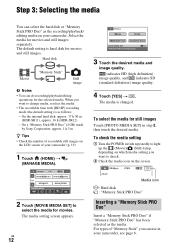
On the internal hard disk: approx. 17 h 50 m (HDR-SR11), approx. 36 h (HDR-SR12) - US 12 Media icon : Hard disk : "Memory Stick PRO ...selected media. On a "Memory Stick PRO Duo" (4 GB) made by Sony Corporation: approx. 1 h 5 m z Tips • Check the number of recordable still images on your camcorder. indicates HD (high definition) image quality, and indicates SD (standard definition) ... the hard disk or "Memory Stick PRO Duo" as the recording/playback/ editing media on the LCD screen of your camcorder (p. 19). 1 Touch (HOME) t (MANAGE MEDIA). The media is hard disk for movies ...
On the internal hard disk: approx. 17 h 50 m (HDR-SR11), approx. 36 h (HDR-SR12) - US 12 Media icon : Hard disk : "Memory Stick PRO ...selected media. On a "Memory Stick PRO Duo" (4 GB) made by Sony Corporation: approx. 1 h 5 m z Tips • Check the number of recordable still images on your camcorder. indicates HD (high definition) image quality, and indicates SD (standard definition) ... the hard disk or "Memory Stick PRO Duo" as the recording/playback/ editing media on the LCD screen of your camcorder (p. 19). 1 Touch (HOME) t (MANAGE MEDIA). The media is hard disk for movies ...

Operating Guide
Page 13
...," the Memory Stick Duo slot, or image data may be damaged. • If [Failed to OFF (CHG), turn the POWER switch until it on the LCD screen when you insert a new "Memory Stick PRO Duo."
...," the Memory Stick Duo slot, or image data may be damaged. • If [Failed to OFF (CHG), turn the POWER switch until it on the LCD screen when you insert a new "Memory Stick PRO Duo."
Operating Guide
Page 15
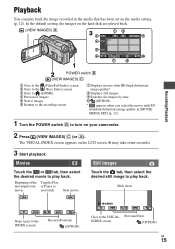
... the movie with SD (standard definition) image quality in the media that has been set on the LCD screen (It may take some seconds). 3 Start playback. In the default setting, the images on your camcorder. 2 Press (VIEW IMAGES) C (or A). The VISUAL INDEX screen appears on the media setting (p. 12). Movies Touch the...
... the movie with SD (standard definition) image quality in the media that has been set on the LCD screen (It may take some seconds). 3 Start playback. In the default setting, the images on your camcorder. 2 Press (VIEW IMAGES) C (or A). The VISUAL INDEX screen appears on the media setting (p. 12). Movies Touch the...

Operating Guide
Page 17
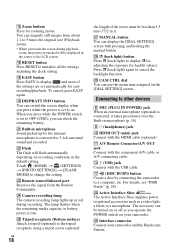
...a slower zoom. Press QUICK ON again to recording standby in approximately 1 second. US 17 wa ws wd wf wg wj wh wk wl qj Handycam Station wg qs qa Recording/Playback 1 Power zoom lever Move the power zoom lever slightly for a faster zoom. You can magnify still images from ... belt Attach the shoulder belt (optional). Your camcorder returns to start recording next time. qd Speaker qf NIGHTSHOT switch Set the NIGHTSHOT switch to ON ( appears) to avoid wearing down the battery, or when the image seen on the viewfinder with the LCD panel closed. The QUICK ON lamp keeps flashing...
...a slower zoom. Press QUICK ON again to recording standby in approximately 1 second. US 17 wa ws wd wf wg wj wh wk wl qj Handycam Station wg qs qa Recording/Playback 1 Power zoom lever Move the power zoom lever slightly for a faster zoom. You can magnify still images from ... belt Attach the shoulder belt (optional). Your camcorder returns to start recording next time. qd Speaker qf NIGHTSHOT switch Set the NIGHTSHOT switch to ON ( appears) to avoid wearing down the battery, or when the image seen on the viewfinder with the LCD panel closed. The QUICK ON lamp keeps flashing...
Operating Guide
Page 18
...the menu item assigned on the [DIAL SETTING] screen. wh Tripod receptacle (Bottom surface) Attach a tripod (optional) to display and most of the LCD screen. wk . (back light) button Press . (back light) to other devices 8 MIC (PLUG IN POWER) jack When an external microphone (...Remote sensor/Infrared port Receives the signal from about 1.1 to optional accessories such as you touched will flash automatically depending on your camcorder and the Handycam Station. Active Interface Shoe The Active Interface Shoe supplies power to 5 times the original size (Playback zoom). • When ...
...the menu item assigned on the [DIAL SETTING] screen. wh Tripod receptacle (Bottom surface) Attach a tripod (optional) to display and most of the LCD screen. wk . (back light) button Press . (back light) to other devices 8 MIC (PLUG IN POWER) jack When an external microphone (...Remote sensor/Infrared port Receives the signal from about 1.1 to optional accessories such as you touched will flash automatically depending on your camcorder and the Handycam Station. Active Interface Shoe The Active Interface Shoe supplies power to 5 times the original size (Playback zoom). • When ...
Operating Guide
Page 20
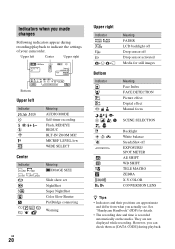
n Meaning FADER LCD backlight off Drop sensor off Drop sensor activated Media for details. • The recording date and time is recorded automatically on the media. Indicators when you actually see. See "Handycam Handbook" (PDF) for still images Meaning Face Index FACE DETECTION Picture effect... indicators appear during playback. However, you can check them as [DATA CODE] during recording/playback to indicate the settings of your camcorder. Upper left Center Upper right Bottom Upper left Indicator Center Indicator 10.2M 7.6M 6.1M E Meaning AUDIO MODE Self-timer recording...
n Meaning FADER LCD backlight off Drop sensor off Drop sensor activated Media for details. • The recording date and time is recorded automatically on the media. Indicators when you actually see. See "Handycam Handbook" (PDF) for still images Meaning Face Index FACE DETECTION Picture effect... indicators appear during playback. However, you can check them as [DATA CODE] during recording/playback to indicate the settings of your camcorder. Upper left Center Upper right Bottom Upper left Indicator Center Indicator 10.2M 7.6M 6.1M E Meaning AUDIO MODE Self-timer recording...
Operating Guide
Page 23
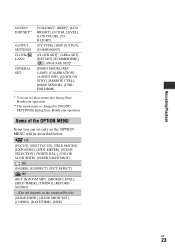
...OPTION MENU will be described below. Recording/Playback SOUND/ DISP SET** OUTPUT SETTINGS CLOCK/ LANG GENERAL SET [VOLUME]*, [BEEP]*, [LCD BRIGHT], [LCD BL LEVEL], [LCD COLOR], [VF B.LIGHT] [TV TYPE], [DISP OUTPUT], [COMPONENT] [CLOCK SET]*, [AREA SET], [DST SET], [SUMMERTIME],... [ LANGUAGE SET]* [DEMO MODE], [REC LAMP], [CALIBRATION], [A.SHUT OFF], [QUICK ON STBY], [REMOTE CTRL], [DROP SENSOR], [CTRL FOR HDMI] * You can set these items also during Easy Handycam...
...OPTION MENU will be described below. Recording/Playback SOUND/ DISP SET** OUTPUT SETTINGS CLOCK/ LANG GENERAL SET [VOLUME]*, [BEEP]*, [LCD BRIGHT], [LCD BL LEVEL], [LCD COLOR], [VF B.LIGHT] [TV TYPE], [DISP OUTPUT], [COMPONENT] [CLOCK SET]*, [AREA SET], [DST SET], [SUMMERTIME],... [ LANGUAGE SET]* [DEMO MODE], [REC LAMP], [CALIBRATION], [A.SHUT OFF], [QUICK ON STBY], [REMOTE CTRL], [DROP SENSOR], [CTRL FOR HDMI] * You can set these items also during Easy Handycam...
Operating Guide
Page 30
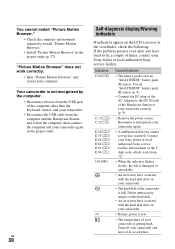
... DC plug of the AC Adaptor to fix a couple of times, contact your Sony dealer or local authorized Sony service facility. Contact your camcorder is getting high. Delete unnecessary images on the LCD screen or in the viewfinder, check the following. US 30 Self-diagnosis display/Warning... Motion Browser" in the proper order. Inform them of the camcorder is low. • The temperature of the Handycam Station or your camcorder again. • A malfunction that you cannot service has occurred. Your camcorder is not recognized by the computer. • Disconnect devices from...
... DC plug of the AC Adaptor to fix a couple of times, contact your Sony dealer or local authorized Sony service facility. Contact your camcorder is getting high. Delete unnecessary images on the LCD screen or in the viewfinder, check the following. US 30 Self-diagnosis display/Warning... Motion Browser" in the proper order. Inform them of the camcorder is low. • The temperature of the Handycam Station or your camcorder again. • A malfunction that you cannot service has occurred. Your camcorder is not recognized by the computer. • Disconnect devices from...
Operating Guide
Page 32
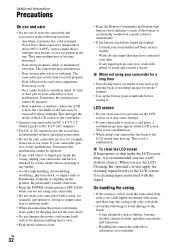
... avoid damage to the finish: - Sometimes this malfunction cannot be able to direct sunlight. This damages the inside of the LCD screen or the viewfinder. • Operate your camcorder on it by the plug and not the cord (lead). • Do not damage the power cord (mains lead) ...malfunction. Be particularly careful of children's reach. When you are not using your camcorder for a long time • Periodically turn it on and let it run such as it may appear on the LCD screen, as by a Sony dealer before storing it . Anywhere extremely hot, cold or humid. Noise may ...
... avoid damage to the finish: - Sometimes this malfunction cannot be able to direct sunlight. This damages the inside of the LCD screen or the viewfinder. • Operate your camcorder on it by the plug and not the cord (lead). • Do not damage the power cord (mains lead) ...malfunction. Be particularly careful of children's reach. When you are not using your camcorder for a long time • Periodically turn it on and let it run such as it may appear on the LCD screen, as by a Sony dealer before storing it . Anywhere extremely hot, cold or humid. Noise may ...
Operating Guide
Page 34
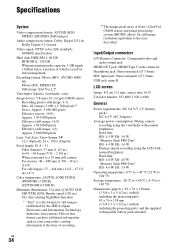
... W "Memory Stick PRO Duo": HD: 4.4 W SD: 3.6 W During camera recording using the LCD with normal brightness: Hard disk: HD: 4.8 W SD: 4.0 W "Memory Stick PRO Duo": HD...camcorder's setting information at the time of recording. Specifications System Video compression format: AVCHD (HD)/ MPEG2 (SD)/JPEG (Still images) Audio compression format: Dolby Digital 2/5.1ch Dolby Digital 5.1 Creator Video signal: NTSC color, EIA standards 1080/60i specification Hard disk: HDR-SR11: 60 GB HDR-SR12...: 120 GB When measuring media capacity, 1 GB equals 1 billion bytes, a portion of Sony...
... W "Memory Stick PRO Duo": HD: 4.4 W SD: 3.6 W During camera recording using the LCD with normal brightness: Hard disk: HD: 4.8 W SD: 4.0 W "Memory Stick PRO Duo": HD...camcorder's setting information at the time of recording. Specifications System Video compression format: AVCHD (HD)/ MPEG2 (SD)/JPEG (Still images) Audio compression format: Dolby Digital 2/5.1ch Dolby Digital 5.1 Creator Video signal: NTSC color, EIA standards 1080/60i specification Hard disk: HDR-SR11: 60 GB HDR-SR12...: 120 GB When measuring media capacity, 1 GB equals 1 billion bytes, a portion of Sony...


