Operating Guide
Page 4
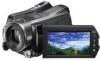
...for the FCC related matters only. Address: 16530 Via Esprillo, San Diego, CA 92127 U.S.A. US 4 Regulatory Information Declaration of Conformity Trade Name: SONY Model No.: HDR-SR12 Responsible Party: Sony Electronics Inc. Operation is to the following two conditions: (1) This device may not cause harmful interference, and (2) this device must accept any ... U.S.A. Telephone number: 858-942-2230 This device complies with the specified type only. Telephone number: 858-942-2230 This device complies with the Handycam Station Model DCRA-C210 and AC Adaptor Model AC-L200/L200B.
...for the FCC related matters only. Address: 16530 Via Esprillo, San Diego, CA 92127 U.S.A. US 4 Regulatory Information Declaration of Conformity Trade Name: SONY Model No.: HDR-SR12 Responsible Party: Sony Electronics Inc. Operation is to the following two conditions: (1) This device may not cause harmful interference, and (2) this device must accept any ... U.S.A. Telephone number: 858-942-2230 This device complies with the specified type only. Telephone number: 858-942-2230 This device complies with the Handycam Station Model DCRA-C210 and AC Adaptor Model AC-L200/L200B.
Operating Guide
Page 5
...Connect the equipment into the terminal will not occur in a residential installation. Handycam Handbook (PDF) • "Operating Guide" (This manual) (1) US A B C D Using the camcorder • The camcorder is no guarantee that interference will damage the terminal and may cause harmful interference... installed. • Rechargeable battery pack NP-FH60 (1) • CD-ROM "Handycam Application Software" (1) (p. 26) - For the State of FCC Rules. Notes on a circuit different from the camcorder - Eject the "Memory Stick PRO Duo" - These limits are designed to provide...
...Connect the equipment into the terminal will not occur in a residential installation. Handycam Handbook (PDF) • "Operating Guide" (This manual) (1) US A B C D Using the camcorder • The camcorder is no guarantee that interference will damage the terminal and may cause harmful interference... installed. • Rechargeable battery pack NP-FH60 (1) • CD-ROM "Handycam Application Software" (1) (p. 26) - For the State of FCC Rules. Notes on a circuit different from the camcorder - Eject the "Memory Stick PRO Duo" - These limits are designed to provide...
Operating Guide
Page 6
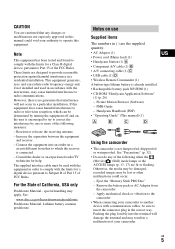
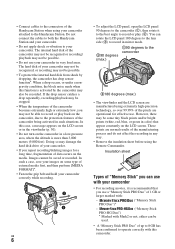
...30). • Do not turn on the camcorder in color) that you use a "Memory Stick PRO Duo" of 1 GB or larger marked with Mark2 or not, either can use with your camcorder • For recording movies, it to the best angle to the Handycam Station. • Connect cables to the ...connectors of the Handycam Station when using your camcorder attached to record or play back on some tiny black points and...
...30). • Do not turn on the camcorder in color) that you use a "Memory Stick PRO Duo" of 1 GB or larger marked with Mark2 or not, either can use with your camcorder • For recording movies, it to the best angle to the Handycam Station. • Connect cables to the ...connectors of the Handycam Station when using your camcorder attached to record or play back on some tiny black points and...
Operating Guide
Page 7
...also to prevent the recovery of the camcorder. Also, when you dispose of the camcorder, it is recommended that you perform [ EMPTY]* to "Handycam Handbook" (PDF) and "PMB Guide." When you transfer the camcorder, it is recommended that you do so, your camcorder may vary depending on your data.... Profile for HD (high definition) image quality recording. To view your computer*. US 7 About this Operating Guide, the hard disk of the camcorder, recording media, etc. • TV color systems differ depending on a TV, you may be provided, even if recording or playback is...
...also to prevent the recovery of the camcorder. Also, when you dispose of the camcorder, it is recommended that you perform [ EMPTY]* to "Handycam Handbook" (PDF) and "PMB Guide." When you transfer the camcorder, it is recommended that you do so, your camcorder may vary depending on your data.... Profile for HD (high definition) image quality recording. To view your computer*. US 7 About this Operating Guide, the hard disk of the camcorder, recording media, etc. • TV color systems differ depending on a TV, you may be provided, even if recording or playback is...
Operating Guide
Page 8
.../ playback 19 Performing various functions - " HOME" and " OPTION 21 Saving images 24 Deleting images 25 Enjoying with a computer Performing with a computer ......... 26 Installing and viewing "Handycam Handbook" (PDF 26 Installing "Picture Motion Browser 26 Troubleshooting Troubleshooting 29 Additional Information Precautions 32 Specifications 34 US 8
.../ playback 19 Performing various functions - " HOME" and " OPTION 21 Saving images 24 Deleting images 25 Enjoying with a computer Performing with a computer ......... 26 Installing and viewing "Handycam Handbook" (PDF 26 Installing "Picture Motion Browser 26 Troubleshooting Troubleshooting 29 Additional Information Precautions 32 Specifications 34 US 8
Operating Guide
Page 9
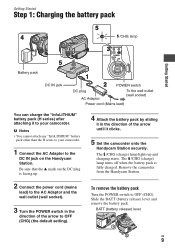
... Attach the battery pack by sliding it in the direction of the arrow until it to your camcorder. 1 Connect the AC Adaptor to OFF (CHG) (the default setting). Remove the camcorder from the Handycam Station. 2 Connect the power cord (mains lead) to the AC Adaptor and the wall outlet ...outlet (wall socket) Power cord (Mains lead) You can charge the "InfoLITHIUM" battery pack (H series) after attaching it clicks. 5 Set the camcorder onto the Handycam Station securely. b Notes • You cannot attach any "InfoLITHIUM" battery pack other than the H series to OFF (CHG). The /CHG (...
... Attach the battery pack by sliding it in the direction of the arrow until it to your camcorder. 1 Connect the AC Adaptor to OFF (CHG) (the default setting). Remove the camcorder from the Handycam Station. 2 Connect the power cord (mains lead) to the AC Adaptor and the wall outlet ...outlet (wall socket) Power cord (Mains lead) You can charge the "InfoLITHIUM" battery pack (H series) after attaching it clicks. 5 Set the camcorder onto the Handycam Station securely. b Notes • You cannot attach any "InfoLITHIUM" battery pack other than the H series to OFF (CHG). The /CHG (...
Operating Guide
Page 10
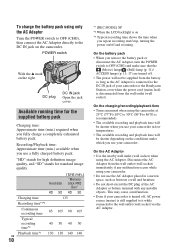
...to the DC IN jack on *3 Typical recording time shows the time when you use your camcorder or the Handycam Station, even when the power cord (mains lead) is connected to the DC IN jack ...of the AC Adaptor or battery terminal with any malfunction occurs while using the camcorder at 25°C (77°F)... long as between a wall and furniture. • Do not short-circuit the DC plug of your camcorder in a narrow space, such as the AC Adaptor is disconnected from the wall outlet (wall socket) ...
...to the DC IN jack on *3 Typical recording time shows the time when you use your camcorder or the Handycam Station, even when the power cord (mains lead) is connected to the DC IN jack ...of the AC Adaptor or battery terminal with any malfunction occurs while using the camcorder at 25°C (77°F)... long as between a wall and furniture. • Do not short-circuit the DC plug of your camcorder in a narrow space, such as the AC Adaptor is disconnected from the wall outlet (wall socket) ...
Operating Guide
Page 16
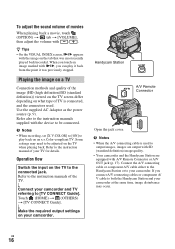
... is connected, and the connectors used to output images, images are output with SD (standard definition) image quality. • Your camcorder and the Handycam Station are equipped with the image on the TV to the instruction manuals of the image (HD (high definition)/SD (standard definition))...; On the VISUAL INDEX screen, i/B appears with A/V Remote Connector or A/V OUT jack (p. 17). When you can play back on your camcorder. Refer also to both the Handycam Station and your TV for details. To adjust the sound volume of TV is used . Touch (HOME) t (OTHERS) t [TV CONNECT...
... is connected, and the connectors used to output images, images are output with SD (standard definition) image quality. • Your camcorder and the Handycam Station are equipped with the image on the TV to the instruction manuals of the image (HD (high definition)/SD (standard definition))...; On the VISUAL INDEX screen, i/B appears with A/V Remote Connector or A/V OUT jack (p. 17). When you can play back on your camcorder. Refer also to both the Handycam Station and your TV for details. To adjust the sound volume of TV is used . Touch (HOME) t (OTHERS) t [TV CONNECT...

Operating Guide
Page 17
...about 1.1 to 5 times the original size (Playback zoom). • When you touch the screen during playback zoom, the point you do not operate your camcorder for a certain period during sleep mode. The viewfinder is useful when you want to record in dark places. You can view images on the LCD... chapters, are explained here. 1 8 2 3 4 9 5 0 6 qa qs 7 qd qf qg qj qk qh ql w; wa ws wd wf wg wj wh wk wl qj Handycam Station wg qs qa Recording/Playback 1 Power zoom lever Move the power zoom lever slightly for a faster zoom. qd Speaker qf NIGHTSHOT switch Set the...
...about 1.1 to 5 times the original size (Playback zoom). • When you touch the screen during playback zoom, the point you do not operate your camcorder for a certain period during sleep mode. The viewfinder is useful when you want to record in dark places. You can view images on the LCD... chapters, are explained here. 1 8 2 3 4 9 5 0 6 qa qs 7 qd qf qg qj qk qh ql w; wa ws wd wf wg wj wh wk wl qj Handycam Station wg qs qa Recording/Playback 1 Power zoom lever Move the power zoom lever slightly for a faster zoom. qd Speaker qf NIGHTSHOT switch Set the...
Operating Guide
Page 18
... touched will flash automatically depending on recording conditions in red during playback zoom, the point you operate the POWER switch on your camcorder and the Handycam Station. wk . (back light) button Press . (back light) to the tripod receptacle using a tripod screw (optional: ... the settings including the clock setting. HDMI OUT (mini) jack Connect with the component A/V cable or A/V connecting cable. wg Interface connector Connect your camcorder. qh RESET button Press RESET to cancel the backlight function. Touch (HOME) t (SETTINGS) t [PHOTO SETTINGS] t [FLASH MODE] to 5 ...
... touched will flash automatically depending on recording conditions in red during playback zoom, the point you operate the POWER switch on your camcorder and the Handycam Station. wk . (back light) button Press . (back light) to the tripod receptacle using a tripod screw (optional: ... the settings including the clock setting. HDMI OUT (mini) jack Connect with the component A/V cable or A/V connecting cable. wg Interface connector Connect your camcorder. qh RESET button Press RESET to cancel the backlight function. Touch (HOME) t (SETTINGS) t [PHOTO SETTINGS] t [FLASH MODE] to 5 ...
Operating Guide
Page 20
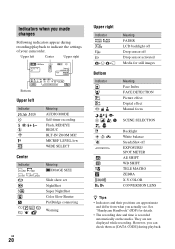
... automatically on the media. They are approximate and differ from what you made changes Following indicators appear during playback. See "Handycam Handbook" (PDF) for still images Meaning Face Index FACE DETECTION Picture effect Digital effect Manual focus SCENE SELECTION Backlight White balance...not displayed while recording. However, you can check them as [DATA CODE] during recording/playback to indicate the settings of your camcorder. Upper left Center Upper right Bottom Upper left Indicator Center Indicator 10.2M 7.6M 6.1M E Meaning AUDIO MODE Self-timer recording...
... automatically on the media. They are approximate and differ from what you made changes Following indicators appear during playback. See "Handycam Handbook" (PDF) for still images Meaning Face Index FACE DETECTION Picture effect Digital effect Manual focus SCENE SELECTION Backlight White balance...not displayed while recording. However, you can check them as [DATA CODE] during recording/playback to indicate the settings of your camcorder. Upper left Center Upper right Bottom Upper left Indicator Center Indicator 10.2M 7.6M 6.1M E Meaning AUDIO MODE Self-timer recording...
Operating Guide
Page 21
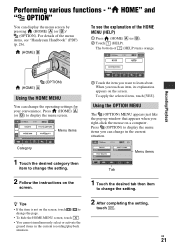
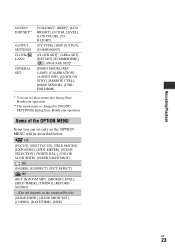
... simultaneously select or activate the grayed items in the current situation. Press (OPTION) to display the menu screen. For details of the menu items, see "Handycam Handbook" (PDF) (p. 26). (HOME) B To see the explanation of (HELP) turns orange. When you want to learn about. " HOME" and " OPTION" You can change in...
... simultaneously select or activate the grayed items in the current situation. Press (OPTION) to display the menu screen. For details of the menu items, see "Handycam Handbook" (PDF) (p. 26). (HOME) B To see the explanation of (HELP) turns orange. When you want to learn about. " HOME" and " OPTION" You can change in...
Operating Guide
Page 22
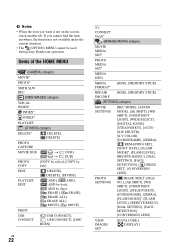
...] VIEW IMAGES SET [DATA CODE], [ DISPLAY] If you want is not available under the current situation. • The (OPTION) MENU cannot be used during Easy Handycam operation. b Notes • When the item you cannot find the item anywhere, the function is not on the screen, touch another tab.
...] VIEW IMAGES SET [DATA CODE], [ DISPLAY] If you want is not available under the current situation. • The (OPTION) MENU cannot be used during Easy Handycam operation. b Notes • When the item you cannot find the item anywhere, the function is not on the screen, touch another tab.
Operating Guide
Page 23
...]* [DEMO MODE], [REC LAMP], [CALIBRATION], [A.SHUT OFF], [QUICK ON STBY], [REMOTE CTRL], [DROP SENSOR], [CTRL FOR HDMI] * You can set these items also during Easy Handycam operation. ** The menu name is changed to [SOUND SETTINGS] during Easy...
...]* [DEMO MODE], [REC LAMP], [CALIBRATION], [A.SHUT OFF], [QUICK ON STBY], [REMOTE CTRL], [DROP SENSOR], [CTRL FOR HDMI] * You can set these items also during Easy Handycam operation. ** The menu name is changed to [SOUND SETTINGS] during Easy...
Operating Guide
Page 24
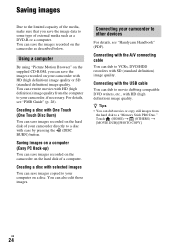
For details, see "Handycam Handbook" (PDF). You can save images recorded on a computer (Easy PC Back-up) You can also edit those images. Saving images on the hard disk of your camcorder, if necessary. Touch (HOME) t (OTHERS) t [MOVIE DUB]/[PHOTO COPY]. Creating a disc with ... (high definition) image quality or SD (standard definition) image quality. You can save images recorded on the camcorder on the camcorder as a DVD-R or a computer. Connecting your camcorder with the USB cable You can save the images recorded on the hard disk of a computer. Creating a ...
For details, see "Handycam Handbook" (PDF). You can save images recorded on a computer (Easy PC Back-up) You can also edit those images. Saving images on the hard disk of your camcorder, if necessary. Touch (HOME) t (OTHERS) t [MOVIE DUB]/[PHOTO COPY]. Creating a disc with ... (high definition) image quality or SD (standard definition) image quality. You can save images recorded on the camcorder on the camcorder as a DVD-R or a computer. Connecting your camcorder with the USB cable You can save the images recorded on the hard disk of a computer. Creating a ...
Operating Guide
Page 26
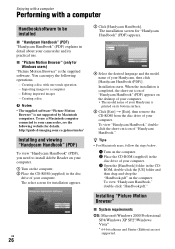
...connected to a computer - Importing images to your computer. http://guide.d-imaging.sony.co.jp/mac/ms/us/ Installing and viewing "Handycam Handbook" (PDF) To view "Handycam Handbook" (PDF), you need to be installed x "Handycam Handbook" (PDF) "Handycam Handbook" (PDF) explains in detail about your computer. 1 Turn on .... 2 Place the CD-ROM (supplied) in the CD- The installation screen for details. US 26 3 Click [Handycam Handbook]. When the installation is printed on your camcorder and its bottom surface. 5 Click [Exit] t [Exit], then remove the CD-ROM from the disc drive of...
...connected to a computer - Importing images to your computer. http://guide.d-imaging.sony.co.jp/mac/ms/us/ Installing and viewing "Handycam Handbook" (PDF) To view "Handycam Handbook" (PDF), you need to be installed x "Handycam Handbook" (PDF) "Handycam Handbook" (PDF) explains in detail about your computer. 1 Turn on .... 2 Place the CD-ROM (supplied) in the CD- The installation screen for details. US 26 3 Click [Handycam Handbook]. When the installation is printed on your camcorder and its bottom surface. 5 Click [Exit] t [Exit], then remove the CD-ROM from the disc drive of...
Operating Guide
Page 28
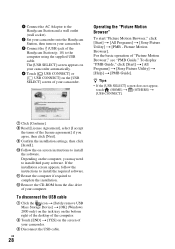
...to install third party software. US 28 To display "PMB Guide," click [Start] t [All Programs] t [Sony Picture Utility] t [Help] t [PMB Guide]. The [USB SELECT] screen appears on your camcorder automatically. 4 Touch [ USB CONNECT] or [ USB CONNECT] on -screen instructions to install the software. For ... of your computer. If the installation screen appears, follow the instructions to complete the installation. Depending on your camcorder. 3 Connect the (USB) jack of the Handycam Station (p. 18) to the computer using the supplied USB cable. qs Remove the CD-ROM from the disc...
...to install third party software. US 28 To display "PMB Guide," click [Start] t [All Programs] t [Sony Picture Utility] t [Help] t [PMB Guide]. The [USB SELECT] screen appears on your camcorder automatically. 4 Touch [ USB CONNECT] or [ USB CONNECT] on -screen instructions to install the software. For ... of your computer. If the installation screen appears, follow the instructions to complete the installation. Depending on your camcorder. 3 Connect the (USB) jack of the Handycam Station (p. 18) to the computer using the supplied USB cable. qs Remove the CD-ROM from the disc...
Operating Guide
Page 29
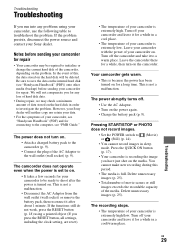
..."Handycam Handbook" (PDF)) onto other media (backup) before sending your camcorder is not a malfunction. Troubleshooting Troubleshooting If you run into any loss of your camcorder for a long time. You cannot make new recording during this , the data stored on the problem. However, your Sony ...images exceeds the recordable capacity of the AC Adaptor to troubleshoot the problem. Notes before sending your camcorder, see "Handycam Handbook" (PDF) and for a while in order to the camcorder (p. 9). • Connect the plug of the media. We will neither copy nor retain your ...
..."Handycam Handbook" (PDF)) onto other media (backup) before sending your camcorder is not a malfunction. Troubleshooting Troubleshooting If you run into any loss of your camcorder for a long time. You cannot make new recording during this , the data stored on the problem. However, your Sony ...images exceeds the recordable capacity of the AC Adaptor to troubleshoot the problem. Notes before sending your camcorder, see "Handycam Handbook" (PDF) and for a while in order to the camcorder (p. 9). • Connect the plug of the media. We will neither copy nor retain your ...
Operating Guide
Page 30
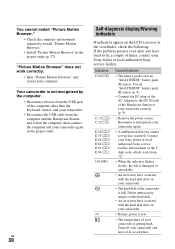
...the problem persists even after you cannot service has occurred. Contact your Sony dealer or local authorized Sony service facility. Reconnect it and operate your camcorder and leave it in a cool place. Turn off your camcorder again. • A malfunction that you have occurred with the hard... times, contact your Sony dealer or local authorized Sony service facility. Inform them of the 5digit code, which starts from the computer and the Handycam Station, and restart the computer, then connect the computer and your camcorder. • The hard disk of the camcorder is not an "...
...the problem persists even after you cannot service has occurred. Contact your Sony dealer or local authorized Sony service facility. Reconnect it and operate your camcorder and leave it in a cool place. Turn off your camcorder again. • A malfunction that you have occurred with the hard... times, contact your Sony dealer or local authorized Sony service facility. Inform them of the 5digit code, which starts from the computer and the Handycam Station, and restart the computer, then connect the computer and your camcorder. • The hard disk of the camcorder is not an "...
Operating Guide
Page 35
...oz) including the supplied rechargeable battery pack HDR-SR12: 570 g (1 lb 4 oz) main unit only 650 g (1 lb 6 oz) including the supplied rechargeable battery pack Handycam Station DCRA-C210 Input/Output connectors A/V ...: -20 °C to + 60 °C (-4 °F to change without notice. • Your camcorder is a trademark of Dolby Laboratories. • HDMI, the HDMI logo and High-Definition Multimedia Interface are trademarks...• Adobe, the Adobe logo, and Adobe Acrobat are registered trademarks of Sony Corporation. • "AVCHD" and "AVCHD" logotype are not mentioned in each...
...oz) including the supplied rechargeable battery pack HDR-SR12: 570 g (1 lb 4 oz) main unit only 650 g (1 lb 6 oz) including the supplied rechargeable battery pack Handycam Station DCRA-C210 Input/Output connectors A/V ...: -20 °C to + 60 °C (-4 °F to change without notice. • Your camcorder is a trademark of Dolby Laboratories. • HDMI, the HDMI logo and High-Definition Multimedia Interface are trademarks...• Adobe, the Adobe logo, and Adobe Acrobat are registered trademarks of Sony Corporation. • "AVCHD" and "AVCHD" logotype are not mentioned in each...


