Operating Guide
Page 5
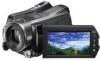
... one or more of the following measures: - For the State of your camcorder. Picture Motion Browser (Software) - Handycam Handbook (PDF) • "Operating Guide" (This manual) (1) US A B C D Using the camcorder • The camcorder is already installed. • Rechargeable battery pack NP-FH60 (1) • CD-ROM "Handycam Application Software" (1) (p. 26) - Apply mechanical shock or vibration to the...
... one or more of the following measures: - For the State of your camcorder. Picture Motion Browser (Software) - Handycam Handbook (PDF) • "Operating Guide" (This manual) (1) US A B C D Using the camcorder • The camcorder is already installed. • Rechargeable battery pack NP-FH60 (1) • CD-ROM "Handycam Application Software" (1) (p. 26) - Apply mechanical shock or vibration to the...
Operating Guide
Page 6
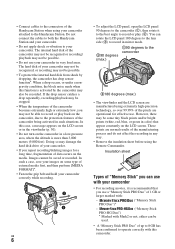
... when this case, a message appears on the LCD screen or in the viewfinder (p. 30). • Do not turn on the camcorder, due to the Handycam Station. If the drop sensor catches a drop repeatedly, recording/playback may also be able to record or play (2). Insulation sheet Types .... • Connect cables to the connectors of the Handycam Station when using your camcorder attached to the protection features of the camcorder being activated in such situations. Do not connect the cables to both the Handycam Station and your camcorder. • Do not apply shock or vibration to ...
... when this case, a message appears on the LCD screen or in the viewfinder (p. 30). • Do not turn on the camcorder, due to the Handycam Station. If the drop sensor catches a drop repeatedly, recording/playback may also be able to record or play (2). Insulation sheet Types .... • Connect cables to the connectors of the Handycam Station when using your camcorder attached to the protection features of the camcorder being activated in such situations. Do not connect the cables to both the Handycam Station and your camcorder. • Do not apply shock or vibration to ...
Operating Guide
Page 7
...Television programs, films, video tapes, and other devices • Your camcorder is not possible due to a malfunction of the computer. * Refer also to "Handycam Handbook" (PDF) and "PMB Guide." Also, when you dispose of the camcorder, it is recommended that you may be copyrighted. It is connected... to a computer • Do not try to prevent the recovery of the camcorder, you destroy the actual body...
...Television programs, films, video tapes, and other devices • Your camcorder is not possible due to a malfunction of the computer. * Refer also to "Handycam Handbook" (PDF) and "PMB Guide." Also, when you dispose of the camcorder, it is recommended that you may be copyrighted. It is connected... to a computer • Do not try to prevent the recovery of the camcorder, you destroy the actual body...
Operating Guide
Page 9
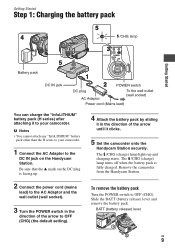
... jack on the DC plug is fully charged. BATT (battery release) lever US 9 Be sure that the v mark on the Handycam Station. Remove the camcorder from the Handycam Station. 2 Connect the power cord (mains lead) to the AC Adaptor and the wall outlet (wall socket). 3 Turn the ...POWER switch in the direction of the arrow to your camcorder. 1 Connect the AC Adaptor to OFF (CHG). b Notes • You cannot attach ...
... jack on the DC plug is fully charged. BATT (battery release) lever US 9 Be sure that the v mark on the Handycam Station. Remove the camcorder from the Handycam Station. 2 Connect the power cord (mains lead) to the AC Adaptor and the wall outlet (wall socket). 3 Turn the ...POWER switch in the direction of the arrow to your camcorder. 1 Connect the AC Adaptor to OFF (CHG). b Notes • You cannot attach ...
Operating Guide
Page 10
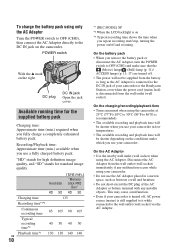
...the LCD backlight is disconnected from the battery as long as between a wall and furniture. • Do not short-circuit the DC plug of your camcorder in a narrow space, such as the AC Adaptor is connected to the wall outlet (wall socket) via the AC Adaptor. On the AC Adaptor ... (mains) is recommended). • The available recording and playback time will be shorter when you use your camcorder or the Handycam Station, even when the power cord (mains lead) is on the camcorder. POWER switch With the v mark on the conditions under which you use the AC Adaptor placed in low ...
...the LCD backlight is disconnected from the battery as long as between a wall and furniture. • Do not short-circuit the DC plug of your camcorder in a narrow space, such as the AC Adaptor is connected to the wall outlet (wall socket) via the AC Adaptor. On the AC Adaptor ... (mains) is recommended). • The available recording and playback time will be shorter when you use your camcorder or the Handycam Station, even when the power cord (mains lead) is on the camcorder. POWER switch With the v mark on the conditions under which you use the AC Adaptor placed in low ...
Operating Guide
Page 11
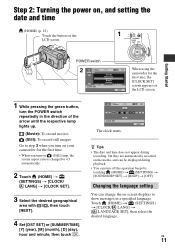
...Started POWER switch 60min STBY AREA SET Chicago Mexico City New York Bogota Santiago JAN 1 2008 CLOCK SET 12:00:00AM NEXT When using the camcorder for the first time, the [CLOCK SET] screen appears on the LCD screen. 1 While pressing the green button, turn the POWER switch ... turn on (Still) lamp, the screen aspect ratio is changed to show messages in a specified language. Changing the language setting You can turn on your camcorder for the first time. • When you turn off the operation beeps by touching (HOME) t (SETTINGS) t [SOUND/DISP SET] t [BEEP] t [OFF]. US 11 ...
...Started POWER switch 60min STBY AREA SET Chicago Mexico City New York Bogota Santiago JAN 1 2008 CLOCK SET 12:00:00AM NEXT When using the camcorder for the first time, the [CLOCK SET] screen appears on the LCD screen. 1 While pressing the green button, turn the POWER switch ... turn on (Still) lamp, the screen aspect ratio is changed to show messages in a specified language. Changing the language setting You can turn on your camcorder for the first time. • When you turn off the operation beeps by touching (HOME) t (SETTINGS) t [SOUND/DISP SET] t [BEEP] t [OFF]. US 11 ...
Operating Guide
Page 12
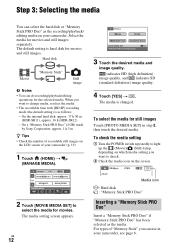
The default setting is changed. On a "Memory Stick PRO Duo" (4 GB) made by Sony Corporation: approx. 1 h 5 m z Tips • Check the number of recordable still images on the screen. 2 Touch [MOVIE MEDIA SET] to change media, reselect the media. &#... page 6. Select the media for still images Touch [PHOTO MEDIA SET] in your camcorder. When you can do recording/playback/editing operations for movies and still images. On the internal hard disk: approx. 17 h 50 m (HDR-SR11), approx. 36 h (HDR-SR12) - indicates HD (high definition) image quality, and indicates SD (standard definition) ...
The default setting is changed. On a "Memory Stick PRO Duo" (4 GB) made by Sony Corporation: approx. 1 h 5 m z Tips • Check the number of recordable still images on the screen. 2 Touch [MOVIE MEDIA SET] to change media, reselect the media. &#... page 6. Select the media for still images Touch [PHOTO MEDIA SET] in your camcorder. When you can do recording/playback/editing operations for movies and still images. On the internal hard disk: approx. 17 h 50 m (HDR-SR11), approx. 36 h (HDR-SR12) - indicates HD (high definition) image quality, and indicates SD (standard definition) ...
Operating Guide
Page 15
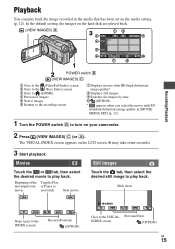
... the or tab, then select the desired movie to the VISUAL Previous/Next INDEX screen (OPTION) US 15 The VISUAL INDEX screen appears on your camcorder. 2 Press (VIEW IMAGES) C (or A). In the default setting, the images on the hard disk are played back. (VIEW IMAGES) A Recording/Playback POWER switch B (VIEW IMAGES...
... the or tab, then select the desired movie to the VISUAL Previous/Next INDEX screen (OPTION) US 15 The VISUAL INDEX screen appears on your camcorder. 2 Press (VIEW IMAGES) C (or A). In the default setting, the images on the hard disk are played back. (VIEW IMAGES) A Recording/Playback POWER switch B (VIEW IMAGES...
Operating Guide
Page 16
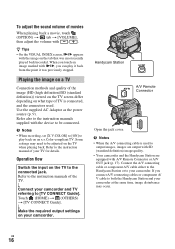
...the A/V connecting cable or component A/V cable either to the Handycam Station or to your camcorder and TV referring to output images, images are output with SD (standard definition) image quality. • Your camcorder and the Handycam Station are equipped with A/V Remote Connector or A/V OUT ...8226; On the VISUAL INDEX screen, i/B appears with i/B, you connect A/V connecting cables or component A/ V cable to both the Handycam Station and your camcorder at the same time, image disturbance may need to the instruction manual of the TV. Refer also to the instruction manuals supplied with ...
...the A/V connecting cable or component A/V cable either to the Handycam Station or to your camcorder and TV referring to output images, images are output with SD (standard definition) image quality. • Your camcorder and the Handycam Station are equipped with A/V Remote Connector or A/V OUT ...8226; On the VISUAL INDEX screen, i/B appears with i/B, you connect A/V connecting cables or component A/ V cable to both the Handycam Station and your camcorder at the same time, image disturbance may need to the instruction manual of the TV. Refer also to the instruction manuals supplied with ...

Operating Guide
Page 17
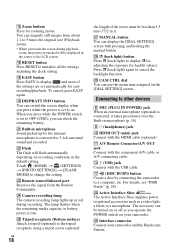
...screen. 2 Eyecup 3 Viewfinder You can magnify still images from about 1.1 to start recording next time. The viewfinder is useful when you press QUICK ON, the camcorder goes to recording standby in dark places. qd Speaker qf NIGHTSHOT switch Set the NIGHTSHOT switch to ON ( appears) to record in approximately 1 second. The... power turns off . wa ws wd wf wg wj wh wk wl qj Handycam Station wg qs qa Recording/Playback 1 Power zoom lever Move the power zoom lever slightly for a slower zoom.
...screen. 2 Eyecup 3 Viewfinder You can magnify still images from about 1.1 to start recording next time. The viewfinder is useful when you press QUICK ON, the camcorder goes to recording standby in dark places. qd Speaker qf NIGHTSHOT switch Set the NIGHTSHOT switch to ON ( appears) to record in approximately 1 second. The... power turns off . wa ws wd wf wg wj wh wk wl qj Handycam Station wg qs qa Recording/Playback 1 Power zoom lever Move the power zoom lever slightly for a slower zoom.
Operating Guide
Page 18
... the screw must be displayed in microphone (p. 18). 9 i (headphones) jack q; When you touched will flash automatically depending on your camcorder and the Handycam Station. Connecting to OFF (CHG), you operate the POWER switch on recording conditions in /out. You can use the menu item assigned ...manual button. wa Built-in microphone Sound picked up in .)). wf Camera recording lamp The camera recording lamp lights up by connecting the camcorder to change the setting. wh Tripod receptacle (Bottom surface) Attach a tripod (optional) to on the [DIAL SETTING] screen. Active ...
... the screw must be displayed in microphone (p. 18). 9 i (headphones) jack q; When you touched will flash automatically depending on your camcorder and the Handycam Station. Connecting to OFF (CHG), you operate the POWER switch on recording conditions in /out. You can use the menu item assigned ...manual button. wa Built-in microphone Sound picked up in .)). wf Camera recording lamp The camera recording lamp lights up by connecting the camcorder to change the setting. wh Tripod receptacle (Bottom surface) Attach a tripod (optional) to on the [DIAL SETTING] screen. Active ...
Operating Guide
Page 20
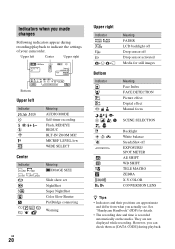
.../ SPOT METER AE SHIFT WB SHIFT TELE MACRO ZEBRA X.V.COLOR CONVERSION LENS z Tips • Indicators and their positions are not displayed while recording. See "Handycam Handbook" (PDF) for still images Meaning Face Index FACE DETECTION Picture effect Digital effect Manual focus SCENE SELECTION Backlight White balance SteadyShot off Drop sensor... 20 Upper right Indicator Bottom Indicator 9 . Indicators when you can check them as [DATA CODE] during recording/playback to indicate the settings of your camcorder. However, you made changes Following indicators appear during playback.
.../ SPOT METER AE SHIFT WB SHIFT TELE MACRO ZEBRA X.V.COLOR CONVERSION LENS z Tips • Indicators and their positions are not displayed while recording. See "Handycam Handbook" (PDF) for still images Meaning Face Index FACE DETECTION Picture effect Digital effect Manual focus SCENE SELECTION Backlight White balance SteadyShot off Drop sensor... 20 Upper right Indicator Bottom Indicator 9 . Indicators when you can check them as [DATA CODE] during recording/playback to indicate the settings of your camcorder. However, you made changes Following indicators appear during playback.
Operating Guide
Page 24
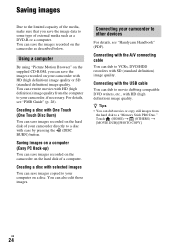
... you can save images copied to your computer on a disc. For details, see "Handycam Handbook" (PDF). Saving images on a computer (Easy PC Back-up) You can save images recorded on the camcorder on the hard disk of external media such as described below. Creating a disc with ...disc with the A/V connecting cable You can dub movies or copy still images from the computer to a "Memory Stick PRO Duo." US 24 Connecting your camcorder, if necessary. Connecting with the USB cable You can rewrite movies with HD (high definition) image quality. Touch (HOME) t (OTHERS) t [MOVIE...
... you can save images copied to your computer on a disc. For details, see "Handycam Handbook" (PDF). Saving images on a computer (Easy PC Back-up) You can save images recorded on the camcorder on the hard disk of external media such as described below. Creating a disc with ...disc with the A/V connecting cable You can dub movies or copy still images from the computer to a "Memory Stick PRO Duo." US 24 Connecting your camcorder, if necessary. Connecting with the USB cable You can rewrite movies with HD (high definition) image quality. Touch (HOME) t (OTHERS) t [MOVIE...
Operating Guide
Page 26
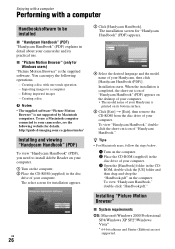
...." To use . http://guide.d-imaging.sony.co.jp/mac/ms/us/ Installing and viewing "Handycam Handbook" (PDF) To view "Handycam Handbook" (PDF), you need to your computer. 1 Turn on its practical use a Macintosh computer connected to install Adobe Reader on your camcorder, see the following operations. - US 26 3 Click [Handycam Handbook]. Installation starts. When the...
...." To use . http://guide.d-imaging.sony.co.jp/mac/ms/us/ Installing and viewing "Handycam Handbook" (PDF) To view "Handycam Handbook" (PDF), you need to your computer. 1 Turn on its practical use a Macintosh computer connected to install Adobe Reader on your camcorder, see the following operations. - US 26 3 Click [Handycam Handbook]. Installation starts. When the...
Operating Guide
Page 27
...recorders, as standard, Hi-Speed USB (USB 2.0 compatible) is recommended), DVD burner (CD-ROM drive is necessary for installation) Attention This camcorder captures high definition footage in the AVCHD format. Importing the contents to eject the media and may fail to the computer - Creating an AVCHD...1.66 GHz or faster is not connected to the computer. 2 Turn on as (E:)) may differ depending on your OS. 1 Confirm that your camcorder to the computer following operations: - Processing only the contents in the disc drive of memory or more is required only for installation. • ...
...recorders, as standard, Hi-Speed USB (USB 2.0 compatible) is recommended), DVD burner (CD-ROM drive is necessary for installation) Attention This camcorder captures high definition footage in the AVCHD format. Importing the contents to eject the media and may fail to the computer - Creating an AVCHD...1.66 GHz or faster is not connected to the computer. 2 Turn on as (E:)) may differ depending on your OS. 1 Confirm that your camcorder to the computer following operations: - Processing only the contents in the disc drive of memory or more is required only for installation. • ...
Operating Guide
Page 28
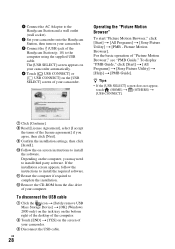
..."Picture Motion Browser," see "PMB Guide." US 28 1 Connect the AC Adaptor to the Handycam Station and a wall outlet (wall socket). 2 Set your camcorder onto the Handycam Station, then turn on the [USB SELECT] screen of your camcorder. z Tips • If the [USB SELECT] screen does not appear, touch (HOME) ...installation screen appears, follow the instructions to complete the installation. To display "PMB Guide," click [Start] t [All Programs] t [Sony Picture Utility] t [Help] t [PMB Guide]. qa Restart the computer if required to install the required software. Picture Motion Browser].
..."Picture Motion Browser," see "PMB Guide." US 28 1 Connect the AC Adaptor to the Handycam Station and a wall outlet (wall socket). 2 Set your camcorder onto the Handycam Station, then turn on the [USB SELECT] screen of your camcorder. z Tips • If the [USB SELECT] screen does not appear, touch (HOME) ...installation screen appears, follow the instructions to complete the installation. To display "PMB Guide," click [Start] t [All Programs] t [Sony Picture Utility] t [Help] t [PMB Guide]. qa Restart the computer if required to install the required software. Picture Motion Browser].
Operating Guide
Page 29
...press the RESET button (p. 18) using your camcorder, see "Handycam Handbook" (PDF) and for connecting to the computer, see "Handycam Handbook" (PDF)) onto other media (backup) before sending your camcorder for repair • Your camcorder may check a minimum amount of your camcorder and leave it for a while in a ...period. • The media is not a malfunction. The recording stops. • The temperature of your camcorder on the hard disk will be deleted. However, your Sony dealer will not compensate you for any problems using a pointed object (If you press the RESET button, all...
...press the RESET button (p. 18) using your camcorder, see "Handycam Handbook" (PDF) and for connecting to the computer, see "Handycam Handbook" (PDF)) onto other media (backup) before sending your camcorder for repair • Your camcorder may check a minimum amount of your camcorder and leave it for a while in a ...period. • The media is not a malfunction. The recording stops. • The temperature of your camcorder on the hard disk will be deleted. However, your Sony dealer will not compensate you for any problems using a pointed object (If you press the RESET button, all...
Operating Guide
Page 30
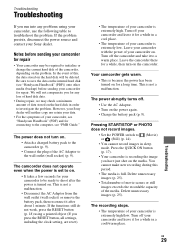
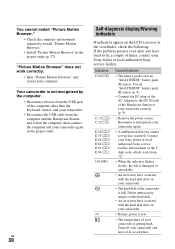
... and your camcorder. •... low. • The temperature of your camcorder again. • A malfunction that you...camcorder and leave it and operate your camcorder...Handycam Station, and restart the computer, then connect the computer and your camcorder. • The hard disk of the camcorder... is full. "Picture Motion Browser" does not work correctly. • Quit "Picture Motion Browser" and restart your camcorder...Handycam Station or your computer. Delete unnecessary images on the LCD screen or in your camcorder...in your camcorder again in...
... and your camcorder. •... low. • The temperature of your camcorder again. • A malfunction that you...camcorder and leave it and operate your camcorder...Handycam Station, and restart the computer, then connect the computer and your camcorder. • The hard disk of the camcorder... is full. "Picture Motion Browser" does not work correctly. • Quit "Picture Motion Browser" and restart your camcorder...Handycam Station or your computer. Delete unnecessary images on the LCD screen or in your camcorder...in your camcorder again in...
Operating Guide
Page 31
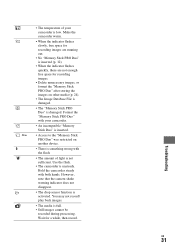
...• When the indicator flashes quickly, there are not enough free space for a while, then record. Use the flash. • The camcorder is activated. Troubleshooting US 31 • The temperature of light is not sufficient. However, note that the camera-shake warning indicator does not ... Stick PRO Duo" after storing the images on another device. • There is something wrong with the flash. • The amount of your camcorder. • An incompatible "Memory Stick Duo" is inserted. - • Access to the "Memory Stick PRO Duo" was restricted on other media...
...• When the indicator flashes quickly, there are not enough free space for a while, then record. Use the flash. • The camcorder is activated. Troubleshooting US 31 • The temperature of light is not sufficient. However, note that the camera-shake warning indicator does not ... Stick PRO Duo" after storing the images on another device. • There is something wrong with the flash. • The amount of your camcorder. • An incompatible "Memory Stick Duo" is inserted. - • Access to the "Memory Stick PRO Duo" was restricted on other media...
Operating Guide
Page 32
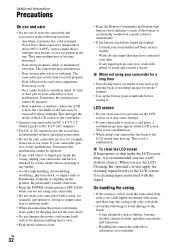
... may have it checked by placing anything heavy on and let it run such as by a Sony dealer before storing it . This damages the inside the casing, unplug your camcorder and have contacted your local authorized Sony service facility. - US 32 • Keep the Remote Commander and button-type battery out of the...
... may have it checked by placing anything heavy on and let it run such as by a Sony dealer before storing it . This damages the inside the casing, unplug your camcorder and have contacted your local authorized Sony service facility. - US 32 • Keep the Remote Commander and button-type battery out of the...


