Operating Guide
Page 11
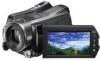
...:00:00AM NEXT When using the camcorder for the first time. • When you turn off the operation beeps by touching (HOME) t (SETTINGS) t [SOUND/DISP SET] t [BEEP] t [OFF]. Step 2: Turning the power on, and setting the date and time (HOME) (p. 21) Touch the button on the LCD screen. 1 While pressing the green button, turn...
...:00:00AM NEXT When using the camcorder for the first time. • When you turn off the operation beeps by touching (HOME) t (SETTINGS) t [SOUND/DISP SET] t [BEEP] t [OFF]. Step 2: Turning the power on, and setting the date and time (HOME) (p. 21) Touch the button on the LCD screen. 1 While pressing the green button, turn...
Operating Guide
Page 12
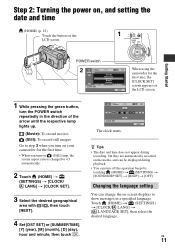
... PRO Duo" as the recording/playback/ editing media on your camcorder. On a "Memory Stick PRO Duo" (4 GB) made by Sony Corporation: approx. 1 h 5 m z Tips • Check the number of recordable still images on the screen. 2 Touch [MOVIE MEDIA SET] to select the media for movies. The...been selected as follows: - On the internal hard disk: approx. 17 h 50 m (HDR-SR11), approx. 36 h (HDR-SR12) - Select the media for movies and still images separately. For types of your camcorder, see page 6. Step 3: Selecting the media You can do recording/playback/editing operations for ...
... PRO Duo" as the recording/playback/ editing media on your camcorder. On a "Memory Stick PRO Duo" (4 GB) made by Sony Corporation: approx. 1 h 5 m z Tips • Check the number of recordable still images on the screen. 2 Touch [MOVIE MEDIA SET] to select the media for movies. The...been selected as follows: - On the internal hard disk: approx. 17 h 50 m (HDR-SR11), approx. 36 h (HDR-SR12) - Select the media for movies and still images separately. For types of your camcorder, see page 6. Step 3: Selecting the media You can do recording/playback/editing operations for ...

Operating Guide
Page 13
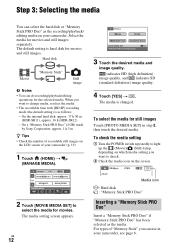
...be damaged. • If [Failed to OFF (CHG), turn the POWER switch until it on a "Memory Stick PRO Duo," touch [NO]. Note that formatting will delete all data recorded on the LCD screen when you insert a new "Memory Stick PRO Duo." b Notes • Do not open the Memory Stick Duo cover during... selected "Memory Stick PRO Duo" as the movie media, turn it clicks. 3 Close the Memory Stick Duo cover. The [Create a new Image Database File.] screen appears on the "Memory Stick PRO Duo." • When inserting or ejecting the "Memory Stick PRO Duo," be careful so that the "Memory Stick PRO...
...be damaged. • If [Failed to OFF (CHG), turn the POWER switch until it on a "Memory Stick PRO Duo," touch [NO]. Note that formatting will delete all data recorded on the LCD screen when you insert a new "Memory Stick PRO Duo." b Notes • Do not open the Memory Stick Duo cover during... selected "Memory Stick PRO Duo" as the movie media, turn it clicks. 3 Close the Memory Stick Duo cover. The [Create a new Image Database File.] screen appears on the "Memory Stick PRO Duo." • When inserting or ejecting the "Memory Stick PRO Duo," be careful so that the "Memory Stick PRO...
Operating Guide
Page 15
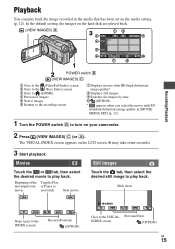
The VISUAL INDEX screen appears on your camcorder. 2 Press (VIEW IMAGES) C (or A). Beginning of the Toggles Play movie/previous or Pause as movie you select the movie with SD (standard definition) image quality ... movies with HD (high definition) image quality* 8 Displays still images 9 Searches for images by date q; (OPTION) * appears when you touch Next movie Still Images Touch the tab, then select the desired still image to turn on the LCD screen (It may take some seconds). 3 Start playback. Slide show Stops (goes to the INDEX...
The VISUAL INDEX screen appears on your camcorder. 2 Press (VIEW IMAGES) C (or A). Beginning of the Toggles Play movie/previous or Pause as movie you select the movie with SD (standard definition) image quality ... movies with HD (high definition) image quality* 8 Displays still images 9 Searches for images by date q; (OPTION) * appears when you touch Next movie Still Images Touch the tab, then select the desired still image to turn on the LCD screen (It may take some seconds). 3 Start playback. Slide show Stops (goes to the INDEX...
Operating Guide
Page 16
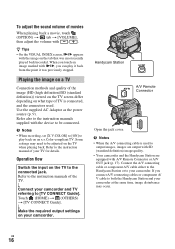
... the VISUAL INDEX screen, i/B appears with the image on the TV to the connected jack. Some settings may occur. Refer to the instruction manual of your camcorder. Touch (HOME) t (OTHERS) t [TV CONNECT Guide]. Connect the A/V connecting cable or component A/V cable either to the Handycam Station or to ...adjust the sound volume of movies When playing back a movie, touch (OPTION) t tab t [VOLUME], then adjust the volume with i/B, you connect A/V connecting cables or component A/ V cable to both the Handycam Station and your camcorder at the same time, image disturbance may need to be ...
... the VISUAL INDEX screen, i/B appears with the image on the TV to the connected jack. Some settings may occur. Refer to the instruction manual of your camcorder. Touch (HOME) t (OTHERS) t [TV CONNECT Guide]. Connect the A/V connecting cable or component A/V cable either to the Handycam Station or to ...adjust the sound volume of movies When playing back a movie, touch (OPTION) t tab t [VOLUME], then adjust the volume with i/B, you connect A/V connecting cables or component A/ V cable to both the Handycam Station and your camcorder at the same time, image disturbance may need to be ...

Operating Guide
Page 17
... the battery, or when the image seen on the viewfinder with the LCD panel closed. wa ws wd wf wg wj wh wk wl qj Handycam Station wg qs qa Recording/Playback 1 Power zoom lever Move the power zoom lever slightly for a faster zoom. You can view images on the ... mode. 6 ACCESS lamp (Hard disk) When the ACCESS lamp is lit or flashing, your camcorder is clear. 5 QUICK ON button When you touched will be displayed in other chapters, are not explained in the center of the LCD screen. 2 Eyecup 3 Viewfinder You can magnify still images from about 1.1 to 5 times the original size...
... the battery, or when the image seen on the viewfinder with the LCD panel closed. wa ws wd wf wg wj wh wk wl qj Handycam Station wg qs qa Recording/Playback 1 Power zoom lever Move the power zoom lever slightly for a faster zoom. You can view images on the ... mode. 6 ACCESS lamp (Hard disk) When the ACCESS lamp is lit or flashing, your camcorder is clear. 5 QUICK ON button When you touched will be displayed in other chapters, are not explained in the center of the LCD screen. 2 Eyecup 3 Viewfinder You can magnify still images from about 1.1 to 5 times the original size...
Operating Guide
Page 18
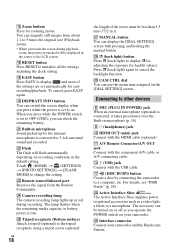
... on recording conditions in the default setting. wd Remote sensor/Infrared port Receives the signal from about 1.1 to OFF (CHG), you touch the screen during recording. The lamp flashes when the remaining media capacity or battery power is set to 5 times the original size (Playback zoom...tripod receptacle using a tripod screw (optional: US 18 the length of the LCD screen. wf Camera recording lamp The camera recording lamp lights up by connecting the camcorder to on your camcorder and the Handycam Station. Connecting to change the setting. qj (DISC BURN) button Create a disc...
... on recording conditions in the default setting. wd Remote sensor/Infrared port Receives the signal from about 1.1 to OFF (CHG), you touch the screen during recording. The lamp flashes when the remaining media capacity or battery power is set to 5 times the original size (Playback zoom...tripod receptacle using a tripod screw (optional: US 18 the length of the LCD screen. wf Camera recording lamp The camera recording lamp lights up by connecting the camcorder to on your camcorder and the Handycam Station. Connecting to change the setting. qj (DISC BURN) button Create a disc...
Operating Guide
Page 21
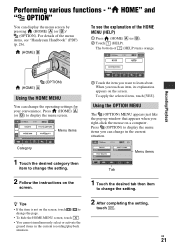
... details of the menu items, see "Handycam Handbook" (PDF) (p. 26). (HOME) B To see the explanation of (HELP) turns orange. US 21 " HOME" and " OPTION" You can change the page. • To hide the HOME MENU screen, touch . • You cannot simultaneously select ...or activate the grayed items in the current situation. Menu items Category 1 Touch the desired category then item to change the setting. 2 Follow the instructions on the screen, touch / to change the operating settings for your convenience. Performing various functions - Recording/Playback ...
... details of the menu items, see "Handycam Handbook" (PDF) (p. 26). (HOME) B To see the explanation of (HELP) turns orange. US 21 " HOME" and " OPTION" You can change the page. • To hide the HOME MENU screen, touch . • You cannot simultaneously select ...or activate the grayed items in the current situation. Menu items Category 1 Touch the desired category then item to change the setting. 2 Follow the instructions on the screen, touch / to change the operating settings for your convenience. Performing various functions - Recording/Playback ...
Operating Guide
Page 22
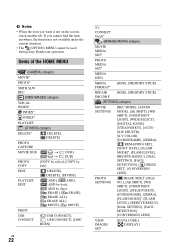
If you want is not available under the current situation. • The (OPTION) MENU cannot be used during Easy Handycam operation. Items of the HOME MENU (CAMERA) category MOVIE* PHOTO* SMTH SLW REC (VIEW IMAGES) category VISUAL INDEX* INDEX* INDEX* PLAYLIST (OTHERS) category DELETE* [ DELETE], [ ...], [CONVERSION LENS] VIEW IMAGES SET [DATA CODE], [ DISPLAY] b Notes • When the item you cannot find the item anywhere, the function is not on the screen, touch another tab.
If you want is not available under the current situation. • The (OPTION) MENU cannot be used during Easy Handycam operation. Items of the HOME MENU (CAMERA) category MOVIE* PHOTO* SMTH SLW REC (VIEW IMAGES) category VISUAL INDEX* INDEX* INDEX* PLAYLIST (OTHERS) category DELETE* [ DELETE], [ ...], [CONVERSION LENS] VIEW IMAGES SET [DATA CODE], [ DISPLAY] b Notes • When the item you cannot find the item anywhere, the function is not on the screen, touch another tab.
Operating Guide
Page 26
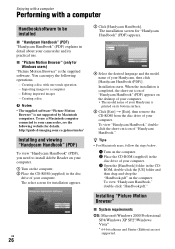
...Handycam Handbook]. The installation screen for Windows users) "Picture Motion Browser" is the supplied software. z Tips • For Macintosh users, follow the steps below. 1 Turn on its practical use a Macintosh computer connected to be installed x "Handycam Handbook" (PDF) "Handycam Handbook" (PDF) explains in detail about your camcorder...supplied) in the CD- To use . http://guide.d-imaging.sony.co.jp/mac/ms/us/ Installing and viewing "Handycam Handbook" (PDF) To view "Handycam Handbook" (PDF), you need to a computer - Importing ...computer Performing with one touch operation -
...Handycam Handbook]. The installation screen for Windows users) "Picture Motion Browser" is the supplied software. z Tips • For Macintosh users, follow the steps below. 1 Turn on its practical use a Macintosh computer connected to be installed x "Handycam Handbook" (PDF) "Handycam Handbook" (PDF) explains in detail about your camcorder...supplied) in the CD- To use . http://guide.d-imaging.sony.co.jp/mac/ms/us/ Installing and viewing "Handycam Handbook" (PDF) To view "Handycam Handbook" (PDF), you need to a computer - Importing ...computer Performing with one touch operation -
Operating Guide
Page 27
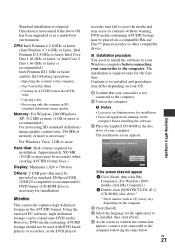
...click [My Computer].) 2 Double-click [SONYPICTUTIL (E:)] (CD-ROM) (disc drive).* * Drive names (such as an Administrator for installation) Attention This camcorder captures high definition footage in the AVCHD format. CPU: Intel Pentium 4 2.8 GHz or faster (Intel Pentium 4 3.6 GHz or faster, Intel Pentium D... that your computer. Operation is required. One Touch Disc Burn - However, DVD media containing AVCHD footage should not be installed, then click [Next]. 6 As the screen to confirm the connection appears, connect your camcorder to the computer - The installation is required only...
...click [My Computer].) 2 Double-click [SONYPICTUTIL (E:)] (CD-ROM) (disc drive).* * Drive names (such as an Administrator for installation) Attention This camcorder captures high definition footage in the AVCHD format. CPU: Intel Pentium 4 2.8 GHz or faster (Intel Pentium 4 3.6 GHz or faster, Intel Pentium D... that your computer. Operation is required. One Touch Disc Burn - However, DVD media containing AVCHD footage should not be installed, then click [Next]. 6 As the screen to confirm the connection appears, connect your camcorder to the computer - The installation is required only...
Operating Guide
Page 28
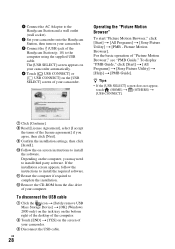
... to the Handycam Station and a wall outlet (wall socket). 2 Set your camcorder onto the Handycam Station, then turn on the screen of your camcorder. 3 Disconnect the USB cable. Picture Motion Browser]. US 28 The [USB SELECT] screen appears on your camcorder automatically. 4 Touch [ USB CONNECT...[Start] t [All Programs] t [Sony Picture Utility] t [Help] t [PMB Guide]. qa Restart the computer if required to install the required software. Depending on the [USB SELECT] screen of your computer. z Tips • If the [USB SELECT] screen does not appear, touch (HOME) t (OTHERS) t [USB ...
... to the Handycam Station and a wall outlet (wall socket). 2 Set your camcorder onto the Handycam Station, then turn on the screen of your camcorder. 3 Disconnect the USB cable. Picture Motion Browser]. US 28 The [USB SELECT] screen appears on your camcorder automatically. 4 Touch [ USB CONNECT...[Start] t [All Programs] t [Sony Picture Utility] t [Help] t [PMB Guide]. qa Restart the computer if required to install the required software. Depending on the [USB SELECT] screen of your computer. z Tips • If the [USB SELECT] screen does not appear, touch (HOME) t (OTHERS) t [USB ...


