Operating Guide
Page 6
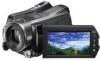
... may not be some type of the pixels are normal results of the Handycam Station when using your camcorder in very loud areas. When a drop occurs, or under a nongravity condition, the block noise made when this camcorder. You can rotate the LCD panel 180 degrees to the lens side (2) to record in mirror mode...
... may not be some type of the pixels are normal results of the Handycam Station when using your camcorder in very loud areas. When a drop occurs, or under a nongravity condition, the block noise made when this camcorder. You can rotate the LCD panel 180 degrees to the lens side (2) to record in mirror mode...
Operating Guide
Page 7
...and sound are recorded without any problems. • Compensation for the contents of recordings cannot be contrary to "Handycam Handbook" (PDF) and "PMB Guide." When you transfer the camcorder, it is recommended that you can save the image data on -screen displays in each local language are used...purposes are captured using a digital still camera, and therefore may appear different from the actual images of the LCD screen. • In this Operating Guide, the hard disk of your camcorder and "Memory Stick PRO Duo" are called as DVD-R using your computer*. On recording • Before ...
...and sound are recorded without any problems. • Compensation for the contents of recordings cannot be contrary to "Handycam Handbook" (PDF) and "PMB Guide." When you transfer the camcorder, it is recommended that you can save the image data on -screen displays in each local language are used...purposes are captured using a digital still camera, and therefore may appear different from the actual images of the LCD screen. • In this Operating Guide, the hard disk of your camcorder and "Memory Stick PRO Duo" are called as DVD-R using your computer*. On recording • Before ...
Operating Guide
Page 10
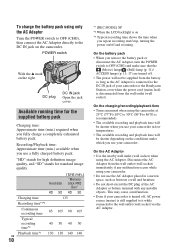
... time 85 105 90 105 Typical recording time*3 Playback time*2 US 10 40 50 40 50 130 130 140 140 *1 [REC MODE]: SP *2 When the LCD backlight is still supplied to it while connected to OFF (CHG) and make sure that the (Movie) lamp/ (Still) lamp (p. 11)/ ACCESS lamps (p. 13, 17.... Disconnect the AC Adaptor from the battery as long as between a wall and furniture. • Do not short-circuit the DC plug of your camcorder or the Handycam Station, even when the power cord (mains lead) is recommended). • The available recording and playback time will be shorter when you use a fully...
... time 85 105 90 105 Typical recording time*3 Playback time*2 US 10 40 50 40 50 130 130 140 140 *1 [REC MODE]: SP *2 When the LCD backlight is still supplied to it while connected to OFF (CHG) and make sure that the (Movie) lamp/ (Still) lamp (p. 11)/ ACCESS lamps (p. 13, 17.... Disconnect the AC Adaptor from the battery as long as between a wall and furniture. • Do not short-circuit the DC plug of your camcorder or the Handycam Station, even when the power cord (mains lead) is recommended). • The available recording and playback time will be shorter when you use a fully...
Operating Guide
Page 11
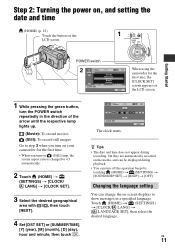
...AREA SET Chicago Mexico City New York Bogota Santiago JAN 1 2008 CLOCK SET 12:00:00AM NEXT When using the camcorder for the first time, the [CLOCK SET] screen appears on the LCD screen. 1 While pressing the green button, turn the POWER switch repeatedly in the direction of the arrow until the... respective lamp lights up. (Movie): To record movies (Still): To record still images Go to step 3 when you turn on your camcorder for the first time. &#...
...AREA SET Chicago Mexico City New York Bogota Santiago JAN 1 2008 CLOCK SET 12:00:00AM NEXT When using the camcorder for the first time, the [CLOCK SET] screen appears on the LCD screen. 1 While pressing the green button, turn the POWER switch repeatedly in the direction of the arrow until the... respective lamp lights up. (Movie): To record movies (Still): To record still images Go to step 3 when you turn on your camcorder for the first time. &#...
Operating Guide
Page 12
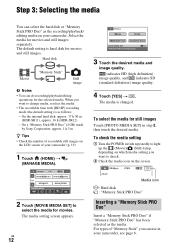
... operations for still images Touch [PHOTO MEDIA SET] in your camcorder, see page 6. On a "Memory Stick PRO Duo" (4 GB) made by Sony Corporation: approx. 1 h 5 m z Tips • Check the number of recordable still images on the LCD screen of "Memory Stick" you can select the hard disk or... Duo" has been selected as follows: - For types of your camcorder. The default setting is hard disk for movies and still images separately. On the internal hard disk: approx. 17 h 50 m (HDR-SR11), approx. 36 h (HDR-SR12) - HDD HDD MEMORY STICK MEMORY STICK MOVIE MEDIA SET Select the...
... operations for still images Touch [PHOTO MEDIA SET] in your camcorder, see page 6. On a "Memory Stick PRO Duo" (4 GB) made by Sony Corporation: approx. 1 h 5 m z Tips • Check the number of recordable still images on the LCD screen of "Memory Stick" you can select the hard disk or... Duo" has been selected as follows: - For types of your camcorder. The default setting is hard disk for movies and still images separately. On the internal hard disk: approx. 17 h 50 m (HDR-SR11), approx. 36 h (HDR-SR12) - HDD HDD MEMORY STICK MEMORY STICK MOVIE MEDIA SET Select the...

Operating Guide
Page 13
...; When inserting or ejecting the "Memory Stick PRO Duo," be damaged. • If [Failed to OFF (CHG), turn the POWER switch until it on the LCD screen when you force the "Memory Stick PRO Duo" into the Memory Stick Duo slot in the right direction until the (Movie) lamp lights up...
...; When inserting or ejecting the "Memory Stick PRO Duo," be damaged. • If [Failed to OFF (CHG), turn the POWER switch until it on the LCD screen when you force the "Memory Stick PRO Duo" into the Memory Stick Duo slot in the right direction until the (Movie) lamp lights up...
Operating Guide
Page 15
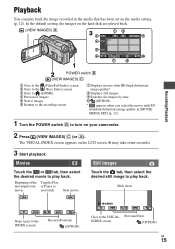
... the movie with SD (standard definition) image quality in the media that has been set on the LCD screen (It may take some seconds). 3 Start playback. In the default setting, the images on your camcorder. 2 Press (VIEW IMAGES) C (or A). Slide show Stops (goes to the INDEX screen) Reverse/Forward (OPTION) Goes to...
... the movie with SD (standard definition) image quality in the media that has been set on the LCD screen (It may take some seconds). 3 Start playback. In the default setting, the images on your camcorder. 2 Press (VIEW IMAGES) C (or A). Slide show Stops (goes to the INDEX screen) Reverse/Forward (OPTION) Goes to...

Operating Guide
Page 17
...2 Eyecup 3 Viewfinder You can view images on the LCD panel is poor. 4 Viewfinder lens adjustment lever Move up the viewfinder and move the viewfinder lens adjustment lever until the image is clear. 5 QUICK ON button When you press QUICK ON, the camcorder goes to sleep mode (power saving mode) instead of... viewfinder with the LCD panel closed. The QUICK ON lamp keeps flashing during sleep mode. 6 ACCESS lamp (Hard disk) When the ACCESS lamp is lit or flashing, your camcorder for a shoulder belt Attach the shoulder belt (optional). wa ws wd wf wg wj wh wk wl qj Handycam Station wg qs...
...2 Eyecup 3 Viewfinder You can view images on the LCD panel is poor. 4 Viewfinder lens adjustment lever Move up the viewfinder and move the viewfinder lens adjustment lever until the image is clear. 5 QUICK ON button When you press QUICK ON, the camcorder goes to sleep mode (power saving mode) instead of... viewfinder with the LCD panel closed. The QUICK ON lamp keeps flashing during sleep mode. 6 ACCESS lamp (Hard disk) When the ACCESS lamp is lit or flashing, your camcorder for a shoulder belt Attach the shoulder belt (optional). wa ws wd wf wg wj wh wk wl qj Handycam Station wg qs...
Operating Guide
Page 18
...on recording conditions in microphone (p. 18). 9 i (headphones) jack q; The lamp flashes when the remaining media capacity or battery power is set to on your camcorder and the Handycam Station. Touch (HOME) t (SETTINGS) t [PHOTO SETTINGS] t [FLASH MODE] to cancel the backlight function. wj MANUAL button You can check the remaining...for zooming in .)). qh RESET button Press RESET to the tripod receptacle using a tripod screw (optional: US 18 the length of the LCD screen. wl CAM CTRL dial You can be displayed in the center of the screw must be less than 5.5 mm (7/32 in /out...
...on recording conditions in microphone (p. 18). 9 i (headphones) jack q; The lamp flashes when the remaining media capacity or battery power is set to on your camcorder and the Handycam Station. Touch (HOME) t (SETTINGS) t [PHOTO SETTINGS] t [FLASH MODE] to cancel the backlight function. wj MANUAL button You can check the remaining...for zooming in .)). qh RESET button Press RESET to the tripod receptacle using a tripod screw (optional: US 18 the length of the LCD screen. wl CAM CTRL dial You can be displayed in the center of the screw must be less than 5.5 mm (7/32 in /out...
Operating Guide
Page 20
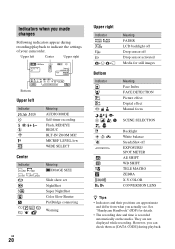
n Meaning FADER LCD backlight off Drop sensor off Drop sensor activated Media for details. • The recording date and time is recorded automatically on the media. They are approximate and differ from what you actually see. See "Handycam Handbook" (PDF) for still images Meaning Face Index...indicators appear during playback. Indicators when you can check them as [DATA CODE] during recording/playback to indicate the settings of your camcorder. Upper left Center Upper right Bottom Upper left Indicator Center Indicator 10.2M 7.6M 6.1M E Meaning AUDIO MODE Self-timer recording ...
n Meaning FADER LCD backlight off Drop sensor off Drop sensor activated Media for details. • The recording date and time is recorded automatically on the media. They are approximate and differ from what you actually see. See "Handycam Handbook" (PDF) for still images Meaning Face Index...indicators appear during playback. Indicators when you can check them as [DATA CODE] during recording/playback to indicate the settings of your camcorder. Upper left Center Upper right Bottom Upper left Indicator Center Indicator 10.2M 7.6M 6.1M E Meaning AUDIO MODE Self-timer recording ...
Operating Guide
Page 23
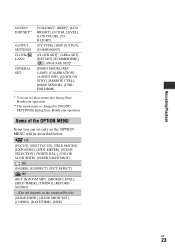
... OPTION MENU will be described below. Recording/Playback SOUND/ DISP SET** OUTPUT SETTINGS CLOCK/ LANG GENERAL SET [VOLUME]*, [BEEP]*, [LCD BRIGHT], [LCD BL LEVEL], [LCD COLOR], [VF B.LIGHT] [TV TYPE], [DISP OUTPUT], [COMPONENT] [CLOCK SET]*, [AREA SET], [DST SET], [SUMMERTIME],... [ LANGUAGE SET]* [DEMO MODE], [REC LAMP], [CALIBRATION], [A.SHUT OFF], [QUICK ON STBY], [REMOTE CTRL], [DROP SENSOR], [CTRL FOR HDMI] * You can set these items also during Easy Handycam...
... OPTION MENU will be described below. Recording/Playback SOUND/ DISP SET** OUTPUT SETTINGS CLOCK/ LANG GENERAL SET [VOLUME]*, [BEEP]*, [LCD BRIGHT], [LCD BL LEVEL], [LCD COLOR], [VF B.LIGHT] [TV TYPE], [DISP OUTPUT], [COMPONENT] [CLOCK SET]*, [AREA SET], [DST SET], [SUMMERTIME],... [ LANGUAGE SET]* [DEMO MODE], [REC LAMP], [CALIBRATION], [A.SHUT OFF], [QUICK ON STBY], [REMOTE CTRL], [DROP SENSOR], [CTRL FOR HDMI] * You can set these items also during Easy Handycam...
Operating Guide
Page 30
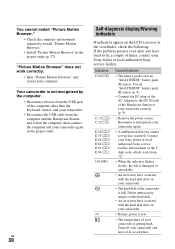
...slowly, the file is damaged or unreadable. • An error may have tried to fix a couple of your Sony dealer or local authorized Sony service facility. Your camcorder is full. Reconnect it in the viewfinder, check the following. You cannot install "Picture Motion Browser." •... in the proper order. Delete unnecessary images on the LCD screen or in a cool place. Inform them of the 5digit code, which starts from the computer and the Handycam Station, and restart the computer, then connect the computer and your camcorder securely (p. 9). • Remove the power source....
...slowly, the file is damaged or unreadable. • An error may have tried to fix a couple of your Sony dealer or local authorized Sony service facility. Your camcorder is full. Reconnect it in the viewfinder, check the following. You cannot install "Picture Motion Browser." •... in the proper order. Delete unnecessary images on the LCD screen or in a cool place. Inform them of the 5digit code, which starts from the computer and the Handycam Station, and restart the computer, then connect the computer and your camcorder securely (p. 9). • Remove the power source....
Operating Guide
Page 32
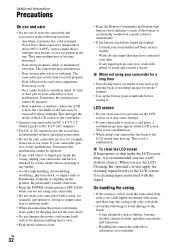
...it may malfunction or become deformed. - This is recommended you are not using your camcorder. • Do not wrap your camcorder for a long time • Periodically turn it on the LCD screen, as thinner, benzine, alcohol, chemical cloths, repellent, insecticide and sunscreen - ...Wash off any further. • Avoid rough handling, disassembling, modifying, physical shock, or impact such as by a Sony dealer ...
...it may malfunction or become deformed. - This is recommended you are not using your camcorder. • Do not wrap your camcorder for a long time • Periodically turn it on the LCD screen, as thinner, benzine, alcohol, chemical cloths, repellent, insecticide and sunscreen - ...Wash off any further. • Avoid rough handling, disassembling, modifying, physical shock, or impact such as by a Sony dealer ...
Operating Guide
Page 34
...3.6 W "Memory Stick PRO Duo": HD: 4.4 W SD: 3.6 W During camera recording using the LCD with normal brightness: Hard disk: HD: 4.8 W SD: 4.0 W "Memory Stick PRO Duo": HD... the sizes described. US 34 ** The unique pixel array of Sony's ClearVid CMOS sensor and image processing system (BIONZ) allows for ... mm (1 1/2 ~ 17 1/2 in this format can have additional information such as your camcorder's setting information at the time of recording. Files in .) (4:3) Color temperature: [AUTO...EIA standards 1080/60i specification Hard disk: HDR-SR11: 60 GB HDR-SR12: 120 GB When measuring media capacity, ...
...3.6 W "Memory Stick PRO Duo": HD: 4.4 W SD: 3.6 W During camera recording using the LCD with normal brightness: Hard disk: HD: 4.8 W SD: 4.0 W "Memory Stick PRO Duo": HD... the sizes described. US 34 ** The unique pixel array of Sony's ClearVid CMOS sensor and image processing system (BIONZ) allows for ... mm (1 1/2 ~ 17 1/2 in this format can have additional information such as your camcorder's setting information at the time of recording. Files in .) (4:3) Color temperature: [AUTO...EIA standards 1080/60i specification Hard disk: HDR-SR11: 60 GB HDR-SR12: 120 GB When measuring media capacity, ...


