Operating Guide
Page 4
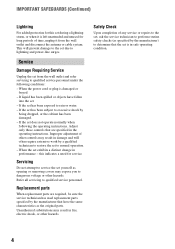
... extensive work by being dropped, or the cabinet has been damaged. - Service Damage Requiring Service Unplug the set . - Adjust only those controls that are required, be sure the service technician has used replacement parts specified by the manufacturer) to lightning and power-line surges. this set is in performance - If liquid has been spilled or objects have the same characteristics as opening or removing...
... extensive work by being dropped, or the cabinet has been damaged. - Service Damage Requiring Service Unplug the set . - Adjust only those controls that are required, be sure the service technician has used replacement parts specified by the manufacturer) to lightning and power-line surges. this set is in performance - If liquid has been spilled or objects have the same characteristics as opening or removing...
Operating Guide
Page 7
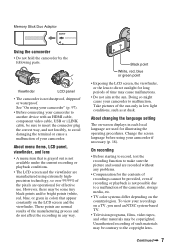
... connecting your recordings on the LCD screen and the viewfinder. Change the screen language before using extremely highprecision technology, so over 99.99% of recordings cannot be some tiny black points and/or bright points (white, red, blue, or green in low light conditions, such as at the sun. Take pictures of your camcorder if necessary (p. 18). To view your camcorder to another device with an HDMI cable, component video cable, USB...
... connecting your recordings on the LCD screen and the viewfinder. Change the screen language before using extremely highprecision technology, so over 99.99% of recordings cannot be some tiny black points and/or bright points (white, red, blue, or green in low light conditions, such as at the sun. Take pictures of your camcorder if necessary (p. 18). To view your camcorder to another device with an HDMI cable, component video cable, USB...
Operating Guide
Page 8
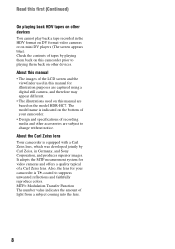
... and faithfully reproduce colors. MTF= Modulation Transfer Function The number value indicates the amount of a Carl Zeiss lens. Read this first (Continued) On playing back HDV tapes on other devices You cannot play back a tape recorded in the HDV format on DV format video cameras or on the model HDR-HC7. Check the contents of tapes by Carl Zeiss, in Germany, and Sony Corporation, and produces superior images. The model name is...
... and faithfully reproduce colors. MTF= Modulation Transfer Function The number value indicates the amount of a Carl Zeiss lens. Read this first (Continued) On playing back HDV tapes on other devices You cannot play back a tape recorded in the HDV format on DV format video cameras or on the model HDR-HC7. Check the contents of tapes by Carl Zeiss, in Germany, and Sony Corporation, and produces superior images. The model name is...

Operating Guide
Page 9
... DV format only IMPORTANT SAFEGUARDS .........3 Read this first 5 Enjoying pictures with high definition quality Trying out the new HDV format! ... 11 Viewing video recorded in the HDV format 12 Getting Started Step 1: Checking supplied items 13 Step 2: Charging the battery pack 14 Step 3: Turning the power on and setting the date and time 17 Step 4: Making setting adjustments before recording 19 Step 5: Inserting a tape or a "Memory Stick Duo 20 Playback 29 Using PB zoom 31 Using the guide functions (USAGE GUIDE...
... DV format only IMPORTANT SAFEGUARDS .........3 Read this first 5 Enjoying pictures with high definition quality Trying out the new HDV format! ... 11 Viewing video recorded in the HDV format 12 Getting Started Step 1: Checking supplied items 13 Step 2: Charging the battery pack 14 Step 3: Turning the power on and setting the date and time 17 Step 4: Making setting adjustments before recording 19 Step 5: Inserting a tape or a "Memory Stick Duo 20 Playback 29 Using PB zoom 31 Using the guide functions (USAGE GUIDE...
Operating Guide
Page 15
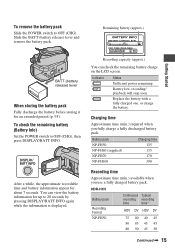
Replace the battery with a fully charged one, or charge the battery. To check the remaining battery (Battery Info) Set the POWER switch to OFF (CHG). Indicator Status Sufficient power remaining Battery low, recording/ playback will stop soon. BATT (battery release) lever When storing the battery pack Fully discharge the battery before storing it for about 7 seconds. HDR-HC5 Battery pack Recording Format NP-FH50 Continuous Typical recording recording time time* HDV DV HDV DV 75 80 40 45 80...
Replace the battery with a fully charged one, or charge the battery. To check the remaining battery (Battery Info) Set the POWER switch to OFF (CHG). Indicator Status Sufficient power remaining Battery low, recording/ playback will stop soon. BATT (battery release) lever When storing the battery pack Fully discharge the battery before storing it for about 7 seconds. HDR-HC5 Battery pack Recording Format NP-FH50 Continuous Typical recording recording time time* HDV DV HDV DV 75 80 40 45 80...

Operating Guide
Page 16
... recording time shows the time when you use a fully charged battery pack. On the battery pack • Before changing the battery pack, slide the POWER switch to the DC IN jack of your camcorder, even when the power cord is disconnected from the battery as long as the AC Adaptor is damaged. - HDR-HC5 Battery pack Recorded Format NP-FH50 NP-FH60 (supplied) NP-FH70 NP-FH100 LCD panel LCD panel opened* closed...
... recording time shows the time when you use a fully charged battery pack. On the battery pack • Before changing the battery pack, slide the POWER switch to the DC IN jack of your camcorder, even when the power cord is disconnected from the battery as long as the AC Adaptor is damaged. - HDR-HC5 Battery pack Recorded Format NP-FH50 NP-FH60 (supplied) NP-FH70 NP-FH100 LCD panel LCD panel opened* closed...
Operating Guide
Page 18
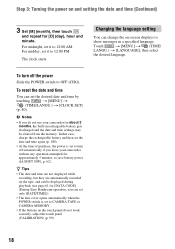
... desired language. For midday, set the desired date and time by touching t [MENU] t (TIME/LANGU.) t [CLOCK SET] (p. 40). To reset the date and time You can set only [DATE/TIME])). • The lens cover opens automatically when the POWER switch is set it to turn off automatically if you do not work correctly, adjust the touch panel (CALIBRATION) (p. 99). 18 b Notes • If you leave your camcorder for [DATA CODE] (During Easy Handycam operation, you can set...
... desired language. For midday, set the desired date and time by touching t [MENU] t (TIME/LANGU.) t [CLOCK SET] (p. 40). To reset the date and time You can set only [DATE/TIME])). • The lens cover opens automatically when the POWER switch is set it to turn off automatically if you do not work correctly, adjust the touch panel (CALIBRATION) (p. 99). 18 b Notes • If you leave your camcorder for [DATA CODE] (During Easy Handycam operation, you can set...
Operating Guide
Page 27
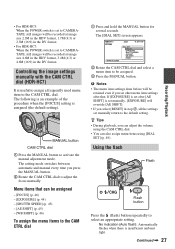
... MANUAL button. The [DIAL SET] screen appears. 6 0 min STBY 0:00:00 [MANUAL]:EXEC DIAL SET FOCUS EXPOSURE SHUTTR SPEED AE SHIFT WB SHIFT RESET 2 Rotate the CAM CTRL dial and select a menu item to the CAM CTRL dial. The following is an example of the procedure when the [FOCUS] setting is insufficient ambient light. • For HDR-HC5: When the POWER switch is set to CAMERATAPE, still images will be recorded at image size...
... MANUAL button. The [DIAL SET] screen appears. 6 0 min STBY 0:00:00 [MANUAL]:EXEC DIAL SET FOCUS EXPOSURE SHUTTR SPEED AE SHIFT WB SHIFT RESET 2 Rotate the CAM CTRL dial and select a menu item to the CAM CTRL dial. The following is an example of the procedure when the [FOCUS] setting is insufficient ambient light. • For HDR-HC5: When the POWER switch is set to CAMERATAPE, still images will be recorded at image size...
Operating Guide
Page 37
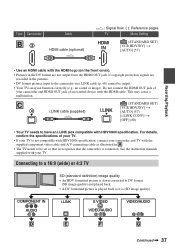
Type Camcorder B3 Cable HDMI cable (optional) : Signal flow, ( ): Reference pages TV Menu Setting HDMI IN (STANDARD SET) [VCR HDV/DV] t [AUTO] (57) Recording/Playback • Use an HDMI cable with the HDMI logo (on the front cover). • Pictures in the DV format are not output from the HDMI OUT jack, if copyright protection signals are recorded in the pictures. • DV format pictures input to DV format (SD image quality) and played back...
Type Camcorder B3 Cable HDMI cable (optional) : Signal flow, ( ): Reference pages TV Menu Setting HDMI IN (STANDARD SET) [VCR HDV/DV] t [AUTO] (57) Recording/Playback • Use an HDMI cable with the HDMI logo (on the front cover). • Pictures in the DV format are not output from the HDMI OUT jack, if copyright protection signals are recorded in the pictures. • DV format pictures input to DV format (SD image quality) and played back...
Operating Guide
Page 42
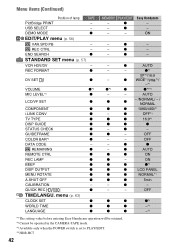
...Handycam operation will be retained. *2 Cannot be operated in the CAMERA-TAPE mode. *3 Available only when the POWER switch is set to PLAY/EDIT. *4 HDR-HC7 42 REC CTRL - PLAY/EDIT z z - ON - z - - AUTO z z - /NORMAL/ - / NORMAL z z 1080i/480i*1 - z - z*1 SP*1/16:9 - z OFF*1 z z 16:9*1 z z z - USB SELECT - REC FORMAT z DV SET z VOLUME z*4 MIC LEVEL*4 z LCD/VF SET z COMPONENT z i.LINK CONV z TV TYPE z DISP GUIDE z STATUS CHECK z GUIDEFRAME z COLOR BAR*4 z DATA CODE - menu (p. 63) CLOCK SET z WORLD TIME z LANGUAGE z MEMORY...
...Handycam operation will be retained. *2 Cannot be operated in the CAMERA-TAPE mode. *3 Available only when the POWER switch is set to PLAY/EDIT. *4 HDR-HC7 42 REC CTRL - PLAY/EDIT z z - ON - z - - AUTO z z - /NORMAL/ - / NORMAL z z 1080i/480i*1 - z - z*1 SP*1/16:9 - z OFF*1 z z 16:9*1 z z z - USB SELECT - REC FORMAT z DV SET z VOLUME z*4 MIC LEVEL*4 z LCD/VF SET z COMPONENT z i.LINK CONV z TV TYPE z DISP GUIDE z STATUS CHECK z GUIDEFRAME z COLOR BAR*4 z DATA CODE - menu (p. 63) CLOCK SET z WORLD TIME z LANGUAGE z MEMORY...
Operating Guide
Page 54
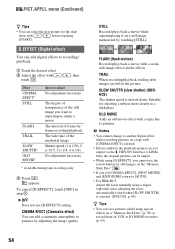
... using special effects on a "Memory Stick Duo" (p. 70) or record them on a tape with a sepia hue to [AUTO]. • For HDR-HC5: Adjust the focus manually using a tripod (optional) since adjusting the focus automatically is hard when [SLOW SHUTTR] is slowed down. Only the original pictures can add a cinematic atmosphere to superimpose under a movie The interval of frame-byframe recording/playback The fade time of the still image you cannot use [D.EFFECT] setting. appears. FLASH (flash motion) Records/plays back a movie...
... using special effects on a "Memory Stick Duo" (p. 70) or record them on a tape with a sepia hue to [AUTO]. • For HDR-HC5: Adjust the focus manually using a tripod (optional) since adjusting the focus automatically is hard when [SLOW SHUTTR] is slowed down. Only the original pictures can add a cinematic atmosphere to superimpose under a movie The interval of frame-byframe recording/playback The fade time of the still image you cannot use [D.EFFECT] setting. appears. FLASH (flash motion) Records/plays back a movie...
Operating Guide
Page 61
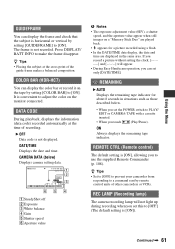
... tape indicator for a picture recorded using a flash. • In the DATE/TIME data display, the date and time are displayed in situations such as those described below ) Displays camera setting data. 6 0 min 1 0 : 0 0 : 0 0 : 0 0 60min 2 GUIDE AUTO 100 AWB F1. 8 9 dB P-MENU 3 6 54 A SteadyShot off B Exposure C White balance D Gain E Shutter speed F Aperture value b Notes • The exposure adjustment value (0EV), a shutter speed, and the aperture value appear when still images on the monitor connected. Press DISPLAY/ BATT INFO to adjust the color on a "Memory...
... tape indicator for a picture recorded using a flash. • In the DATE/TIME data display, the date and time are displayed in situations such as those described below ) Displays camera setting data. 6 0 min 1 0 : 0 0 : 0 0 : 0 0 60min 2 GUIDE AUTO 100 AWB F1. 8 9 dB P-MENU 3 6 54 A SteadyShot off B Exposure C White balance D Gain E Shutter speed F Aperture value b Notes • The exposure adjustment value (0EV), a shutter speed, and the aperture value appear when still images on the monitor connected. Press DISPLAY/ BATT INFO to adjust the color on a "Memory...
Operating Guide
Page 68
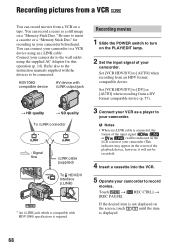
... using an i.LINK cable. Connect your camcorder to insert a cassette or a "Memory Stick Duo" for this operation (p. 14). Set [VCR HDV/DV] to your camcorder beforehand. Touch t [ REC CTRL] t [REC PAUSE]. Recording movies 1 Slide the POWER switch to turn on a "Memory Stick Duo." You can record a scene as a player to [AUTO] when recording from a VCR on the screen of the playback device, however, it will be connected. Recording pictures from a VCR You can record movies from an HDV format compatible device. b Notes • When an i.LINK cable is connected...
... using an i.LINK cable. Connect your camcorder to insert a cassette or a "Memory Stick Duo" for this operation (p. 14). Set [VCR HDV/DV] to your camcorder beforehand. Touch t [ REC CTRL] t [REC PAUSE]. Recording movies 1 Slide the POWER switch to turn on a "Memory Stick Duo." You can record a scene as a player to [AUTO] when recording from a VCR on the screen of the playback device, however, it will be connected. Recording pictures from a VCR You can record movies from an HDV format compatible device. b Notes • When an i.LINK cable is connected...
Operating Guide
Page 77
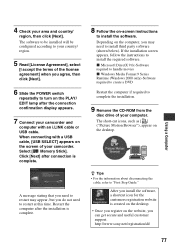
... do not need to turn on the PLAY/ EDIT lamp after connection is complete. Click [Next] after the connection confirmation display appears. 7 Connect your camcorder and computer with a USB cable, [USB SELECT] appears on -screen instructions to complete the installation. 9 Remove the CD-ROM from the disc drive of your country/ region. 5 Read [License Agreement], select [I accept the terms of the license agreement] when you install the software, a shortcut icon...
... do not need to turn on the PLAY/ EDIT lamp after connection is complete. Click [Next] after the connection confirmation display appears. 7 Connect your camcorder and computer with a USB cable, [USB SELECT] appears on -screen instructions to complete the installation. 9 Remove the CD-ROM from the disc drive of your country/ region. 5 Read [License Agreement], select [I accept the terms of the license agreement] when you install the software, a shortcut icon...
Operating Guide
Page 84
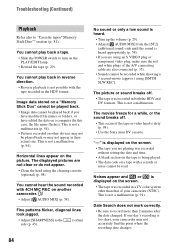
... jagged. • Adjust [SHARPNESS] to "Cassette tapes/"Memory Stick Duo"" section (p. 81). You cannot play back a tape. • Slide the POWER switch to record more than that of the A/V connecting cable are also connected (p. 35). • Sounds cannot be recorded while shooting a 3 second-movie (approx.) using the cleaning cassette (optional) (p. 98). The displayed pictures are playing was recorded without setting the date and time. • A blank section on the tape is being played. • The data code on a tape with a scratch or...
... jagged. • Adjust [SHARPNESS] to "Cassette tapes/"Memory Stick Duo"" section (p. 81). You cannot play back a tape. • Slide the POWER switch to record more than that of the A/V connecting cable are also connected (p. 35). • Sounds cannot be recorded while shooting a 3 second-movie (approx.) using the cleaning cassette (optional) (p. 98). The displayed pictures are playing was recorded without setting the date and time. • A blank section on the tape is being played. • The data code on a tape with a scratch or...
Operating Guide
Page 85
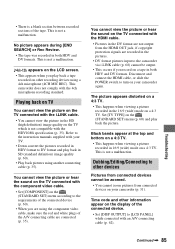
... sound on the TV connected with your camcorder again. Set [TV TYPE] on the (STANDARD SET) menu (p. 60) and play back a tape recorded on a tape in the DV format are not output from the HDMI OUT jack, if copyright protection signals are connected (p. 35). This is not a malfunction. Troubleshooting Continued , 85 Disconnect and connect the HDMI cable, or slide the POWER switch to other recording devices using a 4ch microphone (4CH MIC REC). appears on the LCD screen...
... sound on the TV connected with your camcorder again. Set [TV TYPE] on the (STANDARD SET) menu (p. 60) and play back a tape recorded on a tape in the DV format are not output from the HDMI OUT jack, if copyright protection signals are connected (p. 35). This is not a malfunction. Troubleshooting Continued , 85 Disconnect and connect the HDMI cable, or slide the POWER switch to other recording devices using a 4ch microphone (4CH MIC REC). appears on the LCD screen...
Operating Guide
Page 92
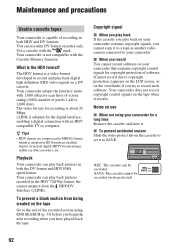
... record and play back pictures recorded in another video camera connected to copyright protection.] appears on the LCD screen, or on use mini DV format cassettes only. Maintenance and precautions Usable cassette tapes Your camcorder is capable of pixels 1,440 × 1,080 dots). Notes on the viewfinder if you record You cannot record software on your camcorder that contains copyright control signals for a long time Remove the cassette and store it records. You can play back digital high definition...
... record and play back pictures recorded in another video camera connected to copyright protection.] appears on the LCD screen, or on use mini DV format cassettes only. Maintenance and precautions Usable cassette tapes Your camcorder is capable of pixels 1,440 × 1,080 dots). Notes on the viewfinder if you record You cannot record software on your camcorder that contains copyright control signals for a long time Remove the cassette and store it records. You can play back digital high definition...
Operating Guide
Page 105
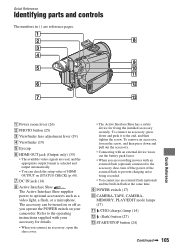
... prevent charging noise being recorded. • You cannot use an external flash (optional) and the built-in ( ) are recording movies with your camcorder. The accessory can check the setup value of the external flash to the end, and then tighten the screw. MEMORY, PLAY/EDIT mode lamps (17) K /CHG (charge) lamp (14) L (flash) button (27) M START/STOP button (24) Continued , 105 Quick Reference qa 6 qs 7 qd A Power zoom lever (26) B PHOTO button (25) C Viewfinder lens adjustment lever...
... prevent charging noise being recorded. • You cannot use an external flash (optional) and the built-in ( ) are recording movies with your camcorder. The accessory can check the setup value of the external flash to the end, and then tighten the screw. MEMORY, PLAY/EDIT mode lamps (17) K /CHG (charge) lamp (14) L (flash) button (27) M START/STOP button (24) Continued , 105 Quick Reference qa 6 qs 7 qd A Power zoom lever (26) B PHOTO button (25) C Viewfinder lens adjustment lever...
Operating Guide
Page 113
... CAMERA COLOR 46 CAMERA DATA 61 CAMERA SET menu ...........43 CANDLE 43 Cassette 20, 92 CD-ROM 74 Charging time 15 Cleaning cassette 98 CLOCK SET 17 CNNECT GUIDE...........32, 35 COLOR BAR 61 COLOR SLOW S (Color Slow Shutter 48, 83, 87 COMPONENT 60 COMPONENT OUT jack 35, 106 Component video cable........ 36 Computer 74 CONV.LENS 49 D DATA CODE 18, 61 Date search 34 DATE/TIME .......... 18, 61, 109 Delete pictures 70 DEMO MODE 56 DIAL SET 49 DIGITAL ZOOM........... 49, 87 DISP GUIDE (Display guide 112 DISP OUTPUT (Display output...
... CAMERA COLOR 46 CAMERA DATA 61 CAMERA SET menu ...........43 CANDLE 43 Cassette 20, 92 CD-ROM 74 Charging time 15 Cleaning cassette 98 CLOCK SET 17 CNNECT GUIDE...........32, 35 COLOR BAR 61 COLOR SLOW S (Color Slow Shutter 48, 83, 87 COMPONENT 60 COMPONENT OUT jack 35, 106 Component video cable........ 36 Computer 74 CONV.LENS 49 D DATA CODE 18, 61 Date search 34 DATE/TIME .......... 18, 61, 109 Delete pictures 70 DEMO MODE 56 DIAL SET 49 DIGITAL ZOOM........... 49, 87 DISP GUIDE (Display guide 112 DISP OUTPUT (Display output...
Operating Guide
Page 114
... color systems 91 TV TYPE 60 U USAGE GUIDE 32 USB jack 106 USB SELECT 56 Using abroad 91 See Personal Menu PORTRAIT (Soft portrait)... 43 Power cord 14 Print 72 Print mark 71 Q QUALITY 50 QUICK REC (Quick recording 62 R REC CTRL (Recording control 68 REC FOLDER (Recording folder 52 REC MODE (Recording mode 58 Rec review 33 Recording 24 Recording time 15 REDEYE REDUC 47 REMAINING 61 Remaining battery........ 15, 109 Remote Commander .......... 108 REMOTE CTRL (Remote control 61 Reversal Playback 56 S S VIDEO...
... color systems 91 TV TYPE 60 U USAGE GUIDE 32 USB jack 106 USB SELECT 56 Using abroad 91 See Personal Menu PORTRAIT (Soft portrait)... 43 Power cord 14 Print 72 Print mark 71 Q QUALITY 50 QUICK REC (Quick recording 62 R REC CTRL (Recording control 68 REC FOLDER (Recording folder 52 REC MODE (Recording mode 58 Rec review 33 Recording 24 Recording time 15 REDEYE REDUC 47 REMAINING 61 Remaining battery........ 15, 109 Remote Commander .......... 108 REMOTE CTRL (Remote control 61 Reversal Playback 56 S S VIDEO...


