Operating Guide (Large File - 11.29 MB)
Page 10
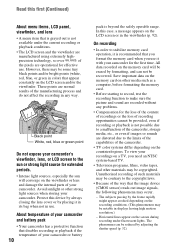
..., LCD panel, viewfinder, and lens • A menu item that you format the memory card when you need an NTSC system-based TV. • Television programs, films, video tapes, and other materials may be provided, even if recording or playback is beyond the safely operable range. Protect this case, a message appears on a TV, you use . Save important data on the memory card on other strong light sources when storing your recordings on the LCD screen...
..., LCD panel, viewfinder, and lens • A menu item that you format the memory card when you need an NTSC system-based TV. • Television programs, films, video tapes, and other materials may be provided, even if recording or playback is beyond the safely operable range. Protect this case, a message appears on a TV, you use . Save important data on the memory card on other strong light sources when storing your recordings on the LCD screen...
Operating Guide (Large File - 11.29 MB)
Page 11
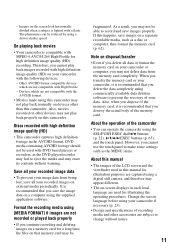
... you delete the data completely using a slower shutter speed. Note on -screen displays in each local language are used with the AVCHD format • Movies made using [MEDIA FORMAT] if images are not compatible with the following devices; - However, you delete all your camcorder if necessary (p. 23). • Design and specifications of your camcorder, it is compatible with MPEG-4 AVC/H.264 High Profile for illustration purposes are captured using your recorded images on a separate recordable media, such as the MENU...
... you delete the data completely using a slower shutter speed. Note on -screen displays in each local language are used with the AVCHD format • Movies made using [MEDIA FORMAT] if images are not compatible with the following devices; - However, you delete all your camcorder if necessary (p. 23). • Design and specifications of your camcorder, it is compatible with MPEG-4 AVC/H.264 High Profile for illustration purposes are captured using your recorded images on a separate recordable media, such as the MENU...
Operating Guide (Large File - 11.29 MB)
Page 12
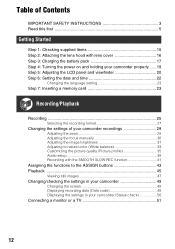
...a memory card 23 Recording/Playback Recording 25 Selecting the recording format 27 Changing the settings of your camcorder recordings 29 Adjusting the zoom 29 Adjusting the focus manually 30 Adjusting the image brightness 31 Adjusting to natural color (White balance 33 Customizing the picture quality (Picture profile 35 Audio setup 39 Recording with the SMOOTH SLOW REC function 41 Assigning the functions to the ASSIGN buttons 43 Playback 45 Viewing still images 47 Changing/checking the settings in your camcorder 49 Changing the screen 49 Displaying recording data (Data code 49...
...a memory card 23 Recording/Playback Recording 25 Selecting the recording format 27 Changing the settings of your camcorder recordings 29 Adjusting the zoom 29 Adjusting the focus manually 30 Adjusting the image brightness 31 Adjusting to natural color (White balance 33 Customizing the picture quality (Picture profile 35 Audio setup 39 Recording with the SMOOTH SLOW REC function 41 Assigning the functions to the ASSIGN buttons 43 Playback 45 Viewing still images 47 Changing/checking the settings in your camcorder 49 Changing the screen 49 Displaying recording data (Data code 49...

Operating Guide (Large File - 11.29 MB)
Page 13
... 58 Playing the Playlist 58 Capturing still images from a movie 59 Dividing a movie 60 Deleting movies and still images 61 Formatting the memory card 62 Preventing data on the memory card from being recovered 63 Repairing the image database file 64 Using the Menu Operating the menu 65 Menu items 67 (CAMERA SET) menu 69 Settings to adjust your camcorder to the recording conditions (GAIN SET/ BACK LIGHT/STEADYSHOT, etc.) (REC/OUT SET) menu 73 Recording settings, input and output settings (REC FORMAT/VIDEO OUT, etc.) (AUDIO SET) menu 75 Settings for the audio recording (AUDIO LIMIT...
... 58 Playing the Playlist 58 Capturing still images from a movie 59 Dividing a movie 60 Deleting movies and still images 61 Formatting the memory card 62 Preventing data on the memory card from being recovered 63 Repairing the image database file 64 Using the Menu Operating the menu 65 Menu items 67 (CAMERA SET) menu 69 Settings to adjust your camcorder to the recording conditions (GAIN SET/ BACK LIGHT/STEADYSHOT, etc.) (REC/OUT SET) menu 73 Recording settings, input and output settings (REC FORMAT/VIDEO OUT, etc.) (AUDIO SET) menu 75 Settings for the audio recording (AUDIO LIMIT...
Operating Guide (Large File - 11.29 MB)
Page 25
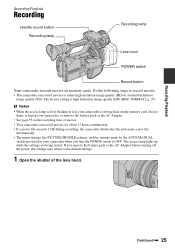
... image quality (HD) ([REC FORMAT], p. 27). The factory setting is writing data on the memory card. If you turn the POWER switch to OFF. Recording/Playback Continued , 25 Do not shake or knock your camcorder, or remove the battery pack or the AC Adaptor. • See page 95 on memory cards. Do the following steps to the default settings. 1 Open the shutter of movies. • Your camcorder can record movies in red, your camcorder when you remove the battery...
... image quality (HD) ([REC FORMAT], p. 27). The factory setting is writing data on the memory card. If you turn the POWER switch to OFF. Recording/Playback Continued , 25 Do not shake or knock your camcorder, or remove the battery pack or the AC Adaptor. • See page 95 on memory cards. Do the following steps to the default settings. 1 Open the shutter of movies. • Your camcorder can record movies in red, your camcorder when you remove the battery...
Operating Guide (Large File - 11.29 MB)
Page 27
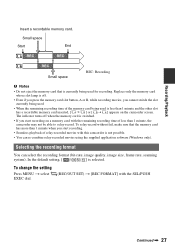
... In the default setting, [ ] is switched. • If you start recording on the camcorder screen. To relay-record without fail, make sure that is not possible. • You can select the recording format (bit-rate, image quality, image size, frame rate, scanning system). To change the setting Press MENU t select EXEC dial. (REC/OUT SET) t [REC FORMAT] with this camcorder is currently being used for recording. Replace only the memory card whose slot lamp...
... In the default setting, [ ] is switched. • If you start recording on the camcorder screen. To relay-record without fail, make sure that is not possible. • You can select the recording format (bit-rate, image quality, image size, frame rate, scanning system). To change the setting Press MENU t select EXEC dial. (REC/OUT SET) t [REC FORMAT] with this camcorder is currently being used for recording. Replace only the memory card whose slot lamp...
Operating Guide (Large File - 11.29 MB)
Page 32
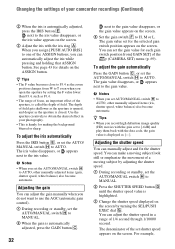
...; When you set AUTO/MANUAL switch H to use the AGC (automatic gain control). 1 During recording or standby, set for making the background blurred or sharp. You can set shutter speed appears on the screen. 3 Adjust the iris with the data code, the gain value is automatically adjusted, press the IRIS button E. Adjusting the gain You can adjust the gain manually when you do not want to AUTO, other manually adjusted items (gain, shutter speed, white balance) also...
...; When you set AUTO/MANUAL switch H to use the AGC (automatic gain control). 1 During recording or standby, set for making the background blurred or sharp. You can set shutter speed appears on the screen. 3 Adjust the iris with the data code, the gain value is automatically adjusted, press the IRIS button E. Adjusting the gain You can adjust the gain manually when you do not want to AUTO, other manually adjusted items (gain, shutter speed, white balance) also...
Operating Guide (Large File - 11.29 MB)
Page 33
... mercury lamps, the picture may flicker or change the ND filters B during the iris automatic adjustment, set correctly. Adjusting to natural color (White balance) You can record the subject clearly by adjusting the shutter speed. Adjusting the volume of light (ND filter) You can adjust and fix the white balance according to the shutter speed value. You may be adjusted with the frame rate of Continued , 33 Recording/Playback The shutter speed value disappears, or appears...
... mercury lamps, the picture may flicker or change the ND filters B during the iris automatic adjustment, set correctly. Adjusting to natural color (White balance) You can record the subject clearly by adjusting the shutter speed. Adjusting the volume of light (ND filter) You can adjust and fix the white balance according to the shutter speed value. You may be adjusted with the frame rate of Continued , 33 Recording/Playback The shutter speed value disappears, or appears...
Operating Guide (Large File - 11.29 MB)
Page 34
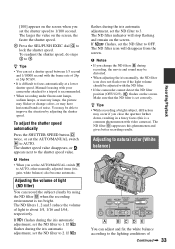
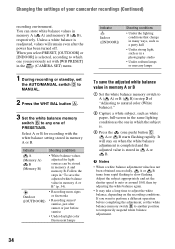
... color (White balance)." 2 Capture a white subject, such as white paper, full-screen in the same lighting condition as the one in which the subject is selected, according to which one you previously set with the white balance setting stored in memory A and memory B. Indicator Shooting conditions A (Memory A) B (Memory B) • White balance values adjusted for recording with [WB PRESET] in the (CAMERA SET) menu. 1 During recording or standby, set the AUTO/MANUAL switch D to MANUAL. 2 Press the WHT BAL button A. 3 Set the white balance memory switch B to slow flashing...
... color (White balance)." 2 Capture a white subject, such as white paper, full-screen in the same lighting condition as the one in which the subject is selected, according to which one you previously set with the white balance setting stored in memory A and memory B. Indicator Shooting conditions A (Memory A) B (Memory B) • White balance values adjusted for recording with [WB PRESET] in the (CAMERA SET) menu. 1 During recording or standby, set the AUTO/MANUAL switch D to MANUAL. 2 Press the WHT BAL button A. 3 Set the white balance memory switch B to slow flashing...

Operating Guide (Large File - 11.29 MB)
Page 40
... the screen. 2 Turn the AUDIO LEVEL dial F to adjust the volume during recording to connecting the device. When you disconnect the device, set the INPUT1/INPUT2 switch to MIC first, then disconnect it with the CH1 (AUDIO LEVEL) dial and the CH1 (AUTO/ MAN) switch. ** You can adjust the volume of an internal microphone or a microphone connected to MAN. appears on the CH1 (INT MIC/INPUT1) and the CH2 (INT MIC/INPUT1/INPUT2) switches. 1 Set the AUTO/MAN...
... the screen. 2 Turn the AUDIO LEVEL dial F to adjust the volume during recording to connecting the device. When you disconnect the device, set the INPUT1/INPUT2 switch to MIC first, then disconnect it with the CH1 (AUDIO LEVEL) dial and the CH1 (AUTO/ MAN) switch. ** You can adjust the volume of an internal microphone or a microphone connected to MAN. appears on the CH1 (INT MIC/INPUT1) and the CH2 (INT MIC/INPUT1/INPUT2) switches. 1 Set the AUTO/MAN...

Operating Guide (Large File - 11.29 MB)
Page 53
... example, no sound or image). • Do not connect the HDMI OUT jack of your camcorder and HDMI OUT jack of the external device with "BRAVIA" sync. Recording/Playback Continued , 53 Type Camcorder Cable HDMI cable (sold separately) TV HDMI IN : Signal flow Menu Setting (REC/OUT SET) menu t [VIDEO OUT] t [HDMI OUTPUT] t [AUTO] (default) (p. 74) b Notes • Use an HDMI cable with the HDMI logo. • Images are not output from the HDMI...
... example, no sound or image). • Do not connect the HDMI OUT jack of your camcorder and HDMI OUT jack of the external device with "BRAVIA" sync. Recording/Playback Continued , 53 Type Camcorder Cable HDMI cable (sold separately) TV HDMI IN : Signal flow Menu Setting (REC/OUT SET) menu t [VIDEO OUT] t [HDMI OUTPUT] t [AUTO] (default) (p. 74) b Notes • Use an HDMI cable with the HDMI logo. • Images are not output from the HDMI...
Operating Guide (Large File - 11.29 MB)
Page 71
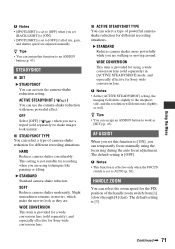
... powerful effect. z Tips • You can select the zoom speed for the FIX position of camera-shake reduction for different recording situations. Using the Menu b Notes • [SPOTLIGHT] is set to [OFF] when you set [BACK LIGHT] to [ON]. • [SPOTLIGHT] is set to [OFF] if all of iris, gain, and shutter speed are . HARD Reduces camera shakes considerably. HANDLE ZOOM You can assign an ASSIGN button to work...
... powerful effect. z Tips • You can select the zoom speed for the FIX position of camera-shake reduction for different recording situations. Using the Menu b Notes • [SPOTLIGHT] is set to [OFF] when you set [BACK LIGHT] to [ON]. • [SPOTLIGHT] is set to [OFF] if all of iris, gain, and shutter speed are . HARD Reduces camera shakes considerably. HANDLE ZOOM You can assign an ASSIGN button to work...
Operating Guide (Large File - 11.29 MB)
Page 85
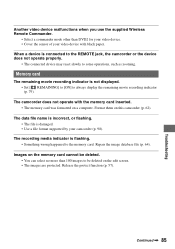
... protect function (p. 57). The recording media indicator is damaged. • Use a file format supported by your video device with the memory card inserted. • The memory card was formatted on the edit screen. • The images are protected. Continued , 85 Memory card The remaining movie recording indicator is connected to the REMOTE jack, the camcorder or the device does not operate properly. • The connected device may react slowly to always display the remaining movie recording indicator (p. 79). Troubleshooting Another video device malfunctions...
... protect function (p. 57). The recording media indicator is damaged. • Use a file format supported by your video device with the memory card inserted. • The memory card was formatted on the edit screen. • The images are protected. Continued , 85 Memory card The remaining movie recording indicator is connected to the REMOTE jack, the camcorder or the device does not operate properly. • The connected device may react slowly to always display the remaining movie recording indicator (p. 79). Troubleshooting Another video device malfunctions...

Operating Guide (Large File - 11.29 MB)
Page 86
... setting changes. • Some menu items return to the default setting when the power is turned off (p. 67). • The LCD backlight setting and the EXPANDED FOCUS setting are not stored. • You disconnected the power sources when the POWER switch was stopped. • Your camcorder is recording the scene you have just shot on the condition of your camcorder. Replace the memory card with new one, delete unnecessary images (p. 61) or format...
... setting changes. • Some menu items return to the default setting when the power is turned off (p. 67). • The LCD backlight setting and the EXPANDED FOCUS setting are not stored. • You disconnected the power sources when the POWER switch was stopped. • Your camcorder is recording the scene you have just shot on the condition of your camcorder. Replace the memory card with new one, delete unnecessary images (p. 61) or format...
Operating Guide (Large File - 11.29 MB)
Page 97
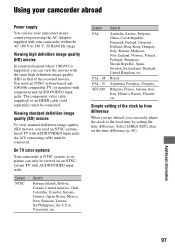
... easily adjust the clock to 240 V, 50 Hz/60 Hz range. Viewing high definition image quality (HD) movies In countries/regions where 1080/60i is NTSC system, so its picture can only be viewed on an NTSCsystem TV with your camcorder in any country/region using the AC Adaptor supplied with AUDIO/VIDEO input jacks. Simple setting of the recorded movies. An A/V connecting cable must be connected. N SECAM Used...
... easily adjust the clock to 240 V, 50 Hz/60 Hz range. Viewing high definition image quality (HD) movies In countries/regions where 1080/60i is NTSC system, so its picture can only be viewed on an NTSCsystem TV with your camcorder in any country/region using the AC Adaptor supplied with AUDIO/VIDEO input jacks. Simple setting of the recorded movies. An A/V connecting cable must be connected. N SECAM Used...
Operating Guide (Large File - 11.29 MB)
Page 99
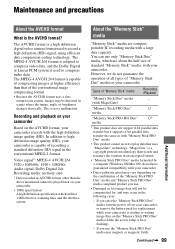
... AVCHD format, your camcorder. This is a high definition digital video camera format used to compress audio data. Recording and playback on your camcorder Based on the "Memory Stick PRO Duo" media (while the access lamp is capable of compressing images at higher efficiency than the above mentioned cannot be compensated for replacement while your camcorder. • 1080i specification A high definition specification which are compact, portable IC recording media with "Memory Stick PRO Duo" media. • This product cannot record or play data...
... AVCHD format, your camcorder. This is a high definition digital video camera format used to compress audio data. Recording and playback on your camcorder Based on the "Memory Stick PRO Duo" media (while the access lamp is capable of compressing images at higher efficiency than the above mentioned cannot be compensated for replacement while your camcorder. • 1080i specification A high definition specification which are compact, portable IC recording media with "Memory Stick PRO Duo" media. • This product cannot record or play data...
Operating Guide (Large File - 11.29 MB)
Page 115
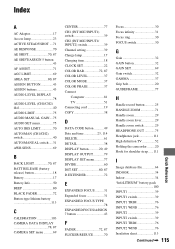
... BLACK FADER 72 Button-type lithium battery 113 C CALIBRATION 103 CAMERA DATA DISPLAY 78, 87 CAMERA SET menu ...........69 CENTER 77 CH1 (INT MIC/INPUT1) switch 39 CH2 (INT MIC/INPUT1/ INPUT2) switch 39 Channel setting 39 Charge lamp 17 Charging time 18 CLOCK SET 22 COLOR BAR 72, 87 COLOR LEVEL 37 COLOR MODE 37 COLOR PHASE 37 Connect Computer 81 TV 51 Connecting cord 19 COPY 38 D DATA CODE button 49 Date and time 23, 114 DELETE 61 DETAIL 38 DISPLAY button 20, 49 DISPLAY OUTPUT 79 DISPLAY SET menu...
... BLACK FADER 72 Button-type lithium battery 113 C CALIBRATION 103 CAMERA DATA DISPLAY 78, 87 CAMERA SET menu ...........69 CENTER 77 CH1 (INT MIC/INPUT1) switch 39 CH2 (INT MIC/INPUT1/ INPUT2) switch 39 Channel setting 39 Charge lamp 17 Charging time 18 CLOCK SET 22 COLOR BAR 72, 87 COLOR LEVEL 37 COLOR MODE 37 COLOR PHASE 37 Connect Computer 81 TV 51 Connecting cord 19 COPY 38 D DATA CODE button 49 Date and time 23, 114 DELETE 61 DETAIL 38 DISPLAY button 20, 49 DISPLAY OUTPUT 79 DISPLAY SET menu...
Operating Guide (Large File - 11.29 MB)
Page 116
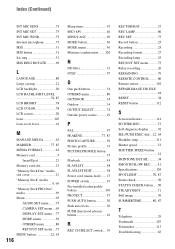
... PICTURE PROFILE button 35 Playback 45 PLAYLIST 58 PLAYLIST EDIT 58 Power cord (mains lead) ...... 17 POWER switch 19 Pre-installed rechargeable battery 103 PROTECT 57 PUSH AUTO button 30 Push auto focus 30 PUSH (lens hood release) button 16 R REC CH SELECT switch .... 39 REC FORMAT 27 REC LAMP 80 REC SET 73 Record button 25 Recording 25 Recording format 27 Recording lamp 25 REC/OUT SET menu...........73 Relay recording 26 REMAINING 79 REMOTE CONTROL.......... 80 Remote sensor 110 REPAIR IMAGE DB FILE 64 RESET 38 RESET button 112 S Screen...
... PICTURE PROFILE button 35 Playback 45 PLAYLIST 58 PLAYLIST EDIT 58 Power cord (mains lead) ...... 17 POWER switch 19 Pre-installed rechargeable battery 103 PROTECT 57 PUSH AUTO button 30 Push auto focus 30 PUSH (lens hood release) button 16 R REC CH SELECT switch .... 39 REC FORMAT 27 REC LAMP 80 REC SET 73 Record button 25 Recording 25 Recording format 27 Recording lamp 25 REC/OUT SET menu...........73 Relay recording 26 REMAINING 79 REMOTE CONTROL.......... 80 Remote sensor 110 REPAIR IMAGE DB FILE 64 RESET 38 RESET button 112 S Screen...
Marketing Specifications
Page 1
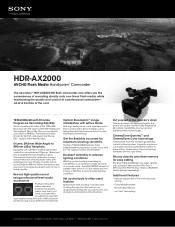
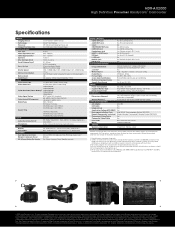
... your external microphones. than a shaky video. And that's just what you'll get when you need for AVCHD, and enjoy near Blu-ray Disc™ quality video reproduction. HDR-AX2000 AVCHD Flash Media Handycam® Camcorder The new Sony® HDR-AX2000 HD flash camcorder now offers you use most to 24p Progressive Recording capabilities plus two groundbreaking video technologies. Optical Steadyshot™ image stabilization with Active Mode Nothing's more time shooting-and less time...
... your external microphones. than a shaky video. And that's just what you'll get when you need for AVCHD, and enjoy near Blu-ray Disc™ quality video reproduction. HDR-AX2000 AVCHD Flash Media Handycam® Camcorder The new Sony® HDR-AX2000 HD flash camcorder now offers you use most to 24p Progressive Recording capabilities plus two groundbreaking video technologies. Optical Steadyshot™ image stabilization with Active Mode Nothing's more time shooting-and less time...
Marketing Specifications
Page 2
...) Yes (mini B / Hi-Speed) No Yes (Stereo-minijack Ø 2.5 mm) Yes CONVENIENCE FEATURES Image Stabilization x.v.Color™ White Balance Fader Effects Picture Profile Scene Selection Mode(s) Multiple Language Display Smooth Slow Record Optical SteadyShot™ image stabilization (SteadyShot, Active SteadyShot*, OFF) Yes Auto / outdoor / indoor / One-push (A/B) OFF, Black, White Yes (PP1 - All screen images are trademarks of their respective owners. Sony, the Sony logo, Handycam, the Handycam logo, Memory Stick, Memory Stick PRO Duo, Memory Stick PRO-HG, Memory Stick Duo...
...) Yes (mini B / Hi-Speed) No Yes (Stereo-minijack Ø 2.5 mm) Yes CONVENIENCE FEATURES Image Stabilization x.v.Color™ White Balance Fader Effects Picture Profile Scene Selection Mode(s) Multiple Language Display Smooth Slow Record Optical SteadyShot™ image stabilization (SteadyShot, Active SteadyShot*, OFF) Yes Auto / outdoor / indoor / One-push (A/B) OFF, Black, White Yes (PP1 - All screen images are trademarks of their respective owners. Sony, the Sony logo, Handycam, the Handycam logo, Memory Stick, Memory Stick PRO Duo, Memory Stick PRO-HG, Memory Stick Duo...


