Handbook
Page 1
Table of contents Operation Search Settings Search Index Handbook Digital HD Video Camera Recorder HDR-AS15/AS10 © 2012 Sony Corporation US 4-432-600-12(1)
Table of contents Operation Search Settings Search Index Handbook Digital HD Video Camera Recorder HDR-AS15/AS10 © 2012 Sony Corporation US 4-432-600-12(1)

Handbook
Page 2
.... Search for information by operation. Search for information in this handbook Click on a button on the right to jump to the correct operation of the camera.
.... Search for information by operation. Search for information in this handbook Click on a button on the right to jump to the correct operation of the camera.
Handbook
Page 3
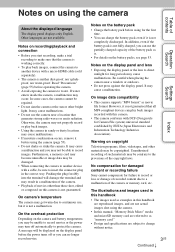
..., edited or composed on this camera is not a malfunction. In some cases, the camera cannot be displayed on the display panel before using the camera (page 55). • Do not shake or strike the camera. No compensation for damaged content or recording failure Sony cannot compensate for the first time.... • You can no longer record movies. Other languages are not available. Notes on using the camera. • In this manual, "Memory Stick ...
..., edited or composed on this camera is not a malfunction. In some cases, the camera cannot be displayed on the display panel before using the camera (page 55). • Do not shake or strike the camera. No compensation for damaged content or recording failure Sony cannot compensate for the first time.... • You can no longer record movies. Other languages are not available. Notes on using the camera. • In this manual, "Memory Stick ...

Handbook
Page 4
...Sony makes no guarantees whatsoever in Germany. 4US The lens for HD (high definition) image quality recording. Therefore, you cannot play back properly on the camera with the devices which is important to conform with WiFi specifications set security when using this camera. On wireless network function • Only the HDR-AS15... is compatible with HD (high definition) image quality on this camera may not play back images recorded with MPEG-4 AVC/ H.264 Main Profile for the camera has been produced...
...Sony makes no guarantees whatsoever in Germany. 4US The lens for HD (high definition) image quality recording. Therefore, you cannot play back properly on the camera with the devices which is important to conform with WiFi specifications set security when using this camera. On wireless network function • Only the HDR-AS15... is compatible with HD (high definition) image quality on this camera may not play back images recorded with MPEG-4 AVC/ H.264 Main Profile for the camera has been produced...

Handbook
Page 5
Waterproof Head Mount Kit & Waterproof Case Adhesive Mount & Waterproof Case Headband Mount 5US Continued r Table of contents Operation Search Settings Search Index How to enjoy the camera Enjoy more using the accessories Movies are recorded at a maximum of 1920×1080 30p full high definition.
Waterproof Head Mount Kit & Waterproof Case Adhesive Mount & Waterproof Case Headband Mount 5US Continued r Table of contents Operation Search Settings Search Index How to enjoy the camera Enjoy more using the accessories Movies are recorded at a maximum of 1920×1080 30p full high definition.

Handbook
Page 6
Table of contents Operation Search Settings Search Index Share your life Upload captured moments You can directly upload images and share them by using the wireless network function of this camera (page 39). Connect to TV Connect the camera to a TV with a micro HDMI cable (sold separately), and enjoy images on the big screen (page 38). 6US
Table of contents Operation Search Settings Search Index Share your life Upload captured moments You can directly upload images and share them by using the wireless network function of this camera (page 39). Connect to TV Connect the camera to a TV with a micro HDMI cable (sold separately), and enjoy images on the big screen (page 38). 6US
Handbook
Page 7
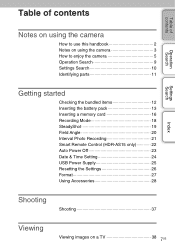
... of contents Table of contents Operation Search Settings Search Index Notes on using the camera How to use this handbook 2 Notes on using the camera 3 How to enjoy the camera 5 Operation Search 9 Settings Search 10 Identifying parts 11 Getting started Checking the bundled... items 12 Inserting the battery pack 13 Inserting a memory card 16 Recording Mode 18 SteadyShot 19 Field Angle 20 Interval Photo Recording 21 Smart Remote Control (HDR-AS15...
... of contents Table of contents Operation Search Settings Search Index Notes on using the camera How to use this handbook 2 Notes on using the camera 3 How to enjoy the camera 5 Operation Search 9 Settings Search 10 Identifying parts 11 Getting started Checking the bundled... items 12 Inserting the battery pack 13 Inserting a memory card 16 Recording Mode 18 SteadyShot 19 Field Angle 20 Interval Photo Recording 21 Smart Remote Control (HDR-AS15...
Handbook
Page 8
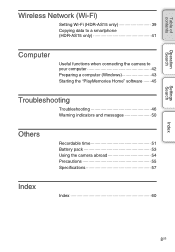
Table of contents Operation Search Settings Search Wireless Network (Wi-Fi) Setting Wi-Fi (HDR-AS15 only 39 Copying data to a smartphone (HDR-AS15 only 41 Computer Useful functions when connecting the camera to your computer 42 Preparing a computer (Windows 43 Starting the "PlayMemories Home" software 45 Troubleshooting Troubleshooting 46 Warning indicators and messages 50 Others Recordable time 51 Battery pack 53 Using the camera abroad 54 Precautions 55 Specifications 57 Index Index 60 Index 8US
Table of contents Operation Search Settings Search Wireless Network (Wi-Fi) Setting Wi-Fi (HDR-AS15 only 39 Copying data to a smartphone (HDR-AS15 only 41 Computer Useful functions when connecting the camera to your computer 42 Preparing a computer (Windows 43 Starting the "PlayMemories Home" software 45 Troubleshooting Troubleshooting 46 Warning indicators and messages 50 Others Recordable time 51 Battery pack 53 Using the camera abroad 54 Precautions 55 Specifications 57 Index Index 60 Index 8US
Handbook
Page 10
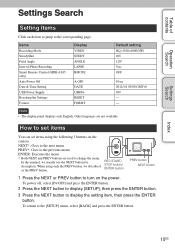
How to turn on the camera. REC START/ STOP button/ ENTER button PREV button NEXT button 1 Press the NEXT or PREV button to set items You can set items using only ... it as the PREV button. When using the following 3 buttons on the power. Items Recording Mode SteadyShot Field Angle Interval Photo Recording Smart Remote Control (HDR-AS15 only) Auto Power Off Date & Time Setting USB Power Supply Resetting the Settings Format Display VIDEO STEDY ANGLE LAPSE RMOTE A.OFF DATE USBPw RESET FORMT...
How to turn on the camera. REC START/ STOP button/ ENTER button PREV button NEXT button 1 Press the NEXT or PREV button to set items You can set items using only ... it as the PREV button. When using the following 3 buttons on the power. Items Recording Mode SteadyShot Field Angle Interval Photo Recording Smart Remote Control (HDR-AS15 only) Auto Power Off Date & Time Setting USB Power Supply Resetting the Settings Format Display VIDEO STEDY ANGLE LAPSE RMOTE A.OFF DATE USBPw RESET FORMT...

Handbook
Page 12
... the bundled items Make sure that you have following bundled items. The number in parentheses indicates the quantity of that item bundled. • Camera (1) • Micro USB cable (1) • Rechargeable battery pack (NP-BX1) (1) • Battery tray, type X (only for NP-BX1) (1) Attached ...to the camera. • Battery tray, type G (only for NP-BG1/FG1) (1) • Waterproof Case (SPK-AS1) (1) • Adhesive Mount (VCT-AM1) Attachment Buckle (1) Flat Adhesive...
... the bundled items Make sure that you have following bundled items. The number in parentheses indicates the quantity of that item bundled. • Camera (1) • Micro USB cable (1) • Rechargeable battery pack (NP-BX1) (1) • Battery tray, type X (only for NP-BX1) (1) Attached ...to the camera. • Battery tray, type G (only for NP-BG1/FG1) (1) • Waterproof Case (SPK-AS1) (1) • Adhesive Mount (VCT-AM1) Attachment Buckle (1) Flat Adhesive...
Handbook
Page 13
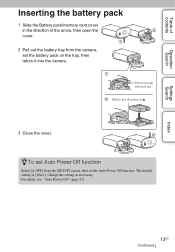
zTo set Auto Power Off function Select [A.OFF] from the camera, set the Auto Power Off function. The default setting is [10sec]. Change the setting as necessary. Table of contents Operation Search Settings Search Index Inserting ... open the cover. 2 Pull out the battery tray from the [SETUP] screen, then set the battery pack on the tray, then return it into the camera. For detail, see "Auto Power Off" (page 23). 13US Continued r Pinch the tab and pull out.
zTo set Auto Power Off function Select [A.OFF] from the camera, set the Auto Power Off function. The default setting is [10sec]. Change the setting as necessary. Table of contents Operation Search Settings Search Index Inserting ... open the cover. 2 Pull out the battery tray from the [SETUP] screen, then set the battery pack on the tray, then return it into the camera. For detail, see "Auto Power Off" (page 23). 13US Continued r Pinch the tab and pull out.
Handbook
Page 14
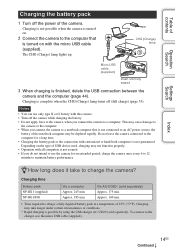
... the USB charger AC-UD20 (sold separately) Approx. 175 min. Do not leave the camera connected to the computer for an extended period, charge the camera once every 6 to 12 months to charge the camera? zHow long does it take longer under certain circumstances or conditions. * Rapid charging is... not guaranteed. Depending on the type of the camera. Charging time Battery pack NP-BX1 (supplied) NP-BG1/FG1 Via a computer Approx. 245 min. Via AC-UD20* (sold separately). Approx. 140 min....
... the USB charger AC-UD20 (sold separately) Approx. 175 min. Do not leave the camera connected to the computer for an extended period, charge the camera once every 6 to 12 months to charge the camera? zHow long does it take longer under certain circumstances or conditions. * Rapid charging is... not guaranteed. Depending on the type of the camera. Charging time Battery pack NP-BX1 (supplied) NP-BG1/FG1 Via a computer Approx. 245 min. Via AC-UD20* (sold separately). Approx. 140 min....
Handbook
Page 16
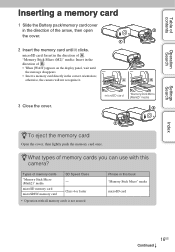
... card cover in the direction of B. • When [WAIT] appears on the display panel, wait until it . A B 3 Close the cover. microSD card: Insert in this camera? Phrase in the direction of memory cards "Memory Stick Micro (Mark2)" media microSD memory card microSDHC memory card SD Speed Class - microSD card "Memory Stick... Micro (Mark2)" media zTo eject the memory card Open the cover, then lightly push the memory card once. Types of A. otherwise, the camera will not recognize it clicks.
... card cover in the direction of B. • When [WAIT] appears on the display panel, wait until it . A B 3 Close the cover. microSD card: Insert in this camera? Phrase in the direction of memory cards "Memory Stick Micro (Mark2)" media microSD memory card microSDHC memory card SD Speed Class - microSD card "Memory Stick... Micro (Mark2)" media zTo eject the memory card Open the cover, then lightly push the memory card once. Types of A. otherwise, the camera will not recognize it clicks.
Handbook
Page 17
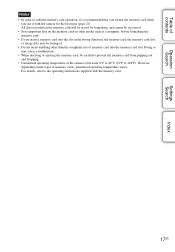
However, depending on other than the compliant size of the camera is recommended that you format the memory card when you insert a memory card into the slot in the wrong direction, the memory card, the memory ..., before formatting the memory card. • If you use it is between 0°C to 40°C (32°F to the operating instructions supplied with the camera for the first time (page 27). For details, refer to 104°F). All data recorded on the memory card will be erased by formatting, and...
However, depending on other than the compliant size of the camera is recommended that you format the memory card when you insert a memory card into the slot in the wrong direction, the memory card, the memory ..., before formatting the memory card. • If you use it is between 0°C to 40°C (32°F to the operating instructions supplied with the camera for the first time (page 27). For details, refer to 104°F). All data recorded on the memory card will be erased by formatting, and...
Handbook
Page 18
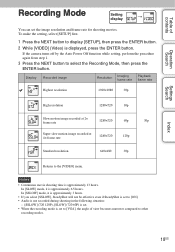
If the camera turns off by the Auto Power Off function while setting, perform the procedure again from step 1. 3 Press the NEXT button to the [VIDEO] menu. In [...
If the camera turns off by the Auto Power Off function while setting, perform the procedure again from step 1. 3 Press the NEXT button to the [VIDEO] menu. In [...
Handbook
Page 19
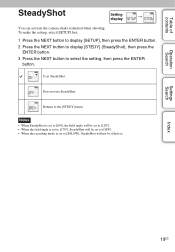
... to select the setting, then press the ENTER button. Settings Search Index 19US Table of contents Operation Search SteadyShot Setting display t You can activate the camera-shake reduction when shooting. Uses SteadyShot.
... to select the setting, then press the ENTER button. Settings Search Index 19US Table of contents Operation Search SteadyShot Setting display t You can activate the camera-shake reduction when shooting. Uses SteadyShot.
Handbook
Page 21
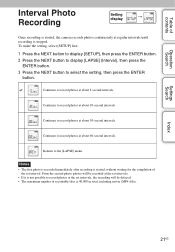
..., the recording will be delayed. • The maximum number of contents Operation Search Settings Search Interval Photo Recording Setting display t Once recording is started, the camera records photos continuously at about 5-second intervals. Index 21US Table of recordable files is 40,000 in total, including movie (MP4) files.
..., the recording will be delayed. • The maximum number of contents Operation Search Settings Search Interval Photo Recording Setting display t Once recording is started, the camera records photos continuously at about 5-second intervals. Index 21US Table of recordable files is 40,000 in total, including movie (MP4) files.
Handbook
Page 22
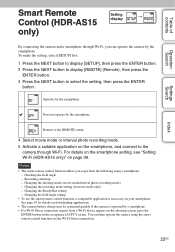
...on the smartphone setting, see "Setting Wi-Fi (HDR-AS15 only)" on your smartphone. Checking the field angle - See page 39 for details on downloading applications. • The camera battery charge may be consumed quickly if the camera is necessary on page 39. Does not operate by .... Recording start/stop - Table of contents Operation Search Settings Search Smart Remote Setting Control (HDR-AS15 display t only) By connecting the camera and a smartphone through Wi-Fi. Returns to the camera through Wi-Fi, you to select the setting, then press the ENTER button. Index 22US...
...on the smartphone setting, see "Setting Wi-Fi (HDR-AS15 only)" on your smartphone. Checking the field angle - See page 39 for details on downloading applications. • The camera battery charge may be consumed quickly if the camera is necessary on page 39. Does not operate by .... Recording start/stop - Table of contents Operation Search Settings Search Smart Remote Setting Control (HDR-AS15 display t only) By connecting the camera and a smartphone through Wi-Fi. Returns to the camera through Wi-Fi, you to select the setting, then press the ENTER button. Index 22US...
Handbook
Page 24
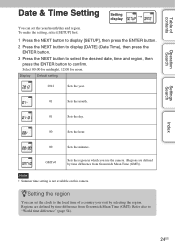
... in which you visit by selecting the region. zSetting the region You can set the clock to the local time of a country you use the camera. (Regions are defined by time difference from Greenwich Mean Time (GMT)). Display Default setting 2012 Sets the year. 01 Sets the month. 01 Sets... the day. 00 Sets the hour. 00 Sets the minutes. Note • Summer time setting is not available on this camera. Regions are defined by time difference from Greenwich Mean Time (GMT). Index 24US Select 00:00 for midnight, 12:00 for noon. Refer also to...
... in which you visit by selecting the region. zSetting the region You can set the clock to the local time of a country you use the camera. (Regions are defined by time difference from Greenwich Mean Time (GMT)). Display Default setting 2012 Sets the year. 01 Sets the month. 01 Sets... the day. 00 Sets the hour. 00 Sets the minutes. Note • Summer time setting is not available on this camera. Regions are defined by time difference from Greenwich Mean Time (GMT). Index 24US Select 00:00 for midnight, 12:00 for noon. Refer also to...
Handbook
Page 25
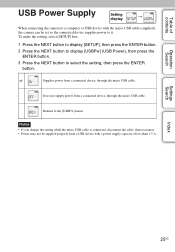
... setting, then press the ENTER button. Table of contents Operation Search USB Power Supply Setting display t When connecting the camera to a computer or USB device with the micro USB cable (supplied), the camera can be supplied properly from a USB device with a power supply capacity of less than 1.5 A. Returns to the [USBPw] menu...
... setting, then press the ENTER button. Table of contents Operation Search USB Power Supply Setting display t When connecting the camera to a computer or USB device with the micro USB cable (supplied), the camera can be supplied properly from a USB device with a power supply capacity of less than 1.5 A. Returns to the [USBPw] menu...


