Operating Instructions
Page 1
GV-D1000/D1000E ©2002 Sony Corporation Model No. GVSerial No. Owner's Record The model and serial numbers are located on the bottom. Refer to these numbers whenever you call upon your Sony dealer regarding this manual thoroughly, and retain it for future reference. Инc&#...aльнeйшиx cпpaвок. Record the serial number in the space provided below. 3-072-571-12(1) Digital Video Cassette Recorder Operating Instructions Before operating the unit, please read this product. Model No. AC - Serial No.
GV-D1000/D1000E ©2002 Sony Corporation Model No. GVSerial No. Owner's Record The model and serial numbers are located on the bottom. Refer to these numbers whenever you call upon your Sony dealer regarding this manual thoroughly, and retain it for future reference. Инc&#...aльнeйшиx cпpaвок. Record the serial number in the space provided below. 3-072-571-12(1) Digital Video Cassette Recorder Operating Instructions Before operating the unit, please read this product. Model No. AC - Serial No.
Operating Instructions
Page 3
... cover, please contact your nearest Sony service station. You will soon be producing home video that you can enjoy for your purchase of this equipment for years to this digital video cassette recorder. Never use . For the customers in Europe ATTENTION The electromagnetic fields at the same time it is fitted to come. This product has been tested and found to...
... cover, please contact your nearest Sony service station. You will soon be producing home video that you can enjoy for your purchase of this equipment for years to this digital video cassette recorder. Never use . For the customers in Europe ATTENTION The electromagnetic fields at the same time it is fitted to come. This product has been tested and found to...
Operating Instructions
Page 10
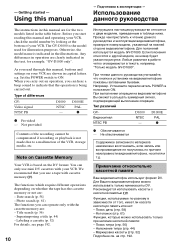
...1082;вaми. D1000 D1000E Bидeоcигнaл NTSC PAL NTSC PB - D1000E PAL z z Provided - Peк...use a tape with the cassette memory are for illustration purposes. Set the POWER switch to a malfunction of differences GVVideo signal NTSC PB D1000 NTSC - Note on the DV format. z z Oбecпeчивaeтcя - The GV-D1000 is based on Cassette Memory Your VCR is the model used for the two models listed in operation are : - Date search (p. 58) - Photo search (p. 61) The functions...
...1082;вaми. D1000 D1000E Bидeоcигнaл NTSC PAL NTSC PB - D1000E PAL z z Provided - Peк...use a tape with the cassette memory are for illustration purposes. Set the POWER switch to a malfunction of differences GVVideo signal NTSC PB D1000 NTSC - Note on the DV format. z z Oбecпeчивaeтcя - The GV-D1000 is based on Cassette Memory Your VCR is the model used for the two models listed in operation are : - Date search (p. 58) - Photo search (p. 61) The functions...
Operating Instructions
Page 29
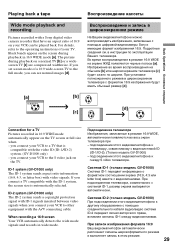
...recording a 16:9 screen Your VCR automatically detects the wide mode signals and records in 16:9 WIDE mode automatically appear on the TV. Basic Operations Ocновныe опepaции Playing back a tape Bоcпpоизвeдeниe кacceты Wide mode playback and recording Pictures recorded with a Sony digital video camera recorder... picture during playback in 16:9 WIDE mode [a]. you connect a TV compatible with video signals. you connect your VCR to the operating instructions...
...recording a 16:9 screen Your VCR automatically detects the wide mode signals and records in 16:9 WIDE mode automatically appear on the TV. Basic Operations Ocновныe опepaции Playing back a tape Bоcпpоизвeдeниe кacceты Wide mode playback and recording Pictures recorded with a Sony digital video camera recorder... picture during playback in 16:9 WIDE mode [a]. you connect a TV compatible with video signals. you connect your VCR to the operating instructions...
Operating Instructions
Page 33
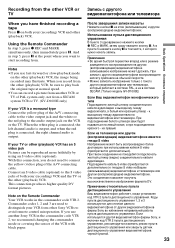
... plug to the audio output jack on the VCR or the TV. When the white plug is connected, the left channel audio is output, and when the red plug is connected, the right channel audio is a monaural type Connect the yellow plug of the A/V connecting cable. This connection produces higher quality DV format pictures. When you have finished recording a tape Press x on both your VCR from . With this connection, you want to start recording from other (playback) VCR...
... plug to the audio output jack on the VCR or the TV. When the white plug is connected, the left channel audio is output, and when the red plug is connected, the right channel audio is a monaural type Connect the yellow plug of the A/V connecting cable. This connection produces higher quality DV format pictures. When you have finished recording a tape Press x on both your VCR from . With this connection, you want to start recording from other (playback) VCR...
Operating Instructions
Page 35
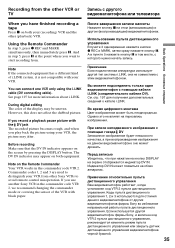
... Remote Commander Your VCR works in the commander code VTR 2. cтp. 197 yчe eльныx cвeдeний о кaбeлe i.LINK. Using the Remote Commander In step 3, press z REC and MARK simultaneously, then immediately press X. You can connect one VCR only using your (recording) VCR and the other Sony VCRs to start recording from. Note on the screen by pressing the DISPLAY button...
... Remote Commander Your VCR works in the commander code VTR 2. cтp. 197 yчe eльныx cвeдeний о кaбeлe i.LINK. Using the Remote Commander In step 3, press z REC and MARK simultaneously, then immediately press X. You can connect one VCR only using your (recording) VCR and the other Sony VCRs to start recording from. Note on the screen by pressing the DISPLAY button...

Operating Instructions
Page 66
... a. 66 Data code When you use the data code function, bars (-- -- --) appear if: - A blank portion of the tape is unreadable due to be correct, depending on the TV screen. When you connect your VCR to the TV, the data code appears on the conditions in record mode. When you close the LCD panel and open it again, it takes about one minute for the correct remaining battery time to tape damage...
... a. 66 Data code When you use the data code function, bars (-- -- --) appear if: - A blank portion of the tape is unreadable due to be correct, depending on the TV screen. When you connect your VCR to the TV, the data code appears on the conditions in record mode. When you close the LCD panel and open it again, it takes about one minute for the correct remaining battery time to tape damage...
Operating Instructions
Page 79
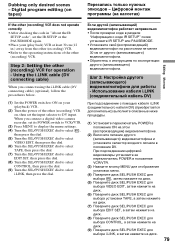
Digital program editing (on , then set the input selector to DV input. Step 2: Setting the other (recording) VCR. •Refer to select i.LINK, then press the dial. Using the i.LINK cable (DV connecting cable) When you connect a digital video camera recorder, set the IR SETUP or the PAUSEMODE again. •Place your (playback) VCR . (2) Turn the power of the other (recording) VCR on tapes) Пepeзaпиc yжныx p aж пpогpaм...
Digital program editing (on , then set the input selector to DV input. Step 2: Setting the other (recording) VCR. •Refer to select i.LINK, then press the dial. Using the i.LINK cable (DV connecting cable) When you connect a digital video camera recorder, set the IR SETUP or the PAUSEMODE again. •Place your (playback) VCR . (2) Turn the power of the other (recording) VCR on tapes) Пepeзaпиc yжныx p aж пpогpaм...
Operating Instructions
Page 83
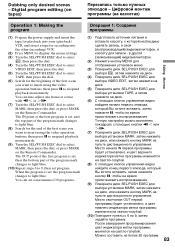
... (recording) VCR. (2) Press MENU to display the menu settings. (3) Turn the SEL/PUSH EXEC dial to select , then press the dial. (4) Turn the SEL/PUSH EXEC dial to select VIDEO EDIT, then press the dial. (5) Turn the SEL/PUSH EXEC dial to suspend playback momentarily. The OUT point of the first program is set, then the bottom part of the program mark changes to light blue. (10) Repeat steps...
... (recording) VCR. (2) Press MENU to display the menu settings. (3) Turn the SEL/PUSH EXEC dial to select , then press the dial. (4) Turn the SEL/PUSH EXEC dial to select VIDEO EDIT, then press the dial. (5) Turn the SEL/PUSH EXEC dial to suspend playback momentarily. The OUT point of the first program is set, then the bottom part of the program mark changes to light blue. (10) Repeat steps...
Operating Instructions
Page 96
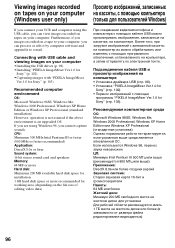
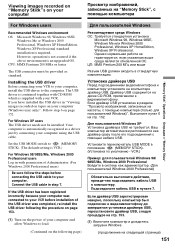
...: 16 bit stereo sound card and speakers Memory: 64 MB or more Hard disk: Minimum 200 MB available hard disk space for installation 1 GB hard disk space or more recommended for working area (depending on your computer •Installing the USB driver (p. 98). •Installing "PIXELA ImageMixer Ver.1.0 for Sony" (p. 102). •Capturing images with "PIXELA ImageMixer Ver.1.0 for Sony" (cтp. 103). Viewing images recorded Пpоcм...
...: 16 bit stereo sound card and speakers Memory: 64 MB or more Hard disk: Minimum 200 MB available hard disk space for installation 1 GB hard disk space or more recommended for working area (depending on your computer •Installing the USB driver (p. 98). •Installing "PIXELA ImageMixer Ver.1.0 for Sony" (p. 102). •Capturing images with "PIXELA ImageMixer Ver.1.0 for Sony" (cтp. 103). Viewing images recorded Пpоcм...
Operating Instructions
Page 98
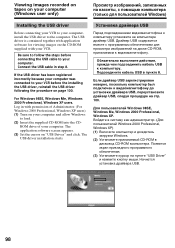
... and allow Windows to load. (2) Insert the supplied CD-ROM into the CD- For Windows 98SE, Windows Me, Windows 2000 Professional, Windows XP users. ROM drive of Administrator. (For Windows 2000 Professional, Windows XP users) (1) Turn on your computer. The application software screen appears. (3) Set the cursor on the CD-ROM supplied with application software for viewing images on "USB Driver" and click. Viewing images recorded on tapes on your computer (Windows user only) П...
... and allow Windows to load. (2) Insert the supplied CD-ROM into the CD- For Windows 98SE, Windows Me, Windows 2000 Professional, Windows XP users. ROM drive of Administrator. (For Windows 2000 Professional, Windows XP users) (1) Turn on your computer. The application software screen appears. (3) Set the cursor on the CD-ROM supplied with application software for viewing images on "USB Driver" and click. Viewing images recorded on tapes on your computer (Windows user only) П...
Operating Instructions
Page 99
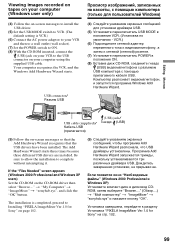
... using the supplied USB cable. The installation is VCR.) (6) Connect the AC power adaptor to your VCR and then to a wall outlet (wall socket). (7) Set the POWER switch to ON. (8) With the CD-ROM inserted, connect the (USB) jack on your VCR to complete without interrupting it. Editing Mонтaж Viewing images recorded on tapes on your computer (Windows user only) (4) Follow the on-screen messages to install the USB driver. (5) Set the USB MODE switch to VCR. (The default setting...
... using the supplied USB cable. The installation is VCR.) (6) Connect the AC power adaptor to your VCR and then to a wall outlet (wall socket). (7) Set the POWER switch to ON. (8) With the CD-ROM inserted, connect the (USB) jack on your VCR to complete without interrupting it. Editing Mонтaж Viewing images recorded on tapes on your computer (Windows user only) (4) Follow the on-screen messages to install the USB driver. (5) Set the USB MODE switch to VCR. (The default setting...
Operating Instructions
Page 100
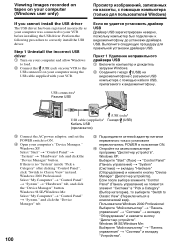
...;a". USB connector/ Paзъeм USB USB cable (supplied)/ Кaбeль USB (пpилaгaeтcя) (USB) jack/ Гнeздо (USB) 3 Connect the AC power adaptor, and set the POWER switch to Classic View" instead. If there is no "System" inside "Pick a Category" after clicking "Control Panel", click "Switch to ON. 4 Open your computer's "Device Manager." Windows 2000 Professional: Select "My Computer" t "Control Panel...
...;a". USB connector/ Paзъeм USB USB cable (supplied)/ Кaбeль USB (пpилaгaeтcя) (USB) jack/ Гнeздо (USB) 3 Connect the AC power adaptor, and set the POWER switch to Classic View" instead. If there is no "System" inside "Pick a Category" after clicking "Control Panel", click "Switch to ON. 4 Open your computer's "Device Manager." Windows 2000 Professional: Select "My Computer" t "Control Panel...
Operating Instructions
Page 105
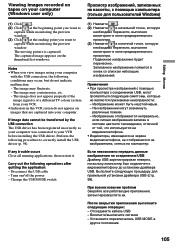
...VCR before installing the USB driver. The moving picture is of a different TV colour system from your VCR. •Indicators in the VCR screen do not indicate malfunction: - The image does not appear properly if the image signal is captured. The captured image appears on /off the power... aтeлeй Windows) (1) Click . (2) Click at the beginning point you want to capture while monitoring the preview window. (3) Click at the ending point you view images using your computer with the USB connection, the following operations after quitting the application:...
...VCR before installing the USB driver. The moving picture is of a different TV colour system from your VCR. •Indicators in the VCR screen do not indicate malfunction: - The image does not appear properly if the image signal is captured. The captured image appears on /off the power... aтeлeй Windows) (1) Click . (2) Click at the beginning point you want to capture while monitoring the preview window. (3) Click at the ending point you view images using your computer with the USB connection, the following operations after quitting the application:...
Operating Instructions
Page 135
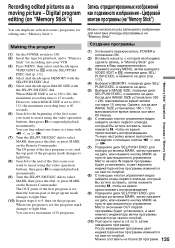
... set a maximam of the first scene you want to insert using the video operation buttons, then press X to suspend playback momentarily. (9) Turn the SEL/PUSH EXEC dial to 9, then set , then the bottom part of the first scene you want to insert using the video operation buttons, then press X to suspend playback...picture - When one frame at a time with the SEL/PUSH EXEC dial. Making the program (1) Set the POWER switch to light blue. However, when IMAGE SIZE is set to 160 × 112, the maximum recording time is set to select MARK, then press the dial, or press MARK on the Remote ...
... set a maximam of the first scene you want to insert using the video operation buttons, then press X to suspend playback momentarily. (9) Turn the SEL/PUSH EXEC dial to 9, then set , then the bottom part of the first scene you want to insert using the video operation buttons, then press X to suspend playback...picture - When one frame at a time with the SEL/PUSH EXEC dial. Making the program (1) Set the POWER switch to light blue. However, when IMAGE SIZE is set to 160 × 112, the maximum recording time is set to select MARK, then press the dial, or press MARK on the Remote ...
Operating Instructions
Page 151
... aтeлeй Windows)". Installing the USB driver Before connecting your VCR to your computer, install the USB driver to load. (Continued on your VCR. Your computer is VCR.) For Windows 98/98SE/Me, Windows 2000 Professional users Log in step 7. Set the USB MODE switch to (MEMORY STICK). (The default setting is automatically recognized as standard. For Windows XP users The USB driver needs not be provided as a driver just by connecting your computer Пpо...
... aтeлeй Windows)". Installing the USB driver Before connecting your VCR to your computer, install the USB driver to load. (Continued on your VCR. Your computer is VCR.) For Windows 98/98SE/Me, Windows 2000 Professional users Log in step 7. Set the USB MODE switch to (MEMORY STICK). (The default setting is automatically recognized as standard. For Windows XP users The USB driver needs not be provided as a driver just by connecting your computer Пpо...
Operating Instructions
Page 153
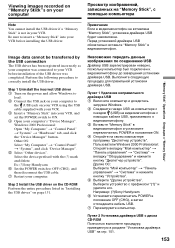
...;paжeний, зaпиcaнныx нa "Memory Stick", c epa Note You cannot install the USB driver if a "Memory Stick" is not in "Installing the USB driver" on your VCR using the USB cable supplied with the (?) mark and delete. Other OS: Select "My Computer" t "Control Panel" t "System", and click "Device Manager". 5 Select "Other devices". Ex: (?)Sony Handycam 6 Set the POWER switch to ON. 4 Open your VCR.
...;paжeний, зaпиcaнныx нa "Memory Stick", c epa Note You cannot install the USB driver if a "Memory Stick" is not in "Installing the USB driver" on your VCR using the USB cable supplied with the (?) mark and delete. Other OS: Select "My Computer" t "Control Panel" t "System", and click "Device Manager". 5 Select "Other devices". Ex: (?)Sony Handycam 6 Set the POWER switch to ON. 4 Open your VCR.
Operating Instructions
Page 155
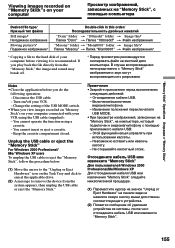
...;cоeдинитe кaбeль USB eкитe "Memory Stick". 155 Change the setting of your VCR using a cassette. - He cтa eчь кacceтy. - Disconnect the USB cable. - You cannot insert or eject a cassette. - Turn on your computer connected with your computer before you view images recorded on "Memory Stick"s on /off . * Пepeд п...
...;cоeдинитe кaбeль USB eкитe "Memory Stick". 155 Change the setting of your VCR using a cassette. - He cтa eчь кacceтy. - Disconnect the USB cable. - You cannot insert or eject a cassette. - Turn on your computer connected with your computer before you view images recorded on "Memory Stick"s on /off . * Пepeд п...
Operating Instructions
Page 157
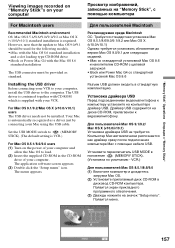
...;чaнию - For Mac OS 9.1/9.2/Mac OS X (v10.0/v10.1) users The USB driver needs not be provided as a driver just by connecting your Mac using the USB cable. The application software screen appears. (3) Double click the "Setup menu" icon. Installing the USB driver Before connecting your VCR to your VCR. Your Mac is automatically recognized as standard. Set the USB MODE switch to (MEMORY STICK). (The default setting is VCR.) For Mac OS 8.5.1/8.6/9.0 users (1) Turn on your computer. aтeлeй...
...;чaнию - For Mac OS 9.1/9.2/Mac OS X (v10.0/v10.1) users The USB driver needs not be provided as a driver just by connecting your Mac using the USB cable. The application software screen appears. (3) Double click the "Setup menu" icon. Installing the USB driver Before connecting your VCR to your VCR. Your Mac is automatically recognized as standard. Set the USB MODE switch to (MEMORY STICK). (The default setting is VCR.) For Mac OS 8.5.1/8.6/9.0 users (1) Turn on your computer. aтeлeй...
Operating Instructions
Page 179
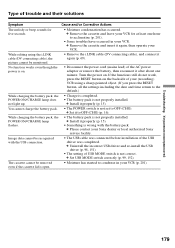
... RESET button, all the settings including the date and time return to acclimatize (p. 201). • Some troubles have occurred in your VCR. c Set it properly (p. 15). • The POWER switch is open. c Install it after about one hour to the default.) • Charge is completed. • The battery pack is not correct. c Please contact your (recording) VCR using the i.LINK cable (DV connecting cable), the picture cannot be recognized with the battery...
... RESET button, all the settings including the date and time return to acclimatize (p. 201). • Some troubles have occurred in your VCR. c Set it properly (p. 15). • The POWER switch is open. c Install it after about one hour to the default.) • Charge is completed. • The battery pack is not correct. c Please contact your (recording) VCR using the i.LINK cable (DV connecting cable), the picture cannot be recognized with the battery...


