Operating Instructions
Page 3
...Function of Parts and Controls ....... 7 (GB) Front / Rear / Side 7 (GB) Indicator Section 8 (GB) Control Button Section (Top 8 (GB) Connector Panel 9 (GB) Remote Commander RM-980 11 (GB) Caution 13 (GB) Connections 14 (GB) Connecting the Speakers 14 (GB) Connecting the AC Power Cord 14 (...Through Menus 16 (GB) Menu Guide 16 (GB) GB Watching the Picture 21 (GB) Switching the Input Signal 21 (GB) Input Signal, Picture Mode and Display Status Information 22 (GB) Selecting Image Quality 24 (GB) Adjusting the Picture 24 (GB) Adjusting the Contrast, Brightness, Chroma, and Phase, etc...
...Function of Parts and Controls ....... 7 (GB) Front / Rear / Side 7 (GB) Indicator Section 8 (GB) Control Button Section (Top 8 (GB) Connector Panel 9 (GB) Remote Commander RM-980 11 (GB) Caution 13 (GB) Connections 14 (GB) Connecting the Speakers 14 (GB) Connecting the AC Power Cord 14 (...Through Menus 16 (GB) Menu Guide 16 (GB) GB Watching the Picture 21 (GB) Switching the Input Signal 21 (GB) Input Signal, Picture Mode and Display Status Information 22 (GB) Selecting Image Quality 24 (GB) Adjusting the Picture 24 (GB) Adjusting the Contrast, Brightness, Chroma, and Phase, etc...

Operating Instructions
Page 5
...The screen will disappear as time passes. • The panel surface or the cabinet may warm up . On cleaning the display The panel surface • Be sure to normal operation as malfunction of the Remote Commander, noisy picture, noisy sound, may damage the finish of the unit...out by qualified personnel before cleaning the display. • The LCD panel surface has been given a special finish. Although the LCD panel is not to use rubbing alcohol, benzine or thinner for a long time will damage the panel. Take this unit, contact your authorized Sony dealers. 5 (GB) This does ...
...The screen will disappear as time passes. • The panel surface or the cabinet may warm up . On cleaning the display The panel surface • Be sure to normal operation as malfunction of the Remote Commander, noisy picture, noisy sound, may damage the finish of the unit...out by qualified personnel before cleaning the display. • The LCD panel surface has been given a special finish. Although the LCD panel is not to use rubbing alcohol, benzine or thinner for a long time will damage the panel. Take this unit, contact your authorized Sony dealers. 5 (GB) This does ...
Operating Instructions
Page 9
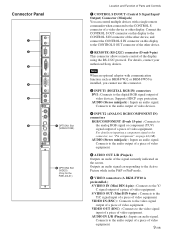
...equipment. Outputs an audio signal corresponding to the Active Picture while in the P&P or PinP mode. 6 VIDEO connectors (A BKM-FW10 is installed, you cannot use this display to the CONTROL S OUT connector of the other display. Connects to the audio output of a piece ...your authorized Sony dealers. IN CONTROL S OUT REMOTE Connector Panel 1 2 3 4 5 DVI-HDCP INPUT 1 AUDIO RGB/COMPONENT INPUT 2 AUDIO L AUDIO OUT R S VIDEO IN OUT VIDEO IN 6 7 OPTION1 Slot (VIDEO/COM ) VIDEO INPUT ADAPTOR OUT AUDIO IN L R 8 OPTION2 Slot (VIDEO) (Only for the FWD-40LX1) Location...
...equipment. Outputs an audio signal corresponding to the Active Picture while in the P&P or PinP mode. 6 VIDEO connectors (A BKM-FW10 is installed, you cannot use this display to the CONTROL S OUT connector of the other display. Connects to the audio output of a piece ...your authorized Sony dealers. IN CONTROL S OUT REMOTE Connector Panel 1 2 3 4 5 DVI-HDCP INPUT 1 AUDIO RGB/COMPONENT INPUT 2 AUDIO L AUDIO OUT R S VIDEO IN OUT VIDEO IN 6 7 OPTION1 Slot (VIDEO/COM ) VIDEO INPUT ADAPTOR OUT AUDIO IN L R 8 OPTION2 Slot (VIDEO) (Only for the FWD-40LX1) Location...
Operating Instructions
Page 11
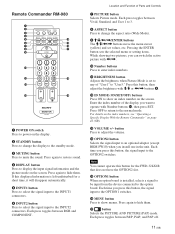
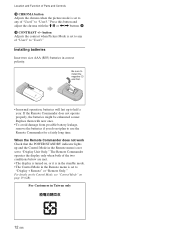
.... 3 MUTING button Press to mute the sound. Location and Function of Parts and Controls 7 PICTURE button Selects Picture mode. Each press toggles between RGB and COMPONENT. If this displayed information is left undisturbed for a short time, it will disappear automatically. 5 INPUT1 button Press ...to select the signal input to the INPUT1 connectors. 6 INPUT2 button Press to select the signal input to display the input signal information and the picture mode on the display. 2 STANDBY button Press to change the aspect ratio (Wide Mode). 9 M/m/ Press again to hide them. Remote...
.... 3 MUTING button Press to mute the sound. Location and Function of Parts and Controls 7 PICTURE button Selects Picture mode. Each press toggles between RGB and COMPONENT. If this displayed information is left undisturbed for a short time, it will disappear automatically. 5 INPUT1 button Press ...to select the signal input to the INPUT1 connectors. 6 INPUT2 button Press to select the signal input to display the input signal information and the picture mode on the display. 2 STANDBY button Press to change the aspect ratio (Wide Mode). 9 M/m/ Press again to hide them. Remote...
Operating Instructions
Page 12
Press this button and adjust the chroma with the M/m or Location and Function of Parts and Controls qk CHROMA button Adjusts the chroma when the picture mode is set to any of "User1" to "User3."
Press this button and adjust the chroma with the M/m or Location and Function of Parts and Controls qk CHROMA button Adjusts the chroma when the picture mode is set to any of "User1" to "User3."
Operating Instructions
Page 16
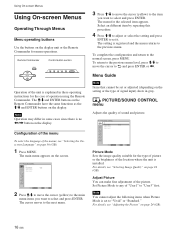
Note Operation may differ in some cases since there is explained in these operating instructions for menu operations. Using On-screen Menus Using On-screen Menus Operating Through Menus Menu operating buttons Use the buttons on the display. The M/m and ENTER buttons on the Remote Commander have the same functions as the M/m and ENTER buttons on the display unit or the Remote Commander for the case of the unit is no Remote Commander MENU Control button section ENTER Operation of operation using the Remote Commander.
Note Operation may differ in some cases since there is explained in these operating instructions for menu operations. Using On-screen Menus Using On-screen Menus Operating Through Menus Menu operating buttons Use the buttons on the display. The M/m and ENTER buttons on the Remote Commander have the same functions as the M/m and ENTER buttons on the display unit or the Remote Commander for the case of the unit is no Remote Commander MENU Control button section ENTER Operation of operation using the Remote Commander.
Operating Instructions
Page 17
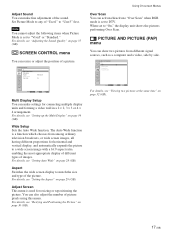
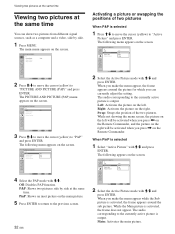
...the Auto Wide function. The Auto Wide function is used for horizontal and vertical display, and automatically expands the picture to a wide screen image with a 16:9 aspect ratio, enabling the most appropriate display of different types of the sound. For details, see "Setting the Aspect"... the size and type of picture pixels using this menu. Aspect Switches the wide screen display to "User3" first. For details, see "Viewing two pictures at the same time" on page 30 (GB). PICTURE AND PICTURE(PAP) PAP: Off Active Picture Picture Size Picture Position Select Set ENTER Exit ...
...the Auto Wide function. The Auto Wide function is used for horizontal and vertical display, and automatically expands the picture to a wide screen image with a 16:9 aspect ratio, enabling the most appropriate display of different types of the sound. For details, see "Setting the Aspect"... the size and type of picture pixels using this menu. Aspect Switches the wide screen display to "User3" first. For details, see "Viewing two pictures at the same time" on page 30 (GB). PICTURE AND PICTURE(PAP) PAP: Off Active Picture Picture Size Picture Position Select Set ENTER Exit ...
Operating Instructions
Page 18
.../COMPONENT connector. H/Comp: When a horizontal signal is input Video: When a video signal is not displayed. Display Select On to a PC. PC: When connected to display the input signal information and Picture Mode for more information on the picture. Closed Caption Displays closed captions only while inputting signals from the speakers SS-SP40FW/32FW (not supplied.) When...
.../COMPONENT connector. H/Comp: When a horizontal signal is input Video: When a video signal is not displayed. Display Select On to a PC. PC: When connected to display the input signal information and Picture Mode for more information on the picture. Closed Caption Displays closed captions only while inputting signals from the speakers SS-SP40FW/32FW (not supplied.) When...
Operating Instructions
Page 21
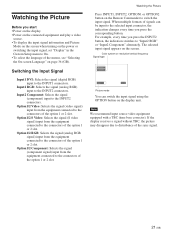
...input from the equipment connected to the connectors of signals can switch the input signal using the OPTION button on the display unit. Watching the Picture Press INPUT1, INPUT2, OPTION1 or OPTION2 button on the Remote Commander to the selected input connector, the indication changes ...Color system or resolution/vertical frequency Signal type Input1 DVI 640x480/60 Vivid 15 : 07 Picture mode You can be input to switch the input signal. If the display receives a signal without TBC, the picture may disappear due to "Input2 RGB" or "Input2 Component" alternately. For example, every...
...input from the equipment connected to the connectors of signals can switch the input signal using the OPTION button on the display unit. Watching the Picture Press INPUT1, INPUT2, OPTION1 or OPTION2 button on the Remote Commander to the selected input connector, the indication changes ...Color system or resolution/vertical frequency Signal type Input1 DVI 640x480/60 Vivid 15 : 07 Picture mode You can be input to switch the input signal. If the display receives a signal without TBC, the picture may disappear due to "Input2 RGB" or "Input2 Component" alternately. For example, every...
Operating Instructions
Page 22
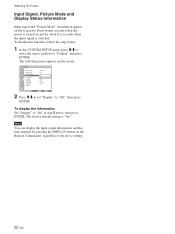
... Off Off YO/nPB/PR 1080i DTV H/Comp High Select Set ENTER Exit MENU 2 Press M/m to set "Display" to "Display" and press ENTER. Watching the Picture Input Signal, Picture Mode and Display Status Information Input signal and "Picture Mode" information appear on the screen for about twenty seconds when the power is turned on and for...
... Off Off YO/nPB/PR 1080i DTV H/Comp High Select Set ENTER Exit MENU 2 Press M/m to set "Display" to "Display" and press ENTER. Watching the Picture Input Signal, Picture Mode and Display Status Information Input signal and "Picture Mode" information appear on the screen for about twenty seconds when the power is turned on and for...

Operating Instructions
Page 23
.../50p 576/50P 13 480/60p 480/60P 14 1080/60i 1080/60I 15 720/60p 720/60P 16 720/50p 720/50P Watching the Picture a) VGA is a registered trademark of Option 1 or 2 slot is set to component video. Actual on the INPUT2 connector or the BKM-FW12. • If ... mode of Option 1 or 2 slot is set to composite video. Option 1/2 Component The signal mode of INPUT2 is set to the display unit, adjust the "Chroma" setting in the Adjust Picture menu. • When the phase is no input signal. Not Supported Signal The selected input signal is NTSC. NTSC (e.g.) The selected...
.../50p 576/50P 13 480/60p 480/60P 14 1080/60i 1080/60I 15 720/60p 720/60P 16 720/50p 720/50P Watching the Picture a) VGA is a registered trademark of Option 1 or 2 slot is set to component video. Actual on the INPUT2 connector or the BKM-FW12. • If ... mode of Option 1 or 2 slot is set to composite video. Option 1/2 Component The signal mode of INPUT2 is set to the display unit, adjust the "Chroma" setting in the Adjust Picture menu. • When the phase is no input signal. Not Supported Signal The selected input signal is NTSC. NTSC (e.g.) The selected...

Operating Instructions
Page 24
... main menu appears on the Adjust Picture menu. PICTURE/SOUND CONTROL Picture Mode: Adjust Picture Adjust Sound Vivid Standard User1 User2 User3 Select Set ENTER Exit MENU 4 Select the Picture Mode with image contour and contrast maximized. Vivid: Pictures get intense sharpness with M/m. on...to move the cursor (yellow) to "User3." Adjusting the Contrast, Brightness, Chroma, and Phase, etc. Selecting Image Quality / Adjusting the Picture Selecting Image Quality You can adjust contrast, brightness, chroma, phase, and so on, to show the main menu and adjust "Backlight," "Contrast...
... main menu appears on the Adjust Picture menu. PICTURE/SOUND CONTROL Picture Mode: Adjust Picture Adjust Sound Vivid Standard User1 User2 User3 Select Set ENTER Exit MENU 4 Select the Picture Mode with image contour and contrast maximized. Vivid: Pictures get intense sharpness with M/m. on...to move the cursor (yellow) to "User3." Adjusting the Contrast, Brightness, Chroma, and Phase, etc. Selecting Image Quality / Adjusting the Picture Selecting Image Quality You can adjust contrast, brightness, chroma, phase, and so on, to show the main menu and adjust "Backlight," "Contrast...

Operating Instructions
Page 25
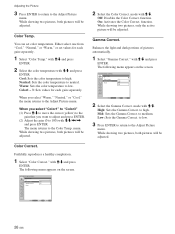
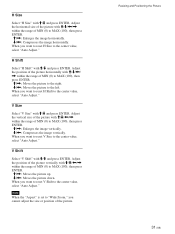
Chroma Select "Chroma" with M/m/ Adjust the chroma with M/m and press ENTER.
Chroma Select "Chroma" with M/m/ Adjust the chroma with M/m and press ENTER.
Operating Instructions
Page 26
... ENTER to return to low. When you want to adjust and press ENTER. (2) Adjust the gain (0 to the Adjust Picture menu. You can set values for each gain separately. 1 Select "Color Temp." Either select one from "Cool," "Neutral," or "Warm," or set color ...temperature. Warm: Sets the color temperature to the Adjust Picture menu. When you select "Color1" to "Color3" (1) Press M/m to move the cursor (yellow) to the gain that you select "Warm," "Neutral," or "Cool,"...
... ENTER to return to low. When you want to adjust and press ENTER. (2) Adjust the gain (0 to the Adjust Picture menu. You can set values for each gain separately. 1 Select "Color Temp." Either select one from "Cool," "Neutral," or "Warm," or set color ...temperature. Warm: Sets the color temperature to the Adjust Picture menu. When you select "Color1" to "Color3" (1) Press M/m to move the cursor (yellow) to the gain that you select "Warm," "Neutral," or "Cool,"...
Operating Instructions
Page 27
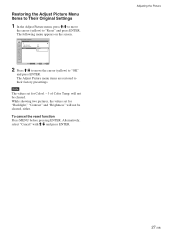
...move the cursor (yellow) to "OK" and press ENTER. The following menu appears on the screen. will not be cleared. PICTURE/SOUND CONTROL Adjust Picture Color Correct.: Gamma Correct.: Reset Off Mid Cancel OK Select Set ENTER Exit MENU 2 Press M/m to move the cursor (yellow)...Note The values set for Color1 - 3 of Color Temp. While showing two pictures, the values set for "Backlight," "Contrast" and "Brightness" will not be cleared, either. Adjusting the Picture 27 (GB) The Adjust Picture menu items are restored to "Reset" and press ENTER. Alternatively, select "Cancel...
...move the cursor (yellow) to "OK" and press ENTER. The following menu appears on the screen. will not be cleared. PICTURE/SOUND CONTROL Adjust Picture Color Correct.: Gamma Correct.: Reset Off Mid Cancel OK Select Set ENTER Exit MENU 2 Press M/m to move the cursor (yellow)...Note The values set for Color1 - 3 of Color Temp. While showing two pictures, the values set for "Backlight," "Contrast" and "Brightness" will not be cleared, either. Adjusting the Picture 27 (GB) The Adjust Picture menu items are restored to "Reset" and press ENTER. Alternatively, select "Cancel...
Operating Instructions
Page 28
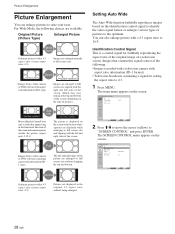
... bottom of the following: • Images recorded with a television camera with aspect ratio information (ID-1 type) Images are displayed in the original 4:3 aspect ratio without changing the top and bottom. Original Picture (Picture Type) Enlarged Picture Wide Zoom Ordinary pictures with a 4:3 aspect ratio (screen aspect ratio: 4:3). Zoom Hey! The main menu appears on the screen...
... bottom of the following: • Images recorded with a television camera with aspect ratio information (ID-1 type) Images are displayed in the original 4:3 aspect ratio without changing the top and bottom. Original Picture (Picture Type) Enlarged Picture Wide Zoom Ordinary pictures with a 4:3 aspect ratio (screen aspect ratio: 4:3). Zoom Hey! The main menu appears on the screen...

Operating Instructions
Page 29
...The menu returns to the SCREEN CONTROL menu. Select Set ENTER Exit MENU 2 Select the Aspect with M/m and press ENTER. Normal: Displays the picture without changing the top and bottom. Note • While inputting DVI or RGB signals, you set the Auto Wide because the Auto ...Zoom Select Set ENTER Exit MENU 4 Press M/m to move the cursor (yellow) to 16:9 pictures. Wide Zoom: Enlarges 4:3 pictures full-screen to "Wide Setup" and press ENTER. SCREEN CONTROL Multi Display Setup Wide Setup Aspect: Adjust Screen Over Scan: Wide Zoom Zoom Subtitle Full Normal Select Set ...
...The menu returns to the SCREEN CONTROL menu. Select Set ENTER Exit MENU 2 Select the Aspect with M/m and press ENTER. Normal: Displays the picture without changing the top and bottom. Note • While inputting DVI or RGB signals, you set the Auto Wide because the Auto ...Zoom Select Set ENTER Exit MENU 4 Press M/m to move the cursor (yellow) to 16:9 pictures. Wide Zoom: Enlarges 4:3 pictures full-screen to "Wide Setup" and press ENTER. SCREEN CONTROL Multi Display Setup Wide Setup Aspect: Adjust Screen Over Scan: Wide Zoom Zoom Subtitle Full Normal Select Set ...

Operating Instructions
Page 30
... screen" menu are adjusted automatically. The following menu appears on the edges of characters or vertical lines or if the size or position of the picture separately. SCREEN CONTROL Adjust Screen Auto Adjust Dot Phase: Total H Pixel: H Size: H Shift: V Size: V Shift: 28 1344 50 50 50 50 Select... Set ENTER Exit MENU 2 You can shift the position of the picture to show the main menu and adjust "Dot Phase," "Total H Pixel," "H Size," "H Shift," "V Size," or "V Shift" on the screen. (When you select "Dot...
... screen" menu are adjusted automatically. The following menu appears on the edges of characters or vertical lines or if the size or position of the picture separately. SCREEN CONTROL Adjust Screen Auto Adjust Dot Phase: Total H Pixel: H Size: H Shift: V Size: V Shift: 28 1344 50 50 50 50 Select... Set ENTER Exit MENU 2 You can shift the position of the picture to show the main menu and adjust "Dot Phase," "Total H Pixel," "H Size," "H Shift," "V Size," or "V Shift" on the screen. (When you select "Dot...
Operating Instructions
Page 31
H Size Select "H Size" with M/m/ Adjust the horizontal size of the picture with M/m and press ENTER.
H Size Select "H Size" with M/m/ Adjust the horizontal size of the picture with M/m and press ENTER.
Operating Instructions
Page 32
... appear. While not showing the menu screen, the picture on the left . PICTURE AND PICTURE(PAP) PAP: Active Picture: Picture Size: Picture Position P&P Left Right Swap Select Set ENTER Exit MENU 2 Press M/m to move the cursor (yellow) to "PICTURE AND PICTURE (PAP)" and press ENTER. PICTURE AND PICTURE(PAP) PAP: Off Active Picture Picture Size Picture Position Select Set ENTER Exit MENU 3 Press...
... appear. While not showing the menu screen, the picture on the left . PICTURE AND PICTURE(PAP) PAP: Active Picture: Picture Size: Picture Position P&P Left Right Swap Select Set ENTER Exit MENU 2 Press M/m to move the cursor (yellow) to "PICTURE AND PICTURE (PAP)" and press ENTER. PICTURE AND PICTURE(PAP) PAP: Off Active Picture Picture Size Picture Position Select Set ENTER Exit MENU 3 Press...


