Operating Instructions
Page 42
... OF USED BATTERIES ACCORDING TO THE LOCAL RULES. WARNING Owner's Record The model and serial numbers are registered trademarks of BBE Sound, Inc. Refer servicing to correct the interference by BBE Sound, Inc. If you call ; If this product, you carry the display unit, hold the unit itself, not the speakers. Serial No. BBE and BBE symbol are located on , the user is connected...
... OF USED BATTERIES ACCORDING TO THE LOCAL RULES. WARNING Owner's Record The model and serial numbers are registered trademarks of BBE Sound, Inc. Refer servicing to correct the interference by BBE Sound, Inc. If you call ; If this product, you carry the display unit, hold the unit itself, not the speakers. Serial No. BBE and BBE symbol are located on , the user is connected...
Operating Instructions
Page 43
... Location and Function of Parts and Controls Front Panel...7 Side Panel...8 Optional Adaptors ...10 Rear Panel ...11 Remote Control ...12 Button Description...12 Special Buttons on the Remote Control 14 GB Using the Wide Mode...14 Using the PAP Setting 15 Using the ID MODE button 16 Using the ECO Mode function 16 x Connections Connecting the Speakers...17 Connecting the AC Power Cord 17 Cable Management...18 Using the Settings Overview of the Menus ...20 Picture Settings ...22 Sound Settings...24 Screen Settings...25 Setup Settings...29 Other Information Troubleshooting ...32 Input Signal...
... Location and Function of Parts and Controls Front Panel...7 Side Panel...8 Optional Adaptors ...10 Rear Panel ...11 Remote Control ...12 Button Description...12 Special Buttons on the Remote Control 14 GB Using the Wide Mode...14 Using the PAP Setting 15 Using the ID MODE button 16 Using the ECO Mode function 16 x Connections Connecting the Speakers...17 Connecting the AC Power Cord 17 Cable Management...18 Using the Settings Overview of the Menus ...20 Picture Settings ...22 Sound Settings...24 Screen Settings...25 Setup Settings...29 Other Information Troubleshooting ...32 Input Signal...
Operating Instructions
Page 44
... the unit from the wall outlet if it can cause irregularities in the screen or a malfunction of time, the ghosting may not be gradually resolved by grasping the plug. Although the LCD panel is not to be sure to avoid touching the panel directly. Wipe off stains using a dry, soft cloth. • Never use the optional display stand. When shipping the...
... the unit from the wall outlet if it can cause irregularities in the screen or a malfunction of time, the ghosting may not be gradually resolved by grasping the plug. Although the LCD panel is not to be sure to avoid touching the panel directly. Wipe off stains using a dry, soft cloth. • Never use the optional display stand. When shipping the...
Operating Instructions
Page 47
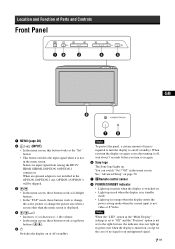
... menu screen, these buttons work as up in green even when the display is not video or S Video. Selects an input signal from among the HD15/ HDMI 1/HDMI 2/OPTION 1/OPTION 2 connectors. You can switch "On"/"Off" in the menu screen. See "Advanced Setup" on page 30. 7 Remote control sensor 8 POWER/STANDBY indicator • Lights up in green when the display is switched on. • Lights up in red when the display is in standby mode. • Lights up /down buttons ( / ). 51 Switches the display...
... menu screen, these buttons work as up in green even when the display is not video or S Video. Selects an input signal from among the HD15/ HDMI 1/HDMI 2/OPTION 1/OPTION 2 connectors. You can switch "On"/"Off" in the menu screen. See "Advanced Setup" on page 30. 7 Remote control sensor 8 POWER/STANDBY indicator • Lights up in green when the display is switched on. • Lights up in red when the display is in standby mode. • Lights up /down buttons ( / ). 51 Switches the display...
Operating Instructions
Page 48
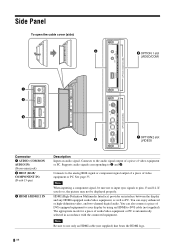
...-channel digital audio. Note When inputting a component signal, be displayed properly. Supports audio signals corresponding to use only an HDMI cable (not supplied) that bears the HDMI logo. 8 GB The appropriate mode for a piece of DVI-equipped equipment to your display by using an HDMI-to the audio signal output of a piece of video equipment or PC. Side Panel To open the cable cover (side) 4 IN 5 OPTION 1 slot (VIDEO/COM) OPTION 1(VIDEO/COM) MONITOR CONTROL ADAPTOR CONTROL S OUT REMOTE RGB/COMPONENT IN AUDIO...
...-channel digital audio. Note When inputting a component signal, be displayed properly. Supports audio signals corresponding to use only an HDMI cable (not supplied) that bears the HDMI logo. 8 GB The appropriate mode for a piece of DVI-equipped equipment to your display by using an HDMI-to the audio signal output of a piece of video equipment or PC. Side Panel To open the cable cover (side) 4 IN 5 OPTION 1 slot (VIDEO/COM) OPTION 1(VIDEO/COM) MONITOR CONTROL ADAPTOR CONTROL S OUT REMOTE RGB/COMPONENT IN AUDIO...
Operating Instructions
Page 49
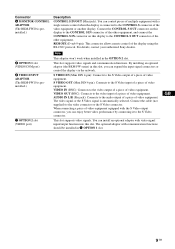
... (VIDEO port) Note This adaptor won't work when installed in this display to the CONTROL S OUT connector of the other equipment. S VIDEO OUT (Mini DIN 4-pin): Connects to the video output of a piece of video equipment. VIDEO IN (BNC): Connects to the S Video input of a piece of video equipment. The optional adaptor with video signal input/output function into this slot. GB 9 GB S VIDEO IN (Mini DIN 4-pin): Connects to the audio output of...
... (VIDEO port) Note This adaptor won't work when installed in this display to the CONTROL S OUT connector of the other equipment. S VIDEO OUT (Mini DIN 4-pin): Connects to the video output of a piece of video equipment. VIDEO IN (BNC): Connects to the S Video input of a piece of video equipment. The optional adaptor with video signal input/output function into this slot. GB 9 GB S VIDEO IN (Mini DIN 4-pin): Connects to the audio output of...
Operating Instructions
Page 50
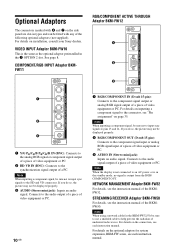
... not be sure not to input sync signals to the connector, see "Pin assignment" on installation, consult your Sony dealers. STREAMING RECEIVER Adaptor BKM-FW50 For details, see the instruction manual of the BKMFW32. Note When using a network cable for system expansion, BKM-FW series, see each instruction manual. Note When inputting a component signal, be displayed properly. 2 RGB/COMPONENT OUT (D-sub 15-pin): Connects to help prevent the radiation of...
... not be sure not to input sync signals to the connector, see "Pin assignment" on installation, consult your Sony dealers. STREAMING RECEIVER Adaptor BKM-FW50 For details, see the instruction manual of the BKMFW32. Note When using a network cable for system expansion, BKM-FW series, see each instruction manual. Note When inputting a component signal, be displayed properly. 2 RGB/COMPONENT OUT (D-sub 15-pin): Connects to help prevent the radiation of...

Operating Instructions
Page 51
... screen and enjoy viewing with the speakers. Rear Panel GB R L SPEAKER Parts 1 AC IN socket 2 SPEAKER socket 3 Stand installation hooks Description Connect the supplied AC power cord to this socket, you connect the AC power cord, the POWER/STANDBY indicator lights up in red and the display goes into the standby mode. Once you can output the audio matching the signal displayed on how to connect the speakers correctly. By connecting the speakers SS-SP40FW/32FW (not supplied) to this socket and to install the display stand...
... screen and enjoy viewing with the speakers. Rear Panel GB R L SPEAKER Parts 1 AC IN socket 2 SPEAKER socket 3 Stand installation hooks Description Connect the supplied AC power cord to this socket, you connect the AC power cord, the POWER/STANDBY indicator lights up in red and the display goes into the standby mode. Once you can output the audio matching the signal displayed on how to connect the speakers correctly. By connecting the speakers SS-SP40FW/32FW (not supplied) to this socket and to install the display stand...
Operating Instructions
Page 53
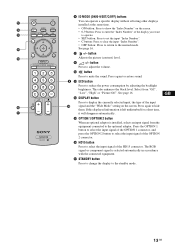
... OPTION2 DISPLAY HDMI2 PICTURE ECO SOUND ON ID MODE OFF SET RM-FW001 9 ID MODE (ON/0-9/SET/C/OFF) buttons You can operate a specific display without affecting other displays installed at the same time. • ON button: Press to show the "Index Number" on the screen. • 0-9 button: Press to enter the "Index Number" of the input signal and the "Wide Mode" setting on the screen. qs button Press to the optional adaptor. The RGB signal or component signal...
... OPTION2 DISPLAY HDMI2 PICTURE ECO SOUND ON ID MODE OFF SET RM-FW001 9 ID MODE (ON/0-9/SET/C/OFF) buttons You can operate a specific display without affecting other displays installed at the same time. • ON button: Press to show the "Index Number" on the screen. • 0-9 button: Press to enter the "Index Number" of the input signal and the "Wide Mode" setting on the screen. qs button Press to the optional adaptor. The RGB signal or component signal...
Operating Instructions
Page 56
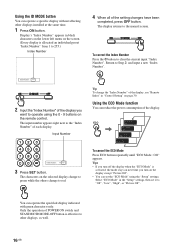
... input "Index Number". Only the operation of POWER ON switch and STANDBY/ID MODE-OFF button is allocated an individual preset "Index Number" from 1 to green while the others change the "Index Number" of the display, see "Remote Index" in "Control Setting" on the display except "Picture Off". • You can reduce the power consumption of each display. Display's "Index Number" appears in the "Setup" settings, then set the "ECO Mode" using the 0 - 9 buttons on the remote control. Using the ID MODE button...
... input "Index Number". Only the operation of POWER ON switch and STANDBY/ID MODE-OFF button is allocated an individual preset "Index Number" from 1 to green while the others change the "Index Number" of the display, see "Remote Index" in "Control Setting" on the display except "Picture Off". • You can reduce the power consumption of each display. Display's "Index Number" appears in the "Setup" settings, then set the "ECO Mode" using the 0 - 9 buttons on the remote control. Using the ID MODE button...
Operating Instructions
Page 63
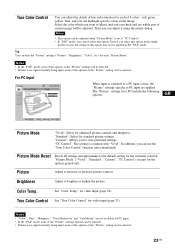
... want to adjust, and you can adjust it using the matrix dialog. picture screen, the setting of this option. For PC Input Picture Picture Mode : Picture Mode Reset Picture : Brightness : Color : Hue : Color Temp. : Sharpness : Noise Reduction : CineMotion : True Color Control : HD15 RGB Vivid 50 40 Neutral When input is no signal currently being input, none of the options of the "Picture" setting can alter the "Picture" settings ("Picture", "Brightness", "Color", etc.) for each of 4 colors : red, green, yellow, blue...
... want to adjust, and you can adjust it using the matrix dialog. picture screen, the setting of this option. For PC Input Picture Picture Mode : Picture Mode Reset Picture : Brightness : Color : Hue : Color Temp. : Sharpness : Noise Reduction : CineMotion : True Color Control : HD15 RGB Vivid 50 40 Neutral When input is no signal currently being input, none of the options of the "Picture" setting can alter the "Picture" settings ("Picture", "Brightness", "Color", etc.) for each of 4 colors : red, green, yellow, blue...
Operating Instructions
Page 64
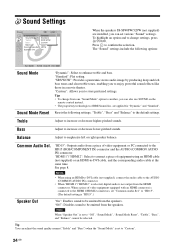
... Balance Adjust to the default settings. "HD15": Outputs audio from one "Sound Mode" option to another, you can set to enjoy powerful sound effects like those in a movie theater. Notes • When using an HDMI cable (not supplied) or an HDMI-to be emitted from the speakers. "Off": Disables sound to -DVI cable, and the corresponding audio cable at the same time. The "Sound" settings include the following settings; Sound Mode Reset Resets the following options: Sel: Set: Back: Exit: MENU Sound Mode...
... Balance Adjust to the default settings. "HD15": Outputs audio from one "Sound Mode" option to another, you can set to enjoy powerful sound effects like those in a movie theater. Notes • When using an HDMI cable (not supplied) or an HDMI-to be emitted from the speakers. "Off": Disables sound to -DVI cable, and the corresponding audio cable at the same time. The "Sound" settings include the following settings; Sound Mode Reset Resets the following options: Sel: Set: Back: Exit: MENU Sound Mode...
Operating Instructions
Page 67
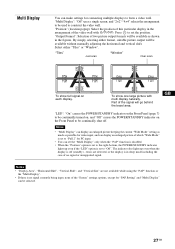
... disabled. • When the "Position" option is set to the right-bottom, the POWER/STANDBY indicator lights up even when the display is set to "Full 2" for "PAP Setting" and "Multi Display" can be available without manually adjusting the horizontal and vertical shift. Press to set to be used to form a video wall. The indicator also lights up even if the "LED" option is no signal or unsupported signal...
... disabled. • When the "Position" option is set to the right-bottom, the POWER/STANDBY indicator lights up even when the display is set to "Full 2" for "PAP Setting" and "Multi Display" can be available without manually adjusting the horizontal and vertical shift. Press to set to be used to form a video wall. The indicator also lights up even if the "LED" option is no signal or unsupported signal...

Operating Instructions
Page 68
The "Screen" settings for a PC include the following settings; A black frame will appear on the surrounding of the picture when the display receives an input signal from the connected PC. Note that "Auto Adjustment" may not work well with certain input signals. Resets the following options: Wide Mode "Normal": Select to display the picture in the window. Note You cannot set the "Wide Mode" while using the "PAP" function or the "Multi Display" function...
The "Screen" settings for a PC include the following settings; A black frame will appear on the surrounding of the picture when the display receives an input signal from the connected PC. Note that "Auto Adjustment" may not work well with certain input signals. Resets the following options: Wide Mode "Normal": Select to display the picture in the window. Note You cannot set the "Wide Mode" while using the "PAP" function or the "Multi Display" function...
Operating Instructions
Page 69
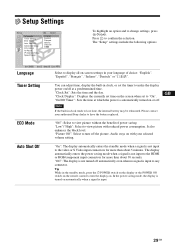
... off the picture. "Clock Set": Sets the time and the day. Please contact your language of power saving. The "Setup" settings include the following options: Sel: Set: Back: Exit: MENU Language Select to have the battery replaced. "Off": The display is not turned off at which the power is input to change settings, press F/f/G/g. Setup Settings Setup Language : Timer Setting ECO Mode: Auto Shut Off: Advanced Setup Information All Reset IP Address Setup Speed Setup HDMI 1 English Espa...
... off the picture. "Clock Set": Sets the time and the day. Please contact your language of power saving. The "Setup" settings include the following options: Sel: Set: Back: Exit: MENU Language Select to have the battery replaced. "Off": The display is not turned off at which the power is input to change settings, press F/f/G/g. Setup Settings Setup Language : Timer Setting ECO Mode: Auto Shut Off: Advanced Setup Information All Reset IP Address Setup Speed Setup HDMI 1 English Espa...
Operating Instructions
Page 70
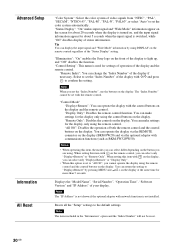
... settings of operation of the display and the remote control. You can change the "Index Number" of the display if necessary. Advanced Setup Information All Reset "Color System": Select the color system of video signals from "NTSC", "PAL", "SECAM", "NTSC4.43", "PAL-M", "PAL-N", "PAL60", or select "Auto" to set with communication functions (such as BKM-FW32/FW50). "Status Display": "On" makes input signal and "Wide Mode" information appear on the screen...
... settings of operation of the display and the remote control. You can change the "Index Number" of the display if necessary. Advanced Setup Information All Reset "Color System": Select the color system of video signals from "NTSC", "PAL", "SECAM", "NTSC4.43", "PAL-M", "PAL-N", "PAL60", or select "Auto" to set with communication functions (such as BKM-FW32/FW50). "Status Display": "On" makes input signal and "Wide Mode" information appear on the screen...
Operating Instructions
Page 72
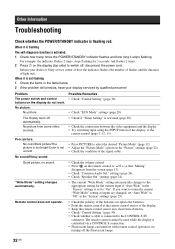
...flashes 2 times. 2 Press 1 on the display (top side) to switch off, disconnect the power cord. Inform your display serviced by qualified personnel Problem The power switch and control buttons on the remote control or + so that "Muting" disappears from some video sources. • Check if "Timer Setting" is controlled via a CONTROL S connection. • Fluorescent lamps can interfere with remote control operation; "Wide Mode" setting changes automatically. Other Information Troubleshooting Check whether the POWER/STANDBY indicator is set "Auto Wide" to "Off" in the "Screen" settings...
...flashes 2 times. 2 Press 1 on the display (top side) to switch off, disconnect the power cord. Inform your display serviced by qualified personnel Problem The power switch and control buttons on the remote control or + so that "Muting" disappears from some video sources. • Check if "Timer Setting" is controlled via a CONTROL S connection. • Fluorescent lamps can interfere with remote control operation; "Wide Mode" setting changes automatically. Other Information Troubleshooting Check whether the POWER/STANDBY indicator is set "Auto Wide" to "Off" in the "Screen" settings...
Operating Instructions
Page 74
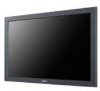
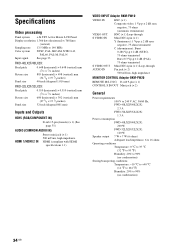
...-inch (diagonal 1,016 mm) FWD-32LX2F/32LX2X: Pixel pitch Picture size Panel size 0.510 (horizontal) × 0.510 (vertical) mm (1/32 × 1/32 inches) 698 (horizontal) × 392 (vertical) mm (27 1/2 × 15 1/2 inches) 32-inch (diagonal 801 mm) Inputs and Outputs HD15 (RGB/COMPONENT IN) D-sub 15-pin (female) (× 1) (See page 35.) AUDIO (COMMON AUDIO IN) HDMI 1/HDMI 2 IN Stereo mini jack (× 1) 500 mVrms, high impedance HDMI (compliant with HDMI specifications 1.1) VIDEO INPUT...
...-inch (diagonal 1,016 mm) FWD-32LX2F/32LX2X: Pixel pitch Picture size Panel size 0.510 (horizontal) × 0.510 (vertical) mm (1/32 × 1/32 inches) 698 (horizontal) × 392 (vertical) mm (27 1/2 × 15 1/2 inches) 32-inch (diagonal 801 mm) Inputs and Outputs HD15 (RGB/COMPONENT IN) D-sub 15-pin (female) (× 1) (See page 35.) AUDIO (COMMON AUDIO IN) HDMI 1/HDMI 2 IN Stereo mini jack (× 1) 500 mVrms, high impedance HDMI (compliant with HDMI specifications 1.1) VIDEO INPUT...
Operating Instructions
Page 75
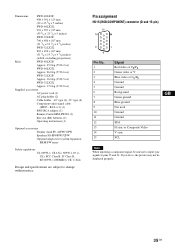
... video or CB/PB Ground Ground Red ground Green ground Blue ground Not used Ground Ground SDA H sync or Composite Video V sync SCL GB Note When inputting a component signal, be displayed properly. 35 GB RCA × 3) (1) BNC-RCA adaptor (1) Remote Control RM-FW001 (1) Size AA (R6) batteries (2) Operating instructions (1) Optional accessories Display stand SU-42FW/32FW Speakers SS-SP40FW/32FW Optional adaptors for system expansion, BKM-FW series...
... video or CB/PB Ground Ground Red ground Green ground Blue ground Not used Ground Ground SDA H sync or Composite Video V sync SCL GB Note When inputting a component signal, be displayed properly. 35 GB RCA × 3) (1) BNC-RCA adaptor (1) Remote Control RM-FW001 (1) Size AA (R6) batteries (2) Operating instructions (1) Optional accessories Display stand SU-42FW/32FW Speakers SS-SP40FW/32FW Optional adaptors for system expansion, BKM-FW series...
Operating Instructions
Page 255
..., 22 Picture 设定 19, 21 Pitch 20, 27 Position 26 POWER 开关 7 POWER ON 开关 12 POWER/STANDBY 指示灯 7 R Remote Index 29 REMOTE 连接器 9 Reset 20, 25, 27 S S VIDEO IN/OUT 连接器 9 Screen 设定 20, 24 Setup 设定 20, 28 Sharpness 19, 21 32 Sony 标志 7, 29 SOUND 键 12 Sound Mode 19, 23 Sound Mode Reset...
..., 22 Picture 设定 19, 21 Pitch 20, 27 Position 26 POWER 开关 7 POWER ON 开关 12 POWER/STANDBY 指示灯 7 R Remote Index 29 REMOTE 连接器 9 Reset 20, 25, 27 S S VIDEO IN/OUT 连接器 9 Screen 设定 20, 24 Setup 设定 20, 28 Sharpness 19, 21 32 Sony 标志 7, 29 SOUND 键 12 Sound Mode 19, 23 Sound Mode Reset...


