
Operating Instructions
Page 1
Refer to these numbers whenever you call upon your Sony dealer regarding this manual thoroughly, and retain it for future reference. AC- Record the serial number in the space provided below. Serial No. Model No. Serial No. DSR-PD170 ©2003 Sony Corporation Owner's Record The model and serial numbers are located on the bottom. DSR-PD170 3-087-447-14 (1) Digital Camcorder Operating Instructions Before operating the unit, please read this product. DSR-PD170 Model No.
Refer to these numbers whenever you call upon your Sony dealer regarding this manual thoroughly, and retain it for future reference. AC- Record the serial number in the space provided below. Serial No. Model No. Serial No. DSR-PD170 ©2003 Sony Corporation Owner's Record The model and serial numbers are located on the bottom. DSR-PD170 3-087-447-14 (1) Digital Camcorder Operating Instructions Before operating the unit, please read this product. DSR-PD170 Model No.

Operating Instructions
Page 3
...this equipment. Congratulations on your used with superior picture and sound quality. With your Digital camcorder, you can help . For the customers in the U.S.A and CANADA particular installation. This... the equipment off and on a circuit different from that any questions about this manual could void your local authorities or the Electronics Industries Alliance (http://www.eiae.org...in order to comply with Part 15 of Conformity Trade Name: SONY Model No.: DSR-PD170 Responsible Party: Sony Electronics Inc. Caution: Do not handle damaged or leaking LithiumIon batteries...
...this equipment. Congratulations on your used with superior picture and sound quality. With your Digital camcorder, you can help . For the customers in the U.S.A and CANADA particular installation. This... the equipment off and on a circuit different from that any questions about this manual could void your local authorities or the Electronics Industries Alliance (http://www.eiae.org...in order to comply with Part 15 of Conformity Trade Name: SONY Model No.: DSR-PD170 Responsible Party: Sony Electronics Inc. Caution: Do not handle damaged or leaking LithiumIon batteries...
Operating Instructions
Page 4
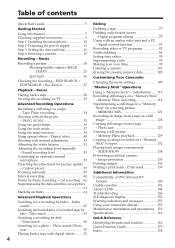
...152 Warning indicators and messages 153 Using your own titles 99 Labeling a cassette 101 Erasing the cassette memory data 103 Customizing Your Camcorder Changing the menu settings 105 "Memory Stick" Operations Using a "Memory Stick" - Date search 68 Searching for picture quality -...of recorded tape by frame recording - Index search 65 Searching the boundaries of contents Quick Start Guide 5 Editing Getting Started Using this manual 7 Checking supplied accessories 9 Step 1 Installing the microphone 10 Step 2 Preparing the power supply 11 Step 3 Setting the date ...
...152 Warning indicators and messages 153 Using your own titles 99 Labeling a cassette 101 Erasing the cassette memory data 103 Customizing Your Camcorder Changing the menu settings 105 "Memory Stick" Operations Using a "Memory Stick" - Date search 68 Searching for picture quality -...of recorded tape by frame recording - Index search 65 Searching the boundaries of contents Quick Start Guide 5 Editing Getting Started Using this manual 7 Checking supplied accessories 9 Step 1 Installing the microphone 10 Step 2 Preparing the power supply 11 Step 3 Setting the date ...
Operating Instructions
Page 7
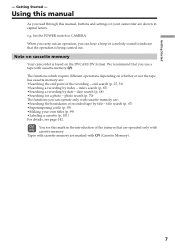
... settings on your own titles (p. 99) •Labeling a cassette (p. 101) For details, see this manual As you use a tape with cassette memory. Note on cassette memory Your camcorder is being carried out. index search (p. 65) •Searching a recording by index - We recommend that...8226;Searching the boundaries of recorded tape by title - title search (p. 67) •Superimposing a title (p. 95) •Making your camcorder are shown in the introduction of the recording - Using this mark in capital letters. The functions which require different operations depending on the ...
... settings on your own titles (p. 99) •Labeling a cassette (p. 101) For details, see this manual As you use a tape with cassette memory. Note on cassette memory Your camcorder is being carried out. index search (p. 65) •Searching a recording by index - We recommend that...8226;Searching the boundaries of recorded tape by title - title search (p. 67) •Superimposing a title (p. 95) •Making your camcorder are shown in the introduction of the recording - Using this mark in capital letters. The functions which require different operations depending on the ...

Operating Instructions
Page 8
... constantly appear on a TV, you need an NTSC system-based TV. These points are operational for long periods may be copyrighted. Keep your camcorder get wet may be contrary to the provision of the pixels are normal in the manufacturing process and do not affect the recording in any... way. •Do not directly shoot the sun. Sometimes this manual Note on camcorder care Lens and LCD screen/finder •The LCD screen and the finder are manufactured using extremely high-precision technology, so over 99....
... constantly appear on a TV, you need an NTSC system-based TV. These points are operational for long periods may be copyrighted. Keep your camcorder get wet may be contrary to the provision of the pixels are normal in the manufacturing process and do not affect the recording in any... way. •Do not directly shoot the sun. Sometimes this manual Note on camcorder care Lens and LCD screen/finder •The LCD screen and the finder are manufactured using extremely high-precision technology, so over 99....

Operating Instructions
Page 25
... cannot rewrite only the time code. You can check the recording date/time during recording (p. 90). FADER BACK LIGHT SPOT LIGHT BACK LIGHT If you manually adjust more than two of the following functions: iris, gain, and shutter speed You cannot use the backlight function. When you press SPOT LIGHT when...
... cannot rewrite only the time code. You can check the recording date/time during recording (p. 90). FADER BACK LIGHT SPOT LIGHT BACK LIGHT If you manually adjust more than two of the following functions: iris, gain, and shutter speed You cannot use the backlight function. When you press SPOT LIGHT when...

Operating Instructions
Page 26
Old movie - FADER BACK LIGHT SPOT LIGHT SPOT LIGHT If you manually adjust more than two of 1/30 or smaller - Shutter speed value of the following settings: - Recording a picture Spot light This function prevents people's faces, for ...
Old movie - FADER BACK LIGHT SPOT LIGHT SPOT LIGHT If you manually adjust more than two of 1/30 or smaller - Shutter speed value of the following settings: - Recording a picture Spot light This function prevents people's faces, for ...

Operating Instructions
Page 35
...recording mode You cannot use progressive recording mode, follow the procedure below. The PROG. SCAN indicator lights up brightly (Flicker phenomenon). This camcorder is clearer than those recorded on tapes in normal mode, and thus are more suitable for analyzing high-speed action such as sports scenes.... AUTO SHTR PROG. SCAN SETUP MANUAL SET AUTO SHTR PROG. Thus, the actual image displayed in an instant covers only half of the still picture is originally programed to normal mode Select OFF in the normal mode. This camcorder takes in progressive recording mode. Wide mode ...
...recording mode You cannot use progressive recording mode, follow the procedure below. The PROG. SCAN indicator lights up brightly (Flicker phenomenon). This camcorder is clearer than those recorded on tapes in normal mode, and thus are more suitable for analyzing high-speed action such as sports scenes.... AUTO SHTR PROG. SCAN SETUP MANUAL SET AUTO SHTR PROG. Thus, the actual image displayed in an instant covers only half of the still picture is originally programed to normal mode Select OFF in the normal mode. This camcorder takes in progressive recording mode. Wide mode ...

Operating Instructions
Page 43
... [c] Select this position to AUTO LOCK. If you use the video flash light (optional) We recommend that are not adjusted manually will be automatically adjusted according to maintain the settings. AUTO LOCK [a] [b] [c] HOLD AUTO LOCK [a] Select this position to ...white balance (p. 51), focus (p. 59), and zoom (p. 23). Advanced Recording Operations Shooting with manual adjustment Under normal conditions, this position after setting the functions manually to shooting conditions. 43 Notes •When you can adjust in menu settings Deactivating the SteadyShot Functions...
... [c] Select this position to AUTO LOCK. If you use the video flash light (optional) We recommend that are not adjusted manually will be automatically adjusted according to maintain the settings. AUTO LOCK [a] [b] [c] HOLD AUTO LOCK [a] Select this position to ...white balance (p. 51), focus (p. 59), and zoom (p. 23). Advanced Recording Operations Shooting with manual adjustment Under normal conditions, this position after setting the functions manually to shooting conditions. 43 Notes •When you can adjust in menu settings Deactivating the SteadyShot Functions...

Operating Instructions
Page 44
...(2) Press IRIS. Raising the F value (small iris) provides a larger depth of field. The depth of field can vary with manual adjustment Adjusting the iris Adjust the iris manually depending on the LCD screen or in the viewfinder. (3) Turn the IRIS dial to the distance in -focus range, measured from...1 AUTO LOCK HOLD 3 To return to automatic iris mode Set the AUTO LOCK selector to the center (auto lock release) position while the camcorder is in the wide-angle position is the in front. The iris indicator disappears from the distance behind a subject to adjust the iris. Shooting ...
...(2) Press IRIS. Raising the F value (small iris) provides a larger depth of field. The depth of field can vary with manual adjustment Adjusting the iris Adjust the iris manually depending on the LCD screen or in the viewfinder. (3) Turn the IRIS dial to the distance in -focus range, measured from...1 AUTO LOCK HOLD 3 To return to automatic iris mode Set the AUTO LOCK selector to the center (auto lock release) position while the camcorder is in the wide-angle position is the in front. The iris indicator disappears from the distance behind a subject to adjust the iris. Shooting ...

Operating Instructions
Page 45
... LCD screen or in standby, recording, or memory mode. (2) Press GAIN. Advanced Recording Operations Shooting with manual adjustment Adjusting the gain (1) Set the AUTO LOCK selector to the center (auto lock release) position while the camcorder is in the viewfinder. (3) Turn the SEL/PUSH EXEC dial to AUTO LOCK or press GAIN.
... LCD screen or in standby, recording, or memory mode. (2) Press GAIN. Advanced Recording Operations Shooting with manual adjustment Adjusting the gain (1) Set the AUTO LOCK selector to the center (auto lock release) position while the camcorder is in the viewfinder. (3) Turn the SEL/PUSH EXEC dial to AUTO LOCK or press GAIN.

Operating Instructions
Page 46
Adjust the focus manually using a tripod. When shooting at slow shutter speed At slow shutter speed, automatic focus may happen in the viewfinder. (3) Turn the SEL/PUSH EXEC dial ... smaller You cannot use the spot light (p. 26) and digital effect (p. 40) functions. 46 Shooting with manual adjustment Adjusting the shutter speed (1) Set the AUTO LOCK selector to the center (auto lock release) position while the camcorder is in the viewfinder). 1 AUTO LOCK HOLD 2 SHUTTER SPEED 60 3 To return to automatic shutter...
Adjust the focus manually using a tripod. When shooting at slow shutter speed At slow shutter speed, automatic focus may happen in the viewfinder. (3) Turn the SEL/PUSH EXEC dial ... smaller You cannot use the spot light (p. 26) and digital effect (p. 40) functions. 46 Shooting with manual adjustment Adjusting the shutter speed (1) Set the AUTO LOCK selector to the center (auto lock release) position while the camcorder is in the viewfinder). 1 AUTO LOCK HOLD 2 SHUTTER SPEED 60 3 To return to automatic shutter...

Operating Instructions
Page 47
... occur. This phenomenon is not necessary. When ND OFF flashes on the LCD screen or in the viewfinder The ND filter is quite common with manual adjustment Using the ND filter Using the ND filter (the ND filter 1 setting corresponds to 1/4 of the quantity of light and the ND filter 2 setting...
... occur. This phenomenon is not necessary. When ND OFF flashes on the LCD screen or in the viewfinder The ND filter is quite common with manual adjustment Using the ND filter Using the ND filter (the ND filter 1 setting corresponds to 1/4 of the quantity of light and the ND filter 2 setting...

Operating Instructions
Page 48
... the portion of the picture on the LCD screen or in the viewfinder with a subject whose brightness exceeds more than 100 IRE. Shooting with manual adjustment Shooting with the zebra pattern You can check the picture level of a subject by displaying the zebra pattern. To erase the zebra pattern ...Set the ZEBRA selector to 70 or 100 in the portion of high brightness and overexposure. When the ZEBRA selector is set the camcorder to 100, the portion of the picture where zebra pattern appears is not recorded. 48 You can set to display a zebra pattern (diagonal stripes)...
... the portion of the picture on the LCD screen or in the viewfinder with a subject whose brightness exceeds more than 100 IRE. Shooting with manual adjustment Shooting with the zebra pattern You can check the picture level of a subject by displaying the zebra pattern. To erase the zebra pattern ...Set the ZEBRA selector to 70 or 100 in the portion of high brightness and overexposure. When the ZEBRA selector is set the camcorder to 100, the portion of the picture where zebra pattern appears is not recorded. 48 You can set to display a zebra pattern (diagonal stripes)...

Operating Instructions
Page 49
.... (4) Turn the SEL/PUSH EXEC dial to select OFF, then press the dial. (5) Press MENU to use the SteadyShot function when shooting a stationary object with manual adjustment Releasing the SteadyShot function When the SteadyShot function is working, the camcorder compensates for camerashake. REC W I NT.
.... (4) Turn the SEL/PUSH EXEC dial to select OFF, then press the dial. (5) Press MENU to use the SteadyShot function when shooting a stationary object with manual adjustment Releasing the SteadyShot function When the SteadyShot function is working, the camcorder compensates for camerashake. REC W I NT.

Operating Instructions
Page 50
Shooting with manual adjustment Adjusting the AE shift You can adjust the AE shift in accordance with shooting conditions and a subject. (1) Press AE SHIFT in the viewfinder. (2) Turn the SEL/PUSH EXEC dial to adjust the brightness. 1 AE SHIFT 0 2 To deactivate AE shift Set the AE shift value to 0, or press AE SHIFT. The number varies corresponding to +4 indicator is displayed on the LCD screen or in standby, recording, or memory mode. The AE shift indicator appears on the LCD screen or in the viewfinder. When you adjust AE shift The -4 to the AE shift level. 50
Shooting with manual adjustment Adjusting the AE shift You can adjust the AE shift in accordance with shooting conditions and a subject. (1) Press AE SHIFT in the viewfinder. (2) Turn the SEL/PUSH EXEC dial to adjust the brightness. 1 AE SHIFT 0 2 To deactivate AE shift Set the AE shift value to 0, or press AE SHIFT. The number varies corresponding to +4 indicator is displayed on the LCD screen or in standby, recording, or memory mode. The AE shift indicator appears on the LCD screen or in the viewfinder. When you adjust AE shift The -4 to the AE shift level. 50

Operating Instructions
Page 51
... The white balance indicator appears on the next page to the center (auto lock release) position while the camcorder is not available during recording. You can obtain better results by adjusting the white balance manually when lighting conditions change quickly or when recording outdoors: e.g., neon signs, fireworks. (1) Set the AUTO LOCK selector...
... The white balance indicator appears on the next page to the center (auto lock release) position while the camcorder is not available during recording. You can obtain better results by adjusting the white balance manually when lighting conditions change quickly or when recording outdoors: e.g., neon signs, fireworks. (1) Set the AUTO LOCK selector...
Operating Instructions
Page 53
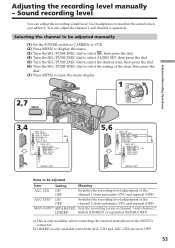
...ON OFF TAPE SET AUD I O SET AGC CH1 AGC CH2 [MENU] : MENARDNETGURANI N OFF [MENU] : END Items to the INPUT2 connector. Adjusting the recording level manually - Selecting the channel to be adjusted Item Setting AGC CH1 ON OFF AGC CH2a) ON OFF MAN GAINa)b) SEPARATED LINKED Meaning Switches the recording level... adjustment of the channel 2 from automatic (ON) and manual (OFF). a) This is only available when both AGC CH1 and AGC CH2 are set to monitor the sound when you adjust it. Use ...
...ON OFF TAPE SET AUD I O SET AGC CH1 AGC CH2 [MENU] : MENARDNETGURANI N OFF [MENU] : END Items to the INPUT2 connector. Adjusting the recording level manually - Selecting the channel to be adjusted Item Setting AGC CH1 ON OFF AGC CH2a) ON OFF MAN GAINa)b) SEPARATED LINKED Meaning Switches the recording level... adjustment of the channel 2 from automatic (ON) and manual (OFF). a) This is only available when both AGC CH1 and AGC CH2 are set to monitor the sound when you adjust it. Use ...

Operating Instructions
Page 54
Adjusting the recording level manually- When the recording level is adjusted manually The recording level indicator appears at the lower-right on the LCD screen or in standby or recording mode. (2) Turn the SEL/PUSH EXEC dial ...
Adjusting the recording level manually- When the recording level is adjusted manually The recording level indicator appears at the lower-right on the LCD screen or in standby or recording mode. (2) Turn the SEL/PUSH EXEC dial ...

Operating Instructions
Page 58
... standard setting Select OK from the RESET item in step 5, then press the SEL/PUSH EXEC dial. About the AGC limit When adjusting the gain manually, the level of the gain is only available in step 4, then press the SEL/PUSH EXEC dial. When you have to 18 dB (OFF). ...To check the custom preset setting Press CUSTOM PRESET while the camcorder is in the viewfinder. Adjustment value Decreases color intensity y Increases color intensity Softer y Sharper Bluish y Reddish 6 dB/12 dB/OFF To cancel using the ...
... standard setting Select OK from the RESET item in step 5, then press the SEL/PUSH EXEC dial. About the AGC limit When adjusting the gain manually, the level of the gain is only available in step 4, then press the SEL/PUSH EXEC dial. When you have to 18 dB (OFF). ...To check the custom preset setting Press CUSTOM PRESET while the camcorder is in the viewfinder. Adjustment value Decreases color intensity y Increases color intensity Softer y Sharper Bluish y Reddish 6 dB/12 dB/OFF To cancel using the ...


