Operating Instructions
Page 4
... indicators and messages 153 Using your own titles 99 Labeling a cassette 101 Erasing the cassette memory data 103 Customizing Your Camcorder Changing the menu settings 105 "Memory Stick" Operations Using a "Memory Stick" - Table of recorded tape by title - Photo search/Photo ...all the pixels - Signal convert function 81 Recording video or TV programs 82 Audio dubbing 86 Setting time values 90 Superimposing a title 95 Making your camcorder abroad 155 Maintenance information and precautions .. 156 Specifications 161 Quick Reference Identifying the parts and controls ...
... indicators and messages 153 Using your own titles 99 Labeling a cassette 101 Erasing the cassette memory data 103 Customizing Your Camcorder Changing the menu settings 105 "Memory Stick" Operations Using a "Memory Stick" - Table of recorded tape by title - Photo search/Photo ...all the pixels - Signal convert function 81 Recording video or TV programs 82 Audio dubbing 86 Setting time values 90 Superimposing a title 95 Making your camcorder abroad 155 Maintenance information and precautions .. 156 Specifications 161 Quick Reference Identifying the parts and controls ...
Operating Instructions
Page 6
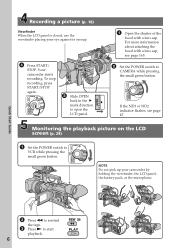
... page 165. 2 Set the POWER switch to open the LCD panel. MEMORY OFF CAMERA (CHG) VCR NOTE Do not pick up your eye against its eyecup. PLAY 6 Recording a picture (p. 18) Viewfinder When the LCD panel is closed, use the viewfinder placing your camcorder by holding the viewfinder...with a lens cap, see page 47. MEMORY OFF CAMERA (CHG) VCR 4 Press START/ STOP. Your camcorder starts recording. Monitoring the playback picture on the LCD screen (p. 28) 1 POWER Set the POWER switch to start playback. For more information about attaching the hood with a lens cap. Quick ...
... page 165. 2 Set the POWER switch to open the LCD panel. MEMORY OFF CAMERA (CHG) VCR NOTE Do not pick up your eye against its eyecup. PLAY 6 Recording a picture (p. 18) Viewfinder When the LCD panel is closed, use the viewfinder placing your camcorder by holding the viewfinder...with a lens cap, see page 47. MEMORY OFF CAMERA (CHG) VCR 4 Press START/ STOP. Your camcorder starts recording. Monitoring the playback picture on the LCD screen (p. 28) 1 POWER Set the POWER switch to start playback. For more information about attaching the hood with a lens cap. Quick ...
Operating Instructions
Page 7
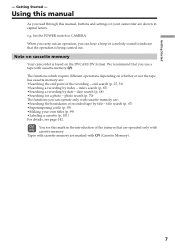
... depending on cassette memory Your camcorder is being carried out. photo search (p. 70) The functions you read through this mark in capital letters. title search (p. 67) •Superimposing a title (p. 95) •Making your own titles (p. 99) •Labeling a cassette (p. 101) For details, see this manual, buttons and settings on the DVCAM/DV...
... depending on cassette memory Your camcorder is being carried out. photo search (p. 70) The functions you read through this mark in capital letters. title search (p. 67) •Superimposing a title (p. 95) •Making your own titles (p. 99) •Labeling a cassette (p. 101) For details, see this manual, buttons and settings on the DVCAM/DV...
Operating Instructions
Page 10
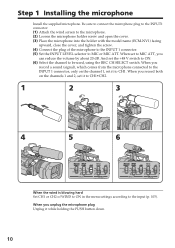
...model name (ECM-NV1) facing upward, close the cover, and tighten the screw. (4) Connect the plug of WIND to ON in the menu settings according to be used, using the REC CH SELECT switch. Step 1 Installing the microphone Install the supplied microphone. When you record both on ...the channel 1, set it while holding the PUSH button down. 10 When you record a sound (signal), which comes from the microphone connected to the INPUT 1 connector...
...model name (ECM-NV1) facing upward, close the cover, and tighten the screw. (4) Connect the plug of WIND to ON in the menu settings according to be used, using the REC CH SELECT switch. Step 1 Installing the microphone Install the supplied microphone. When you record both on ...the channel 1, set it while holding the PUSH button down. 10 When you record a sound (signal), which comes from the microphone connected to the INPUT 1 connector...

Operating Instructions
Page 12
...plug's v mark facing toward the LCD panel side. (2) Connect the power cord to the AC Adaptor. (3) Connect the power cord to a wall outlet. (4) Set the POWER switch to be correct, depending on the conditions in which you close the LCD panel and open it again, it takes about one...is completed. Note on the remaining battery time indicator The remaining battery time indicator on the LCD screen/display window or in minutes on your camcorder to u, normal charge is indicated in the viewfinder indicates the recording time using the viewfinder. The indicator may not be displayed. 12 Fully...
...plug's v mark facing toward the LCD panel side. (2) Connect the power cord to the AC Adaptor. (3) Connect the power cord to a wall outlet. (4) Set the POWER switch to be correct, depending on the conditions in which you close the LCD panel and open it again, it takes about one...is completed. Note on the remaining battery time indicator The remaining battery time indicator on the LCD screen/display window or in minutes on your camcorder to u, normal charge is indicated in the viewfinder indicates the recording time using the viewfinder. The indicator may not be displayed. 12 Fully...

Operating Instructions
Page 15
... when the power cord is connected to a wall outlet. 1 2,3 Precaution The set is not disconnected from a wall outlet using the AC Adaptor. (1) Open the DC IN jack cover and connect the AC Adaptor to the DC IN jack on your camcorder with the plug's v mark facing toward the LCD panel side. (2) Connect... the power cord to the AC Adaptor. (3) Connect the power cord to the wall outlet, even if the set itself has been turned off. Using a car battery Use the Sony DC Adaptor/Charger (optional). 15...
... when the power cord is connected to a wall outlet. 1 2,3 Precaution The set is not disconnected from a wall outlet using the AC Adaptor. (1) Open the DC IN jack cover and connect the AC Adaptor to the DC IN jack on your camcorder with the plug's v mark facing toward the LCD panel side. (2) Connect... the power cord to the AC Adaptor. (3) Connect the power cord to the wall outlet, even if the set itself has been turned off. Using a car battery Use the Sony DC Adaptor/Charger (optional). 15...
Operating Instructions
Page 16
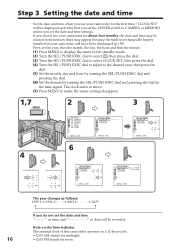
... may appear) because the built-in rechargeable battery installed in your camcorder for noon. The clock starts to move. (7) Press MENU to make the menu settings disappear. 1,7 2 3 MENU 4 2005 JAN 1 12 00 AM TC/UB SET TC PRESET UB PRESET TC FORMAT TC RUN TC MAKE UB T...MENU] : END SETUP MENU CLOCK SET JUL 4 2005 LTR S I ME [MENU] : END 6 SETUP MENU CLOCK SET --:--:-- If you do not use your camcorder will have been discharged (p.158). Step 3 Setting the date and time Set the date and time when you set the date and time settings. "CLOCK SET" will be cleared from memory ...
... may appear) because the built-in rechargeable battery installed in your camcorder for noon. The clock starts to move. (7) Press MENU to make the menu settings disappear. 1,7 2 3 MENU 4 2005 JAN 1 12 00 AM TC/UB SET TC PRESET UB PRESET TC FORMAT TC RUN TC MAKE UB T...MENU] : END SETUP MENU CLOCK SET JUL 4 2005 LTR S I ME [MENU] : END 6 SETUP MENU CLOCK SET --:--:-- If you do not use your camcorder will have been discharged (p.158). Step 3 Setting the date and time Set the date and time when you set the date and time settings. "CLOCK SET" will be cleared from memory ...

Operating Instructions
Page 18
... the front and rear of the ND FILTER selector before shooting. Recording - For more information. (3) Set the POWER switch to CAMERA while pressing the small green button. Recording a picture Your camcorder automatically focuses for more information about attaching the hood with a lens cap. See "Step 2" to .... To stop recording, press START/STOP again. However, if you check the position of your camcorder light up. We recommend that you change or audio noise may occur. This is set to 1 or 2. Note Fasten the grip strap firmly. 18 Basics - The "REC" indicator...
... the front and rear of the ND FILTER selector before shooting. Recording - For more information. (3) Set the POWER switch to CAMERA while pressing the small green button. Recording a picture Your camcorder automatically focuses for more information about attaching the hood with a lens cap. See "Step 2" to .... To stop recording, press START/STOP again. However, if you check the position of your camcorder light up. We recommend that you change or audio noise may occur. This is set to 1 or 2. Note Fasten the grip strap firmly. 18 Basics - The "REC" indicator...

Operating Instructions
Page 19
... tape wear and save the battery power. Usable cassettes You can make longer recording, use the mini DV cassette. When you set to the left when you record on your camcorder. Note on the LOCK switch When you slide the LOCK switch to the left, the POWER switch can no longer be...images on a cassette. The playback picture may be distorted or the time code may not be set PROG. Notes •If you set REC MODE to DVCAM in the DV format, the transition of the camcorder automatically stops rotating. We recommend that you recorded and the next scene is played back. To enable...
... tape wear and save the battery power. Usable cassettes You can make longer recording, use the mini DV cassette. When you set to the left when you record on your camcorder. Note on the LOCK switch When you slide the LOCK switch to the left, the POWER switch can no longer be...images on a cassette. The playback picture may be distorted or the time code may not be set PROG. Notes •If you set REC MODE to DVCAM in the DV format, the transition of the camcorder automatically stops rotating. We recommend that you recorded and the next scene is played back. To enable...
Operating Instructions
Page 20
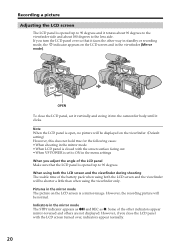
... in the mirror mode •When LCD panel is closed with the LCD screen turned over so that the LCD panel is set it vertically and swing it into the camcorder body until it rotates about 90 degrees to the viewfinder side and about 180 degrees to 90 degrees. However, the recording... of the battery pack when using the viewfinder only. When using both the LCD screen and the viewfinder will be displayed on the viewfinder. (Default setting) However, this does not hold true for the following cases: •When shooting in the mirror mode The picture on the LCD screen and in...
... in the mirror mode •When LCD panel is closed with the LCD screen turned over so that the LCD panel is set it vertically and swing it into the camcorder body until it rotates about 90 degrees to the viewfinder side and about 180 degrees to 90 degrees. However, the recording... of the battery pack when using the viewfinder only. When using both the LCD screen and the viewfinder will be displayed on the viewfinder. (Default setting) However, this does not hold true for the following cases: •When shooting in the mirror mode The picture on the LCD screen and in...
Operating Instructions
Page 21
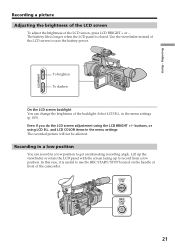
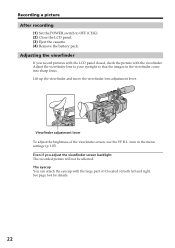
...LCD BRIGHT + or -. buttons, or using the LCD BRIGHT +/- To brighten To darken On the LCD screen backlight You can record in the menu settings The recorded picture will not be affected. START/ STOP REC REC START/ STOP 21 and LCD COLOR items in a low position to record from a ... is closed. Even if you do the LCD screen adjustment using LCD B.L. Recording in a low position You can change the brightness of the camcorder. Recording - in the menu settings (p. 105). Lift up the viewfinder or rotate the LCD panel with the screen facing up to get an interesting recording angle.
...LCD BRIGHT + or -. buttons, or using the LCD BRIGHT +/- To brighten To darken On the LCD screen backlight You can record in the menu settings The recorded picture will not be affected. START/ STOP REC REC START/ STOP 21 and LCD COLOR items in a low position to record from a ... is closed. Even if you do the LCD screen adjustment using LCD B.L. Recording in a low position You can change the brightness of the camcorder. Recording - in the menu settings (p. 105). Lift up the viewfinder or rotate the LCD panel with the screen facing up to get an interesting recording angle.
Operating Instructions
Page 22
... viewfinder come into sharp focus. The eyecup You can attach the eyecup with the viewfinder. Recording a picture After recording (1) Set the POWER switch to your eyesight so that the images in the menu settings (p. 105). Adjust the viewfinder lens to OFF (CHG). (2) Close the LCD panel. (3) Eject the cassette. (4) Remove the battery...
... viewfinder come into sharp focus. The eyecup You can attach the eyecup with the viewfinder. Recording a picture After recording (1) Set the POWER switch to your eyesight so that the images in the menu settings (p. 105). Adjust the viewfinder lens to OFF (CHG). (2) Close the LCD panel. (3) Eject the cassette. (4) Remove the battery...

Operating Instructions
Page 23
... zoom switch. "T" side: for telephoto (subject appears closer) "W" side: for a slower zoom. H: Fast L: Slow Handle zoom switch W T T W T W Notes •When the handle zoom switch is set to the zoom ring adjustment. To zoom with the zoom ring Using the zoom ring, you can control the zoom by your desired speed and... function sparingly results in the wide-angle position. Press it deeper for a faster zoom. When you cannot get a sharp focus, press the "W" side of the camcorder.
... zoom switch. "T" side: for telephoto (subject appears closer) "W" side: for a slower zoom. H: Fast L: Slow Handle zoom switch W T T W T W Notes •When the handle zoom switch is set to the zoom ring adjustment. To zoom with the zoom ring Using the zoom ring, you can control the zoom by your desired speed and... function sparingly results in the wide-angle position. Press it deeper for a faster zoom. When you cannot get a sharp focus, press the "W" side of the camcorder.
Operating Instructions
Page 24
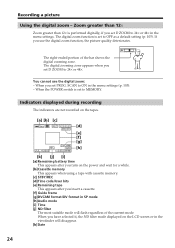
...code/User bits [e] Remaining tape This appears after you insert a cassette. [f] Guide frame [g]DVCAM format/DV format in the menu settings (p. 105). - If you set PROG. The digital zooming zone appears when you use the digital zoom: - You cannot use the digital zoom function, the picture quality... [h] [k] [j] [i] [a] Remaining battery time This appears after you turn on the LCD screen or in the menu settings. When the POWER switch is performed digitally, if you set D ZOOM to 24× or 48× in the viewfinder will flash regardless of the bar shows the digital...
...code/User bits [e] Remaining tape This appears after you insert a cassette. [f] Guide frame [g]DVCAM format/DV format in the menu settings (p. 105). - If you set PROG. The digital zooming zone appears when you use the digital zoom: - You cannot use the digital zoom function, the picture quality... [h] [k] [j] [i] [a] Remaining battery time This appears after you turn on the LCD screen or in the menu settings. When the POWER switch is performed digitally, if you set D ZOOM to 24× or 48× in the viewfinder will flash regardless of the bar shows the digital...

Operating Instructions
Page 25
... the subject or a subject with the date and time, you want to ON in the menu settings. The . When you cannot erase them. Note on date/time Recording date/time is not displayed during shooting, set DATE REC to display the date and time during shooting, however, it is automatically recorded on...
... the subject or a subject with the date and time, you want to ON in the menu settings. The . When you cannot erase them. Note on date/time Recording date/time is not displayed during shooting, set DATE REC to display the date and time during shooting, however, it is automatically recorded on...

Operating Instructions
Page 26
... using the spot light function The spot light function will be canceled and the backlight function will be enabled. Shutter speed value of the following settings: - Recording a picture Spot light This function prevents people's faces, for example, from appearing excessively white when shooting subjects lit by strong light, such as in...
... using the spot light function The spot light function will be canceled and the backlight function will be enabled. Shutter speed value of the following settings: - Recording a picture Spot light This function prevents people's faces, for example, from appearing excessively white when shooting subjects lit by strong light, such as in...

Operating Instructions
Page 28
... MEMORY OFF CAMERA (CHG) VCR 28 Playing back a tape You can also control playback using the Remote Commander supplied with your camcorder. (1) Install the power source and insert the recorded tape. (2) Set the POWER switch to start playback. (6) To adjust the volume, press either of the VOLUME +/- The video control buttons light...
... MEMORY OFF CAMERA (CHG) VCR 28 Playing back a tape You can also control playback using the Remote Commander supplied with your camcorder. (1) Install the power source and insert the recorded tape. (2) Set the POWER switch to start playback. (6) To adjust the volume, press either of the VOLUME +/- The video control buttons light...

Operating Instructions
Page 30
... Shutter speed [f] Aperture value To not display the various settings Set DATA CODE to minimum "CLOSE" is displayed at the location of the tape is set to DATE in the menu settings (p. 105). Data code When you record with your camcorder to the TV, the data code also appears on the ... date/time is automatically recorded on the tape but also the recording data (date/time or various settings when recorded) (Data code). However, once you connect your camcorder in the menu settings. You can check the recording date/time during shooting, however, it is not displayed during playback...
... Shutter speed [f] Aperture value To not display the various settings Set DATA CODE to minimum "CLOSE" is displayed at the location of the tape is set to DATE in the menu settings (p. 105). Data code When you record with your camcorder to the TV, the data code also appears on the ... date/time is automatically recorded on the tape but also the recording data (date/time or various settings when recorded) (Data code). However, once you connect your camcorder in the menu settings. You can check the recording date/time during shooting, however, it is not displayed during playback...

Operating Instructions
Page 31
... speed (slow playback) Press y during playback. Playback - Basics Playing back a tape Various playback modes To operate video control buttons, set the POWER switch to reverse the playback direction. To change the playback direction Press on the Remote Commander. To resume normal playback, press... N. For frame-by -frame Press C on your camcorder, however, this function does not work for five minutes Your camcorder automatically enters the stop mode. To search the last scene recorded (END SEARCH) Press END SEARCH in...
... speed (slow playback) Press y during playback. Playback - Basics Playing back a tape Various playback modes To operate video control buttons, set the POWER switch to reverse the playback direction. To change the playback direction Press on the Remote Commander. To resume normal playback, press... N. For frame-by -frame Press C on your camcorder, however, this function does not work for five minutes Your camcorder automatically enters the stop mode. To search the last scene recorded (END SEARCH) Press END SEARCH in...
Operating Instructions
Page 33
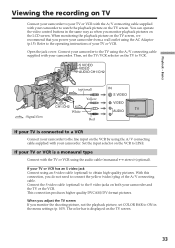
... when you monitor the shooting picture, not the playback picture, set the TV/VCR selector on the TV to watch the playback picture on TV Connect your camcorder to your TV or VCR with the A/V connecting cable supplied with your camcorder to VCR. Basics Viewing the recording on the TV screen. ... your TV or VCR is a monaural type Connect with your TV is displayed on both your camcorder from a wall outlet using the A/V connecting cable supplied with your camcorder. Set the input selector on the VCR to the S video jacks on the TV screen. 33 If your TV or VCR has an S ...
... when you monitor the shooting picture, not the playback picture, set the TV/VCR selector on the TV to watch the playback picture on TV Connect your camcorder to your TV or VCR with the A/V connecting cable supplied with your camcorder to VCR. Basics Viewing the recording on the TV screen. ... your TV or VCR is a monaural type Connect with your TV is displayed on both your camcorder from a wall outlet using the A/V connecting cable supplied with your camcorder. Set the input selector on the VCR to the S video jacks on the TV screen. 33 If your TV or VCR has an S ...


