Operating Instructions
Page 6
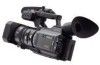
.... Recording a picture (p. 18) Viewfinder When the LCD panel is closed, use the viewfinder placing your camcorder by holding the viewfinder, the LCD panel, the battery pack, or the microphone. Your camcorder starts recording. PLAY 6 OPEN MEMORY OFF CAMERA (CHG) VCR 1 Open the shutter of the hood with a lens cap, see page 47. POWER...
.... Recording a picture (p. 18) Viewfinder When the LCD panel is closed, use the viewfinder placing your camcorder by holding the viewfinder, the LCD panel, the battery pack, or the microphone. Your camcorder starts recording. PLAY 6 OPEN MEMORY OFF CAMERA (CHG) VCR 1 Open the shutter of the hood with a lens cap, see page 47. POWER...
Operating Instructions
Page 7
...search (p. 65) •Searching a recording by index - Set the POWER switch to indicate that the operation is based on cassette memory Your camcorder is being carried out. Note on the DVCAM/DV format. end search (p. 27, 31) •Searching a recording by date - photo... Getting Started - title search (p. 67) •Superimposing a title (p. 95) •Making your camcorder are shown in the introduction of the features that you can hear a beep or a melody sound to CAMERA. We recommend that are marked with cassette memory. date search (p. 68) •Searching for a photo...
...search (p. 65) •Searching a recording by index - Set the POWER switch to indicate that the operation is based on cassette memory Your camcorder is being carried out. Note on the DVCAM/DV format. end search (p. 27, 31) •Searching a recording by date - photo... Getting Started - title search (p. 67) •Superimposing a title (p. 95) •Making your camcorder are shown in the introduction of the features that you can hear a beep or a melody sound to CAMERA. We recommend that are marked with cassette memory. date search (p. 68) •Searching for a photo...

Operating Instructions
Page 8
...pixels are operational for long periods may cause malfunctions [c]. [a] [b] [c] Contents of the recording cannot be repaired [a]. •Never leave your camcorder to malfunction. Take pictures of the copyright laws. Exposing the LCD screen, the finder or the lens to the provision of the sun in ...the sun or under direct sunlight [b]. •Be careful when placing the camera near a window or outdoors. Doing so might cause your camcorder get wet may be contrary to direct sunlight for effective use. Sometimes this manual Note on a TV, ...
...pixels are operational for long periods may cause malfunctions [c]. [a] [b] [c] Contents of the recording cannot be repaired [a]. •Never leave your camcorder to malfunction. Take pictures of the copyright laws. Exposing the LCD screen, the finder or the lens to the provision of the sun in ...the sun or under direct sunlight [b]. •Be careful when placing the camera near a window or outdoors. Doing so might cause your camcorder get wet may be contrary to direct sunlight for effective use. Sometimes this manual Note on a TV, ...

Operating Instructions
Page 12
...When the remaining battery indicator changes to use the battery longer than usual. 4 POWER VCR 1 MEMORY OFF CAMERA (CHG) After charging the battery pack Disconnect the AC Adaptor from the DC IN jack on your camcorder to the DC IN jack with the plug's v mark facing toward the LCD panel side. (2) Connect ... and open it again, it takes about one minute for about one hour after charging it. When you to u, normal charge is completed. Your camcorder operates only with the "InfoLITHIUM" battery pack (L series). (1) Open the DC IN jack cover and connect the AC Adaptor supplied with your...
...When the remaining battery indicator changes to use the battery longer than usual. 4 POWER VCR 1 MEMORY OFF CAMERA (CHG) After charging the battery pack Disconnect the AC Adaptor from the DC IN jack on your camcorder to the DC IN jack with the plug's v mark facing toward the LCD panel side. (2) Connect ... and open it again, it takes about one minute for about one hour after charging it. When you to u, normal charge is completed. Your camcorder operates only with the "InfoLITHIUM" battery pack (L series). (1) Open the DC IN jack cover and connect the AC Adaptor supplied with your...
Operating Instructions
Page 16
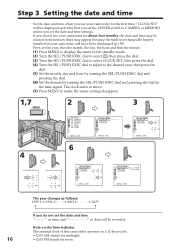
...follows: 1995 1996 2003 2079 If you do not use your camcorder will be displayed each time that you set the POWER switch to CAMERA or MEMORY unless you do not set the date and time... as time, and as date will have been discharged (p.158). Step 3 Setting the date and time Set the date and time when you use your camcorder..., then the month, the day, the hour and then the minute. (1) Press MENU to display the menu in your camcorder for noon. LTR S I ZE RETURN [MENU] : END SETUP MENU CLOCK SET LTR S I ZE RETURN 2003 JAN...
...follows: 1995 1996 2003 2079 If you do not use your camcorder will be displayed each time that you set the POWER switch to CAMERA or MEMORY unless you do not set the date and time... as time, and as date will have been discharged (p.158). Step 3 Setting the date and time Set the date and time when you use your camcorder..., then the month, the day, the hour and then the minute. (1) Press MENU to display the menu in your camcorder for noon. LTR S I ZE RETURN [MENU] : END SETUP MENU CLOCK SET LTR S I ZE RETURN 2003 JAN...

Operating Instructions
Page 18
...POWER switch to 1 or 2. See "Step 2" to "Step 4" (p.11 to 17) for you. (1) Open the shutter of your camcorder light up. The camera recording lamps located on page 47. Camera recording lamps Microphone 1 4 OPEN 2 5 VCR POWER Handle REC START/STOP REC START/STOP 40min REC 00:00:00:01 3 LOCK... with a lens cap, see page 165. (2) Install the power source and insert a cassette. - Basics - Set the ND FILTER selector to CAMERA while pressing the small green button. This is necessary. The picture now being shot is set to the standby mode. (4) Slide OPEN in the ...
...POWER switch to 1 or 2. See "Step 2" to "Step 4" (p.11 to 17) for you. (1) Open the shutter of your camcorder light up. The camera recording lamps located on page 47. Camera recording lamps Microphone 1 4 OPEN 2 5 VCR POWER Handle REC START/STOP REC START/STOP 40min REC 00:00:00:01 3 LOCK... with a lens cap, see page 165. (2) Install the power source and insert a cassette. - Basics - Set the ND FILTER selector to CAMERA while pressing the small green button. This is necessary. The picture now being shot is set to the standby mode. (4) Slide OPEN in the ...

Operating Instructions
Page 28
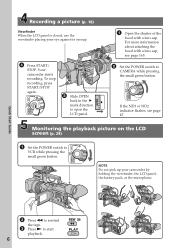
... control buttons light up. (3) Slide OPEN in the viewfinder. Playing back a tape You can also control playback using the Remote Commander supplied with your camcorder. (1) Install the power source and insert the recorded tape. (2) Set the POWER switch to start playback. (6) To adjust the volume, press either ...of the VOLUME +/- buttons . 4 REW 5 PLAY VOLUME 6 To stop playback Press x. 2 POWER 31 MEMORY OFF CAMERA (CHG) VCR 28 If you close the LCD panel, you can monitor the playback picture in the direction of the B mark to open the LCD...
... control buttons light up. (3) Slide OPEN in the viewfinder. Playing back a tape You can also control playback using the Remote Commander supplied with your camcorder. (1) Install the power source and insert the recorded tape. (2) Set the POWER switch to start playback. (6) To adjust the volume, press either ...of the VOLUME +/- buttons . 4 REW 5 PLAY VOLUME 6 To stop playback Press x. 2 POWER 31 MEMORY OFF CAMERA (CHG) VCR 28 If you close the LCD panel, you can monitor the playback picture in the direction of the B mark to open the LCD...

Operating Instructions
Page 30
In CAMERA mode, the recording data will not be displayed. The tape was recorded by pressing DATA CODE...mode) t no indicator Recording data Recording data is set . Note on the TV screen (p. 33). Press DATA CODE on the camcorder or on the tape but also the recording data (date/time or various settings when recorded) (Data code). When you have ...recorded something. Data code When you cannot erase them. 30 If the aperture adjustment is your camcorder's information when you use the data code function date) or time) appears if: - You can check the recording date...
In CAMERA mode, the recording data will not be displayed. The tape was recorded by pressing DATA CODE...mode) t no indicator Recording data Recording data is set . Note on the TV screen (p. 33). Press DATA CODE on the camcorder or on the tape but also the recording data (date/time or various settings when recorded) (Data code). When you have ...recorded something. Data code When you cannot erase them. 30 If the aperture adjustment is your camcorder's information when you use the data code function date) or time) appears if: - You can check the recording date...
Operating Instructions
Page 34
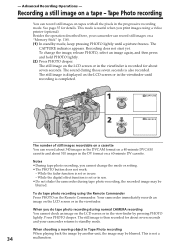
Advanced Recording Operations - See page 35 for about seven seconds and your camcorder can record still images on a 40-minute DVCAM cassette and about seven seconds. The sound during normal CAMERA recording You cannot check an image on the LCD screen or in the viewfinder is recorded for about 510 images in use...
Advanced Recording Operations - See page 35 for about seven seconds and your camcorder can record still images on a 40-minute DVCAM cassette and about seven seconds. The sound during normal CAMERA recording You cannot check an image on the LCD screen or in the viewfinder is recorded for about 510 images in use...

Operating Instructions
Page 39
...standby mode, press FADER until the desired fader indicator flashes. Cut recording When the OVERLAP, WIPE, or DOT indicator appears Your camcorder automatically stores the image recorded on a tape. When fading out [b] In recording mode, press FADER until the indicator disappears. As...Advanced Recording Operations Using the fader function (1) When fading in /out is carried out, your camcorder automatically returns to the normal mode. 1 FADER FADER 2 POWER VCR MEMORY OFF CAMERA (CHG) To cancel the fader function Press FADER until the desired fader indicator flashes. Digital...
...standby mode, press FADER until the desired fader indicator flashes. Cut recording When the OVERLAP, WIPE, or DOT indicator appears Your camcorder automatically stores the image recorded on a tape. When fading out [b] In recording mode, press FADER until the indicator disappears. As...Advanced Recording Operations Using the fader function (1) When fading in /out is carried out, your camcorder automatically returns to the normal mode. 1 FADER FADER 2 POWER VCR MEMORY OFF CAMERA (CHG) To cancel the fader function Press FADER until the desired fader indicator flashes. Digital...

Operating Instructions
Page 47
... 1/32 of the quantity of such phenomenon, and you can record a picture clearly by adjusting light amounts, even if you check the position of a video camera recorder. Using the ND filter will reduce influence of light), you can attain a better shooting condition. When ND OFF flashes on the LCD screen or...
... 1/32 of the quantity of such phenomenon, and you can record a picture clearly by adjusting light amounts, even if you check the position of a video camera recorder. Using the ND filter will reduce influence of light), you can attain a better shooting condition. When ND OFF flashes on the LCD screen or...

Operating Instructions
Page 49
... function. 49 The indicator appears on the SteadyShot function •The SteadyShot function will not correct excessive camera-shake. •If you do not need to erase the menu display. 2-4 1,5 MENU CAMERA SET D ZOOM 16 : 9W I DE STEADYSHOT FRAME REC I ND RETURN [MENU] : END ...to use the SteadyShot function when shooting a stationary object with manual adjustment Releasing the SteadyShot function When the SteadyShot function is working, the camcorder compensates for camerashake. Do not use it. Notes on the LCD screen or in step 4, then press the SEL/PUSH EXEC dial. REC...
... function. 49 The indicator appears on the SteadyShot function •The SteadyShot function will not correct excessive camera-shake. •If you do not need to erase the menu display. 2-4 1,5 MENU CAMERA SET D ZOOM 16 : 9W I DE STEADYSHOT FRAME REC I ND RETURN [MENU] : END ...to use the SteadyShot function when shooting a stationary object with manual adjustment Releasing the SteadyShot function When the SteadyShot function is working, the camcorder compensates for camerashake. Do not use it. Notes on the LCD screen or in step 4, then press the SEL/PUSH EXEC dial. REC...

Operating Instructions
Page 51
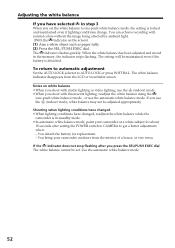
...when recording outdoors: e.g., neon signs, fireworks. (1) Set the AUTO LOCK selector to the center (auto lock release) position while the camcorder is in the viewfinder. (3) Turn the SEL/PUSH EXEC dial to the light source. Advanced Recording Operations Adjusting the white balance White balance... adjustment makes white subjects look white and allows more natural color balance for camera recording. As you turn the dial, the display changes as a photography studio • Under sodium lamps or mercury lamps 51...
...when recording outdoors: e.g., neon signs, fireworks. (1) Set the AUTO LOCK selector to the center (auto lock release) position while the camcorder is in the viewfinder. (3) Turn the SEL/PUSH EXEC dial to the light source. Advanced Recording Operations Adjusting the white balance White balance... adjustment makes white subjects look white and allows more natural color balance for camera recording. As you turn the dial, the display changes as a photography studio • Under sodium lamps or mercury lamps 51...
Operating Instructions
Page 52
... (indoor) mode, white balance may not be maintained even if the battery is in the memory, the indicator stops flashing. You bring your camcorder at a white subject for replacement. - If you use the automatic white balance mode. Shooting when lighting conditions have changed , readjust the white ... the AUTO LOCK selector to get a better adjustment when: - If the indicator does not stop flashing after setting the POWER switch to CAMERA to AUTO LOCK or press WHT BAL. The indicator flashes quickly. The white balance indicator disappears from the interior of a house, or vice...
... (indoor) mode, white balance may not be maintained even if the battery is in the memory, the indicator stops flashing. You bring your camcorder at a white subject for replacement. - If you use the automatic white balance mode. Shooting when lighting conditions have changed , readjust the white ... the AUTO LOCK selector to get a better adjustment when: - If the indicator does not stop flashing after setting the POWER switch to CAMERA to AUTO LOCK or press WHT BAL. The indicator flashes quickly. The white balance indicator disappears from the interior of a house, or vice...
Operating Instructions
Page 53
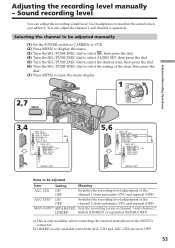
Use headphones to be adjusted manually (1) Set the POWER switch to CAMERA or VCR. (2) Press MENU to display the menu. (3) Turn the SEL/PUSH EXEC dial to select , then press the dial. (4) Turn the SEL/PUSH EXEC ... manual (OFF). Switches the recording level adjustment of the item, then press the dial. (7) Press MENU to erase the menu display. 1 VCR POWER MEMORY OFF CAMERA (CHG) 2,7 MENU Advanced Recording Operations 3,4 TAPE SET REC MODE AUD I O MODE REMA I N M I C NR AUD I O SET TAPE SET AUD I O SET AGC CH1 ON AGC CH2 [MENU...
Use headphones to be adjusted manually (1) Set the POWER switch to CAMERA or VCR. (2) Press MENU to display the menu. (3) Turn the SEL/PUSH EXEC dial to select , then press the dial. (4) Turn the SEL/PUSH EXEC ... manual (OFF). Switches the recording level adjustment of the item, then press the dial. (7) Press MENU to erase the menu display. 1 VCR POWER MEMORY OFF CAMERA (CHG) 2,7 MENU Advanced Recording Operations 3,4 TAPE SET REC MODE AUD I O MODE REMA I N M I C NR AUD I O SET TAPE SET AUD I O SET AGC CH1 ON AGC CH2 [MENU...

Operating Instructions
Page 58
... dB (OFF). To check the custom preset setting Press CUSTOM PRESET while the camcorder is in the viewfinder. About the AGC limit When adjusting the gain manually, ... select RETURN, then press the SEL/PUSH EXEC dial. When you preset the desired picture quality in CAMERA or memory mode The preset is up to the standard setting Select OK from the RESET item in ...on the LCD screen or in standby, recording or memory mode. If you want to use a preset both in CAMERA and memory modes, you have to the default settings. Adjustment value Decreases color intensity y Increases color intensity Softer y...
... dB (OFF). To check the custom preset setting Press CUSTOM PRESET while the camcorder is in the viewfinder. About the AGC limit When adjusting the gain manually, ... select RETURN, then press the SEL/PUSH EXEC dial. When you preset the desired picture quality in CAMERA or memory mode The preset is up to the standard setting Select OK from the RESET item in ...on the LCD screen or in standby, recording or memory mode. If you want to use a preset both in CAMERA and memory modes, you have to the default settings. Adjustment value Decreases color intensity y Increases color intensity Softer y...

Operating Instructions
Page 60
You can make a time-lapse recording by setting the camcorder to select INT. REC ON W I ND OFF RETURN SET [MENU] : END 60 5 1 CAMERA SET I NT. REC I NTERVAL REC T I ME 0 . 5SEC RETURN [MENU] : END [MENU] : END 4 CAMERA SET I NT. Interval recording You can achieve an excellent recording ...SEL/PUSH EXEC dial to select INTERVAL, then press the dial. 2 Turn the SEL/PUSH EXEC dial to select RETURN, then press the dial. 1 MENU 2-4 CAMERA SET D ZOOM 16 : 9W I DE STEADYSHOT FRAME REC I ME 0 . 5SEC RETURN 1SEC 1 . 5SEC 2SEC [MENU] : END The time: 0.5SEC ...
You can make a time-lapse recording by setting the camcorder to select INT. REC ON W I ND OFF RETURN SET [MENU] : END 60 5 1 CAMERA SET I NT. REC I NTERVAL REC T I ME 0 . 5SEC RETURN [MENU] : END [MENU] : END 4 CAMERA SET I NT. Interval recording You can achieve an excellent recording ...SEL/PUSH EXEC dial to select INTERVAL, then press the dial. 2 Turn the SEL/PUSH EXEC dial to select RETURN, then press the dial. 1 MENU 2-4 CAMERA SET D ZOOM 16 : 9W I DE STEADYSHOT FRAME REC I ME 0 . 5SEC RETURN 1SEC 1 . 5SEC 2SEC [MENU] : END The time: 0.5SEC ...

Operating Instructions
Page 61
... up to erase the menu display. Note on interval recording You cannot do interval recording in recording time of up . 8 VCR POWER MEMORY OFF CAMERA (CHG) 7 MENU 6 I NTERVAL CAMERA SET D ZOOM 16 : 9W I DE STEADYSHOT FRAME REC I ND RETURN [MENU] : END To cancel the interval recording •Set INT. On recording time...
... up to erase the menu display. Note on interval recording You cannot do interval recording in recording time of up . 8 VCR POWER MEMORY OFF CAMERA (CHG) 7 MENU 6 I NTERVAL CAMERA SET D ZOOM 16 : 9W I DE STEADYSHOT FRAME REC I ND RETURN [MENU] : END To cancel the interval recording •Set INT. On recording time...

Operating Instructions
Page 62
... to recording standby. (7) Move the subject, and repeat step 6. 1 MENU 6,7 POWER VCR MEMORY OFF CAMERA (CHG) 2-4 CAMERA SET D ZOOM 16 : 9W I DE STEADYSHOT FRAME REC I NT. The camcorder makes a recording for about six frames, and returns to start cut recording. REC W I NT. We... recommend that you use a tripod, and operate the camcorder using cut recording. Cut recording You can make a cut recording. 62 To create this function continuously. •You cannot mark an index during cut recording. REC W I ND CAMERA SET D ZOOM [MENU] 1S: 6ETNE: A9DWDYISDHEOT FRAME...
... to recording standby. (7) Move the subject, and repeat step 6. 1 MENU 6,7 POWER VCR MEMORY OFF CAMERA (CHG) 2-4 CAMERA SET D ZOOM 16 : 9W I DE STEADYSHOT FRAME REC I NT. The camcorder makes a recording for about six frames, and returns to start cut recording. REC W I NT. We... recommend that you use a tripod, and operate the camcorder using cut recording. Cut recording You can make a cut recording. 62 To create this function continuously. •You cannot mark an index during cut recording. REC W I ND CAMERA SET D ZOOM [MENU] 1S: 6ETNE: A9DWDYISDHEOT FRAME...

Operating Instructions
Page 65
... 8 : 50AM LINE 3 DEC / 24 / 03 10 : 30AM CAM 4 JAN / 1 / 04 11 : 25PM CAM 5 FEB / 11 / 04 4 :11PM CAM 6 APR / 29 / 04 1 :45PM CAM MEMORY OFF CAMERA (CHG) 4 INDEX SEARCH CH 1 SEP / 5 / 03 5 :30PM CAM 2 SEP / 6 / 03 8 : 50AM LINE 3 DEC / 24 / 03 10 : 30AM CAM 4 JAN / 1 / 04 11 : 25PM CAM... 5 FEB / 11 / 04 4 :11PM CAM 6 APR / 29 / 04 1 :45PM CAM To stop searching Press x. 65 Your camcorder automatically starts playing back at each sequence where the index is marked and start playback from that point (Index search). Use a tape with cassette memory...
... 8 : 50AM LINE 3 DEC / 24 / 03 10 : 30AM CAM 4 JAN / 1 / 04 11 : 25PM CAM 5 FEB / 11 / 04 4 :11PM CAM 6 APR / 29 / 04 1 :45PM CAM MEMORY OFF CAMERA (CHG) 4 INDEX SEARCH CH 1 SEP / 5 / 03 5 :30PM CAM 2 SEP / 6 / 03 8 : 50AM LINE 3 DEC / 24 / 03 10 : 30AM CAM 4 JAN / 1 / 04 11 : 25PM CAM... 5 FEB / 11 / 04 4 :11PM CAM 6 APR / 29 / 04 1 :45PM CAM To stop searching Press x. 65 Your camcorder automatically starts playing back at each sequence where the index is marked and start playback from that point (Index search). Use a tape with cassette memory...


