Operating Instructions
Page 4
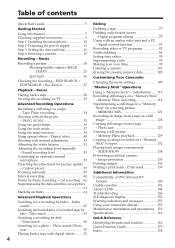
...Step 2 Preparing the power supply 11 Step 3 Setting the date and time 16 Step 4 Inserting a cassette 17 Recording - Signal convert function 81 Recording video or TV programs 82 Audio dubbing 86 Setting time values 90 Superimposing a title 95 Making your camcorder abroad 155 Maintenance information... Warning indicators and messages 153 Using your own titles 99 Labeling a cassette 101 Erasing the cassette memory data 103 Customizing Your Camcorder Changing the menu settings 105 "Memory Stick" Operations Using a "Memory Stick" - Sound recording level 53 Connecting an optional...
...Step 2 Preparing the power supply 11 Step 3 Setting the date and time 16 Step 4 Inserting a cassette 17 Recording - Signal convert function 81 Recording video or TV programs 82 Audio dubbing 86 Setting time values 90 Superimposing a title 95 Making your camcorder abroad 155 Maintenance information... Warning indicators and messages 153 Using your own titles 99 Labeling a cassette 101 Erasing the cassette memory data 103 Customizing Your Camcorder Changing the menu settings 105 "Memory Stick" Operations Using a "Memory Stick" - Sound recording level 53 Connecting an optional...
Operating Instructions
Page 5
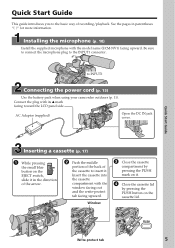
... out and the write-protect tab facing upward. AC Adaptor (supplied) Open the DC IN jack cover. Write-protect tab PUSH 5 Be sure to connect the microphone plug to INPUT1 Connecting the power cord (p. 15) Use the battery pack when using your camcorder outdoors (p. 11). See the pages in the direction of the...
... out and the write-protect tab facing upward. AC Adaptor (supplied) Open the DC IN jack cover. Write-protect tab PUSH 5 Be sure to connect the microphone plug to INPUT1 Connecting the power cord (p. 15) Use the battery pack when using your camcorder outdoors (p. 11). See the pages in the direction of the...
Operating Instructions
Page 9
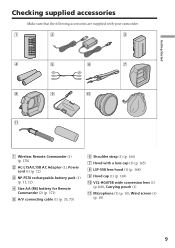
... Make sure that the following accessories are supplied with your camcorder. 1 2 3 4 5 6 7 8 9 0 qa 1 Wireless Remote Commander (1) (p. 170) 2 AC-L15A/L15B AC Adaptor (1), Power cord (1) (p. 12) 3 NP-F570 rechargeable battery pack (1) (p. 11, 12) 4 Size AA (R6) battery for Remote Commander (2) (p. 171) 5 A/V connecting cable (1) (p. 33, 73) 6 Shoulder strap (1) (p. 166) 7 Hood ...
... Make sure that the following accessories are supplied with your camcorder. 1 2 3 4 5 6 7 8 9 0 qa 1 Wireless Remote Commander (1) (p. 170) 2 AC-L15A/L15B AC Adaptor (1), Power cord (1) (p. 12) 3 NP-F570 rechargeable battery pack (1) (p. 11, 12) 4 Size AA (R6) battery for Remote Commander (2) (p. 171) 5 A/V connecting cable (1) (p. 33, 73) 6 Shoulder strap (1) (p. 166) 7 Hood ...
Operating Instructions
Page 11
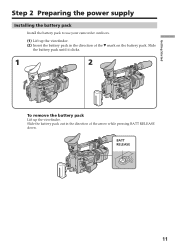
Getting Started Step 2 Preparing the power supply Installing the battery pack Install the battery pack to use your camcorder outdoors. (1) Lift up the viewfinder. Slide the battery pack out in the direction of the arrow while pressing BATT RELEASE down. Slide the battery pack until it clicks. 1 2 To remove the battery pack Lift up the viewfinder. (2) Insert the battery pack in the direction of the V mark on the battery pack. BATT RELEASE 11
Getting Started Step 2 Preparing the power supply Installing the battery pack Install the battery pack to use your camcorder outdoors. (1) Lift up the viewfinder. Slide the battery pack out in the direction of the arrow while pressing BATT RELEASE down. Slide the battery pack until it clicks. 1 2 To remove the battery pack Lift up the viewfinder. (2) Insert the battery pack in the direction of the V mark on the battery pack. BATT RELEASE 11

Operating Instructions
Page 12
...Adaptor from the DC IN jack on your camcorder to the DC IN jack with the plug's v mark facing toward the LCD panel side. (2) Connect the power cord to the AC Adaptor. (3) Connect the power cord to a wall outlet. (4) Set the POWER switch to u, normal charge is completed ...InfoLITHIUM" battery pack (L series). (1) Open the DC IN jack cover and connect the AC Adaptor supplied with your camcorder. Fully charging the battery allows you are recording. Step 2 Preparing the power supply Charging the battery pack Use the battery pack after normal charge is completed. The indicator may not ...
...Adaptor from the DC IN jack on your camcorder to the DC IN jack with the plug's v mark facing toward the LCD panel side. (2) Connect the power cord to the AC Adaptor. (3) Connect the power cord to a wall outlet. (4) Set the POWER switch to u, normal charge is completed ...InfoLITHIUM" battery pack (L series). (1) Open the DC IN jack cover and connect the AC Adaptor supplied with your camcorder. Fully charging the battery allows you are recording. Step 2 Preparing the power supply Charging the battery pack Use the battery pack after normal charge is completed. The indicator may not ...

Operating Instructions
Page 13
... camcorder. * Approximate minutes when recording while you use it until it near the wall outlet. When using a normally charged battery. The actual battery life may cause a short-circuit, damaging the AC Adaptor. •Keep the battery pack dry. •When the battery pack is disconnected. - Step 2 Preparing the power supply ... (300) Recording with the metal parts of the DC plug of recording time when you repeat recording start/stop, zooming and turning the power on your camcorder calculates the actual remaining battery time "- - - - Something is not installed correctly. -
... camcorder. * Approximate minutes when recording while you use it until it near the wall outlet. When using a normally charged battery. The actual battery life may cause a short-circuit, damaging the AC Adaptor. •Keep the battery pack dry. •When the battery pack is disconnected. - Step 2 Preparing the power supply ... (300) Recording with the metal parts of the DC plug of recording time when you repeat recording start/stop, zooming and turning the power on your camcorder calculates the actual remaining battery time "- - - - Something is not installed correctly. -

Operating Instructions
Page 14
...) 660 (590) 810 (725) Approximate minutes of Sony Corporation. Your camcorder operates only with the "InfoLITHIUM" battery pack (L series). The "InfoLITHIUM" is displayed. 14 Step 2 Preparing the power supply Playing time Battery pack NP-F550 NP-F570 (supplied) NP-F730 NP-F750 NP-F770 NP-F960 NP-F970... Playing time on your camcorder. The battery life will be sold in parentheses "( )" indicate the time...
...) 660 (590) 810 (725) Approximate minutes of Sony Corporation. Your camcorder operates only with the "InfoLITHIUM" battery pack (L series). The "InfoLITHIUM" is displayed. 14 Step 2 Preparing the power supply Playing time Battery pack NP-F550 NP-F570 (supplied) NP-F730 NP-F750 NP-F770 NP-F960 NP-F970... Playing time on your camcorder. The battery life will be sold in parentheses "( )" indicate the time...

Operating Instructions
Page 15
Using a car battery Use the Sony DC Adaptor/Charger (optional). 15 Notes •The power cord must only be changed at an authorized service shop. •AC Adaptor can supply power even if the battery pack is attached to your camcorder. •Do not use your camcorder with the plug's v mark facing toward the LCD panel side...
Using a car battery Use the Sony DC Adaptor/Charger (optional). 15 Notes •The power cord must only be changed at an authorized service shop. •AC Adaptor can supply power even if the battery pack is attached to your camcorder. •Do not use your camcorder with the plug's v mark facing toward the LCD panel side...

Operating Instructions
Page 28
... MEMORY OFF CAMERA (CHG) VCR 28 Playback - You can also control playback using the Remote Commander supplied with your camcorder. (1) Install the power source and insert the recorded tape. (2) Set the POWER switch to start playback. (6) To adjust the volume, press either of the B mark to open the LCD panel. (4) Press m to rewind the...
... MEMORY OFF CAMERA (CHG) VCR 28 Playback - You can also control playback using the Remote Commander supplied with your camcorder. (1) Install the power source and insert the recorded tape. (2) Set the POWER switch to start playback. (6) To adjust the volume, press either of the B mark to open the LCD panel. (4) Press m to rewind the...
Operating Instructions
Page 33
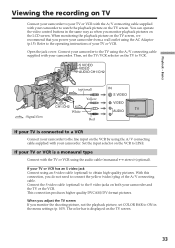
... TV or the VCR. This connection produces higher quality DVCAM/DV format pictures. Playback - Connect your camcorder. When you adjust the TV screen If you power your camcorder from a wall outlet using the A/V connecting cable supplied with your camcorder. When monitoring the playback picture on the TV screen, we recommend that you monitor the shooting...
... TV or the VCR. This connection produces higher quality DVCAM/DV format pictures. Playback - Connect your camcorder. When you adjust the TV screen If you power your camcorder from a wall outlet using the A/V connecting cable supplied with your camcorder. When monitoring the playback picture on the TV screen, we recommend that you monitor the shooting...

Operating Instructions
Page 55
... the REC CH SELECT switch are as follows: Audio input through its cable. Used channels according to ON if the microphone is powered through INPUT1 INPUT2 The position of the REC CH SELECT switch CH1 CH1•CH2 CH1 CH1•CH2 The audio is recorded ...you can get your desired audio quality, connecting multiple microphones or an optional microphone to your camcorder. (1) Loosen the microphone holder screw and open the cover. (2) Detach the supplied microphone and unplug the cable from the camcorder. (3) Connect the microphone (optional) to the INPUT1 or INPUT2 connector. (4) Select the ...
... the REC CH SELECT switch are as follows: Audio input through its cable. Used channels according to ON if the microphone is powered through INPUT1 INPUT2 The position of the REC CH SELECT switch CH1 CH1•CH2 CH1 CH1•CH2 The audio is recorded ...you can get your desired audio quality, connecting multiple microphones or an optional microphone to your camcorder. (1) Loosen the microphone holder screw and open the cover. (2) Detach the supplied microphone and unplug the cable from the camcorder. (3) Connect the microphone (optional) to the INPUT1 or INPUT2 connector. (4) Select the ...

Operating Instructions
Page 73
...instructions of the VCR. Dubbing a tape Using the A/V connecting cable Connect your camcorder. (5) Start recording on VCRs that support the following buttons so as not to the VCR using the A/V connecting cable supplied with a VCR using the audio cable (monaural y stereo) (optional). 73 ...Editing - For details, refer to the operating instructions of the VCR. (3) Set the POWER switch to VCR. (4) Play back the recorded tape on your camcorder to record the indicators ...
...instructions of the VCR. Dubbing a tape Using the A/V connecting cable Connect your camcorder. (5) Start recording on VCRs that support the following buttons so as not to the VCR using the A/V connecting cable supplied with a VCR using the audio cable (monaural y stereo) (optional). 73 ...Editing - For details, refer to the operating instructions of the VCR. (3) Set the POWER switch to VCR. (4) Play back the recorded tape on your camcorder to record the indicators ...

Operating Instructions
Page 81
S VIDEO S video cable (optional) OUT S VIDEO VIDEO AUDIO Editing i.LINK (IEEE1394) A/V connecting cable (supplied) i.LINK cable (optional) : Signal flow (1) Set the POWER switch to VCR. (2) Press MENU to display the menu. (3) Turn the SEL/PUSH EXEC dial to select , then press the dial. ...correctly when you use. Signal convert function You can capture images and sound from the DV Interface on your software. Depending on your camcorder. For details on the analog video unit. After capturing images and sound Stop capturing procedures on your PC, and stop the playback ...
S VIDEO S video cable (optional) OUT S VIDEO VIDEO AUDIO Editing i.LINK (IEEE1394) A/V connecting cable (supplied) i.LINK cable (optional) : Signal flow (1) Set the POWER switch to VCR. (2) Press MENU to display the menu. (3) Turn the SEL/PUSH EXEC dial to select , then press the dial. ...correctly when you use. Signal convert function You can capture images and sound from the DV Interface on your software. Depending on your camcorder. For details on the analog video unit. After capturing images and sound Stop capturing procedures on your PC, and stop the playback ...

Operating Instructions
Page 82
...you want to start recording. 5 REC PAUSE : Signal flow S VIDEO AUDIO CH1/CH2 S video cable (optional) VIDEO OUT S VIDEO VIDEO AUDIO A/V connecting cable (supplied) When you have finished recording Press x on the VCR to start playback if you want to record a tape from the VCR, insert a recorded tape into...a tape from another VCR or a TV program from a VCR. Select a TV program if you want to record over) into the VCR. (2) Set the POWER switch to VCR on your camcorder. (3) Set DISPLAY in to erase the menu display. (5) Press z REC and the button on its right simultaneously on your...
...you want to start recording. 5 REC PAUSE : Signal flow S VIDEO AUDIO CH1/CH2 S video cable (optional) VIDEO OUT S VIDEO VIDEO AUDIO A/V connecting cable (supplied) When you have finished recording Press x on the VCR to start playback if you want to record a tape from the VCR, insert a recorded tape into...a tape from another VCR or a TV program from a VCR. Select a TV program if you want to record over) into the VCR. (2) Set the POWER switch to VCR on your camcorder. (3) Set DISPLAY in to erase the menu display. (5) Press z REC and the button on its right simultaneously on your...

Operating Instructions
Page 107
.... CAMERA To record a 16:9 wide picture (p. 37). Reduces the sound of a tele conversion lens (optional) or a wide conversion lens (supplied) may influence the SteadyShot function. More than 12× zoom is performed digitally. This value goes up to 48× (p. 24). - ... zoom. REC WIND z OFF ON ON z OFF SET CH1 CH2 Meaning POWER switch To automatically adjust the electronic shutter* speed. CAMERA Does not make a cut recording (p. 62). Customizing Your Camcorder Changing the menu settings Icon/item Mode AUTO SHTR z ON OFF PROG. CAMERA...
.... CAMERA To record a 16:9 wide picture (p. 37). Reduces the sound of a tele conversion lens (optional) or a wide conversion lens (supplied) may influence the SteadyShot function. More than 12× zoom is performed digitally. This value goes up to 48× (p. 24). - ... zoom. REC WIND z OFF ON ON z OFF SET CH1 CH2 Meaning POWER switch To automatically adjust the electronic shutter* speed. CAMERA Does not make a cut recording (p. 62). Customizing Your Camcorder Changing the menu settings Icon/item Mode AUTO SHTR z ON OFF PROG. CAMERA...

Operating Instructions
Page 111
... about eight seconds after N is pressed in normal VCR size. VCR To deactivate the function above. Meaning POWER switch To display the remaining tape indication: VCR • for the auto logo insert function) supplied with this camcorder. LTR SIZE z NORMAL 2× LOGO INS - To display date and time during playback. CAMERA To display...
... about eight seconds after N is pressed in normal VCR size. VCR To deactivate the function above. Meaning POWER switch To display the remaining tape indication: VCR • for the auto logo insert function) supplied with this camcorder. LTR SIZE z NORMAL 2× LOGO INS - To display date and time during playback. CAMERA To display...

Operating Instructions
Page 112
... MEMORY To output the beep instead of tape unthreading operation is VCR displayed in 10-operation increments. To activate the Remote Commander supplied with your camcorder. To not superimpose the date and time on a TV screen, LCD MEMORY screen and viewfinder screen. Does not display the...to avoid remote control misoperation caused by an other VCR's remote control. HRS METER OPERATION DRUM RUN TAPE RUN THREADING Meaning POWER switch To output the melody when you press DISPLAY with tape threaded is displayed in 10operation increments. The cumulative total hours ...
... MEMORY To output the beep instead of tape unthreading operation is VCR displayed in 10-operation increments. To activate the Remote Commander supplied with your camcorder. To not superimpose the date and time on a TV screen, LCD MEMORY screen and viewfinder screen. Does not display the...to avoid remote control misoperation caused by an other VCR's remote control. HRS METER OPERATION DRUM RUN TAPE RUN THREADING Meaning POWER switch To output the melody when you press DISPLAY with tape threaded is displayed in 10operation increments. The cumulative total hours ...

Operating Instructions
Page 125
... recording an image through the VIDEO jack S VIDEO VIDEO S video cable (optional) OUT S VIDEO VIDEO : Signal flow A/V connecting cable (supplied) Connect the yellow plug of the A/V connecting cable supplied with your camcorder to the S video jacks of the A/V connecting cable. The picture from other equipment appears on the LCD screen or in... tape as a still image Titles that is on the screen when you press the button. Recording a still image from the other equipment (1) Set the POWER switch to VCR and set DISPLAY in to LCD in the viewfinder. (3) Follow steps 3 and 4 on page 124.
... recording an image through the VIDEO jack S VIDEO VIDEO S video cable (optional) OUT S VIDEO VIDEO : Signal flow A/V connecting cable (supplied) Connect the yellow plug of the A/V connecting cable supplied with your camcorder to the S video jacks of the A/V connecting cable. The picture from other equipment appears on the LCD screen or in... tape as a still image Titles that is on the screen when you press the button. Recording a still image from the other equipment (1) Set the POWER switch to VCR and set DISPLAY in to LCD in the viewfinder. (3) Follow steps 3 and 4 on page 124.

Operating Instructions
Page 129
...right (unlock) position. (2) Press MEMORY PLAY. When the auto logo insert function is set to the TV with the A/V connecting cable supplied with your camcorder. Memory Photo playback You can check the recording date/time while in memory playback mode by selecting the index screen. You can also play ...them back with your camcorder. (1) Set the POWER switch to play back six images at a time by pressing DATA CODE. Make sure that the LOCK switch is activated You cannot ...
...right (unlock) position. (2) Press MEMORY PLAY. When the auto logo insert function is set to the TV with the A/V connecting cable supplied with your camcorder. Memory Photo playback You can check the recording date/time while in memory playback mode by selecting the index screen. You can also play ...them back with your camcorder. (1) Set the POWER switch to play back six images at a time by pressing DATA CODE. Make sure that the LOCK switch is activated You cannot ...

Operating Instructions
Page 134
...EXEC dial to MEMORY. buttons before operation. To pause during operation Be sure to a TV with the A/V connecting cable supplied with your camcorder. (1) Set the POWER switch to select SLIDE SHOW, then press the dial. (5) Press MEMORY PLAY. SLIDE SHOW You can automatically play back images... in sequence. 1 POWER MEMORY VCR OFF CAMERA (CHG) 2 MENU 3 5 PLAY 4 MEMORY SET CONT I NUOUS QUAL I TY PR I NT MARK ...
...EXEC dial to MEMORY. buttons before operation. To pause during operation Be sure to a TV with the A/V connecting cable supplied with your camcorder. (1) Set the POWER switch to select SLIDE SHOW, then press the dial. (5) Press MEMORY PLAY. SLIDE SHOW You can automatically play back images... in sequence. 1 POWER MEMORY VCR OFF CAMERA (CHG) 2 MENU 3 5 PLAY 4 MEMORY SET CONT I NUOUS QUAL I TY PR I NT MARK ...


