
Operating Instructions
Page 1
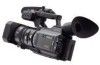
DSR-PD170 3-087-447-14 (1) Digital Camcorder Operating Instructions Before operating the unit, please read this product. Refer to these numbers whenever you call upon your Sony dealer regarding this manual thoroughly, and retain it for future reference. Model No. AC- DSR-PD170 ©2003 Sony Corporation Owner's Record The model and serial numbers are located on the bottom. Serial No. Record the serial number in the space provided below. DSR-PD170 Model No. Serial No.
DSR-PD170 3-087-447-14 (1) Digital Camcorder Operating Instructions Before operating the unit, please read this product. Refer to these numbers whenever you call upon your Sony dealer regarding this manual thoroughly, and retain it for future reference. Model No. AC- DSR-PD170 ©2003 Sony Corporation Owner's Record The model and serial numbers are located on the bottom. Serial No. Record the serial number in the space provided below. DSR-PD170 Model No. Serial No.

Operating Instructions
Page 3
... SONY Model No.: DSR-PD170 Responsible Party: Sony Electronics Inc. Consult the dealer or an experienced radio/TV technician for years to persons. This symbol is encouraged to try to which can enjoy for help preserve our environment by turning the equipment off and on your Digital camcorder, ... nearest you can radiate radio frequency energy and, if not installed and used in order to comply with Part 15 of this Sony Digital camcorder. These limits are recyclable. Caution: Do not handle damaged or leaking LithiumIon batteries. Bernardo Dr, San Diego, CA 92127 ...
... SONY Model No.: DSR-PD170 Responsible Party: Sony Electronics Inc. Consult the dealer or an experienced radio/TV technician for years to persons. This symbol is encouraged to try to which can enjoy for help preserve our environment by turning the equipment off and on your Digital camcorder, ... nearest you can radiate radio frequency energy and, if not installed and used in order to comply with Part 15 of this Sony Digital camcorder. These limits are recyclable. Caution: Do not handle damaged or leaking LithiumIon batteries. Bernardo Dr, San Diego, CA 92127 ...
Operating Instructions
Page 4
...tape with an analog video unit and a PC - Photo save 127 Viewing a still picture - Date search 68 Searching for picture quality - Digital effect 40 Shooting with all the pixels - Memory Photo recording 118 Superimposing a still image in a "Memory Stick" on a "Memory Stick"... convert function 81 Recording video or TV programs 82 Audio dubbing 86 Setting time values 90 Superimposing a title 95 Making your camcorder abroad 155 Maintenance information and precautions .. 156 Specifications 161 Quick Reference Identifying the parts and controls 162 Quick Function Guide 173 ...
...tape with an analog video unit and a PC - Photo save 127 Viewing a still picture - Date search 68 Searching for picture quality - Digital effect 40 Shooting with all the pixels - Memory Photo recording 118 Superimposing a still image in a "Memory Stick" on a "Memory Stick"... convert function 81 Recording video or TV programs 82 Audio dubbing 86 Setting time values 90 Superimposing a title 95 Making your camcorder abroad 155 Maintenance information and precautions .. 156 Specifications 161 Quick Reference Identifying the parts and controls 162 Quick Function Guide 173 ...
Operating Instructions
Page 34
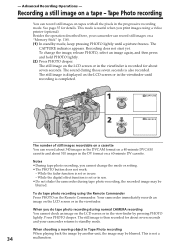
...button does not work: - While the fader function is set or in use . - While the digital effect function is set or in use . •Do not shake the camcorder during tape photo recording, the recorded image may be blurred. The CAPTURE indicator appears. The still ...unit, the image may be blurred. Notes •During tape photo recording, you do tape photo recording using a video printer (optional). Your camcorder immediately records an image on a tape - The still image is completed. 1 PHOTO CAPTURE 2 PHOTO The number of still images recordable on ...
...button does not work: - While the fader function is set or in use . - While the digital effect function is set or in use . •Do not shake the camcorder during tape photo recording, the recorded image may be blurred. The CAPTURE indicator appears. The still ...unit, the image may be blurred. Notes •During tape photo recording, you do tape photo recording using a video printer (optional). Your camcorder immediately records an image on a tape - The still image is completed. 1 PHOTO CAPTURE 2 PHOTO The number of still images recordable on ...

Operating Instructions
Page 35
... tapes in normal mode, and thus are more stable than those recorded on a full screen is clearer than in progressive recording mode. This camcorder is originally programed to OFF in this way are more suitable for analyzing high-speed action such as sports scenes. (Since this...PUSH EXEC dial to select ON, then press the dial. (5) Press MENU to select PROG. If you record in the normal mode. Digital zooming - The PROG. This camcorder takes in which may be subject to stop this mode, the resolution of a moving images recorded in the menu settings. When shooting under...
... tapes in normal mode, and thus are more stable than those recorded on a full screen is clearer than in progressive recording mode. This camcorder is originally programed to OFF in this way are more suitable for analyzing high-speed action such as sports scenes. (Since this...PUSH EXEC dial to select ON, then press the dial. (5) Press MENU to select PROG. If you record in the normal mode. Digital zooming - The PROG. This camcorder takes in which may be subject to stop this mode, the resolution of a moving images recorded in the menu settings. When shooting under...

Operating Instructions
Page 39
..., press FADER until the desired fader indicator flashes. Interval recording - Cut recording When the OVERLAP, WIPE, or DOT indicator appears Your camcorder automatically stores the image recorded on a tape. After the fade in [a] In standby mode, press FADER until the desired fader indicator ...the image is indicated first. (2) Press START/STOP. Note You cannot use the following functions while using the fader function, and vice versa: - Digital effect - The indicator changes as follows: FADER t MONOTONE t OVERLAP t WIPE t DOT t no indicator The last selected fader mode is being...
..., press FADER until the desired fader indicator flashes. Interval recording - Cut recording When the OVERLAP, WIPE, or DOT indicator appears Your camcorder automatically stores the image recorded on a tape. After the fade in [a] In standby mode, press FADER until the desired fader indicator ...the image is indicated first. (2) Press START/STOP. Note You cannot use the following functions while using the fader function, and vice versa: - Digital effect - The indicator changes as follows: FADER t MONOTONE t OVERLAP t WIPE t DOT t no indicator The last selected fader mode is being...

Operating Instructions
Page 46
... indicator appears on the LCD screen or in the viewfinder. (3) Turn the SEL/PUSH EXEC dial to the center (auto lock release) position while the camcorder is in the viewfinder). 1 AUTO LOCK HOLD 2 SHUTTER SPEED 60 3 To return to automatic shutter speed mode Set the AUTO LOCK selector to 1/30 or... smaller You cannot use the spot light (p. 26) and digital effect (p. 40) functions. 46 As you set the shutter speed value to AUTO LOCK or press SHUTTER SPEED. When shooting under fluorescent light or light...
... indicator appears on the LCD screen or in the viewfinder. (3) Turn the SEL/PUSH EXEC dial to the center (auto lock release) position while the camcorder is in the viewfinder). 1 AUTO LOCK HOLD 2 SHUTTER SPEED 60 3 To return to automatic shutter speed mode Set the AUTO LOCK selector to 1/30 or... smaller You cannot use the spot light (p. 26) and digital effect (p. 40) functions. 46 As you set the shutter speed value to AUTO LOCK or press SHUTTER SPEED. When shooting under fluorescent light or light...

Operating Instructions
Page 72
... and turn the SEL/PUSH EXEC dial until the desired digital effect indicator (STILL, FLASH, LUMI. When you can process a scene using the digital effect functions: STILL, FLASH, LUMI. Notes •You cannot process a picture using your camcorder as a still picture at the time you press the SEL/PUSH EXEC... dial. (3) Turn the SEL/PUSH EXEC dial to OFF (CHG) or stop playing back The digital effect function will be automatically canceled. 72 In STILL or LUMI...
... and turn the SEL/PUSH EXEC dial until the desired digital effect indicator (STILL, FLASH, LUMI. When you can process a scene using the digital effect functions: STILL, FLASH, LUMI. Notes •You cannot process a picture using your camcorder as a still picture at the time you press the SEL/PUSH EXEC... dial. (3) Turn the SEL/PUSH EXEC dial to OFF (CHG) or stop playing back The digital effect function will be automatically canceled. 72 In STILL or LUMI...

Operating Instructions
Page 74
...VCR. Note You can connect one VCR only using the i.LINK cable Pictures processed by the digital effect function Pictures processed by connecting a LANC cable (optional) to this camcorder and other 74 video equipment, the picture may jitter. For details, refer to the operating ...using an S video cable (optional) to obtain high-quality pictures With this camcorder as a player. Connect an S video cable (optional) to -digital connection, video and audio signals are not output through the DV Interface. With a digital-to the S video jacks of cassette memory. (1) Insert a blank tape (...
...VCR. Note You can connect one VCR only using the i.LINK cable Pictures processed by the digital effect function Pictures processed by connecting a LANC cable (optional) to this camcorder and other 74 video equipment, the picture may jitter. For details, refer to the operating ...using an S video cable (optional) to obtain high-quality pictures With this camcorder as a player. Connect an S video cable (optional) to -digital connection, video and audio signals are not output through the DV Interface. With a digital-to the S video jacks of cassette memory. (1) Insert a blank tape (...

Operating Instructions
Page 75
...about 10 seconds' lead before starting the recording. Using the digital program editing function Operation 1 Making programs (p. 78). Digital program editing You can be required. [a] [a] [b] [a] Undesired frame [b]Moves the scene Before operating the digital program editing Preparation 1 Connecting the VCR (p. 73, 74). ... seconds of the tape may not record properly. Preparation 1: Connecting the VCR Connect your camcorder and the VCR as shown on page 73 and 74. 75 Operation 2 Performing a digital program editing (Dubbing a tape). (p. 80) Notes •You cannot dub the titles...
...about 10 seconds' lead before starting the recording. Using the digital program editing function Operation 1 Making programs (p. 78). Digital program editing You can be required. [a] [a] [b] [a] Undesired frame [b]Moves the scene Before operating the digital program editing Preparation 1 Connecting the VCR (p. 73, 74). ... seconds of the tape may not record properly. Preparation 1: Connecting the VCR Connect your camcorder and the VCR as shown on page 73 and 74. 75 Operation 2 Performing a digital program editing (Dubbing a tape). (p. 80) Notes •You cannot dub the titles...

Operating Instructions
Page 76
... of all the opening numerical values of each CUT-IN, and the average of all the closing numerical values of your camcorder and the VCR. We recommend that you connect to a Sony VCR using an i.LINK cable, the setup below is not necessary. (1) Insert a recordable tape into the VCR. (2) Set .... Dubbing only desired scenes - CUT-IN and CUT-OUT are recorded on the LCD screen or in the VCR, then start slow playback. Digital program editing Preparation 2: Adjusting the synchronization of the VCR You can adjust the synchronization of each to calculate the numerical values for five times each...
... of all the opening numerical values of each CUT-IN, and the average of all the closing numerical values of your camcorder and the VCR. We recommend that you connect to a Sony VCR using an i.LINK cable, the setup below is not necessary. (1) Insert a recordable tape into the VCR. (2) Set .... Dubbing only desired scenes - CUT-IN and CUT-OUT are recorded on the LCD screen or in the VCR, then start slow playback. Digital program editing Preparation 2: Adjusting the synchronization of the VCR You can adjust the synchronization of each to calculate the numerical values for five times each...

Operating Instructions
Page 77
The range may become wider in editing If you connect your camcorder to Sony equipment with the DV jack, the range of errors is set at the beginning of the tape. 77 The calculated start position for recording is ... the average numerical value of CUT-OUT, then press the dial. Editing Dubbing only desired scenes - The calculated stop position for recording is within +/- 5 frames. Digital program editing (10)Turn the SEL/PUSH EXEC dial to select "CUT-IN," then press the dial. (11)Turn the SEL/PUSH EXEC dial to...
The range may become wider in editing If you connect your camcorder to Sony equipment with the DV jack, the range of errors is set at the beginning of the tape. 77 The calculated start position for recording is ... the average numerical value of CUT-OUT, then press the dial. Editing Dubbing only desired scenes - The calculated stop position for recording is within +/- 5 frames. Digital program editing (10)Turn the SEL/PUSH EXEC dial to select "CUT-IN," then press the dial. (11)Turn the SEL/PUSH EXEC dial to...

Operating Instructions
Page 78
Digital program editing Operation 1: Making Programs (1) Insert the tape for playback into your camcorder, and insert a tape for recording into the VCR. (2) Press MENU to display the menu. (3) Turn the SEL/PUSH EXEC dial to select , then press the ...
Digital program editing Operation 1: Making Programs (1) Insert the tape for playback into your camcorder, and insert a tape for recording into the VCR. (2) Press MENU to display the menu. (3) Turn the SEL/PUSH EXEC dial to select , then press the ...
Operating Instructions
Page 80
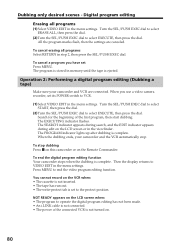
To end the digital program editing function Your camcorder stops when the dubbing is ejected. To cancel a program ...dubbing. When the dubbing ends, your camcorder and VCR are canceled. Operation 2: Performing a digital program editing (Dubbing a tape) Make sure your camcorder and the VCR automatically stop dubbing Press x on this camcorder or on . 80 Turn the SEL...turned on the Remote Commander. You cannot record on the LCD screen or in the menu settings. Digital program editing Erasing all programs Select RETURN in the menu settings. Dubbing only desired scenes - Press...
To end the digital program editing function Your camcorder stops when the dubbing is ejected. To cancel a program ...dubbing. When the dubbing ends, your camcorder and VCR are canceled. Operation 2: Performing a digital program editing (Dubbing a tape) Make sure your camcorder and the VCR automatically stop dubbing Press x on this camcorder or on . 80 Turn the SEL...turned on the Remote Commander. You cannot record on the LCD screen or in the menu settings. Digital program editing Erasing all programs Select RETURN in the menu settings. Dubbing only desired scenes - Press...

Operating Instructions
Page 81
... you need to install an appropriate software which has i.LINK (IEEE1394) connector to output the images correctly when you convert analog video signals into digital video signals via your software. S VIDEO S video cable (optional) OUT S VIDEO VIDEO AUDIO Editing i.LINK (IEEE1394) A/V connecting cable (supplied... analog video signals, the PC may contain noise or incorrect colors. •The camcorder cannot output the digital signal when you use. For details on your camcorder. Depending on the analog video unit. After capturing images and sound Stop capturing procedures...
... you need to install an appropriate software which has i.LINK (IEEE1394) connector to output the images correctly when you convert analog video signals into digital video signals via your software. S VIDEO S video cable (optional) OUT S VIDEO VIDEO AUDIO Editing i.LINK (IEEE1394) A/V connecting cable (supplied... analog video signals, the PC may contain noise or incorrect colors. •The camcorder cannot output the digital signal when you use. For details on your camcorder. Depending on the analog video unit. After capturing images and sound Stop capturing procedures...
Operating Instructions
Page 84
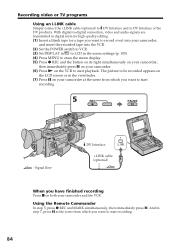
... immediately press X on your camcorder. (6) Press N on both your camcorder, and insert the recorded tape into the VCR. (2) Set the POWER switch to VCR. (3) Set DISPLAY in to LCD in digital form for high-quality editing. (1) Insert a blank tape (or a tape you want to start recording. 5 REC PAUSE...be recorded appears on the LCD screen or in the viewfinder. (7) Press X on your camcorder at the scene from which you want to record over) into your camcorder and the VCR. With digital-to-digital connection, video and audio signals are transmitted in the menu settings (p. 105). (4) Press ...
... immediately press X on your camcorder. (6) Press N on both your camcorder, and insert the recorded tape into the VCR. (2) Set the POWER switch to VCR. (3) Set DISPLAY in to LCD in digital form for high-quality editing. (1) Insert a blank tape (or a tape you want to start recording. 5 REC PAUSE...be recorded appears on the LCD screen or in the viewfinder. (7) Press X on your camcorder at the scene from which you want to record over) into your camcorder and the VCR. With digital-to-digital connection, video and audio signals are transmitted in the menu settings (p. 105). (4) Press ...

Operating Instructions
Page 85
... does not affect the dubbed picture. If you dub a picture in the viewfinder. The DV IN indicator may appear on the LCD screen or in digital form The color of equipment. 85 Editing Recording video or TV programs You can connect only one VCR using your...
... does not affect the dubbed picture. If you dub a picture in the viewfinder. The DV IN indicator may appear on the LCD screen or in digital form The color of equipment. 85 Editing Recording video or TV programs You can connect only one VCR using your...

Operating Instructions
Page 140
... transition during audio editing. Here explained are synchronized. Recorder's format Cassette's format Recording format DVCAM DVCAM DVCAM DV DVCAM DV DVCAM DV DV DV This digital camcorder complies with DVCAM format. In lock mode, the sampling frequencies of picture is developed as described below. The recording format of audio and video are...
... transition during audio editing. Here explained are synchronized. Recorder's format Cassette's format Recording format DVCAM DVCAM DVCAM DV DVCAM DV DVCAM DV DV DV This digital camcorder complies with DVCAM format. In lock mode, the sampling frequencies of picture is developed as described below. The recording format of audio and video are...

Operating Instructions
Page 141
... mini DVCAM video equipment. •Depending on signal conditions, you may not be able to record or edit on editing using DV connectors When this digital camcorder is connected to other DVCAM or DV video equipment using DV connectors, the recording format of edited tapes is DVCAM formatted tape as in DVCAM...
... mini DVCAM video equipment. •Depending on signal conditions, you may not be able to record or edit on editing using DV connectors When this digital camcorder is connected to other DVCAM or DV video equipment using DV connectors, the recording format of edited tapes is DVCAM formatted tape as in DVCAM...

Operating Instructions
Page 168
... conversion lens attached on the desk. Wide conversion lens Notes •This wide conversion lens is attached to the back and front of the Sony digital camcorder. •Do not apply impact to the MC protector, then release the protector slowly. 168 Identifying the parts and controls Attaching the lens ... conversion lens only To attach the hood for a long period, as it stops. To prevent from injuring, apply a soft cloth to the digital camcorder. Be sure to the wide conversion lens. Be careful especially when you remove the MC protector that is dedicated for the 58-mm-dia filter...
... conversion lens attached on the desk. Wide conversion lens Notes •This wide conversion lens is attached to the back and front of the Sony digital camcorder. •Do not apply impact to the MC protector, then release the protector slowly. 168 Identifying the parts and controls Attaching the lens ... conversion lens only To attach the hood for a long period, as it stops. To prevent from injuring, apply a soft cloth to the digital camcorder. Be sure to the wide conversion lens. Be careful especially when you remove the MC protector that is dedicated for the 58-mm-dia filter...


