Instruction Manual
Page 1
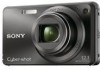
4-125-476-11(1) Digital Still Camera Instruction Manual DSC-W270/W275/W290 Before operating the unit, please read this manual thoroughly, and retain it for future reference. © 2009 Sony Corporation Getting started Shooting/viewing images Using shooting functions Using viewing functions Deleting images Connecting to other devices Changing camera settings GB
4-125-476-11(1) Digital Still Camera Instruction Manual DSC-W270/W275/W290 Before operating the unit, please read this manual thoroughly, and retain it for future reference. © 2009 Sony Corporation Getting started Shooting/viewing images Using shooting functions Using viewing functions Deleting images Connecting to other devices Changing camera settings GB
Instruction Manual
Page 3
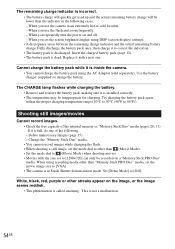
... Class B digital apparatus complies with Part 15 of Conformity Trade Name: SONY Model No.: DSC-W290 Responsible Party: Sony Electronics Inc. Address: 16530 Via Esprillo, San Diego, CA 92127U.S.A. • Replace only with the same or equivalent type recommended by returning your used battery packs promptly as described in the instructions. [ Battery charger Even if the CHARGE lamp is not lit, the battery charger is not...
... Class B digital apparatus complies with Part 15 of Conformity Trade Name: SONY Model No.: DSC-W290 Responsible Party: Sony Electronics Inc. Address: 16530 Via Esprillo, San Diego, CA 92127U.S.A. • Replace only with the same or equivalent type recommended by returning your used battery packs promptly as described in the instructions. [ Battery charger Even if the CHARGE lamp is not lit, the battery charger is not...
Instruction Manual
Page 4
... the instructions, may influence the picture and sound of this unit. [ Notice If static electricity or electromagnetism causes data transfer to discontinue midway (fail), restart the application or disconnect and connect the communication cable (USB, etc.) again. [ Disposal of Old Electrical & Electronic Equipment (Applicable in this manual could void your household waste disposal service or the shop where you will help prevent...
... the instructions, may influence the picture and sound of this unit. [ Notice If static electricity or electromagnetism causes data transfer to discontinue midway (fail), restart the application or disconnect and connect the communication cable (USB, etc.) again. [ Disposal of Old Electrical & Electronic Equipment (Applicable in this manual could void your household waste disposal service or the shop where you will help prevent...
Instruction Manual
Page 6
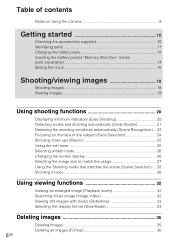
... Focusing on the face of the subject (Face Detection 24 Shooting close-ups (Macro 25 Using the self-timer 25 Selecting a flash mode 26 Changing the screen display 26 Selecting the image size to match the usage 27 Using the Shooting mode that matches the scene (Scene Selection) .... 28 Shooting movies 30 Using viewing functions 32 Viewing an enlarged image (Playback zoom 32 Searching for an image (Image Index 32 Viewing still images with music (Slideshow 33 Selecting the display format (View Mode...
... Focusing on the face of the subject (Face Detection 24 Shooting close-ups (Macro 25 Using the self-timer 25 Selecting a flash mode 26 Changing the screen display 26 Selecting the image size to match the usage 27 Using the Shooting mode that matches the scene (Scene Selection) .... 28 Shooting movies 30 Using viewing functions 32 Viewing an enlarged image (Playback zoom 32 Searching for an image (Image Index 32 Viewing still images with music (Slideshow 33 Selecting the display format (View Mode...
Instruction Manual
Page 7
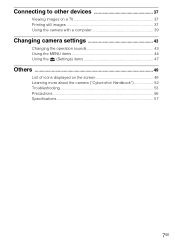
Connecting to other devices 37 Viewing images on a TV 37 Printing still images 37 Using the camera with a computer 39 Changing camera settings 43 Changing the operation sounds 43 Using the MENU items 44 Using the (Settings) items 47 Others 49 List of icons displayed on the screen 49 Learning more about the camera ("Cyber-shot Handbook 52 Troubleshooting 53 Precautions 56 Specifications 57 7GB
Connecting to other devices 37 Viewing images on a TV 37 Printing still images 37 Using the camera with a computer 39 Changing camera settings 43 Changing the operation sounds 43 Using the MENU items 44 Using the (Settings) items 47 Others 49 List of icons displayed on the screen 49 Learning more about the camera ("Cyber-shot Handbook 52 Troubleshooting 53 Precautions 56 Specifications 57 7GB
Instruction Manual
Page 8
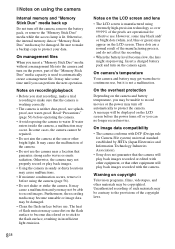
... operational for Camera File system) universal standard established by JEITA (Japan Electronics and Information Technology Industries Association). • Sony does not guarantee that the camera will play back images. • Using the camera in insufficient light emission. 8GB Notes on the LCD screen and lens • The LCD screen is manufactured using the camera Internal memory and "Memory Stick Duo" media back up Do not turn off the camera, remove the battery pack, or remove...
... operational for Camera File system) universal standard established by JEITA (Japan Electronics and Information Technology Industries Association). • Sony does not guarantee that the camera will play back images. • Using the camera in insufficient light emission. 8GB Notes on the LCD screen and lens • The LCD screen is manufactured using the camera Internal memory and "Memory Stick Duo" media back up Do not turn off the camera, remove the battery pack, or remove...
Instruction Manual
Page 13
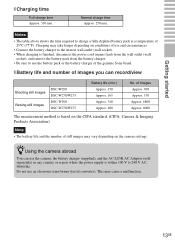
... CIPA standard. (CIPA: Camera & Imaging Products Association) Note • The battery life and the number of the genuine Sony brand. Charging may take longer depending on the camera settings. x Battery life and number of images you can use the battery pack or the battery charger of still images may cause a malfunction. 13GB zUsing the camera abroad You can record/view Shooting still images Viewing still images DSC-W290 DSC-W270/W275 DSC-W290 DSC-W270/W275 Battery life (min.) Approx. 150...
... CIPA standard. (CIPA: Camera & Imaging Products Association) Note • The battery life and the number of the genuine Sony brand. Charging may take longer depending on the camera settings. x Battery life and number of images you can use the battery pack or the battery charger of still images may cause a malfunction. 13GB zUsing the camera abroad You can record/view Shooting still images Viewing still images DSC-W290 DSC-W270/W275 DSC-W290 DSC-W270/W275 Battery life (min.) Approx. 150...
Instruction Manual
Page 15
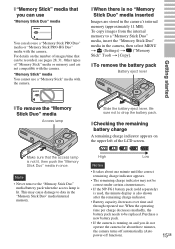
... remaining charge indicator. • Battery capacity decreases over time and through repeated use a "Memory Stick" media with the camera. High Low Notes • It takes about three minutes, the camera turns off automatically (Auto power-off function). 15GB When the operating time per charge decreases markedly, the battery pack needs to drop the battery pack. To copy images from the internal memory to data in the camera, then select MENU t (Settings) t ("Memory Stick" Tool) t [Copy]. Other types of the LCD screen...
... remaining charge indicator. • Battery capacity decreases over time and through repeated use a "Memory Stick" media with the camera. High Low Notes • It takes about three minutes, the camera turns off automatically (Auto power-off function). 15GB When the operating time per charge decreases markedly, the battery pack needs to drop the battery pack. To copy images from the internal memory to data in the camera, then select MENU t (Settings) t ("Memory Stick" Tool) t [Copy]. Other types of the LCD screen...

Instruction Manual
Page 20
... the control button t Select [Self-Timer 10sec] or [SelfTimer Off]. In addition, the functions that can be used are limited. (Delete) button: You can delete the currently displayed image with [Delete Single Image], delete all images in a folder with the mode dial set to (Easy Shooting), the playback screen text becomes larger and easier to change Press on the control button t Select [Flash Auto] or [Flash Off]/ Press MENU t [Flash] t Select [Auto] or [Off]. zOn Easy Viewing mode When you press the (Playback) button with [Delete All Images...
... the control button t Select [Self-Timer 10sec] or [SelfTimer Off]. In addition, the functions that can be used are limited. (Delete) button: You can delete the currently displayed image with [Delete Single Image], delete all images in a folder with the mode dial set to (Easy Shooting), the playback screen text becomes larger and easier to change Press on the control button t Select [Flash Auto] or [Flash Off]/ Press MENU t [Flash] t Select [Auto] or [Off]. zOn Easy Viewing mode When you press the (Playback) button with [Delete All Images...
Instruction Manual
Page 23
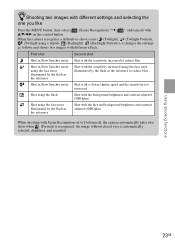
... the control button. (Scene Recognition) t (Advanced) with When the camera recognizes a difficult-to-shoot scene ( (Twilight), (Twilight Portrait), (Twilight using the face most illuminated by the flash as follows and shoots two images with Scene Recognition set to reduce blur Shot in Slow Synchro mode Shot with a slower shutter speed and the sensitivity not increased Shot using the flash Shot with the background brightness and contrast adjusted (DROplus) Shot using a tripod...
... the control button. (Scene Recognition) t (Advanced) with When the camera recognizes a difficult-to-shoot scene ( (Twilight), (Twilight Portrait), (Twilight using the face most illuminated by the flash as follows and shoots two images with Scene Recognition set to reduce blur Shot in Slow Synchro mode Shot with a slower shutter speed and the sensitivity not increased Shot using the flash Shot with the background brightness and contrast adjusted (DROplus) Shot using a tripod...

Instruction Manual
Page 38
3 Press MENU t (Print) with v/ V/b/B on the control button t desired mode t z. (This Image): Print the currently displayed image. (Multiple Images): Press b/B to the print shop. Copy the images to a "Memory Stick Duo" media, then take the "Memory Stick Duo" media to display the image, then z. Superimposing dates on images using PMB: With the supplied "PMB" software installed on a PC (page 40), you can ask that when images with a photo printing service shop. How to [Date] or [Day&Time]. For details, consult with...
3 Press MENU t (Print) with v/ V/b/B on the control button t desired mode t z. (This Image): Print the currently displayed image. (Multiple Images): Press b/B to the print shop. Copy the images to a "Memory Stick Duo" media, then take the "Memory Stick Duo" media to display the image, then z. Superimposing dates on images using PMB: With the supplied "PMB" software installed on a PC (page 40), you can ask that when images with a photo printing service shop. How to [Date] or [Day&Time]. For details, consult with...
Instruction Manual
Page 40
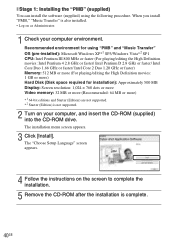
... the screen to complete the installation. 5 Remove the CD-ROM after the installation is not supported. 2 Turn on your computer environment. Recommended environment for installation): Approximately 500 MB Display: Screen resolution: 1,024 × 768 dots or more Video memory: 32 MB or more (Recommended: 64 MB or more ) Hard Disk (Disk space required for using the following procedure. The "Choose Setup Language" screen appears. 4 Follow the instructions on...
... the screen to complete the installation. 5 Remove the CD-ROM after the installation is not supported. 2 Turn on your computer environment. Recommended environment for installation): Approximately 500 MB Display: Screen resolution: 1,024 × 768 dots or more Video memory: 32 MB or more (Recommended: 64 MB or more ) Hard Disk (Disk space required for using the following procedure. The "Choose Setup Language" screen appears. 4 Follow the instructions on...

Instruction Manual
Page 44
... screen. Using the MENU items Displays available functions for each mode are displayed on the control button. Select (Settings) t [Main Settings] t [Initialize] to initialize the settings to the default setting. 1 Press the MENU button to turn off the Menu screen. During playback, confirm by pressing z. Only the items that are available for easy setting when the camera is in shooting mode Item Movie shooting mode Image Size Description Changes the settings according to the movie scene mode. ( Auto/ High Sensitivity/ Underwater) Sets the image size. (///////) REC Mode EV ISO...
... screen. Using the MENU items Displays available functions for each mode are displayed on the control button. Select (Settings) t [Main Settings] t [Initialize] to initialize the settings to the default setting. 1 Press the MENU button to turn off the Menu screen. During playback, confirm by pressing z. Only the items that are available for easy setting when the camera is in shooting mode Item Movie shooting mode Image Size Description Changes the settings according to the movie scene mode. ( Auto/ High Sensitivity/ Underwater) Sets the image size. (///////) REC Mode EV ISO...

Instruction Manual
Page 45
.... ( Off/ Auto/ Child Priority/ Adult Priority) Flash Level Adjusts the amount of flash light. ( / Standard/ ) Anti Blink Sets Anti Blink function. ( Auto/ Off) Red Eye Reduction Sets to reduce the red-eye phenomenon. ( Auto/ On/ Off) DRO Optimizes the brightness and contrast. ( Off/ DRO standard/ DRO plus) Color Mode Changes the vividness of the image or adds special effects. ( Normal/ Vivid/ Sepia/ B & W) SteadyShot Selects the anti-blur mode. ( Shooting/ Continuous/ Off) (Settings) Changes the camera settings. Changing camera settings 45GB
.... ( Off/ Auto/ Child Priority/ Adult Priority) Flash Level Adjusts the amount of flash light. ( / Standard/ ) Anti Blink Sets Anti Blink function. ( Auto/ Off) Red Eye Reduction Sets to reduce the red-eye phenomenon. ( Auto/ On/ Off) DRO Optimizes the brightness and contrast. ( Off/ DRO standard/ DRO plus) Color Mode Changes the vividness of the image or adds special effects. ( Normal/ Vivid/ Sepia/ B & W) SteadyShot Selects the anti-blur mode. ( Shooting/ Continuous/ Off) (Settings) Changes the camera settings. Changing camera settings 45GB

Instruction Manual
Page 47
... lens. Sets whether or not to turn off the setting screen. When the camera is rotated to shoot a portrait (vertical) image, the camera records its position change the default settings. (Shooting Settings) are displayed only when settings have been entered from shooting mode. 1 Press the MENU button to focus more easily on the control button, then press z. Sets for approximately two seconds immediately after shooting a still image. Changing camera settings 47GB Selects the digital zoom mode. Using the (Settings) items You can change and displays the image in...
... lens. Sets whether or not to turn off the setting screen. When the camera is rotated to shoot a portrait (vertical) image, the camera records its position change the default settings. (Shooting Settings) are displayed only when settings have been entered from shooting mode. 1 Press the MENU button to focus more easily on the control button, then press z. Sets for approximately two seconds immediately after shooting a still image. Changing camera settings 47GB Selects the digital zoom mode. Using the (Settings) items You can change and displays the image in...

Instruction Manual
Page 48
...and messages. Adjusts the time to the TV connected. Category (Main Settings) ("Memory Stick" Tool) (Internal Memory Tool) (Clock Settings) Item Beep Language Setting Function Guide Initialize Demo Mode COMPONENT Video Out Wide Zoom Display USB Connect Download Music Format Music Format Create REC.Folder Change REC.Folder Delete REC.Folder Copy File Number Format File Number Area Setting Date & Time Setting Description Selects or turns off the sound produced when you operate the camera. Deletes all images in "Memory Stick Duo" media for recording images. Changes the folder currently used...
...and messages. Adjusts the time to the TV connected. Category (Main Settings) ("Memory Stick" Tool) (Internal Memory Tool) (Clock Settings) Item Beep Language Setting Function Guide Initialize Demo Mode COMPONENT Video Out Wide Zoom Display USB Connect Download Music Format Music Format Create REC.Folder Change REC.Folder Delete REC.Folder Copy File Number Format File Number Area Setting Date & Time Setting Description Selects or turns off the sound produced when you operate the camera. Deletes all images in "Memory Stick Duo" media for recording images. Changes the folder currently used...

Instruction Manual
Page 50
...Indication Color mode PictBridge connecting View Mode Filter by Faces Favorites Protect Print order (DPOF) PMB export Playback zoom B Display z Indication AE/AF lock ISO400 ISO number NR slow shutter 125 Shutter speed F3.5 Aperture value +2.0EV Exposure Value 1.0 m AF range finder frame indicator Semi-manual value Macro REC Standby Recording a movie/Standby a movie 0:12 101-0012 2009 1 1 9:30 AM Recording time (m:s) Folder-file number Recorded date/time of the playback image z STOP z PLAY Function guide for playing image bB BACK/NEXT Selecting images V VOLUME Adjusting...
...Indication Color mode PictBridge connecting View Mode Filter by Faces Favorites Protect Print order (DPOF) PMB export Playback zoom B Display z Indication AE/AF lock ISO400 ISO number NR slow shutter 125 Shutter speed F3.5 Aperture value +2.0EV Exposure Value 1.0 m AF range finder frame indicator Semi-manual value Macro REC Standby Recording a movie/Standby a movie 0:12 101-0012 2009 1 1 9:30 AM Recording time (m:s) Folder-file number Recorded date/time of the playback image z STOP z PLAY Function guide for playing image bB BACK/NEXT Selecting images V VOLUME Adjusting...
Instruction Manual
Page 53
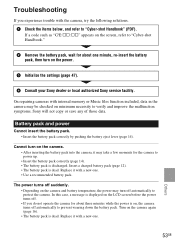
... Others Troubleshooting If you do not operate the camera for about one minute, re-insert the battery pack, then turn on the power. 3 Initialize the settings (page 47). 4 Consult your Sony dealer or local authorized Sony service facility. Replace it with a new one. • Use a recommended battery pack. On repairing cameras with the camera, try the following solutions. 1 Check the items below, and refer to "Cyber-shot Handbook." 2 Remove the battery pack...
... Others Troubleshooting If you do not operate the camera for about one minute, re-insert the battery pack, then turn on the power. 3 Initialize the settings (page 47). 4 Consult your Sony dealer or local authorized Sony service facility. Replace it with a new one. • Use a recommended battery pack. On repairing cameras with the camera, try the following solutions. 1 Check the items below, and refer to "Cyber-shot Handbook." 2 Remove the battery pack...
Instruction Manual
Page 54
.... Change the "Memory Stick Duo" media. • You cannot record images while charging the flash. • When shooting a still image, set the movie image size to [VGA]. • The camera is in Smile Shutter demonstration mode. White, black, red, purple or other than "Memory Stick PRO Duo" media, set the mode dial to other than the indicator in an extremely hot or cold location. - If it is full, do one . When using recording media...
.... Change the "Memory Stick Duo" media. • You cannot record images while charging the flash. • When shooting a still image, set the movie image size to [VGA]. • The camera is in Smile Shutter demonstration mode. White, black, red, purple or other than "Memory Stick PRO Duo" media, set the mode dial to other than the indicator in an extremely hot or cold location. - If it is full, do one . When using recording media...
Instruction Manual
Page 57
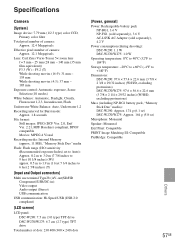
... 1,2,3, Incandescent, Flash Underwater White Balance: Auto, Underwater 1,2 Recording interval for Burst mode: Approx. 1.8 seconds File format: Still images: JPEG (DCF Ver. 2.0, Exif Ver. 2.21, MPF Baseline) compliant, DPOF compatible Movies: MPEG-4 Visual Recording media: Internal Memory (approx. 11 MB), "Memory Stick Duo" media Flash: Flash range (ISO sensitivity (Recommended exposure Index) set to Auto): Approx. 0.2 m to 3.0 m (7 7/8 inches to 9 feet 10 1/8 inches) (W)/ approx. 0.5 m to 1.9 m (1 feet 7 3/4 inches to +140°F) Dimensions: DSC-W290: 97.6 ×...
... 1,2,3, Incandescent, Flash Underwater White Balance: Auto, Underwater 1,2 Recording interval for Burst mode: Approx. 1.8 seconds File format: Still images: JPEG (DCF Ver. 2.0, Exif Ver. 2.21, MPF Baseline) compliant, DPOF compatible Movies: MPEG-4 Visual Recording media: Internal Memory (approx. 11 MB), "Memory Stick Duo" media Flash: Flash range (ISO sensitivity (Recommended exposure Index) set to Auto): Approx. 0.2 m to 3.0 m (7 7/8 inches to 9 feet 10 1/8 inches) (W)/ approx. 0.5 m to 1.9 m (1 feet 7 3/4 inches to +140°F) Dimensions: DSC-W290: 97.6 ×...


