Operating Instructions
Page 4
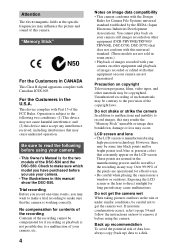
... ) data to direct sunlight for Camera File Systems universal standard established by the JEIDA (Japan Electronic Industries Development Association). Precaution on image data compatibility • This camera conforms with this device must accept any way. However, there may be some areas.) • Playback of images recorded with your camera are not sold in this manual show the DSC-S50. Exposing the LCD screen or the lens to a disk. If...
... ) data to direct sunlight for Camera File Systems universal standard established by the JEIDA (Japan Electronic Industries Development Association). Precaution on image data compatibility • This camera conforms with this device must accept any way. However, there may be some areas.) • Playback of images recorded with your camera are not sold in this manual show the DSC-S50. Exposing the LCD screen or the lens to a disk. If...

Operating Instructions
Page 5
... images (DSC-S50 only 20 B Playback Playing back still images 21 Playing back moving images 22 Viewing images using a personal computer 24 Image file storage destinations and image files 28 Advanced operations Before performing advanced operations How to use the MODE selector .......... 29 How to use the control button 29 How to print (PRINT MARK 53 Additional information Precautions 54 On "Memory Sticks 55 Using your camera abroad 56 Troubleshooting 57 Warning and notice messages 61 Self-diagnosis display 62 Specifications 63 LCD screen indicators...
... images (DSC-S50 only 20 B Playback Playing back still images 21 Playing back moving images 22 Viewing images using a personal computer 24 Image file storage destinations and image files 28 Advanced operations Before performing advanced operations How to use the MODE selector .......... 29 How to use the control button 29 How to print (PRINT MARK 53 Additional information Precautions 54 On "Memory Sticks 55 Using your camera abroad 56 Troubleshooting 57 Warning and notice messages 61 Self-diagnosis display 62 Specifications 63 LCD screen indicators...

Operating Instructions
Page 11
Getting started Notes • The battery life and number of images will be decreased if you continuously record/play back while replacing the "Memory Stick." • If sufficient battery remaining time is limited. The above figures are a guide when you use your camera at low temperatures, use the flash, repeatedly turn the power on/off or use the zoom. • The capacity of the "Memory Stick" is indicated but the power runs out soon...
Getting started Notes • The battery life and number of images will be decreased if you continuously record/play back while replacing the "Memory Stick." • If sufficient battery remaining time is limited. The above figures are a guide when you use your camera at low temperatures, use the flash, repeatedly turn the power on/off or use the zoom. • The capacity of the "Memory Stick" is indicated but the power runs out soon...
Operating Instructions
Page 15
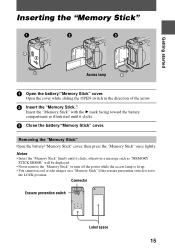
... the battery compartment as "MEMORY STICK ERROR" will be displayed. • Never remove the "Memory Stick" or turn off the power while the access lamp is lit up. • You cannot record or edit images on a "Memory Stick" if the erasure prevention switch is set to the LOCK position. Connector Erasure prevention switch OC Label space 15 Getting started Inserting the "Memory Stick" Access lamp 1 Open the battery/"Memory Stick...
... the battery compartment as "MEMORY STICK ERROR" will be displayed. • Never remove the "Memory Stick" or turn off the power while the access lamp is lit up. • You cannot record or edit images on a "Memory Stick" if the erasure prevention switch is set to the LOCK position. Connector Erasure prevention switch OC Label space 15 Getting started Inserting the "Memory Stick" Access lamp 1 Open the battery/"Memory Stick...
Operating Instructions
Page 16
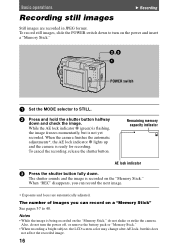
...; Exposure and focus are recorded in JPEG format. The number of images you can record on the power and insert a "Memory Stick." To cancel the recording, release the shutter button. To record still images, slide the POWER switch down to turn the power off, or remove the battery pack or "Memory Stick." • When recording a bright subject, the LCD screen color may change after AE lock, but is not yet recorded. When the camera finishes the automatic adjustments*, the AE lock indicator z lights...
...; Exposure and focus are recorded in JPEG format. The number of images you can record on the power and insert a "Memory Stick." To cancel the recording, release the shutter button. To record still images, slide the POWER switch down to turn the power off, or remove the battery pack or "Memory Stick." • When recording a bright subject, the LCD screen color may change after AE lock, but is not yet recorded. When the camera finishes the automatic adjustments*, the AE lock indicator z lights...

Operating Instructions
Page 20
... press the shutter button momentarily The image and sound are recorded in the menu setting is set to 60 seconds. However, when [IMAGE SIZE] in MPEG format. Zooming or using the self-timer, etc. DISPLAY POWER switch 1 Set the MODE selector to 10 or 15 seconds with audio are recorded for five seconds. You can change the recording time to MOVIE. 2 Press the shutter button fully down. Recording moving images, slide the POWER switch down to turn on the power and insert a "Memory Stick."
... press the shutter button momentarily The image and sound are recorded in the menu setting is set to 60 seconds. However, when [IMAGE SIZE] in MPEG format. Zooming or using the self-timer, etc. DISPLAY POWER switch 1 Set the MODE selector to 10 or 15 seconds with audio are recorded for five seconds. You can change the recording time to MOVIE. 2 Press the shutter button fully down. Recording moving images, slide the POWER switch down to turn on the power and insert a "Memory Stick."
Operating Instructions
Page 24
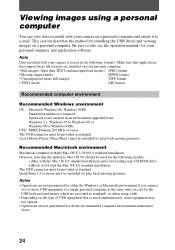
... computer You can view data recorded with your camera on a personal computer. Note Data recorded with your camera is used for installing the USB driver and viewing images on a personal computer and attach it to Windows 98SE. Operation is required. This section describes the method for the following formats. ActiveMovie Player (DirectShow) must be installed (to play back moving pictures). Make sure that applications that support these file formats are not guaranteed for...
... computer You can view data recorded with your camera on a personal computer. Note Data recorded with your camera is used for installing the USB driver and viewing images on a personal computer and attach it to Windows 98SE. Operation is required. This section describes the method for the following formats. ActiveMovie Player (DirectShow) must be installed (to play back moving pictures). Make sure that applications that support these file formats are not guaranteed for...
Operating Instructions
Page 25
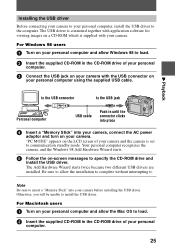
... of your personal computer. 3 Connect the USB jack on your camera with your camera before installing the USB driver. The USB driver is contained together with application software for viewing images on a CD-ROM which is set to communication standby mode. Your personal computer recognizes the camera, and the Windows 98 Add Hardware Wizard starts. 5 Follow the on-screen messages to install the USB driver. For Windows 98 users 1 Turn on your personal computer and...
... of your personal computer. 3 Connect the USB jack on your camera with your camera before installing the USB driver. The USB driver is contained together with application software for viewing images on a CD-ROM which is set to communication standby mode. Your personal computer recognizes the camera, and the Windows 98 Add Hardware Wizard starts. 5 Follow the on-screen messages to install the USB driver. For Windows 98 users 1 Turn on your personal computer and...

Operating Instructions
Page 32
... judgement. SERIES x NORMAL Assigns numbers to files in TEXT mode. MOVIE STILL PLAY ON Plays back images recorded with the self-timer (page 18). MOVIE STILL 32 SENSOR FILE NUMBER Setting Description MODE selector OK CANCEL Formats a "Memory Stick." x OFF When this to OFF to insert the date and time STILL DATE into the image (page 44). Resets the file numbering each time the "Memory Stick" is changed . This function does not work for images recorded in sequence even if the...
... judgement. SERIES x NORMAL Assigns numbers to files in TEXT mode. MOVIE STILL PLAY ON Plays back images recorded with the self-timer (page 18). MOVIE STILL 32 SENSOR FILE NUMBER Setting Description MODE selector OK CANCEL Formats a "Memory Stick." x OFF When this to OFF to insert the date and time STILL DATE into the image (page 44). Resets the file numbering each time the "Memory Stick" is changed . This function does not work for images recorded in sequence even if the...
Operating Instructions
Page 34
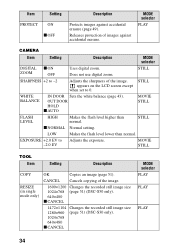
... Item Setting Description COPY RESIZE (in single mode only) OK Copies an image (page 51). STILL LOW Makes the flash level lower than normal. Does not use digital zoom. OUT DOOR HOLD x AUTO MOVIE STILL FLASH LEVEL HIGH Makes the flash level higher than normal. Item Setting PROTECT ON x OFF Description Protects images against accidental erasure. STILL SHARPNESS +2 to -2 Adjusts the sharpness of the image. 1600×1200 Changes the recorded still image size 1024...
... Item Setting Description COPY RESIZE (in single mode only) OK Copies an image (page 51). STILL LOW Makes the flash level lower than normal. Does not use digital zoom. OUT DOOR HOLD x AUTO MOVIE STILL FLASH LEVEL HIGH Makes the flash level higher than normal. Item Setting PROTECT ON x OFF Description Protects images against accidental erasure. STILL SHARPNESS +2 to -2 Adjusts the sharpness of the image. 1600×1200 Changes the recorded still image size 1024...

Operating Instructions
Page 35
... STILL mode. MOVIE STILL PLAY OFF Turns off your camera for about 10 minutes. When ON is heard when you press the shutter button.) x ON Turns on the LCD screen. MOVIE STILL PLAY BEEP SHUTTER Turns off the beep only. (The shutter sound is selected, a demonstration will start if you use the AC MOVIE power adaptor in Japanese. LCD BRIGHT Adjusts the LCD screen brightness using the +/- DELETE Setting OK CANCEL Description Deletes the displayed image. MOVIE STILL PLAY CLOCK SET Sets the date and time...
... STILL mode. MOVIE STILL PLAY OFF Turns off your camera for about 10 minutes. When ON is heard when you press the shutter button.) x ON Turns on the LCD screen. MOVIE STILL PLAY BEEP SHUTTER Turns off the beep only. (The shutter sound is selected, a demonstration will start if you use the AC MOVIE power adaptor in Japanese. LCD BRIGHT Adjusts the LCD screen brightness using the +/- DELETE Setting OK CANCEL Description Deletes the displayed image. MOVIE STILL PLAY CLOCK SET Sets the date and time...
Operating Instructions
Page 39
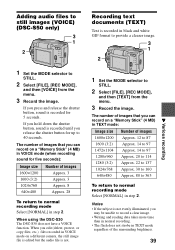
... release the shutter button for five seconds): Image size 1600×1200 1600 (3:2) 1024×768 640×480 Number of images Approx. 3 Approx. 3 Approx. 8 Approx. 28 To return to record a clear image. • Writing and reading data takes more time than in normal recording. • The flash does not strobe in black and white GIF format to provide a clearer image. 3 1 2 1 Set the MODE selector to STILL. 2 Select [FILE], [REC MODE], and...
... release the shutter button for five seconds): Image size 1600×1200 1600 (3:2) 1024×768 640×480 Number of images Approx. 3 Approx. 3 Approx. 8 Approx. 28 To return to record a clear image. • Writing and reading data takes more time than in normal recording. • The flash does not strobe in black and white GIF format to provide a clearer image. 3 1 2 1 Set the MODE selector to STILL. 2 Select [FILE], [REC MODE], and...
Operating Instructions
Page 48
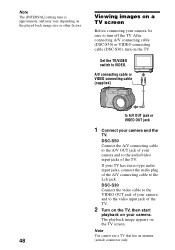
... playback image appears on the played back image size or other factors. Note You cannot use a TV that has an antenna 48 (aerial) connector only. Note The [INTERVAL] setting time is approximate, and may vary depending on the TV screen. Set the TV/VIDEO switch to turn on your camera, be sure to VIDEO. After connecting A/V connecting cable (DSC-S50) or VIDEO connecting cable (DSC-S30), turn off the TV. Viewing images on a TV screen Before connecting your camera. DSC-S30 Connect...
... playback image appears on the played back image size or other factors. Note You cannot use a TV that has an antenna 48 (aerial) connector only. Note The [INTERVAL] setting time is approximate, and may vary depending on the TV screen. Set the TV/VIDEO switch to turn on your camera, be sure to VIDEO. After connecting A/V connecting cable (DSC-S50) or VIDEO connecting cable (DSC-S30), turn off the TV. Viewing images on a TV screen Before connecting your camera. DSC-S30 Connect...
Operating Instructions
Page 55
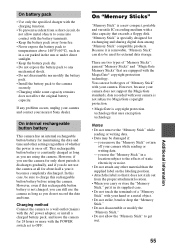
...; Data may be used for exchanging and sharing digital data among "Memory Stick" compatible products. Charging method Connect the camera to a wall outlet (mains) with the AC power adaptor, or install a charged battery pack, and leave the camera for only short periods it discharges gradually, and if you remove the "Memory Stick" or turn off . you use the camera for 24 hours or more with the POWER switch set to charge this rechargeable button battery...
...; Data may be used for exchanging and sharing digital data among "Memory Stick" compatible products. Charging method Connect the camera to a wall outlet (mains) with the AC power adaptor, or install a charged battery pack, and leave the camera for only short periods it discharges gradually, and if you remove the "Memory Stick" or turn off . you use the camera for 24 hours or more with the POWER switch set to charge this rechargeable button battery...
Operating Instructions
Page 57
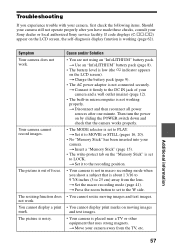
... E indicator appears on the "Memory Stick" is not working (page 62). t Set it to the recording position. • Your camera is not in microcomputer is set to PLAY. t Press the zoom button to set to LOCK. t Move your Sony dealer or local authorized Sony service facility. Your camera cannot record images. The picture is not connected securely. Then turn the power on by sliding the POWER switch down and check that uses strong magnets. Troubleshooting If...
... E indicator appears on the "Memory Stick" is not working (page 62). t Set it to the recording position. • Your camera is not in microcomputer is set to PLAY. t Press the zoom button to set to LOCK. t Move your Sony dealer or local authorized Sony service facility. Your camera cannot record images. The picture is not connected securely. Then turn the power on by sliding the POWER switch down and check that uses strong magnets. Troubleshooting If...

Operating Instructions
Page 58
... not work . t Set the flash to auto (no indicator), or (page 19). • PROGRAM AE is set to the Panfocus mode. t Adjust the exposure (page 43). Digital zoom does not function. t Fully charge the battery pack (page 9). • PROGRAM AE is set to the Twilight, Twilight plus, or Panfocus mode. Sufficient battery remaining indicator is too dark. The date and time are not set to MOVIE (DSC-S50 only). Symptom The picture is displayed but the power...
... not work . t Set the flash to auto (no indicator), or (page 19). • PROGRAM AE is set to the Panfocus mode. t Adjust the exposure (page 43). Digital zoom does not function. t Fully charge the battery pack (page 9). • PROGRAM AE is set to the Twilight, Twilight plus, or Panfocus mode. Sufficient battery remaining indicator is too dark. The date and time are not set to MOVIE (DSC-S50 only). Symptom The picture is displayed but the power...

Operating Instructions
Page 59
... power turns off automatically to TEXT mode. The PROGRAM AE function does not work. The image cannot be played back on , the camera turns off suddenly. t Use an image size of the system and is not a malfunction. • The camera is discharged. The picture is protected. t Turn on the TV screen. t Replace it to B&W mode. t Cancel B&W mode (page 44). The LCD screen freezes momentarily. The image does not appear on the camera. • The battery...
... power turns off automatically to TEXT mode. The PROGRAM AE function does not work. The image cannot be played back on , the camera turns off suddenly. t Use an image size of the system and is not a malfunction. • The camera is discharged. The picture is protected. t Turn on the TV screen. t Replace it to B&W mode. t Cancel B&W mode (page 44). The LCD screen freezes momentarily. The image does not appear on the camera. • The battery...
Operating Instructions
Page 63
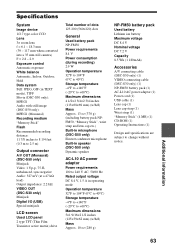
... mm) (w/h/d) Mass Approx. 10 oz (280 g) NP-FM50 battery pack Used battery Lithium ion battery Maximum voltage DC 8.4 V Nominal voltage DC 7.2 V Capacity 8.5 Wh (1 180mAh) Accessories A/V connecting cable (DSC-S50 only) (1) VIDEO connecting cable (DSC-S30 only) (1) NP-FM50 battery pack (1) AC-L10 AC power adaptor (1) Power cord (1) USB cable (1) Lens cap (1) Lens cap strap (1) Wrist strap (1) "Memory Stick" (4 MB) (1) CD-ROM (1) Operating Instructions (1) Design and specifications are subject to change without notice. Additional information 63
... mm) (w/h/d) Mass Approx. 10 oz (280 g) NP-FM50 battery pack Used battery Lithium ion battery Maximum voltage DC 8.4 V Nominal voltage DC 7.2 V Capacity 8.5 Wh (1 180mAh) Accessories A/V connecting cable (DSC-S50 only) (1) VIDEO connecting cable (DSC-S30 only) (1) NP-FM50 battery pack (1) AC-L10 AC power adaptor (1) Power cord (1) USB cable (1) Lens cap (1) Lens cap strap (1) Wrist strap (1) "Memory Stick" (4 MB) (1) CD-ROM (1) Operating Instructions (1) Design and specifications are subject to change without notice. Additional information 63
Operating Instructions
Page 64
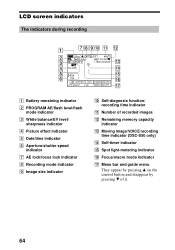
... AE/flash level/flash mode indicator C White balance/EV level/ sharpness indicator D Picture effect indicator E Date/time indicator F Aperture/shutter speed indicator G AE lock/focus lock indicator H Recording mode indicator I Image size indicator J Self-diagnosis function/ recording time indicator K Number of recorded images L Remaining memory capacity indicator M Moving image/VOICE recording time indicator (DSC-S50 only) N Self-timer indicator O Spot light-metering indicator P Focus/macro mode indicator Q Menu bar and guide menu They appear by pressing v on the control button and disappear...
... AE/flash level/flash mode indicator C White balance/EV level/ sharpness indicator D Picture effect indicator E Date/time indicator F Aperture/shutter speed indicator G AE lock/focus lock indicator H Recording mode indicator I Image size indicator J Self-diagnosis function/ recording time indicator K Number of recorded images L Remaining memory capacity indicator M Moving image/VOICE recording time indicator (DSC-S50 only) N Self-timer indicator O Spot light-metering indicator P Focus/macro mode indicator Q Menu bar and guide menu They appear by pressing v on the control button and disappear...
Operating Instructions
Page 66
... Q Quick Review 17 R REC MODE 33 Recording images in macro ..........41 moving images 20 still images 16 still images for e-mail 38 with the flash 19 RESIZE 51 S SECAM system 56 Self-diagnosis display ......62 Setting date and time .......13 SHARPNESS 34 Shutter speed priority mode 42 Single mode 31 SLIDE SHOW 47 Still images playback 21 recording 16 T TEXT 39 TIFF 40 TV color system 56 U USB 25 Using the self-timer .........18 Using your camera abroad 56 V Viewing images...
... Q Quick Review 17 R REC MODE 33 Recording images in macro ..........41 moving images 20 still images 16 still images for e-mail 38 with the flash 19 RESIZE 51 S SECAM system 56 Self-diagnosis display ......62 Setting date and time .......13 SHARPNESS 34 Shutter speed priority mode 42 Single mode 31 SLIDE SHOW 47 Still images playback 21 recording 16 T TEXT 39 TIFF 40 TV color system 56 U USB 25 Using the self-timer .........18 Using your camera abroad 56 V Viewing images...


