Operating Instructions
Page 1
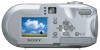
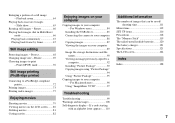
Model No. DSC-P73/P93 © 2004 Sony Corporation 3-091-340-12(1) Getting started Shooting still images Viewing still images Deleting still images Before advanced operations Advanced still image shooting Advanced still image viewing Still image editing Still image printing PictBridge printer) Enjoying movies Enjoying images on the bottom. Owner's Record The model and serial numbers are located on your Sony dealer regarding this manual thoroughly, and retain it for future reference. Refer to these numbers whenever you call upon...
Model No. DSC-P73/P93 © 2004 Sony Corporation 3-091-340-12(1) Getting started Shooting still images Viewing still images Deleting still images Before advanced operations Advanced still image shooting Advanced still image viewing Still image editing Still image printing PictBridge printer) Enjoying movies Enjoying images on the bottom. Owner's Record The model and serial numbers are located on your Sony dealer regarding this manual thoroughly, and retain it for future reference. Refer to these numbers whenever you call upon...
Operating Instructions
Page 3
... installation. If you change the fuse. Attention The electromagnetic fields at the specific frequencies may cause harmful interference to which can be sure to be replaced, a fuse of the same rating as the supplied one and approved by one or more information regarding recycling of this digital camera. Please consult with the instructions, may influence the picture and sound...
... installation. If you change the fuse. Attention The electromagnetic fields at the specific frequencies may cause harmful interference to which can be sure to be replaced, a fuse of the same rating as the supplied one and approved by one or more information regarding recycling of this digital camera. Please consult with the instructions, may influence the picture and sound...

Operating Instructions
Page 4
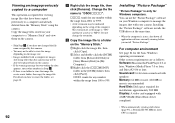
... direct sunlight for if recording or playback is not possible due to a disk. "Memory Stick" N50 For the Customers in color) that the camera is not a malfunction. Notes on image data compatibility • This camera conforms with other equipment on the LCD screen in any way. • Be careful when placing the camera near a window or outdoors. LCD screen, LCD finder (only models with an LCD finder) and lens • The LCD screen...
... direct sunlight for if recording or playback is not possible due to a disk. "Memory Stick" N50 For the Customers in color) that the camera is not a malfunction. Notes on image data compatibility • This camera conforms with other equipment on the LCD screen in any way. • Be careful when placing the camera near a window or outdoors. LCD screen, LCD finder (only models with an LCD finder) and lens • The LCD screen...
Operating Instructions
Page 6
... recording folder 48 Advanced still image shooting Choosing an auto focus method 49 Choosing a focus range finder frame - Picture Effect 62 Advanced still image viewing Selecting the folder and playing back images - Quick Review 27 Using the zoom feature 27 Shooting close-ups - White Balance...58 Adjusting the flash level - Multi Burst 61 Shooting with manual shutter speed and aperture settings - AF Mode 50 Setting the distance to the subject - Manual Exposure 52 Adjusting the exposure - Using auto mode 25 Checking the last image shot - Macro 29 Using the self-timer...
... recording folder 48 Advanced still image shooting Choosing an auto focus method 49 Choosing a focus range finder frame - Picture Effect 62 Advanced still image viewing Selecting the folder and playing back images - Quick Review 27 Using the zoom feature 27 Shooting close-ups - White Balance...58 Adjusting the flash level - Multi Burst 61 Shooting with manual shutter speed and aperture settings - AF Mode 50 Setting the distance to the subject - Manual Exposure 52 Adjusting the exposure - Using auto mode 25 Checking the last image shot - Macro 29 Using the self-timer...
Operating Instructions
Page 7
... Self-diagnosis display - Enlarging a portion of images that can be saved/ shooting time 111 Menu items 112 SET UP items 116 Precautions 118 The "Memory Stick 119 The nickel-metal hydride batteries ........120 The battery charger 121 Specifications 121 The LCD screen 124 Index Index 128 7 Rotate 66 Playing back images shot in Multi Burst mode 66 Playing back continuously 67 Playing back frame by frame 67 Still image editing Protecting images - For Windows users 84 Installing the USB driver...
... Self-diagnosis display - Enlarging a portion of images that can be saved/ shooting time 111 Menu items 112 SET UP items 116 Precautions 118 The "Memory Stick 119 The nickel-metal hydride batteries ........120 The battery charger 121 Specifications 121 The LCD screen 124 Index Index 128 7 Rotate 66 Playing back images shot in Multi Burst mode 66 Playing back continuously 67 Playing back frame by frame 67 Still image editing Protecting images - For Windows users 84 Installing the USB driver...
Operating Instructions
Page 18
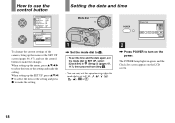
How to use the control button Camera AF Mode: Digital Zoom: Date/Time: Red Eye Reduction: AF Illuminator: Auto Review: Single Smart Off Off Auto Off SELECT Setup 2 File Number: USB Connect: Video Out: OK Clock Set: Cancel To change the current settings of the camera, bring up the menu or the SET UP screen (pages 46, 47), and use the control button to make the setting. Clock Set Y/M/D M/D/Y D/M/Y 2004 / 1 / 1 12 : 00 OK AM Cancel 2 , Press POWER to P, M or . When setting up the SET UP, press v/V/b/ B to...
How to use the control button Camera AF Mode: Digital Zoom: Date/Time: Red Eye Reduction: AF Illuminator: Auto Review: Single Smart Off Off Auto Off SELECT Setup 2 File Number: USB Connect: Video Out: OK Clock Set: Cancel To change the current settings of the camera, bring up the menu or the SET UP screen (pages 46, 47), and use the control button to make the setting. Clock Set Y/M/D M/D/Y D/M/Y 2004 / 1 / 1 12 : 00 OK AM Cancel 2 , Press POWER to P, M or . When setting up the SET UP, press v/V/b/ B to...
Operating Instructions
Page 47
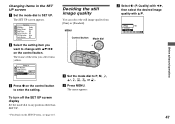
... SET UP items, see page 116. The frame of the item you want to SET UP. The menu appears. Deciding the still image quality You can select the still image quality from [Fine] or [Standard]. Setup 2 File Number: USB Connect: Video Out: OK Clock Set: Cancel c Press z on the control button to P, M, , , , , or . Changing items in the SET UP screen a Set the mode dial to change with v/V. 47 Before advanced operations...
... SET UP items, see page 116. The frame of the item you want to SET UP. The menu appears. Deciding the still image quality You can select the still image quality from [Fine] or [Standard]. Setup 2 File Number: USB Connect: Video Out: OK Clock Set: Cancel c Press z on the control button to P, M, , , , , or . Changing items in the SET UP screen a Set the mode dial to change with v/V. 47 Before advanced operations...
Operating Instructions
Page 87
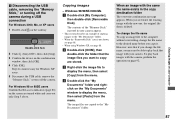
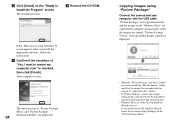
... change the file name to copy are copied to the "My Documents" folder. • When the "Removable Disk" icon is deleted. Double-click here 2 Click (Sony DSC), then click [Stop]. 3 Confirm the device on the screen are turned white and carry out only Step 5 above. Windows 98/98SE/2000/Me a Double-click [My Computer], then double-click [Removable Disk]. Step 4 is unnecessary for Windows XP users. 5 Disconnect the USB cable, remove the "Memory...
... change the file name to copy are copied to the "My Documents" folder. • When the "Removable Disk" icon is deleted. Double-click here 2 Click (Sony DSC), then click [Stop]. 3 Confirm the device on the screen are turned white and carry out only Step 5 above. Windows 98/98SE/2000/Me a Double-click [My Computer], then double-click [Removable Disk]. Step 4 is unnecessary for Windows XP users. 5 Disconnect the USB cable, remove the "Memory...
Operating Instructions
Page 92
... Windows computers. Sound card: 16-bit stereo sound card with your computer to a "Memory Stick" and view them on the camera. • If the warning message for any number within the range from 100 to create the folder, see page 48. 92 a Right-click the image file, then click [Rename]. Installing "Picture Package" "Picture Package" is only for installation: approximately 200 MB Display: A video card equipped with 4 MB VRAM (DirectDraw driver...
... Windows computers. Sound card: 16-bit stereo sound card with your computer to a "Memory Stick" and view them on the camera. • If the warning message for any number within the range from 100 to create the folder, see page 48. 92 a Right-click the image file, then click [Rename]. Installing "Picture Package" "Picture Package" is only for installation: approximately 200 MB Display: A video card equipped with 4 MB VRAM (DirectDraw driver...
Operating Instructions
Page 93
... click [Next]. The installation menu screen appears. • If you have not yet installed the USB driver (page 85), do not connect the camera to CD-Rs. If you install the "Picture Package" software (except Windows XP). Enjoying images on your computer • This software is required in order to write to the computer before using. • A separate environment for operating the recording device is compatible with the DirectX...
... click [Next]. The installation menu screen appears. • If you have not yet installed the USB driver (page 85), do not connect the camera to CD-Rs. If you install the "Picture Package" software (except Windows XP). Enjoying images on your computer • This software is required in order to write to the computer before using. • A separate environment for operating the recording device is compatible with the DirectX...
Operating Instructions
Page 94
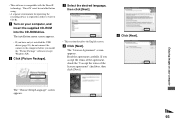
... activation using "Picture Package" Connect the camera and your computer with the camera are copied into these folders. • If "Picture Package" cannot copy images automatically, start up automatically and the images in [Copy automatically]. • Windows XP is checked, then click [Finish]. The shortcut icons of "Yes, I want to Install the Program" screen. f Click [Install] on the "Picture Package Menu." After the images are copied, "Picture Package Viewer" starts up and the images copied are displayed...
... activation using "Picture Package" Connect the camera and your computer with the camera are copied into these folders. • If "Picture Package" cannot copy images automatically, start up automatically and the images in [Copy automatically]. • Windows XP is checked, then click [Finish]. The shortcut icons of "Yes, I want to Install the Program" screen. f Click [Install] on the "Picture Package Menu." After the images are copied, "Picture Package Viewer" starts up and the images copied are displayed...
Operating Instructions
Page 99
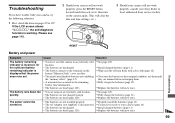
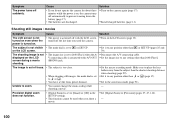
... camera still not work properly, consult your Sony dealer or local authorized Sony service facility. p See page 120. p Install charged batteries (page 11). • The batteries are dead (page 120). p Replace the batteries with new ones. If the LCD screen shows "C:ss:ss," the self-diagnosis function is incorrect. p Install charged batteries (page 11). Troubleshooting RESET Battery and power Symptom Cause Solution The battery remaining indicator is working. p Fully charge the batteries (page 11). Troubleshooting If you have used the camera...
... camera still not work properly, consult your Sony dealer or local authorized Sony service facility. p See page 120. p Install charged batteries (page 11). • The batteries are dead (page 120). p Replace the batteries with new ones. If the LCD screen shows "C:ss:ss," the self-diagnosis function is incorrect. p Install charged batteries (page 11). Troubleshooting RESET Battery and power Symptom Cause Solution The battery remaining indicator is working. p Fully charge the batteries (page 11). Troubleshooting If you have used the camera...
Operating Instructions
Page 100
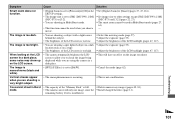
... other than [640 (Fine)]. shooting a movie. Precision digital zoom does not function. • [Digital Zoom] is turned on the camera again (page 17). power is set the focus preset distance. p Set the image size to any position other than the shortest shooting distance when shooting (page 29). p Install charged batteries (page 11). p Set it to [Precision] (pages 27, 47, 116). - 100 Symptom The power turns off the last time you used when you shoot a movie. p Set the macro recording mode. p Turn on .
... other than [640 (Fine)]. shooting a movie. Precision digital zoom does not function. • [Digital Zoom] is turned on the camera again (page 17). power is set the focus preset distance. p Set the image size to any position other than the shortest shooting distance when shooting (page 29). p Install charged batteries (page 11). p Set it to [Precision] (pages 27, 47, 116). - 100 Symptom The power turns off the last time you used when you shoot a movie. p Set the macro recording mode. p Turn on .
Operating Instructions
Page 101
...] (DSC-P73) or [3:2]. • You are shooting in a dark p Adjust the exposure (page 55). The image is monochrome (black and white). • [PFX] (P.Effect) is too bright. • You are shooting a spot lighted subject in Multi Burst mode. • This function cannot be used when you are shooting a very bright subject. • The smear phenomenon is full. mode. • The camera can record only one image, since the p Install charged batteries...
...] (DSC-P73) or [3:2]. • You are shooting in a dark p Adjust the exposure (page 55). The image is monochrome (black and white). • [PFX] (P.Effect) is too bright. • You are shooting a spot lighted subject in Multi Burst mode. • This function cannot be used when you are shooting a very bright subject. • The smear phenomenon is full. mode. • The camera can record only one image, since the p Install charged batteries...

Operating Instructions
Page 102
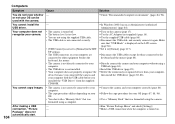
... flash) (page 37). p Set it to the recording position (page 119). - Recording takes a long time. • NR slow shutter function is not a malfunction. p Delete the images saved in Multi Burst or Burst mode. p Set the mode dial to any position other than [640 (Fine)]. p Set the mode dial to any position other than , or (page 37). p Set the flash to "Auto" (No indicator), (Forced flash), or (Slow synchro) (page 31). p Set [Red Eye Reduction...
... flash) (page 37). p Set it to the recording position (page 119). - Recording takes a long time. • NR slow shutter function is not a malfunction. p Delete the images saved in Multi Burst or Burst mode. p Set the mode dial to any position other than [640 (Fine)]. p Set the mode dial to any position other than , or (page 37). p Set the flash to "Auto" (No indicator), (Forced flash), or (Slow synchro) (page 31). p Set [Red Eye Reduction...
Operating Instructions
Page 104
...; You shot with the camera. After making a USB connection, "Picture Package" does not automatically start. Cause - - • The camera is turned off. • The battery level is too low. • You are not using the supplied USB cable. • The USB cable is not connected securely. • [USB Connect] is displayed on the camera (page 17). p Use the supplied USB cable (page 86). p Run "Picture Package Menu" and check [Settings]. p Turn on the LCD screen (page 86). p Use the AC...
...; You shot with the camera. After making a USB connection, "Picture Package" does not automatically start. Cause - - • The camera is turned off. • The battery level is too low. • You are not using the supplied USB cable. • The USB cable is not connected securely. • [USB Connect] is displayed on the camera (page 17). p Use the supplied USB cable (page 86). p Run "Picture Package Menu" and check [Settings]. p Turn on the LCD screen (page 86). p Use the AC...
Operating Instructions
Page 108
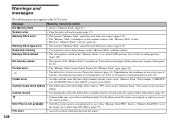
...). • Camera shake may flash even though there are still 5 to select the folder that is low or zero. File error • An error occurred while playing back the image. 108 Memory Stick locked • The write-protect switch on the "Memory Stick." Delete unnecessary images or data (pages 42, 81). You cannot create any more folders • The folder whose first three digits of remaining battery time left. • A folder with a "Memory Stick...
...). • Camera shake may flash even though there are still 5 to select the folder that is low or zero. File error • An error occurred while playing back the image. 108 Memory Stick locked • The write-protect switch on the "Memory Stick." Delete unnecessary images or data (pages 42, 81). You cannot create any more folders • The folder whose first three digits of remaining battery time left. • A folder with a "Memory Stick...
Operating Instructions
Page 116
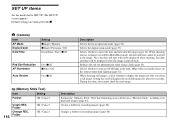
... to focus on a "Memory Stick," including even protected images (page 44). Changes a folder for recording images (page 48). SET UP items Set the mode dial to insert the date and time into the image (page 34). Selects the digital zoom mode (page 27). Also, the date and time will be displayed when shooting. Reduces the red-eye phenomenon when using a flash (page 32). Note that formatting erases all data on the subject under dark lighting (page 32). Creates a folder for recording images...
... to focus on a "Memory Stick," including even protected images (page 44). Changes a folder for recording images (page 48). SET UP items Set the mode dial to insert the date and time into the image (page 34). Selects the digital zoom mode (page 27). Also, the date and time will be displayed when shooting. Reduces the red-eye phenomenon when using a flash (page 32). Note that formatting erases all data on the subject under dark lighting (page 32). Creates a folder for recording images...
Operating Instructions
Page 119
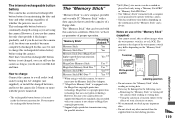
... camera. • The data read/write time differs depending on use of the "Memory Stick" (supplied) • You cannot record, edit, or delete images when the write-protect switch is not subject to MagicGate copyright protection. 3) Supports high-speed data transmission using the parallel interface. 4) [640 (Fine)] size movies can still use the camera as long as you use the camera at all for about one month it with this camera, be sure to charge...
... camera. • The data read/write time differs depending on use of the "Memory Stick" (supplied) • You cannot record, edit, or delete images when the write-protect switch is not subject to MagicGate copyright protection. 3) Supports high-speed data transmission using the parallel interface. 4) [640 (Fine)] size movies can still use the camera as long as you use the camera at all for about one month it with this camera, be sure to charge...
Operating Instructions
Page 128
... 33 Flash 31 Flash Level 59 Fluorescent 58 Focus preset 51 Folder 48, 63 Format 44 H Histogram 56 Index I Image quality 47 Image size 22, 23 ImageMixer VCD2 97 Incandescent 58 Index screen 38 Inserting a "Memory Stick 21 Inserting the date and time 34 Installation 85, 92 J JPG 91 L Landscape 35 LCD backlight 117 LCD screen display 124 Lens ring 8 M Macro 29 Manual exposure 52 Memory Stick 119 Menu 46, 112 Metering mode 57 Mode...
... 33 Flash 31 Flash Level 59 Fluorescent 58 Focus preset 51 Folder 48, 63 Format 44 H Histogram 56 Index I Image quality 47 Image size 22, 23 ImageMixer VCD2 97 Incandescent 58 Index screen 38 Inserting a "Memory Stick 21 Inserting the date and time 34 Installation 85, 92 J JPG 91 L Landscape 35 LCD backlight 117 LCD screen display 124 Lens ring 8 M Macro 29 Manual exposure 52 Memory Stick 119 Menu 46, 112 Metering mode 57 Mode...


