Operating Instructions
Page 3
... to power this product. and Canada RECYCLING NICKEL METAL HYDRIDE BATTERIES Nickel Metal Hydride batteries are designed to Part 15 of the battery used with the equipment in order to comply with the limits for a digital device pursuant to the collection and recycling location nearest you.... or leaking Nickel Metal Hydride batteries. Should the fuse in the plug supplied need to this equipment has a detachable fuse cover, be used to correct the interference by one and approved by returning your nearest Sony service station. If this digital camera. For more of this equipment...
... to power this product. and Canada RECYCLING NICKEL METAL HYDRIDE BATTERIES Nickel Metal Hydride batteries are designed to Part 15 of the battery used with the equipment in order to comply with the limits for a digital device pursuant to the collection and recycling location nearest you.... or leaking Nickel Metal Hydride batteries. Should the fuse in the plug supplied need to this equipment has a detachable fuse cover, be used to correct the interference by one and approved by returning your nearest Sony service station. If this digital camera. For more of this equipment...
Operating Instructions
Page 6
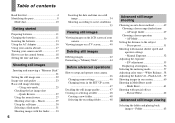
... recording folder 48 Advanced still image shooting Choosing an auto focus method 49 Choosing a focus range finder frame - Table of your camera 38 Viewing images on a TV screen 40 Deleting still images Deleting images 42 Formatting a "Memory Stick 44 Before advanced operations How...Read this first 4 Identifying the parts 8 Mode dial 10 Getting started Preparing batteries 11 Charging the batteries 11 Inserting the batteries 13 Using the AC Adaptor 16 Using your camera abroad 17 Turning your camera 46 Changing menu settings 46 Changing items in Multi Burst mode - Multi Burst...
... recording folder 48 Advanced still image shooting Choosing an auto focus method 49 Choosing a focus range finder frame - Table of your camera 38 Viewing images on a TV screen 40 Deleting still images Deleting images 42 Formatting a "Memory Stick 44 Before advanced operations How...Read this first 4 Identifying the parts 8 Mode dial 10 Getting started Preparing batteries 11 Charging the batteries 11 Inserting the batteries 13 Using the AC Adaptor 16 Using your camera abroad 17 Turning your camera 46 Changing menu settings 46 Changing items in Multi Burst mode - Multi Burst...
Operating Instructions
Page 7
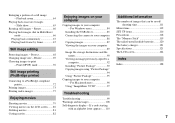
... Additional information The number of a still image - Playback zoom 64 Playing back successive images - For Windows users 84 Installing the USB driver 85 Connecting the camera to your computer 86 Copying images 87 Viewing the images on your computer Copying images to your computer - Protect 68 Changing image size - Rotate 66... images that can be saved/ shooting time 111 Menu items 112 SET UP items 116 Precautions 118 The "Memory Stick 119 The nickel-metal hydride batteries ........120 The battery charger 121 Specifications 121 The LCD screen 124 Index Index 128 7
... Additional information The number of a still image - Playback zoom 64 Playing back successive images - For Windows users 84 Installing the USB driver 85 Connecting the camera to your computer 86 Copying images 87 Viewing the images on your computer Copying images to your computer - Protect 68 Changing image size - Rotate 66... images that can be saved/ shooting time 111 Menu items 112 SET UP items 116 Precautions 118 The "Memory Stick 119 The nickel-metal hydride batteries ........120 The battery charger 121 Specifications 121 The LCD screen 124 Index Index 128 7
Operating Instructions
Page 9
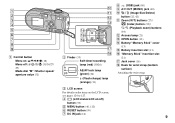
... (MONO) jack (40) J (Image Size/Delete) button (22, 42) K Zoom (W/T) buttons (27)/ (Index) button (39)/ / (Playback zoom) buttons (64) L Access lamp (21) M OPEN button (13) N Battery/"Memory Stick" cover (13) O Battery insertion slot (13) P "Memory Stick" insertion slot (21) Q Jack cover (16) R Hook for wrist strap (bottom surface) Attaching the wrist strap. 9
... (MONO) jack (40) J (Image Size/Delete) button (22, 42) K Zoom (W/T) buttons (27)/ (Index) button (39)/ / (Playback zoom) buttons (64) L Access lamp (21) M OPEN button (13) N Battery/"Memory Stick" cover (13) O Battery insertion slot (13) P "Memory Stick" insertion slot (21) Q Jack cover (16) R Hook for wrist strap (bottom surface) Attaching the wrist strap. 9
Operating Instructions
Page 11
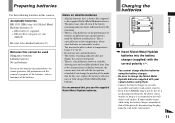
... wall outlet (wall socket). 11 Getting started Charging the batteries 1 , Insert Nickel-Metal Hydride batteries into the battery charger (supplied) with the correct polarity +/-. • You cannot charge alkaline batteries using them. • Connect the battery charger to shoot in this camera. Notes on alkaline batteries • Alkaline batteries have a shorter life compared to the characteristics of alkaline...
... wall outlet (wall socket). 11 Getting started Charging the batteries 1 , Insert Nickel-Metal Hydride batteries into the battery charger (supplied) with the correct polarity +/-. • You cannot charge alkaline batteries using them. • Connect the battery charger to shoot in this camera. Notes on alkaline batteries • Alkaline batteries have a shorter life compared to the characteristics of alkaline...
Operating Instructions
Page 12
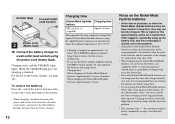
...CHARGE lamp to a wall outlet (wall socket) 2 Power cord (Mains lead) , Connect the battery charger to use the battery charger supplied with a dry cloth. • When transporting the Nickel-Metal Hydride batteries, be fully charged. metal terminals are shorted, there is not a malfunction. • If you ... (mains lead) from the wall outlet (wall socket), and remove the Nickel-Metal Hydride batteries from excessive heat or fire. • Even when Nickel-Metal Hydride batteries are dirty, the batteries may not be sure to a wall outlet (wall socket) using them with the STAMINA...
...CHARGE lamp to a wall outlet (wall socket) 2 Power cord (Mains lead) , Connect the battery charger to use the battery charger supplied with a dry cloth. • When transporting the Nickel-Metal Hydride batteries, be fully charged. metal terminals are shorted, there is not a malfunction. • If you ... (mains lead) from the wall outlet (wall socket), and remove the Nickel-Metal Hydride batteries from excessive heat or fire. • Even when Nickel-Metal Hydride batteries are dirty, the batteries may not be sure to a wall outlet (wall socket) using them with the STAMINA...
Operating Instructions
Page 13
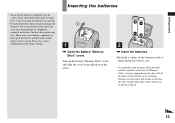
...arrow. 2 , Insert the batteries. Turn up . • Do not peel off the external seals or damage the batteries. Getting started Inserting the batteries • To use batteries from the skin, the operating time of the camera can be caused. marks inside the battery case. • Occasionally ...clean the poles of the batteries and the terminals of the batteries to the +/ -...
...arrow. 2 , Insert the batteries. Turn up . • Do not peel off the external seals or damage the batteries. Getting started Inserting the batteries • To use batteries from the skin, the operating time of the camera can be caused. marks inside the battery case. • Occasionally ...clean the poles of the batteries and the terminals of the batteries to the +/ -...
Operating Instructions
Page 14
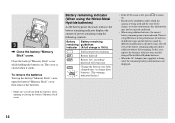
... the conditions under which the camera is being used , the remaining battery information is being used and the state of batteries made by different manufacturers, the power may not be correctly indicated. • When using the following symbols. Battery remaining indicator (When using the Nickel-Metal Hydride batteries) As the battery power decreases with new ones...
... the conditions under which the camera is being used , the remaining battery information is being used and the state of batteries made by different manufacturers, the power may not be correctly indicated. • When using the following symbols. Battery remaining indicator (When using the Nickel-Metal Hydride batteries) As the battery power decreases with new ones...
Operating Instructions
Page 15
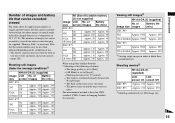
... Camera & Imaging Products Association) Viewing still images2) NH-AA-DA (2) (supplied) No. of Battery size screen images life (min.) DSC-P93 5M On Off Approx. 80 Approx. 40 Approx. 180 Approx. 90 VGA On Approx. 80 Approx. 40 (E-Mail) Off Approx. 180 Approx. 90 DSC-P73... 55 (E-Mail) Off Approx. 240 Approx. 120 When using Sony alkaline batteries 1) Shooting in the following situations: - of Image size images Battery life (min.) DSC-P93 5M Approx. 9200 Approx. 460 VGA (E-Mail) Approx. 9200 Approx. 460 DSC-P73 4M Approx. 9800 Approx. 490 VGA (E-Mail) Approx. 9800...
... Camera & Imaging Products Association) Viewing still images2) NH-AA-DA (2) (supplied) No. of Battery size screen images life (min.) DSC-P93 5M On Off Approx. 80 Approx. 40 Approx. 180 Approx. 90 VGA On Approx. 80 Approx. 40 (E-Mail) Off Approx. 180 Approx. 90 DSC-P73... 55 (E-Mail) Off Approx. 240 Approx. 120 When using Sony alkaline batteries 1) Shooting in the following situations: - of Image size images Battery life (min.) DSC-P93 5M Approx. 9200 Approx. 460 VGA (E-Mail) Approx. 9200 Approx. 460 DSC-P73 4M Approx. 9800 Approx. 490 VGA (E-Mail) Approx. 9800...
Operating Instructions
Page 16
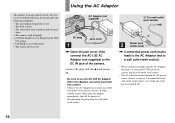
...8226; The set is not disconnected from the AC power source (mains) as long as it is used - The surrounding temperature is low. The battery power is low - Other AC adaptors cannot be recorded/viewed are decreased under the following conditions: - Using the AC Adaptor • The number ...of the camera. The zoom is connected to use the AC-LS5 AC Adaptor. AC Adaptor (not supplied) DC plug 1 Jack cover , Open the jack cover...
...8226; The set is not disconnected from the AC power source (mains) as long as it is used - The surrounding temperature is low. The battery power is low - Other AC adaptors cannot be recorded/viewed are decreased under the following conditions: - Using the AC Adaptor • The number ...of the camera. The zoom is connected to use the AC-LS5 AC Adaptor. AC Adaptor (not supplied) DC plug 1 Jack cover , Open the jack cover...
Operating Instructions
Page 17
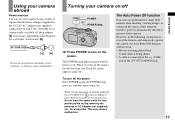
... the first time, the Clock Set screen appears (page 18). Please be careful not to preserve battery power. However, in the following circumstances, even if the batteries are being used to power the camera, the Auto Power Off function will not work. • Movies are performed for a long time...8226; A cable is on with the lens portion pulled out by removing the batteries or AC Adaptor (not supplied), etc., for about three minutes when shooting, viewing images, or setting up the camera while using the batteries, power is automatically shut off POWER POWER lamp , Press POWER to the (USB...
... the first time, the Clock Set screen appears (page 18). Please be careful not to preserve battery power. However, in the following circumstances, even if the batteries are being used to power the camera, the Auto Power Off function will not work. • Movies are performed for a long time...8226; A cable is on with the lens portion pulled out by removing the batteries or AC Adaptor (not supplied), etc., for about three minutes when shooting, viewing images, or setting up the camera while using the batteries, power is automatically shut off POWER POWER lamp , Press POWER to the (USB...

Operating Instructions
Page 19
... Set screen will appear again. When this happens, reset the date and time by starting from [Y/M/D] (year/month/ day), [M/D/Y], and [D/M/Y]. • If the rechargeable button battery, which provides the power for noon. 19 After setting the current numerical value, set the time on the control button, then press z. Clock Set Y/M/D M/D/Y D/M/Y 2004...
... Set screen will appear again. When this happens, reset the date and time by starting from [Y/M/D] (year/month/ day), [M/D/Y], and [D/M/Y]. • If the rechargeable button battery, which provides the power for noon. 19 After setting the current numerical value, set the time on the control button, then press z. Clock Set Y/M/D M/D/Y D/M/Y 2004...

Operating Instructions
Page 21
... Stick" all the way in until it clicks as it out. • Whenever the access lamp is lit, the camera is recording or reading out an image. Never open the battery/"Memory Stick" cover or turn off the power at this time. Shooting still images Inserting and removing a "Memory Stick..." Shooting still images Label side Terminal side Access lamp 1 , Open the battery/"Memory Stick" cover. If you insert a "Memory Stick," push it as far as shown in the direction of the arrow. • Be careful ...
... Stick" all the way in until it clicks as it out. • Whenever the access lamp is lit, the camera is recording or reading out an image. Never open the battery/"Memory Stick" cover or turn off the power at this time. Shooting still images Inserting and removing a "Memory Stick..." Shooting still images Label side Terminal side Access lamp 1 , Open the battery/"Memory Stick" cover. If you insert a "Memory Stick," push it as far as shown in the direction of the arrow. • Be careful ...
Operating Instructions
Page 26
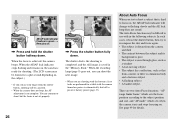
... A backlit subject. When the AE/AF lock indicator stops flashing and remains on, the camera is automatically shut off to use with in the following subjects. About Auto Focus When you are shooting with the batteries, if no tasks are two Auto Focus functions: "AF range finder frame" which sets ...when the camera starts and stops focusing on , power is ready for a while with the camera turned on . There are performed for shooting. (The LCD...
... A backlit subject. When the AE/AF lock indicator stops flashing and remains on, the camera is automatically shut off to use with in the following subjects. About Auto Focus When you are shooting with the batteries, if no tasks are two Auto Focus functions: "AF range finder frame" which sets ...when the camera starts and stops focusing on , power is ready for a while with the camera turned on . There are performed for shooting. (The LCD...

Operating Instructions
Page 33
The digital zoom does not function (page 27) - This is set to [Single] (page 50) - If you press (Flash mode)/ (Self-timer)/ (Macro) with the AE/AF ... screen changes as with the LCD screen turned off, the image will be displayed during playback) The finder is convenient when you want to save battery power, or when it is difficult to confirm the image using the LCD screen.
The digital zoom does not function (page 27) - This is set to [Single] (page 50) - If you press (Flash mode)/ (Self-timer)/ (Macro) with the AE/AF ... screen changes as with the LCD screen turned off, the image will be displayed during playback) The finder is convenient when you want to save battery power, or when it is difficult to confirm the image using the LCD screen.
Operating Instructions
Page 50
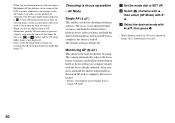
...AF. • When you are restricted based on selected frame, so this is useful for focusing. Choosing a focus operation - After you use the digital zoom or AF illuminator, priority AF movement is given to the center of the mode dial (page 37). a Set the mode dial to focus ...button halfway down and AF lock is complete, the focus is automatically selected. 50 b Select (Camera) with v , then select [AF Mode] with the LCD screen turned off, Single AF is locked. • Battery consumption may be higher than in or near the center of vibration. Center AF automatically focus ...
...AF. • When you are restricted based on selected frame, so this is useful for focusing. Choosing a focus operation - After you use the digital zoom or AF illuminator, priority AF movement is given to the center of the mode dial (page 37). a Set the mode dial to focus ...button halfway down and AF lock is complete, the focus is automatically selected. 50 b Select (Camera) with v , then select [AF Mode] with the LCD screen turned off, Single AF is locked. • Battery consumption may be higher than in or near the center of vibration. Center AF automatically focus ...
Operating Instructions
Page 60
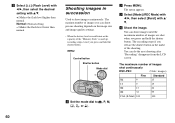
Normal: Normal setting. -: Makes the flash level lower than normal. You can shoot images until the maximum number of images shot continuously DSC-P93: (Units: images) Fine Standard 5M 9 15 3:2 9 15 3M 13 24 1M 32 59 VGA (E-Mail) 100 100 60 You can shoot per... one shooting depends on the image size and image quality settings. • When the battery level is insufficient or the capacity of the shooting. b Press MENU. d Shoot the image. c Select [Mode] (REC Mode) with b/B, then select [Burst] with v/V. ...
Normal: Normal setting. -: Makes the flash level lower than normal. You can shoot images until the maximum number of images shot continuously DSC-P93: (Units: images) Fine Standard 5M 9 15 3:2 9 15 3M 13 24 1M 32 59 VGA (E-Mail) 100 100 60 You can shoot per... one shooting depends on the image size and image quality settings. • When the battery level is insufficient or the capacity of the shooting. b Press MENU. d Shoot the image. c Select [Mode] (REC Mode) with b/B, then select [Burst] with v/V. ...

Operating Instructions
Page 72
... [PictBridge] with a printer. b Select (Setup 2) with V, then select [USB Connect] with B/ v/V. For preparation, you use the fully charged nickel-metal hydride batteries or AC Adaptor (not supplied) to prevent the camera turning off. Connecting to a PictBridge compliant printer Even if you do not have a computer, you can easily print images shot using...
... [PictBridge] with a printer. b Select (Setup 2) with V, then select [USB Connect] with B/ v/V. For preparation, you use the fully charged nickel-metal hydride batteries or AC Adaptor (not supplied) to prevent the camera turning off. Connecting to a PictBridge compliant printer Even if you do not have a computer, you can easily print images shot using...
Operating Instructions
Page 86
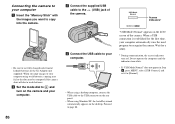
...a desktop computer, connect the USB cable to the USB connector on the desktop. When you want to copy into the camera. • Be sure to use fully charged nickel-metal hydride batteries or the AC Adaptor (not supplied). c Connect the supplied USB cable to page 88. Proceed to the (USB) jack...on the rear panel. • When using weak batteries, copying may fail or the data may be corrupted if the camera shuts off due to weak batteries. b Set the mode dial to and turn on the LCD screen of the camera. Connecting the camera to your computer automatically runs the used program to ...
...a desktop computer, connect the USB cable to the USB connector on the desktop. When you want to copy into the camera. • Be sure to use fully charged nickel-metal hydride batteries or the AC Adaptor (not supplied). c Connect the supplied USB cable to page 88. Proceed to the (USB) jack...on the rear panel. • When using weak batteries, copying may fail or the data may be corrupted if the camera shuts off due to weak batteries. b Set the mode dial to and turn on the LCD screen of the camera. Connecting the camera to your computer automatically runs the used program to ...
Operating Instructions
Page 99
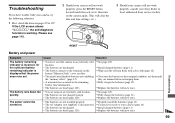
....) Troubleshooting 3 Should your camera still not work properly, consult your camera, try the following solutions. 1 First, check the items on . • The batteries are dead (page 120). quickly. • The batteries are not charged enough. • The batteries are discharged. If the LCD...trouble with your Sony dealer or local authorized Sony service facility. p Connect it securely to their original condition, use them until they are drained before recharging them with new ones. p To restore the batteries to your camera (page 16). • The batteries are dead (page...
....) Troubleshooting 3 Should your camera still not work properly, consult your camera, try the following solutions. 1 First, check the items on . • The batteries are dead (page 120). quickly. • The batteries are not charged enough. • The batteries are discharged. If the LCD...trouble with your Sony dealer or local authorized Sony service facility. p Connect it securely to their original condition, use them until they are drained before recharging them with new ones. p To restore the batteries to your camera (page 16). • The batteries are dead (page...


