User Guide
Page 1
... DSC-M2 "Read This First" (separate volume) Explains the set-up and basic operations for future reference. Model No. Printed on the bottom. Printed in the space provided below. Additional information on this manual and "Read This First" (separate volume) thoroughly, and retain it for shooting/playback with your camera. © 2005 Sony Corporation 2-638-430-12(1) Enjoying the camera Using the menu Using the Setup screen Using your computer Printing still images Connecting...
... DSC-M2 "Read This First" (separate volume) Explains the set-up and basic operations for future reference. Model No. Printed on the bottom. Printed in the space provided below. Additional information on this manual and "Read This First" (separate volume) thoroughly, and retain it for shooting/playback with your camera. © 2005 Sony Corporation 2-638-430-12(1) Enjoying the camera Using the menu Using the Setup screen Using your computer Printing still images Connecting...
User Guide
Page 3
... with the instructions, may influence the picture and sound of this product, please contact your local Civic Office, your household waste disposal service or the shop where you change the fuse. Reorient or relocate the receiving antenna. - Connect the equipment into an outlet on its packaging indicates that this equipment has a detachable fuse cover, be replaced, a fuse of...
... with the instructions, may influence the picture and sound of this product, please contact your local Civic Office, your household waste disposal service or the shop where you change the fuse. Reorient or relocate the receiving antenna. - Connect the equipment into an outlet on its packaging indicates that this equipment has a detachable fuse cover, be replaced, a fuse of...
User Guide
Page 9
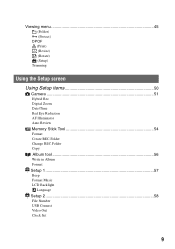
Viewing menu 45 (Folder) - (Protect) DPOF (Print) (Resize) (Rotate) (Setup) Trimming Using the Setup screen Using Setup items 50 Camera 51 Hybrid Rec Digital Zoom Date/Time Red Eye Reduction AF Illuminator Auto Review Memory Stick Tool 54 Format Create REC.Folder Change REC.Folder Copy Album tool 56 Write in Album Format Setup 1 57 1 Beep Format Music LCD Backlight Language Setup 2 58 2 File Number USB Connect Video Out Clock Set 9
Viewing menu 45 (Folder) - (Protect) DPOF (Print) (Resize) (Rotate) (Setup) Trimming Using the Setup screen Using Setup items 50 Camera 51 Hybrid Rec Digital Zoom Date/Time Red Eye Reduction AF Illuminator Auto Review Memory Stick Tool 54 Format Create REC.Folder Change REC.Folder Copy Album tool 56 Write in Album Format Setup 1 57 1 Beep Format Music LCD Backlight Language Setup 2 58 2 File Number USB Connect Video Out Clock Set 9

User Guide
Page 22
Protect (46) PictBridge connecting (76) Print order (DPOF) mark (79) Recording mode (41, t step 5 in "Read This First") White balance (40) Shutter speed Aperture value ISO number (40) Exposure Value (37) Menu/Guide menu (32) Indication Recorded date/time of the playback image (52) 22 M D Display WB 500 F4.5 +2.0EV DPOF E Display 2005 1 1 9:30 AM Indication Change folder (45) • This does not appear when using Album. Flash Metering mode (t step 5 in "Read This First") Indication Do not disconnect the USB cable (77) Histogram...
Protect (46) PictBridge connecting (76) Print order (DPOF) mark (79) Recording mode (41, t step 5 in "Read This First") White balance (40) Shutter speed Aperture value ISO number (40) Exposure Value (37) Menu/Guide menu (32) Indication Recorded date/time of the playback image (52) 22 M D Display WB 500 F4.5 +2.0EV DPOF E Display 2005 1 1 9:30 AM Indication Change folder (45) • This does not appear when using Album. Flash Metering mode (t step 5 in "Read This First") Indication Do not disconnect the USB cable (77) Histogram...

User Guide
Page 23
...; When you start Slide Show, the indicators will be turned off. The flash strobes. - Playback of movies - The image size is displayed during playback may not appear for images recorded using playback zoom. - Enjoying the camera Changing the screen display Each time you press the (Display/LCD backlight on 60min 101 Histogram display (page 37) VGA [ 96] 640 30f [00:10:48] Indicators off • A large difference in the histogram displayed when shooting and during playback. •...
...; When you start Slide Show, the indicators will be turned off. The flash strobes. - Playback of movies - The image size is displayed during playback may not appear for images recorded using playback zoom. - Enjoying the camera Changing the screen display Each time you press the (Display/LCD backlight on 60min 101 Histogram display (page 37) VGA [ 96] 640 30f [00:10:48] Indicators off • A large difference in the histogram displayed when shooting and during playback. •...

User Guide
Page 51
... all image sizes up to record either a pre movie or pre/post movies in Hybrid. Off ( ) Does not use the digital zoom. • When you can select whether to a maximum 3×. Hybrid Rec During Hybrid shooting, you press the zoom button, the zoom scaling indicator appears as follows. When set to [On], the camera adjusts the zoom scaling up to operate automatically when an image needs further enlargement. Using the Setup screen Camera For...
... all image sizes up to record either a pre movie or pre/post movies in Hybrid. Off ( ) Does not use the digital zoom. • When you can select whether to a maximum 3×. Hybrid Rec During Hybrid shooting, you press the zoom button, the zoom scaling indicator appears as follows. When set to [On], the camera adjusts the zoom scaling up to operate automatically when an image needs further enlargement. Using the Setup screen Camera For...
User Guide
Page 53
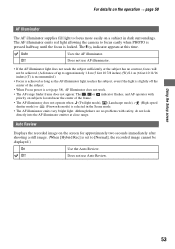
... use Auto Review. Auto Uses the AF illuminator. For details on the operation t page 50 AF Illuminator The AF illuminator supplies fill light to focus more easily on a subject in the Scene mode. (High-speed • The AF illuminator emits very bright light. Auto Review Displays the recorded image on the screen for approximately two seconds immediately after shooting a still image. (When [Hybrid Rec] is locked. The AF illuminator emits red light...
... use Auto Review. Auto Uses the AF illuminator. For details on the operation t page 50 AF Illuminator The AF illuminator supplies fill light to focus more easily on a subject in the Scene mode. (High-speed • The AF illuminator emits very bright light. Auto Review Displays the recorded image on the screen for approximately two seconds immediately after shooting a still image. (When [Hybrid Rec] is locked. The AF illuminator emits red light...

User Guide
Page 58
...; If the camera and a PictBridge compliant printer cannot be connected when set and the camera is connected to a computer, the images in the recording folder on the operation t page 50 The default settings are copied to the computer. (Compatible with Windows XP and Mac OS X.) Mass Storage Auto Establishes a Mass Storage connection between the camera and a computer or other USB device cannot be used to assign file numbers to a PictBridge compliant printer (page 75...
...; If the camera and a PictBridge compliant printer cannot be connected when set and the camera is connected to a computer, the images in the recording folder on the operation t page 50 The default settings are copied to the computer. (Compatible with Windows XP and Mac OS X.) Mass Storage Auto Establishes a Mass Storage connection between the camera and a computer or other USB device cannot be used to assign file numbers to a PictBridge compliant printer (page 75...

User Guide
Page 69
... confirmation message appears, enter a different number. • An extension may be displayed depending on the image size. • When an image file has been processed by a computer or when the image file was recorded using a Windows computer as an example. Using your computer 1 2 • For movie files, the file name format is MP4. Do not change the extension. 69 Change the file name to play back some images depending on the computer settings...
... confirmation message appears, enter a different number. • An extension may be displayed depending on the image size. • When an image file has been processed by a computer or when the image file was recorded using a Windows computer as an example. Using your computer 1 2 • For movie files, the file name format is MP4. Do not change the extension. 69 Change the file name to play back some images depending on the computer settings...
User Guide
Page 70
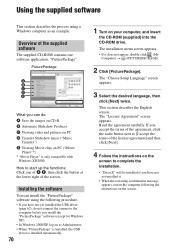
... click [Next]. 4 Follow the instructions on the screen to complete the installation. • "DirectX" will be installed if you have not yet installed the USB driver (page 62), do : A Save the images on CD-R B Automatic Slideshow Producer C Viewing video and pictures on PC D Transfer Slideshow music ("Music Transfer") E Viewing Movie clips on as an example. The "Choose Setup Language" screen appears. 3 Select the desired language, then click [Next] twice. If...
... click [Next]. 4 Follow the instructions on the screen to complete the installation. • "DirectX" will be installed if you have not yet installed the USB driver (page 62), do : A Save the images on CD-R B Automatic Slideshow Producer C Viewing video and pictures on PC D Transfer Slideshow music ("Music Transfer") E Viewing Movie clips on as an example. The "Choose Setup Language" screen appears. 3 Select the desired language, then click [Next] twice. If...

User Guide
Page 72
... pre-installed on connecting your camera to a computer • Operations are stored. 2Drag and drop the image files to the hard disk icon. Recommended environment for a USB connection when connecting a computer, [Auto] (default setting), [Mass Storage] and [PTP] modes. For details on [PTP], see page 67. 3 View images on page 63. 2 Copy image files to the Macintosh computer. 1Double-click the newly recognized icon t [DCIM] (for still image) or [MP_ROOT] (for movie) t the folder...
... pre-installed on connecting your camera to a computer • Operations are stored. 2Drag and drop the image files to the hard disk icon. Recommended environment for a USB connection when connecting a computer, [Auto] (default setting), [Mass Storage] and [PTP] modes. For details on [PTP], see page 67. 3 View images on page 63. 2 Copy image files to the Macintosh computer. 1Double-click the newly recognized icon t [DCIM] (for still image) or [MP_ROOT] (for movie) t the folder...

User Guide
Page 75
...-image mode You can be provided depending on the printer. • The quantity of the camera for about five seconds (error notification), check the connected printer. • It is recommended to use a fully charged battery pack or the AC Adaptor (supplied) to prevent the power from turning off partway through printing. 1 Press MENU to display the menu. 2 Press B on the control button to select (Setup). 3 Select [ ] (Setup 2) with V, then 2 select [USB Connect...
...-image mode You can be provided depending on the printer. • The quantity of the camera for about five seconds (error notification), check the connected printer. • It is recommended to use a fully charged battery pack or the AC Adaptor (supplied) to prevent the power from turning off partway through printing. 1 Press MENU to display the menu. 2 Press B on the control button to select (Setup). 3 Select [ ] (Setup 2) with V, then 2 select [USB Connect...
User Guide
Page 81
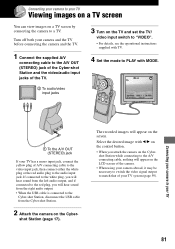
... TV and set the TV/ video input switch to "VIDEO". • For details, see the operational instructions supplied with TV. 4 Set the mode to PLAY with b/B on the Cyber- Connecting your camera to your TV has a mono input jack, connect the yellow plug of A/V connecting cable to the video input jack, then connect either the white plug or the red audio plug to the audio input jack. PHOTO MODE MOVIE 101 8/9 VGA...
... TV and set the TV/ video input switch to "VIDEO". • For details, see the operational instructions supplied with TV. 4 Set the mode to PLAY with b/B on the Cyber- Connecting your camera to your TV has a mono input jack, connect the yellow plug of A/V connecting cable to the video input jack, then connect either the white plug or the red audio plug to the audio input jack. PHOTO MODE MOVIE 101 8/9 VGA...
User Guide
Page 85
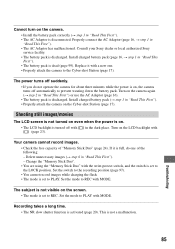
... record images while charging the flash. • The mode is discharged. Set the mode to PLAY with MODE. Shooting still images/movies The LCD screen is not turned on even when the power is discharged. Properly connect the AC Adaptor (page 16, t step 1 in the dark place. Set the mode to REC with MODE. Cannot turn on , the camera turns off automatically to prevent wearing down the battery pack. Recording takes a long time. • The NR slow shutter function...
... record images while charging the flash. • The mode is discharged. Set the mode to PLAY with MODE. Shooting still images/movies The LCD screen is not turned on even when the power is discharged. Properly connect the AC Adaptor (page 16, t step 1 in the dark place. Set the mode to REC with MODE. Cannot turn on , the camera turns off automatically to prevent wearing down the battery pack. Recording takes a long time. • The NR slow shutter function...
User Guide
Page 86
... (Macro) recording mode. The F value and shutter speed flash when you press and hold PHOTO halfway down. • The exposure is selected in the Scene mode (page 36). Select the auto focus mode (page 38). • Refer to "If the subject is too close -up (Macro) function does not work . • The flash is set to (No flash) (t step 5 in "Read This First"). • You cannot use the flash when: - [Mode...
... (Macro) recording mode. The F value and shutter speed flash when you press and hold PHOTO halfway down. • The exposure is selected in the Scene mode (page 36). Select the auto focus mode (page 38). • Refer to "If the subject is too close -up (Macro) function does not work . • The flash is set to (No flash) (t step 5 in "Read This First"). • You cannot use the flash when: - [Mode...

User Guide
Page 88
... movies, Multi Burst images or the images saved on images (page 46), or use the "Memory Stick Duo" with MODE. • The folder/file name has been changed on the TV screen. • Check [Video Out] to see if the video output signal of your camera is set to the USB cable. This is set to the color system of your camera, playback on the LCD screen. • The A/V connecting cable has been connected to image processing. The image...
... movies, Multi Burst images or the images saved on images (page 46), or use the "Memory Stick Duo" with MODE. • The folder/file name has been changed on the TV screen. • Check [Video Out] to see if the video output signal of your camera is set to the USB cable. This is set to the color system of your camera, playback on the LCD screen. • The A/V connecting cable has been connected to image processing. The image...

User Guide
Page 89
... display DPOF (Print order) marks on movies or the images saved on as Administrator (authorized Administrators) (page 62). The "Removable disk" icon does not appear on the computer screen when you connect your computer to the camera. • Follow the procedure below to display the menu, then click [Properties]. Computers You do not know if the OS of your computer is low, install the charged battery...
... display DPOF (Print order) marks on movies or the images saved on as Administrator (authorized Administrators) (page 62). The "Removable disk" icon does not appear on the computer screen when you connect your computer to the camera. • Follow the procedure below to display the menu, then click [Properties]. Computers You do not know if the OS of your computer is low, install the charged battery...

User Guide
Page 90
... Music files of the camera is turned on (page 58). The image cannot be viewed on a computer. • If you are playing back the movie directly from the hard disk (page 62). Copy the movie to the hard disk of each screen. • To playback movie files (MPEG-4) recorded by the camera, you need to install the software compatible with a "Memory Stick Duo" formatted by a computer, you may not be able to copy the images to a folder...
... Music files of the camera is turned on (page 58). The image cannot be viewed on a computer. • If you are playing back the movie directly from the hard disk (page 62). Copy the movie to the hard disk of each screen. • To playback movie files (MPEG-4) recorded by the camera, you need to install the software compatible with a "Memory Stick Duo" formatted by a computer, you may not be able to copy the images to a folder...
User Guide
Page 93
... USB cable and reconnect it whenever you change the paper size after the printer has been connected to the camera. • The print setting of the camera differs from that the AC Adaptor is connected securely. • Properly attach the camera on the Cyber-shot Station (page 17). Charge the battery pack (t step 1 in microcomputer is not working properly. The power is carrying out the cancellation. Turn off the camera...
... USB cable and reconnect it whenever you change the paper size after the printer has been connected to the camera. • The print setting of the camera differs from that the AC Adaptor is connected securely. • Properly attach the camera on the Cyber-shot Station (page 17). Charge the battery pack (t step 1 in microcomputer is not working properly. The power is carrying out the cancellation. Turn off the camera...

User Guide
Page 95
... be erased.) 95 Troubleshooting Select other than this folder. • You did not operate correctly when copying images from your camera (page 97). File protect • Release the protection (page 47). Invalid operation • You are using the "Memory Stick Duo" with the same first three digit number already exists on the "Memory Stick Duo". Set the switch to insufficient light. File error • An error occurred while playing back the image. Turn the power off...
... be erased.) 95 Troubleshooting Select other than this folder. • You did not operate correctly when copying images from your camera (page 97). File protect • Release the protection (page 47). Invalid operation • You are using the "Memory Stick Duo" with the same first three digit number already exists on the "Memory Stick Duo". Set the switch to insufficient light. File error • An error occurred while playing back the image. Turn the power off...


