
User Guide
Page 1
... Japan Digital Still Camera User's Guide/ Troubleshooting Operating Instructions Before operating the unit, please read this product. Owner's Record The model and serial numbers are located on the bottom. DSC-M2 Serial No DSC-M2 "Read This First" (separate volume) Explains the set-up and basic operations for future reference. Model No. Refer to your Sony dealer...
... Japan Digital Still Camera User's Guide/ Troubleshooting Operating Instructions Before operating the unit, please read this product. Owner's Record The model and serial numbers are located on the bottom. DSC-M2 Serial No DSC-M2 "Read This First" (separate volume) Explains the set-up and basic operations for future reference. Model No. Refer to your Sony dealer...
User Guide
Page 3
... for help prevent potential negative consequences for your safety and convenience. Notice for a digital device pursuant to which could otherwise be caused by inappropriate waste handling of materials will... circuit different from that this product, please contact your local Civic Office, your nearest Sony service station. 3 If you change the fuse. These limits are designed to discontinue ...this product is connected. - Reorient or relocate the receiving antenna. - By ensuring this camera. The recycling of this equipment has a detachable fuse cover, be handed over to ...
... for help prevent potential negative consequences for your safety and convenience. Notice for a digital device pursuant to which could otherwise be caused by inappropriate waste handling of materials will... circuit different from that this product, please contact your local Civic Office, your nearest Sony service station. 3 If you change the fuse. These limits are designed to discontinue ...this product is connected. - Reorient or relocate the receiving antenna. - By ensuring this camera. The recycling of this equipment has a detachable fuse cover, be handed over to ...
User Guide
Page 4
... to make sure that can be used (not supplied) The IC recording medium used . • For details on recording/playback • This camera is not fully charged, you can use the battery pack for the first time. (t step 1 in Germany. There are two types of reproducing... data to purchase a "Memory Stick Duo". It may cause malfunctions which is working correctly. • Be careful not to a malfunction of your camera. "Memory Stick": you need to other bright light. This is not completely discharged. No compensation for contents of the recording • The contents...
... to make sure that can be used (not supplied) The IC recording medium used . • For details on recording/playback • This camera is not fully charged, you can use the battery pack for the first time. (t step 1 in Germany. There are two types of reproducing... data to purchase a "Memory Stick Duo". It may cause malfunctions which is working correctly. • Be careful not to a malfunction of your camera. "Memory Stick": you need to other bright light. This is not completely discharged. No compensation for contents of the recording • The contents...
User Guide
Page 5
... malfunction. • Images may cause malfunction. These points are operational for effective use. Be careful not to direct sunlight for Camera File system) universal standard established by JEITA (Japan Electronics and Information Technology Industries Association). • Playback of images recorded with ... condensation occurs, remove it . 5 Also, do not affect the recording in insufficient light emission. Be careful when placing the camera near a location that constantly appear on your finger when the lens cover opens and closes. The screen may not be careful not...
... malfunction. • Images may cause malfunction. These points are operational for effective use. Be careful not to direct sunlight for Camera File system) universal standard established by JEITA (Japan Electronics and Information Technology Industries Association). • Playback of images recorded with ... condensation occurs, remove it . 5 Also, do not affect the recording in insufficient light emission. Be careful when placing the camera near a location that constantly appear on your finger when the lens cover opens and closes. The screen may not be careful not...

User Guide
Page 6
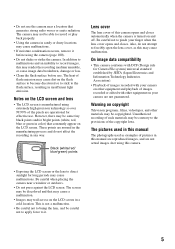
How to handle the camera • When opening the LCD panel, rotate the panel to the left as illustrated. • When opening the LCD panel, make sure not to touch ... open at 90 degrees. 90° • Do not hold the LCD panel with your hand. 180° PHOTO MOVIE MODE • When carrying the camera, close the LCD panel as illustrated. You can adjust the angle of the LCD screen to each side as illustrated. 6
How to handle the camera • When opening the LCD panel, rotate the panel to the left as illustrated. • When opening the LCD panel, make sure not to touch ... open at 90 degrees. 90° • Do not hold the LCD panel with your hand. 180° PHOTO MOVIE MODE • When carrying the camera, close the LCD panel as illustrated. You can adjust the angle of the LCD screen to each side as illustrated. 6
User Guide
Page 7
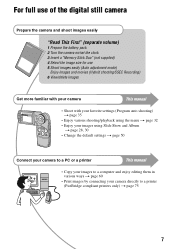
For full use of the digital still camera Prepare the camera and shoot images easily "Read This First" (separate volume) 1 Prepare the battery pack 2 Turn the camera on/set the clock 3 Insert a "Memory Stick Duo" (not supplied) 4 Select the image size for use 5 Shoot images easily (...Auto adjustment mode) Enjoy images and movies (Hybrid shooting/5SEC Recording) 6 View/delete images Get more familiar with your camera This manual PHOTO MOVIE MODE • Shoot with your favorite settings (Program auto shooting) t page 35 • Enjoy various shooting/playback using ...
For full use of the digital still camera Prepare the camera and shoot images easily "Read This First" (separate volume) 1 Prepare the battery pack 2 Turn the camera on/set the clock 3 Insert a "Memory Stick Duo" (not supplied) 4 Select the image size for use 5 Shoot images easily (...Auto adjustment mode) Enjoy images and movies (Hybrid shooting/5SEC Recording) 6 View/delete images Get more familiar with your camera This manual PHOTO MOVIE MODE • Shoot with your favorite settings (Program auto shooting) t page 35 • Enjoy various shooting/playback using ...
User Guide
Page 8
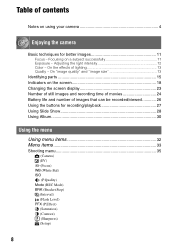
... techniques for recording/playback 27 Using Slide Show 28 Using Album 30 Using the menu Using menu items 32 Menu items 33 Shooting menu 35 (Camera) (EV) 9 (Focus) WB (White Bal) ISO (P.Quality) Mode (REC Mode) BRK (Bracket Step) M (Interval) (Flash Level) PFX (P.Effect) (Saturation) (Contrast) (Sharpness) (Setup) 8 On the effects...
... techniques for recording/playback 27 Using Slide Show 28 Using Album 30 Using the menu Using menu items 32 Menu items 33 Shooting menu 35 (Camera) (EV) 9 (Focus) WB (White Bal) ISO (P.Quality) Mode (REC Mode) BRK (Bracket Step) M (Interval) (Flash Level) PFX (P.Effect) (Saturation) (Contrast) (Sharpness) (Setup) 8 On the effects...
User Guide
Page 9
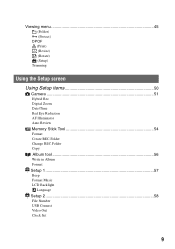
Viewing menu 45 (Folder) - (Protect) DPOF (Print) (Resize) (Rotate) (Setup) Trimming Using the Setup screen Using Setup items 50 Camera 51 Hybrid Rec Digital Zoom Date/Time Red Eye Reduction AF Illuminator Auto Review Memory Stick Tool 54 Format Create REC.Folder Change REC.Folder Copy Album tool 56 Write in Album Format Setup 1 57 1 Beep Format Music LCD Backlight Language Setup 2 58 2 File Number USB Connect Video Out Clock Set 9
Viewing menu 45 (Folder) - (Protect) DPOF (Print) (Resize) (Rotate) (Setup) Trimming Using the Setup screen Using Setup items 50 Camera 51 Hybrid Rec Digital Zoom Date/Time Red Eye Reduction AF Illuminator Auto Review Memory Stick Tool 54 Format Create REC.Folder Change REC.Folder Copy Album tool 56 Write in Album Format Setup 1 57 1 Beep Format Music LCD Backlight Language Setup 2 58 2 File Number USB Connect Video Out Clock Set 9

User Guide
Page 10
Using your computer Enjoying your Windows computer 60 Copying images to your computer 62 Viewing image files stored on a computer with your camera 69 Using the supplied software 70 Using your Macintosh computer 72 Printing still images How to print still images 74 Printing images ...directly using a PictBridge compliant printer 75 Printing at a shop 79 Connecting your camera to your TV Viewing images on a TV screen 81 Troubleshooting Troubleshooting 83 Warning indicators and messages 94 Others On the "Memory Stick 97 ...
Using your computer Enjoying your Windows computer 60 Copying images to your computer 62 Viewing image files stored on a computer with your camera 69 Using the supplied software 70 Using your Macintosh computer 72 Printing still images How to print still images 74 Printing images ...directly using a PictBridge compliant printer 75 Printing at a shop 79 Connecting your camera to your TV Viewing images on a TV screen 81 Troubleshooting Troubleshooting 83 Warning indicators and messages 94 Others On the "Memory Stick 97 ...
User Guide
Page 11
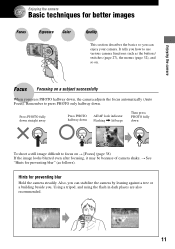
...60min 101 Then press PHOTO fully down VGA FINE [ 96] 30 F2.8 To shoot a still image difficult to press PHOTO only halfway down , the camera adjusts the focus automatically (Auto Focus). Focus Focusing on t [Focus] (page 38) If the image looks blurred even after focusing, it may be because... of camera shake. Remember to focus on a subject successfully When you can enjoy your camera. Using a tripod, and using the flash in dark places are also recommended. 11 Hints for better images Focus ...
...60min 101 Then press PHOTO fully down VGA FINE [ 96] 30 F2.8 To shoot a still image difficult to press PHOTO only halfway down , the camera adjusts the focus automatically (Auto Focus). Focus Focusing on t [Focus] (page 38) If the image looks blurred even after focusing, it may be because... of camera shake. Remember to focus on a subject successfully When you can enjoy your camera. Using a tripod, and using the flash in dark places are also recommended. 11 Hints for better images Focus ...

User Guide
Page 12
...subject to be measured to photo films) receives. However, the image tends to adjust the exposure that the camera will receive when you can create various images by the camera. However, the image may become noisy. To adjust the ISO sensitivity t page 40 High ISO sensitivity ... step 5 in a dark location. Exposure is the same, images differ depending on the ISO sensitivity. Shutter speed = Length of time the camera receives Exposure: light Aperture = Size of light that has been determined by adjusting the exposure and the ISO sensitivity. Exposure Adjusting the light intensity...
...subject to be measured to photo films) receives. However, the image tends to adjust the exposure that the camera will receive when you can create various images by the camera. However, the image may become noisy. To adjust the ISO sensitivity t page 40 High ISO sensitivity ... step 5 in a dark location. Exposure is the same, images differ depending on the ISO sensitivity. Shutter speed = Length of time the camera receives Exposure: light Aperture = Size of light that has been determined by adjusting the exposure and the ISO sensitivity. Exposure Adjusting the light intensity...
User Guide
Page 13
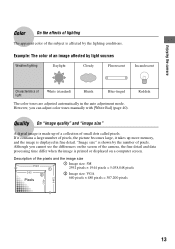
... Quality On "image quality" and "image size" A digital image is made up more memory, and the image is affected by the lighting conditions. Although you can adjust color tones manually with [White Bal] (page 40). Enjoying the camera 1944 480 Color On the effects of lighting The apparent color...in the auto adjustment mode. However, you cannot see the differences on a computer screen. If it takes up of a collection of the camera, the fine detail and data processing time differ when the image is printed or displayed on the screen of small dots called pixels. Description of...
... Quality On "image quality" and "image size" A digital image is made up more memory, and the image is affected by the lighting conditions. Although you can adjust color tones manually with [White Bal] (page 40). Enjoying the camera 1944 480 Color On the effects of lighting The apparent color...in the auto adjustment mode. However, you cannot see the differences on a computer screen. If it takes up of a collection of the camera, the fine detail and data processing time differ when the image is printed or displayed on the screen of small dots called pixels. Description of...

User Guide
Page 15
... "Read This First") REC: REC mode lamp (green) (t step 5 in "Read This First") PLAY: PLAY mode lamp (green) (t step 6 in parentheses for details of operation. Camera 1 qf 2 qg 3 4 qh 5 6 qj 7 8 qk 9 0 PHOTO MOVIE MODE ql w; Identifying parts Enjoying the...
... "Read This First") REC: REC mode lamp (green) (t step 5 in "Read This First") PLAY: PLAY mode lamp (green) (t step 6 in parentheses for details of operation. Camera 1 qf 2 qg 3 4 qh 5 6 qj 7 8 qk 9 0 PHOTO MOVIE MODE ql w; Identifying parts Enjoying the...

User Guide
Page 16
... K Battery eject lever (t step 1 in "Read This First") J Tripod receptacle Use a tripod with a screw length of less than 5.5 mm (7/32 inch), and may damage the camera. You will be unable to firmly secure the camera to a tripod having the screw longer than 5.5 mm (7/32 inch).
... K Battery eject lever (t step 1 in "Read This First") J Tripod receptacle Use a tripod with a screw length of less than 5.5 mm (7/32 inch), and may damage the camera. You will be unable to firmly secure the camera to a tripod having the screw longer than 5.5 mm (7/32 inch).
User Guide
Page 17
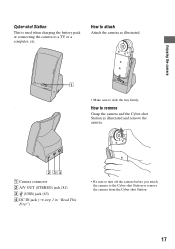
...-shot Station This is used when charging the battery pack or connecting the camera to the Cyber-shot Station or remove the camera from the Cyber-shot Station. 17 How to attach Attach the camera as illustrated and remove the camera. 234 A Camera connector B A/V OUT (STEREO) jack (81) C (USB) jack (63) D DC IN jack (t step...
...-shot Station This is used when charging the battery pack or connecting the camera to the Cyber-shot Station or remove the camera from the Cyber-shot Station. 17 How to attach Attach the camera as illustrated and remove the camera. 234 A Camera connector B A/V OUT (STEREO) jack (81) C (USB) jack (63) D DC IN jack (t step...
User Guide
Page 18
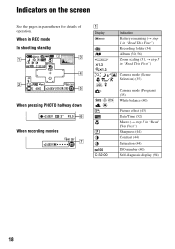
...:00 Indication Battery remaining (t step 1 in "Read This First") Recording folder (54) Album (30, 56) Zoom scaling (51, t step 5 in "Read This First") Camera mode (Scene Selection) (35) Camera mode (Program) (35) White balance (40) Picture effect (43) Date/Time (52) Macro (t step 5 in parentheses for details of operation. Indicators on the...
...:00 Indication Battery remaining (t step 1 in "Read This First") Recording folder (54) Album (30, 56) Zoom scaling (51, t step 5 in "Read This First") Camera mode (Scene Selection) (35) Camera mode (Program) (35) White balance (40) Picture effect (43) Date/Time (52) Macro (t step 5 in parentheses for details of operation. Indicators on the...

User Guide
Page 19
However, we recommend using the flash for better lighting or using a tripod or other means to insufficient lighting. Enjoying the camera B Display Indication Red-eye reduction (52) SL Flash mode (t step 5 in "Read This First") 5M 3:2 3M 1M VGA FINE STD Image size (t step 4 in "Read ...) • Indicates vibration may prevent you can still shoot images. Even if the vibration warning appears, you from shooting clear images due to stabilize the camera.
However, we recommend using the flash for better lighting or using a tripod or other means to insufficient lighting. Enjoying the camera B Display Indication Red-eye reduction (52) SL Flash mode (t step 5 in "Read This First") 5M 3:2 3M 1M VGA FINE STD Image size (t step 4 in "Read ...) • Indicates vibration may prevent you can still shoot images. Even if the vibration warning appears, you from shooting clear images due to stabilize the camera.

User Guide
Page 21
... (45) Playback bar (t step 6 in "Read This First") 21 C:32:00 2 DPOF 4 • To check the playback display on Album, see page 30. Enjoying the camera When playing back still images 60min 101 12/12 3 1 VGA 101 1.3 C:32:00 4 500 F4.5 PLAY ISO100 +2.0EV 2 101-0012 2005 1 1 9:30AM 5 When playing back...
... (45) Playback bar (t step 6 in "Read This First") 21 C:32:00 2 DPOF 4 • To check the playback display on Album, see page 30. Enjoying the camera When playing back still images 60min 101 12/12 3 1 VGA 101 1.3 C:32:00 4 500 F4.5 PLAY ISO100 +2.0EV 2 101-0012 2005 1 1 9:30AM 5 When playing back...

User Guide
Page 23
In index mode - You are using other cameras. • You can turn the indicators on by turning off the LCD backlight. • When you start Slide Show, the indicators will be turned off ) .../off • A large difference in the histogram displayed when shooting and during playback. • The histogram does not appear in the digital zoom area During playback - Recording movies - Enjoying the camera Changing the screen display Each time you set the histogram display to on, image information is 3:2. - The flash strobes. - Recording in...
In index mode - You are using other cameras. • You can turn the indicators on by turning off the LCD backlight. • When you start Slide Show, the indicators will be turned off ) .../off • A large difference in the histogram displayed when shooting and during playback. • The histogram does not appear in the digital zoom area During playback - Recording movies - Enjoying the camera Changing the screen display Each time you set the histogram display to on, image information is 3:2. - The flash strobes. - Recording in...

User Guide
Page 24
...]. • When the number of remaining shootable images is set to [Normal]. 24 The values may vary depending on a "Memory Stick Duo" formatted with this camera. The number of still images in Hybrid shooting (The image quality is [Fine] on the upper line and [Standard] on the lower line.) (Units: Images...
...]. • When the number of remaining shootable images is set to [Normal]. 24 The values may vary depending on a "Memory Stick Duo" formatted with this camera. The number of still images in Hybrid shooting (The image quality is [Fine] on the upper line and [Standard] on the lower line.) (Units: Images...


