
User Guide
Page 1
... your camera to frequently asked questions can be found at our Customer Support Website. Owner's Record The model and serial numbers are located on 100% recycled paper using VOC (Volatile Organic Compound)-free vegetable oil based ink. Model No. Printed on the bottom. Printed in the space provided below. DSC-M2 Serial No DSC-M2 "Read...
... your camera to frequently asked questions can be found at our Customer Support Website. Owner's Record The model and serial numbers are located on 100% recycled paper using VOC (Volatile Organic Compound)-free vegetable oil based ink. Model No. Printed on the bottom. Printed in the space provided below. DSC-M2 Serial No DSC-M2 "Read...
User Guide
Page 4
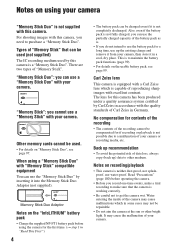
...not supplied). When using a "Memory Stick Duo" with your camera. Carl Zeiss lens This camera is equipped with a Carl Zeiss lens which in "Read This First") 4 • The battery pack can use the "Memory Stick Duo" by this camera, you can use a "Memory Stick Duo" with "Memory Stick...to make sure that can use a "Memory Stick" with this camera has been produced under a quality assurance system certified by Carl Zeiss in accordance with excellent contrast. Read "Precautions" (page 100) before using your camera, then store it is not completely discharged. Also, even if the...
...not supplied). When using a "Memory Stick Duo" with your camera. Carl Zeiss lens This camera is equipped with a Carl Zeiss lens which in "Read This First") 4 • The battery pack can use the "Memory Stick Duo" by this camera, you can use a "Memory Stick Duo" with "Memory Stick...to make sure that can use a "Memory Stick" with this camera has been produced under a quality assurance system certified by Carl Zeiss in accordance with excellent contrast. Read "Precautions" (page 100) before using your camera, then store it is not completely discharged. Also, even if the...
User Guide
Page 7
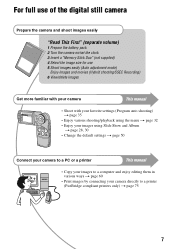
For full use of the digital still camera Prepare the camera and shoot images easily "Read This First" (separate volume) 1 Prepare the battery pack 2 Turn the camera on/set the clock 3 Insert a "Memory Stick Duo" (not supplied) 4 Select the image size for use 5 Shoot images easily (Auto adjustment mode) Enjoy images and ...
For full use of the digital still camera Prepare the camera and shoot images easily "Read This First" (separate volume) 1 Prepare the battery pack 2 Turn the camera on/set the clock 3 Insert a "Memory Stick Duo" (not supplied) 4 Select the image size for use 5 Shoot images easily (Auto adjustment mode) Enjoy images and ...

User Guide
Page 12
...Records a smoother image. To adjust the ISO sensitivity t page 40 High ISO sensitivity Records a bright image even when shooting in "Read This First" Adjusting the ISO sensitivity ISO is unit of measurement (sensitivity), estimating how much light Whitish image Correct exposure Underexposure = ...too little light Darker image The exposure is automatically set to adjust the exposure that the camera will receive when you to change the part of the opening allowing light to pass through ISO = Recording sensitivity Overexposure = ...
...Records a smoother image. To adjust the ISO sensitivity t page 40 High ISO sensitivity Records a bright image even when shooting in "Read This First" Adjusting the ISO sensitivity ISO is unit of measurement (sensitivity), estimating how much light Whitish image Correct exposure Underexposure = ...too little light Darker image The exposure is automatically set to adjust the exposure that the camera will receive when you to change the part of the opening allowing light to pass through ISO = Recording sensitivity Overexposure = ...

User Guide
Page 14
...the shooting situations and the subject. Selecting the image quality (compression ratio) in combination (page 41) You can select the compression ratio when digital images are saved. When you select a high compression ratio, the image lacks the fineness of images Smaller For attaching images to A4 size Few... a large number of detail, but small file size) The default settings are marked with . Selecting the image size for use (t step 4 in "Read This First") Pixel Many pixels (Fine image quality and large file size) Example: Printing in up to e-mail or creating web pages * Images are ...
...the shooting situations and the subject. Selecting the image quality (compression ratio) in combination (page 41) You can select the compression ratio when digital images are saved. When you select a high compression ratio, the image lacks the fineness of images Smaller For attaching images to A4 size Few... a large number of detail, but small file size) The default settings are marked with . Selecting the image size for use (t step 4 in "Read This First") Pixel Many pixels (Fine image quality and large file size) Example: Printing in up to e-mail or creating web pages * Images are ...

User Guide
Page 15
...: / (Playback zoom) button / (Index) button (t step 6 in "Read This First") Q POWER button (t step 2 in "Read This First") R /CHG lamp (orange) (t step 1 in "Read This First") REC: REC mode lamp (green) (t step 5 in "Read This First") PLAY: PLAY mode lamp (green) (t step 6 in parentheses for details of operation. Camera 1 qf 2 qg 3 4 qh 5 6 qj 7 8 qk 9 0 PHOTO MOVIE...
...: / (Playback zoom) button / (Index) button (t step 6 in "Read This First") Q POWER button (t step 2 in "Read This First") R /CHG lamp (orange) (t step 1 in "Read This First") REC: REC mode lamp (green) (t step 5 in "Read This First") PLAY: PLAY mode lamp (green) (t step 6 in parentheses for details of operation. Camera 1 qf 2 qg 3 4 qh 5 6 qj 7 8 qk 9 0 PHOTO MOVIE...

User Guide
Page 16
... illuminator (53) D Speaker E Microphone F Multi connector G Battery insertion slot (t step 1 in "Read This First") H "Memory Stick Duo" slot (t step 3 in "Read This First") I Battery/"Memory Stick Duo" cover (t step 1 and 3 in "Read This First") 16 You will be unable to firmly secure the camera to a tripod having the screw longer than 5.5 mm (7/32 inch).
... illuminator (53) D Speaker E Microphone F Multi connector G Battery insertion slot (t step 1 in "Read This First") H "Memory Stick Duo" slot (t step 3 in "Read This First") I Battery/"Memory Stick Duo" cover (t step 1 and 3 in "Read This First") 16 You will be unable to firmly secure the camera to a tripod having the screw longer than 5.5 mm (7/32 inch).
User Guide
Page 17
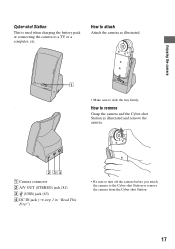
... Attach the camera as illustrated and remove the camera. 234 A Camera connector B A/V OUT (STEREO) jack (81) C (USB) jack (63) D DC IN jack (t step 1 in "Read This First") • Be sure to turn off the camera before you attach the camera to a TV or a computer, etc. Enjoying the camera Cyber-shot ...Station This is used when charging the battery pack or connecting the camera to the Cyber-shot Station or remove the...
... Attach the camera as illustrated and remove the camera. 234 A Camera connector B A/V OUT (STEREO) jack (81) C (USB) jack (63) D DC IN jack (t step 1 in "Read This First") • Be sure to turn off the camera before you attach the camera to a TV or a computer, etc. Enjoying the camera Cyber-shot ...Station This is used when charging the battery pack or connecting the camera to the Cyber-shot Station or remove the...
User Guide
Page 18
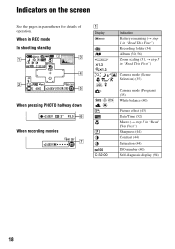
... movies +2.0EV 640 30f 7 C:32:00 Indication Battery remaining (t step 1 in "Read This First") Recording folder (54) Album (30, 56) Zoom scaling (51, t step 5 in "Read This First") Camera mode (Scene Selection) (35) Camera mode (Program) (35) White balance (40) Picture effect (43) Date/Time (52...) Macro (t step 5 in parentheses for details of operation. Indicators on the screen See the pages in "Read This First") Sharpness (44) Contrast...
... movies +2.0EV 640 30f 7 C:32:00 Indication Battery remaining (t step 1 in "Read This First") Recording folder (54) Album (30, 56) Zoom scaling (51, t step 5 in "Read This First") Camera mode (Scene Selection) (35) Camera mode (Program) (35) White balance (40) Picture effect (43) Date/Time (52...) Macro (t step 5 in parentheses for details of operation. Indicators on the screen See the pages in "Read This First") Sharpness (44) Contrast...

User Guide
Page 19
... using a tripod or other means to insufficient lighting. Enjoying the camera B Display Indication Red-eye reduction (52) SL Flash mode (t step 5 in "Read This First") 5M 3:2 3M 1M VGA FINE STD Image size (t step 4 in "Read This First") Image quality (41) ON M BRK S AF ... Even if the vibration warning appears, you from shooting clear images due to stabilize the camera. C Display 0.5m Indication AF range finder frame indicator (38) Focus preset distance (38) Metering mode (t step 5 in "Read This First") Histogram (23, 37) D Display E + Indication Vibration warning (11) ...
... using a tripod or other means to insufficient lighting. Enjoying the camera B Display Indication Red-eye reduction (52) SL Flash mode (t step 5 in "Read This First") 5M 3:2 3M 1M VGA FINE STD Image size (t step 4 in "Read This First") Image quality (41) ON M BRK S AF ... Even if the vibration warning appears, you from shooting clear images due to stabilize the camera. C Display 0.5m Indication AF range finder frame indicator (38) Focus preset distance (38) Metering mode (t step 5 in "Read This First") Histogram (23, 37) D Display E + Indication Vibration warning (11) ...

User Guide
Page 20
F Display z +2.0EV 2" F3.5 G Display +2.0EV zzzzz 00:00:02 Indication AE/AF lock (t step 5 in "Read This First") Recording time (25) 20 Shutter speed Aperture value Indication Exposure Value (37) Movie recording 5SEC recording (t step 5 in "Read This First") Exposure Value (37) NR slow shutter • If the shutter speed is slower than or equal to1/6 second (when set to ISO64/ 100/200) or 1/25 second (when set to ISO400), the NR slow shutter function activates automatically to reduce the picture noise.
F Display z +2.0EV 2" F3.5 G Display +2.0EV zzzzz 00:00:02 Indication AE/AF lock (t step 5 in "Read This First") Recording time (25) 20 Shutter speed Aperture value Indication Exposure Value (37) Movie recording 5SEC recording (t step 5 in "Read This First") Exposure Value (37) NR slow shutter • If the shutter speed is slower than or equal to1/6 second (when set to ISO64/ 100/200) or 1/25 second (when set to ISO400), the NR slow shutter function activates automatically to reduce the picture noise.

User Guide
Page 21
Enjoying the camera When playing back still images 60min 101 12/12 3 1 VGA 101 1.3 C:32:00 4 500 F4.5 ... 30. A Display 60min 101 / 101 12/12 5M 3:2 3M 1M VGA Indication Battery remaining (t step 1 in "Read This First") Playback folder (45)/ Album playback (30) Recording folder (54) Image number/Number of images recorded in selected folder Image ...size (t step 4 in "Read This First") // Playback/Stop/Slide Show fast forward (28, 30, t step 6 in "Read This First") // // 00:00:12 Step 12/16 / 1.3 C:32:00 B Display z...
Enjoying the camera When playing back still images 60min 101 12/12 3 1 VGA 101 1.3 C:32:00 4 500 F4.5 ... 30. A Display 60min 101 / 101 12/12 5M 3:2 3M 1M VGA Indication Battery remaining (t step 1 in "Read This First") Playback folder (45)/ Album playback (30) Recording folder (54) Image number/Number of images recorded in selected folder Image ...size (t step 4 in "Read This First") // Playback/Stop/Slide Show fast forward (28, 30, t step 6 in "Read This First") // // 00:00:12 Step 12/16 / 1.3 C:32:00 B Display z...

User Guide
Page 22
...) Histogram (23, 37) • appears when histogram display is disabled. Protect (46) PictBridge connecting (76) Print order (DPOF) mark (79) Recording mode (41, t step 5 in "Read This First") White balance (40) Shutter speed Aperture value ISO number (40) Exposure Value (37) Menu/Guide menu (32) Indication Recorded date/time of the...
...) Histogram (23, 37) • appears when histogram display is disabled. Protect (46) PictBridge connecting (76) Print order (DPOF) mark (79) Recording mode (41, t step 5 in "Read This First") White balance (40) Shutter speed Aperture value ISO number (40) Exposure Value (37) Menu/Guide menu (32) Indication Recorded date/time of the...

User Guide
Page 27
...REC mode back and forth. 27 PHOTO MOVIE MODE Shuttle During playback, you can fast forward or rewind by rotating Shuttle. t step 5 in "Read This First" MODE button You can adjust EV (page 37). The larger the inclination of Shuttle is, the faster the speed grows (at three ...different speeds). Enjoying the camera Using the buttons for recording/playback You can use the buttons and Shuttle for recording/playback according to REC, the button functions as PHOTO. button...
...REC mode back and forth. 27 PHOTO MOVIE MODE Shuttle During playback, you can fast forward or rewind by rotating Shuttle. t step 5 in "Read This First" MODE button You can adjust EV (page 37). The larger the inclination of Shuttle is, the faster the speed grows (at three ...different speeds). Enjoying the camera Using the buttons for recording/playback You can use the buttons and Shuttle for recording/playback according to REC, the button functions as PHOTO. button...

User Guide
Page 35
...blue of the surroundings. Twilight portrait* Shoots portraits in other adjustments as desired. Beach Shoots seasides or lakesides, with MODE. (Camera) PHOTO MOVIE The following modes are recorded in all their splendor. Candle* Shoot candlelit scenes, without losing the dark atmosphere of...When the mode has been set the desired shooting functions using a tripod is recommended. 35 In addition, you can shoot images in "Read This First" * The shutter speed becomes slower, so using menus. Twilight* Shoots night scenes at a distance without spoiling the atmosphere...
...blue of the surroundings. Twilight portrait* Shoots portraits in other adjustments as desired. Beach Shoots seasides or lakesides, with MODE. (Camera) PHOTO MOVIE The following modes are recorded in all their splendor. Candle* Shoot candlelit scenes, without losing the dark atmosphere of...When the mode has been set the desired shooting functions using a tripod is recommended. 35 In addition, you can shoot images in "Read This First" * The shutter speed becomes slower, so using menus. Twilight* Shoots night scenes at a distance without spoiling the atmosphere...
User Guide
Page 43
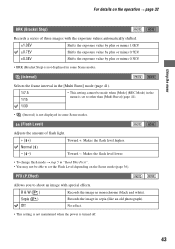
... the amount of flash light. + ( +) Toward +: Makes the flash level higher. Normal ( ) - ( -) Toward -: Makes the flash level lower. • To change flash mode t step 5 in "Read This First". • You may not be made when [Mode] (REC Mode) in the menu is set the Flash Level depending on the operation t page...
... the amount of flash light. + ( +) Toward +: Makes the flash level higher. Normal ( ) - ( -) Toward -: Makes the flash level lower. • To change flash mode t step 5 in "Read This First". • You may not be made when [Mode] (REC Mode) in the menu is set the Flash Level depending on the operation t page...

User Guide
Page 47
... images are protected, and these images cannot be unprotected. 4 Press MENU, select [OK] with v/V, then press z. The resized image is just a guideline. 3M t step 4 in "Read This First" 1M VGA Cancel Cancels resizing. 1 Display the image you want to turn the - The original image is retained even after resizing. 5M The...
... images are protected, and these images cannot be unprotected. 4 Press MENU, select [OK] with v/V, then press z. The resized image is just a guideline. 3M t step 4 in "Read This First" 1M VGA Cancel Cancels resizing. 1 Display the image you want to turn the - The original image is retained even after resizing. 5M The...

User Guide
Page 48
For details on the operation t page 32 • For details on [Image Size] t step 4 in "Read This First" • You cannot resize movies, Multi Burst images or the images saved on Album. • When you change from a small size to a large ... a still image. Determines the rotation. See the following procedure. Cancels rotation. 1 Display the image to be rotated. 2 Press MENU to rotate images shot with other camera. • When viewing images on a computer, the image rotation information may not be displayed on the software. (Setup) See page 50. 48 See the following...
For details on the operation t page 32 • For details on [Image Size] t step 4 in "Read This First" • You cannot resize movies, Multi Burst images or the images saved on Album. • When you change from a small size to a large ... a still image. Determines the rotation. See the following procedure. Cancels rotation. 1 Display the image to be rotated. 2 Press MENU to rotate images shot with other camera. • When viewing images on a computer, the image rotation information may not be displayed on the software. (Setup) See page 50. 48 See the following...

User Guide
Page 49
... the image size with B on Album. Trimming See the following procedure. For details on the operation t page 32 Trimming Records an enlarged image (t step 6 in "Read This First") as the newest file in the selected recording folder, and the original image is recorded as a new file.
... the image size with B on Album. Trimming See the following procedure. For details on the operation t page 32 Trimming Records an enlarged image (t step 6 in "Read This First") as the newest file in the selected recording folder, and the original image is recorded as a new file.

User Guide
Page 52
...or other conditions. 52 Date Superimposes the year, month and day. • The date is inserted in the order you select. (t step 2 in "Read This First") Off Does not superimpose the date and time. • You cannot insert the date and time into movies or images in red on... phenomenon when using the flash. Does not use Red Eye Reduction. • Because it takes about a second until the shutter clicks, hold the camera firmly to prevent the effects of the screen during shooting, instead, the indicator appears. Select this before shooting. Day&Time Superimposes the date, hour,...
...or other conditions. 52 Date Superimposes the year, month and day. • The date is inserted in the order you select. (t step 2 in "Read This First") Off Does not superimpose the date and time. • You cannot insert the date and time into movies or images in red on... phenomenon when using the flash. Does not use Red Eye Reduction. • Because it takes about a second until the shutter clicks, hold the camera firmly to prevent the effects of the screen during shooting, instead, the indicator appears. Select this before shooting. Day&Time Superimposes the date, hour,...