Operating Instructions
Page 1
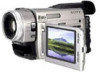
Serial No. AC-L10A Serial No. DCR-TRV900 Model No. Refer to these numbers whenever you call upon your Sony dealer regarding this manual thoroughly, and retain it for future reference. Owner's Record The model and serial numbers are located on the bottom. Model No. Record the serial number in the space provided below. DCR-TRV900 ©1998 by Sony Corporation 3-864-632-14 (2) Digital Video Camera Recorder Operating Instructions Before operating the unit, please read this product.
Serial No. AC-L10A Serial No. DCR-TRV900 Model No. Refer to these numbers whenever you call upon your Sony dealer regarding this manual thoroughly, and retain it for future reference. Owner's Record The model and serial numbers are located on the bottom. Model No. Record the serial number in the space provided below. DCR-TRV900 ©1998 by Sony Corporation 3-864-632-14 (2) Digital Video Camera Recorder Operating Instructions Before operating the unit, please read this product.
Operating Instructions
Page 3
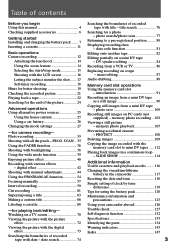
... camcorder 117 Resetting the date and time 118 Simple setting of the picture 24 Advanced operations Using alternative power sources 25 Using the house current 25 Using a car battery 26 Changing the mode settings 27 -for camera recording- SCAN .. 35 Using the FADER function 36 Shooting with backlighting 38 Using the wide mode function 39 Enjoying picture effect 40 Recording with the memory card slot to a pre-registered position ......... 80 Displaying recording data - memory photo recording .. 102 Viewing a still picture - PROTECT 108 Deleting images 109 Copying the image...
... camcorder 117 Resetting the date and time 118 Simple setting of the picture 24 Advanced operations Using alternative power sources 25 Using the house current 25 Using a car battery 26 Changing the mode settings 27 -for camera recording- SCAN .. 35 Using the FADER function 36 Shooting with backlighting 38 Using the wide mode function 39 Enjoying picture effect 40 Recording with the memory card slot to a pre-registered position ......... 80 Displaying recording data - memory photo recording .. 102 Viewing a still picture - PROTECT 108 Deleting images 109 Copying the image...

Operating Instructions
Page 12
.../STOP. Then, eject the cassette and remove the battery pack. Basic operations Camera recording Make sure that the power source is installed and a cassette is inserted and that the camcorder is set to CAMERA. You can also select Recording mode, SP (standard play) mode or LP (long play) mode. The camcorder is set it and reset the date and time to your planned recording before you start . 2 7 0min STBY -:--:-- 1 POWER VTR MEMORY OFF CAMERA POWER VTR MEMORY OFF CAMERA 3 7 0min REC 0 : 0 0 : 0 0 6 0min To stop recording...
.../STOP. Then, eject the cassette and remove the battery pack. Basic operations Camera recording Make sure that the power source is installed and a cassette is inserted and that the camcorder is set to CAMERA. You can also select Recording mode, SP (standard play) mode or LP (long play) mode. The camcorder is set it and reset the date and time to your planned recording before you start . 2 7 0min STBY -:--:-- 1 POWER VTR MEMORY OFF CAMERA POWER VTR MEMORY OFF CAMERA 3 7 0min REC 0 : 0 0 : 0 0 6 0min To stop recording...

Operating Instructions
Page 15
... set the D ZOOM function to ON, the [a] zone appears. ANTI GROUND SHOOTING : The camcorder records only while you press down START/STOP so that you can avoid recording unnecessary scenes. 5SEC : When you can perform zooming of one per second as illustrated below. SCAN to Standby mode automatically. 1 2 START/STOP MODE ANTI GROUND SHOOTING 5SEC 3 REC REC POWER VTR MEMORY OFF CAMERA To extend the recording time in the viewfinder. digital zoom...
... set the D ZOOM function to ON, the [a] zone appears. ANTI GROUND SHOOTING : The camcorder records only while you press down START/STOP so that you can avoid recording unnecessary scenes. 5SEC : When you can perform zooming of one per second as illustrated below. SCAN to Standby mode automatically. 1 2 START/STOP MODE ANTI GROUND SHOOTING 5SEC 3 REC REC POWER VTR MEMORY OFF CAMERA To extend the recording time in the viewfinder. digital zoom...

Operating Instructions
Page 21
... operations Checking the recorded picture Using the EDITSEARCH, you can review the last recorded scene or check the recorded picture on the LCD screen or in the viewfinder. (1) While pressing the small green button on the POWER switch, set it to CAMERA. (2) Press the - Πside of the recorded portion plays back (Rec Review). the last few seconds of EDITSEARCH momentarily; The last recorded point is played back. Note that when you use a tape without cassette memory...
... operations Checking the recorded picture Using the EDITSEARCH, you can review the last recorded scene or check the recorded picture on the LCD screen or in the viewfinder. (1) While pressing the small green button on the POWER switch, set it to CAMERA. (2) Press the - Πside of the recorded portion plays back (Rec Review). the last few seconds of EDITSEARCH momentarily; The last recorded point is played back. Note that when you use a tape without cassette memory...

Operating Instructions
Page 22
.... Before using VOLUME +/- To display the LCD screen/viewfinder screen indicators Press DISPLAY. You can adjust the volume of the LCD screen using the supplied Remote Commander. The remaining battery time in the viewfinder. (1) Insert the recorded tape with the window facing out. (2) While pressing OPEN, open the LCD panel. (3) While pressing the small green button on a TV screen, after connecting the camcorder to a TV or VCR. 4 REW PLAY FF 5 REW PLAY FF 1 POWER VTR LCD BRIGHT 3 MEMORY OFF CAMERA 2 VOLUME DISPLAY To stop playback, press...
.... Before using VOLUME +/- To display the LCD screen/viewfinder screen indicators Press DISPLAY. You can adjust the volume of the LCD screen using the supplied Remote Commander. The remaining battery time in the viewfinder. (1) Insert the recorded tape with the window facing out. (2) While pressing OPEN, open the LCD panel. (3) While pressing the small green button on a TV screen, after connecting the camcorder to a TV or VCR. 4 REW PLAY FF 5 REW PLAY FF 1 POWER VTR LCD BRIGHT 3 MEMORY OFF CAMERA 2 VOLUME DISPLAY To stop playback, press...
Operating Instructions
Page 28
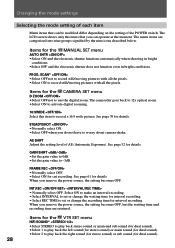
... use the digital zoom. Items for the MANUAL SET menu AUTO SHTR •Select ON and the electronic shutter functions automatically when shooting in bright conditions. •Select OFF and the electronic shutter does not function even in bright conditions. AE SHIFT Adjust the setting level of AE (Automatic Exposure). Select ON to make an interval recording. • Select INTERVAL to set or change the recording time for details. Changing the mode settings...
... use the digital zoom. Items for the MANUAL SET menu AUTO SHTR •Select ON and the electronic shutter functions automatically when shooting in bright conditions. •Select OFF and the electronic shutter does not function even in bright conditions. AE SHIFT Adjust the setting level of AE (Automatic Exposure). Select ON to make an interval recording. • Select INTERVAL to set or change the recording time for details. Changing the mode settings...
Operating Instructions
Page 33
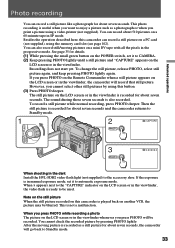
... to Standby mode. 1 2 CAPTURE POWER VTR PHOTO MEMORY OFF CAMERA 3 PHOTO When shooting in manual exposure mode, set it to Standby mode. 33 To change the still picture, release PHOTO, select still picture again, and keep pressing PHOTO lightly again. To record a still picture while normal recording, press PHOTO deeper. If the exposure is in the dark Install the HVL-FDH2 video flash light (not supplied) to be used. You cannot check the recorded picture by using this button. (3) Press PHOTO deeper. You...
... to Standby mode. 1 2 CAPTURE POWER VTR PHOTO MEMORY OFF CAMERA 3 PHOTO When shooting in manual exposure mode, set it to Standby mode. 33 To change the still picture, release PHOTO, select still picture again, and keep pressing PHOTO lightly again. To record a still picture while normal recording, press PHOTO deeper. If the exposure is in the dark Install the HVL-FDH2 video flash light (not supplied) to be used. You cannot check the recorded picture by using this button. (3) Press PHOTO deeper. You...
Operating Instructions
Page 44
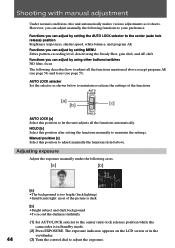
... camcorder is too bright (back lighting) •Insufficient light: most of the functions. Functions you can adjust by setting the AUTO LOCK selector to the center (auto lock release) position Brightness (exposure), shutter speed, white balance, and program AE Functions you can adjust by setting MENU Zebra pattern, recording level, deactivating the Steady Shot, gain shift, and AE shift Functions you can adjust by using other buttons/switches ND filter, focus The following functions to adjust manually the functions...
... camcorder is too bright (back lighting) •Insufficient light: most of the functions. Functions you can adjust by setting the AUTO LOCK selector to the center (auto lock release) position Brightness (exposure), shutter speed, white balance, and program AE Functions you can adjust by setting MENU Zebra pattern, recording level, deactivating the Steady Shot, gain shift, and AE shift Functions you can adjust by using other buttons/switches ND filter, focus The following functions to adjust manually the functions...

Operating Instructions
Page 81
...: date n various settings (SteadyShot, PROGRAM AE, shutter speed, white balance, aperture value, gain) n no indicator. The Data Code is also displayed on the LCD screen or in the menu system, and select the following items: When DATE/CAM is not recorded with adjusting the exposure to the darkest manually "CLOSE" appears at the position of the tape is being played back. • The tape was recorded by a camcorder without having date and time set. •...
...: date n various settings (SteadyShot, PROGRAM AE, shutter speed, white balance, aperture value, gain) n no indicator. The Data Code is also displayed on the LCD screen or in the menu system, and select the following items: When DATE/CAM is not recorded with adjusting the exposure to the darkest manually "CLOSE" appears at the position of the tape is being played back. • The tape was recorded by a camcorder without having date and time set. •...

Operating Instructions
Page 91
... records images and sounds as personal computers etc., using floppy disks, Memory Sticks or PC cards. Once you format the PC card, you can record still images to ATA specification of PC card standard. PC card adaptor Memory Stick The types of PC cards you can exchange image data with this chapter for use . Play back the picture with the floppy disk adapter. Compatible PC cards HITACHI HB286008A3, HB286015A3, HB286030A3, HB286045A3, HB286060A3 Be sure to refer to the instruction manual...
... records images and sounds as personal computers etc., using floppy disks, Memory Sticks or PC cards. Once you format the PC card, you can record still images to ATA specification of PC card standard. PC card adaptor Memory Stick The types of PC cards you can exchange image data with this chapter for use . Play back the picture with the floppy disk adapter. Compatible PC cards HITACHI HB286008A3, HB286015A3, HB286030A3, HB286045A3, HB286060A3 Be sure to refer to the instruction manual...

Operating Instructions
Page 98
... image data breakdown may occur. The image displayed on the screen will be recorded on a floppy disk or a PC card. Recording does not start yet. (4) Press PHOTO deeper. As well do not turn the power off , eject a PC card/floppy disk adapter or remove the battery pack. If "MEMORY FULL" appears on the LCD screen or in moving picture data recorded on a mini DV tape and record it as a still image on a floppy disk or a PC card. The recording is flashing Never...
... image data breakdown may occur. The image displayed on the screen will be recorded on a floppy disk or a PC card. Recording does not start yet. (4) Press PHOTO deeper. As well do not turn the power off , eject a PC card/floppy disk adapter or remove the battery pack. If "MEMORY FULL" appears on the LCD screen or in moving picture data recorded on a mini DV tape and record it as a still image on a floppy disk or a PC card. The recording is flashing Never...
Operating Instructions
Page 116
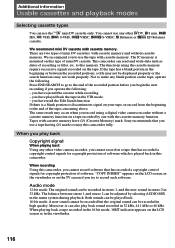
...; ED Betamax cassette. We recommend mini DV cassette with the cassette memory function. This camcorder can be displayed properly or the search functions may not be recorded in the menu system during playback. Sony recommends that has recorded a copyright control signals for copyright protection of software which is mounted on a tape recorded by selecting AUDIO MIX in high quality. The functions using a digital video camera recorder without cassette memory. Additional information Usable cassettes and playback modes Selecting cassette types You can use a tape having...
...; ED Betamax cassette. We recommend mini DV cassette with the cassette memory function. This camcorder can be displayed properly or the search functions may not be recorded in the menu system during playback. Sony recommends that has recorded a copyright control signals for copyright protection of software which is mounted on a tape recorded by selecting AUDIO MIX in high quality. The functions using a digital video camera recorder without cassette memory. Additional information Usable cassettes and playback modes Selecting cassette types You can use a tape having...
Operating Instructions
Page 118
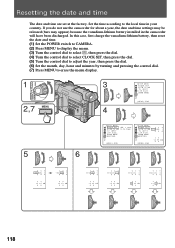
... S I ZE DEMO MODE RETURN JAN 1 1 9 9 8 1 2:0 0:0 0 AM [ MENU ] : END SETUP MENU CLOCK SET AUTO TV ON 1 9 9 8 J AN 1 TV I NPUT LTR S I ZE DEMO MODE RETURN 1 2 0 0 AM [ MENU ] : END 1 9 9 8 JAN 1 1 2 0 0 AM 1 9 9 8 JAN 1 1 2 0 0 AM 1998JUL 1 1 2 0 0 AM 1998JUL 4 1 2 0 0 AM 1998JUL 4 1 0 0 0 AM 1998JUL 4 1 0 3 0 AM 118 Set the time according to erase the menu display. In this case, first charge the vanadium-lithium battery, then reset the date and time. (1) Set the POWER switch to CAMERA. (2) Press MENU to display the menu. (3) Turn the control dial...
... S I ZE DEMO MODE RETURN JAN 1 1 9 9 8 1 2:0 0:0 0 AM [ MENU ] : END SETUP MENU CLOCK SET AUTO TV ON 1 9 9 8 J AN 1 TV I NPUT LTR S I ZE DEMO MODE RETURN 1 2 0 0 AM [ MENU ] : END 1 9 9 8 JAN 1 1 2 0 0 AM 1 9 9 8 JAN 1 1 2 0 0 AM 1998JUL 1 1 2 0 0 AM 1998JUL 4 1 2 0 0 AM 1998JUL 4 1 0 0 0 AM 1998JUL 4 1 0 3 0 AM 118 Set the time according to erase the menu display. In this case, first charge the vanadium-lithium battery, then reset the date and time. (1) Set the POWER switch to CAMERA. (2) Press MENU to display the menu. (3) Turn the control dial...

Operating Instructions
Page 120
... set the POWER switch to OFF. Battery life is shorter in the camcorder to rapid flashing while you can be used when a tape is stopped and started again. To save battery power Do not leave the camcorder in Standby mode when not recording to 3 times as much recording as you are recording in use after using the battery pack This section shows you how you are using the camcorder. 120 Battery pack care •Remove...
... set the POWER switch to OFF. Battery life is shorter in the camcorder to rapid flashing while you can be used when a tape is stopped and started again. To save battery power Do not leave the camcorder in Standby mode when not recording to 3 times as much recording as you are recording in use after using the battery pack This section shows you how you are using the camcorder. 120 Battery pack care •Remove...

Operating Instructions
Page 122
... continuous recording time in the operating instruction is not charged. As the environmental temperature and condition are not clean or when the battery pack has not been used for a long time, repeatedly install and remove the battery pack a few times. Notes on the terminals If the terminals (metal parts on charging A brand-new battery pack A brand-new battery pack is measured under the condition of the AC power...
... continuous recording time in the operating instruction is not charged. As the environmental temperature and condition are not clean or when the battery pack has not been used for a long time, repeatedly install and remove the battery pack a few times. Notes on the terminals If the terminals (metal parts on charging A brand-new battery pack A brand-new battery pack is measured under the condition of the AC power...

Operating Instructions
Page 123
... function except cassette ejection will work. On the lens If moisture condenses on the playback picture • playback pictures do not move • playback pictures are hardly visible • playback pictures do not use the camcorder for about 1 hour). Video head cleaning To ensure normal recording and clear pictures, clean the video heads. In this happens, none of the tape, on the lens, on the head, or on the LCD screen or in one after about 1 hour. Open the cassette compartment, turn...
... function except cassette ejection will work. On the lens If moisture condenses on the playback picture • playback pictures do not move • playback pictures are hardly visible • playback pictures do not use the camcorder for about 1 hour). Video head cleaning To ensure normal recording and clear pictures, clean the video heads. In this happens, none of the tape, on the lens, on the head, or on the LCD screen or in one after about 1 hour. Open the cassette compartment, turn...

Operating Instructions
Page 129
... lens is set to CAMERA without inserting a cassette, the camcorder automatically starts the demonstration or DEMO MODE is not adjusted. m Clean the heads using the Sony DVM12CL (not supplied) cleaning cassette. (p. 123) The picture is too bright or too dark on the LCD screen or in the viewfinder. • The video heads may be dirty. An unknown picture is displayed on the • LCD BRIGHT is not malfunctioning. The click of the tape...
... lens is set to CAMERA without inserting a cassette, the camcorder automatically starts the demonstration or DEMO MODE is not adjusted. m Clean the heads using the Sony DVM12CL (not supplied) cleaning cassette. (p. 123) The picture is too bright or too dark on the LCD screen or in the viewfinder. • The video heads may be dirty. An unknown picture is displayed on the • LCD BRIGHT is not malfunctioning. The click of the tape...
Operating Instructions
Page 133
... heads, PCM system Quantization: 12bits (Fs 32kHz, stereo 1, stereo 2), 16bits (Fs 48kHz, stereo) Video signal NTSC color, EIA standards Usable cassette Mini DV cassette with logo printed Tape speed SP: Approx. 18.81 mm/s LP: Approx. 12.56 mm/s Recording/playback time SP mode: 1 hour (DVM60) LP mode: 1.5 hours (DVM60) Fast forward/rewind time Approx. 2 min. 30 s (DVM60) Image device 3CCD (Charge Coupled Device 1/4") Viewfinder Electric viewfinder (color) Lens Combined power zoom lens, 48x (Digital...
... heads, PCM system Quantization: 12bits (Fs 32kHz, stereo 1, stereo 2), 16bits (Fs 48kHz, stereo) Video signal NTSC color, EIA standards Usable cassette Mini DV cassette with logo printed Tape speed SP: Approx. 18.81 mm/s LP: Approx. 12.56 mm/s Recording/playback time SP mode: 1 hour (DVM60) LP mode: 1.5 hours (DVM60) Fast forward/rewind time Approx. 2 min. 30 s (DVM60) Image device 3CCD (Charge Coupled Device 1/4") Viewfinder Electric viewfinder (color) Lens Combined power zoom lens, 48x (Digital...
Operating Instructions
Page 145
... 50 ZERO SET MEMORY 80 Zoom 14 145 Additional information Index A, B Audio mode 30 AUTO SHTR 28 Battery release 10 BEEP 31 C Car battery 26 Cassette memory 4 Charging battery pack 8 Charging vanadium-lithium battery 117 Cleaning video heads 123 Clock set 118 Color TV system 4, 126 Connection 70, 82 Continuous 103 COPY INHIBIT 116 D, E Data Code 81 Date search 74 Demo 142 DISPLAY 22 Digital zoom 15 DV connecting cable 83 DV format 116 DV IN/OUT 83 Editing 82 EJECT 11...
... 50 ZERO SET MEMORY 80 Zoom 14 145 Additional information Index A, B Audio mode 30 AUTO SHTR 28 Battery release 10 BEEP 31 C Car battery 26 Cassette memory 4 Charging battery pack 8 Charging vanadium-lithium battery 117 Cleaning video heads 123 Clock set 118 Color TV system 4, 126 Connection 70, 82 Continuous 103 COPY INHIBIT 116 D, E Data Code 81 Date search 74 Demo 142 DISPLAY 22 Digital zoom 15 DV connecting cable 83 DV format 116 DV IN/OUT 83 Editing 82 EJECT 11...


