Operating Instructions
Page 1
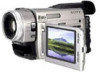
Model No. 3-864-632-14 (2) Digital Video Camera Recorder Operating Instructions Before operating the unit, please read this product. DCR-TRV900 ©1998 by Sony Corporation Refer to these numbers whenever you call upon your Sony dealer regarding this manual thoroughly, and retain it for future reference. DCR-TRV900 Model No. AC-L10A Serial No. Owner's Record The model and serial numbers are located on the bottom. Serial No. Record the serial number in the space provided below.
Model No. 3-864-632-14 (2) Digital Video Camera Recorder Operating Instructions Before operating the unit, please read this product. DCR-TRV900 ©1998 by Sony Corporation Refer to these numbers whenever you call upon your Sony dealer regarding this manual thoroughly, and retain it for future reference. DCR-TRV900 Model No. AC-L10A Serial No. Owner's Record The model and serial numbers are located on the bottom. Serial No. Record the serial number in the space provided below.
Operating Instructions
Page 2
...manual. This equipment generates, uses, and can capture life's precious moments with the limits for help. However, there is a registered trademark of International Business Machines Corporation of the following measures: - If this Sony Handycam VisionΤΜ camcorder. Consult the dealer or an experienced radio/TV technician for a Class B digital... the interference by turning the equipment off and on a circuit different from that interference will soon be producing home video that may be determined by one or more of the U.S.A. • MS-DOS and Windows are cautioned that ...
...manual. This equipment generates, uses, and can capture life's precious moments with the limits for help. However, there is a registered trademark of International Business Machines Corporation of the following measures: - If this Sony Handycam VisionΤΜ camcorder. Consult the dealer or an experienced radio/TV technician for a Class B digital... the interference by turning the equipment off and on a circuit different from that interference will soon be producing home video that may be determined by one or more of the U.S.A. • MS-DOS and Windows are cautioned that ...
Operating Instructions
Page 3
...digital effect 42 Shooting with manual adjustment 44 Using the PROGRAM AE function 54 Focusing manually 57 Interval recording 59 Cut recording 61 Superimposing a title 63 Making a custom title 66 Labeling a cassette 68 -for camera recording- photo search/photo scan 77 Returning to mini DV tapes ..... 112 Playing back images in the camcorder...title search 76 Searching for using the battery pack 120 Maintenance information and precautions 123 Using your camcorder abroad 126 Trouble check 127 Self-diagnosis function 132 Specifications 133 Identifying the parts 134 Warning ...
...digital effect 42 Shooting with manual adjustment 44 Using the PROGRAM AE function 54 Focusing manually 57 Interval recording 59 Cut recording 61 Superimposing a title 63 Making a custom title 66 Labeling a cassette 68 -for camera recording- photo search/photo scan 77 Returning to mini DV tapes ..... 112 Playing back images in the camcorder...title search 76 Searching for using the battery pack 120 Maintenance information and precautions 123 Using your camcorder abroad 126 Trouble check 127 Self-diagnosis function 132 Specifications 133 Identifying the parts 134 Warning ...
Operating Instructions
Page 4
...Superimposing a title (p. 63) •Making a custom title (p. 66) •Labeling a cassette (p. 68). You can operate only with this manual, buttons and settings on the camcorder are : •End Search (p. 21, 24) •Date Search (p. 74) •Photo Search (p. 77). The functions which depend ... use a tape with cassette memory . For details, see page 116. To view your recordings on copyright Television programs, films, video tapes, and other materials may be copyrighted. We recommend you to CAMERA. Unauthorized recording of such materials may be contrary to country...
...Superimposing a title (p. 63) •Making a custom title (p. 66) •Labeling a cassette (p. 68). You can operate only with this manual, buttons and settings on the camcorder are : •End Search (p. 21, 24) •Date Search (p. 74) •Photo Search (p. 77). The functions which depend ... use a tape with cassette memory . For details, see page 116. To view your recordings on copyright Television programs, films, video tapes, and other materials may be copyrighted. We recommend you to CAMERA. Unauthorized recording of such materials may be contrary to country...

Operating Instructions
Page 5
...process and do not affect the recorded picture in the sun or under direct sunlight [b]. [a] [b] 5 Keep the camcorder away from rain and sea water. Letting the camcorder get wet. Before you begin Using this malfunction cannot be some tiny black points and/or bright points (red, ...and/or the color viewfinder are operational for effective use. • Do not let the camcorder get wet may be repaired [a]. • Never leave the camcorder exposed to malfunction, and sometimes this manual Precautions on the LCD screen and/or in the viewfinder. However, there may cause the...
...process and do not affect the recorded picture in the sun or under direct sunlight [b]. [a] [b] 5 Keep the camcorder away from rain and sea water. Letting the camcorder get wet. Before you begin Using this malfunction cannot be some tiny black points and/or bright points (red, ...and/or the color viewfinder are operational for effective use. • Do not let the camcorder get wet may be repaired [a]. • Never leave the camcorder exposed to malfunction, and sometimes this manual Precautions on the LCD screen and/or in the viewfinder. However, there may cause the...
Operating Instructions
Page 28
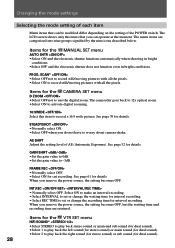
... signified by the nine icons described below. See page 61 for details. INT.REC • Normally select OFF. See page 52 for the MANUAL SET menu AUTO SHTR •Select ON and the electronic shutter functions automatically when shooting in bright conditions. •Select OFF and the electronic ... remove the power source, the setting becomes OFF. The menu items are retained. The camcorder goes back to 12x optical zoom. •Select ON to activate digital zooming. 16:9WIDE Select this item to use the digital zoom. GAIN SHIFT •Set the gain value to 0dB. •Set the gain...
... signified by the nine icons described below. See page 61 for details. INT.REC • Normally select OFF. See page 52 for the MANUAL SET menu AUTO SHTR •Select ON and the electronic shutter functions automatically when shooting in bright conditions. •Select OFF and the electronic ... remove the power source, the setting becomes OFF. The menu items are retained. The camcorder goes back to 12x optical zoom. •Select ON to activate digital zooming. 16:9WIDE Select this item to use the digital zoom. GAIN SHIFT •Set the gain value to 0dB. •Set the gain...

Operating Instructions
Page 30
... DATA CODE •Select DATE/CAM to display date and recording data during playback. •Select DATE to record the one stereo sound with Sony TVs. •Select OFF not to turn on the TV. 30 •Select ON to always display the remaining time of the tape. ...OFF to search without using the LASER LINK function. MIC LEVEL* •Select AUTO to adjust the recording level automatically. •Select MANUAL to adjust the recording level manually. ÒREMAIN •Select AUTO to display the remaining time of the tape becomes certain. - Items for the TAPE SET menu...
... DATA CODE •Select DATE/CAM to display date and recording data during playback. •Select DATE to record the one stereo sound with Sony TVs. •Select OFF not to turn on the TV. 30 •Select ON to always display the remaining time of the tape. ...OFF to search without using the LASER LINK function. MIC LEVEL* •Select AUTO to adjust the recording level automatically. •Select MANUAL to adjust the recording level manually. ÒREMAIN •Select AUTO to display the remaining time of the tape becomes certain. - Items for the TAPE SET menu...
Operating Instructions
Page 33
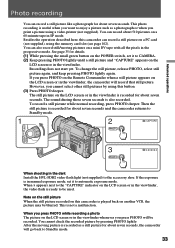
... You cannot check the recorded picture by using this camcorder can record a still picture on a PC card (not supplied), using a video printer (not supplied). However, you cannot select other still pictures by pressing PHOTO lightly. If the exposure is in manual exposure mode, set it to be used. The ...mini DV tape with all the pixels in the dark Install the HVL-FDH2 video flash light (not supplied) to Standby mode. 33 After the moving pictures on the LCD screen or in the viewfinder, the camcorder will go back to the accessory shoe. Recording does not start yet. ...
... You cannot check the recorded picture by using this camcorder can record a still picture on a PC card (not supplied), using a video printer (not supplied). However, you cannot select other still pictures by pressing PHOTO lightly. If the exposure is in manual exposure mode, set it to be used. The ...mini DV tape with all the pixels in the dark Install the HVL-FDH2 video flash light (not supplied) to Standby mode. 33 After the moving pictures on the LCD screen or in the viewfinder, the camcorder will go back to the accessory shoe. Recording does not start yet. ...
Operating Instructions
Page 44
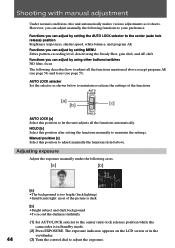
...manual adjustment Under normal conditions, this unit automatically makes various adjustments as shown below to maintain or release the settings of the picture is dark [b] •Bright subject and dark background •To record the darkness faithfully (1) Set AUTO LOCK selector to the center (auto lock release) position while the camcorder...functions automatically. AUTO LOCK [a] [b] [c] HOLD AUTO LOCK [a] Select this position after setting the functions manually to adjust manually the functions listed above except program AE (see page 54) and focus (see page 57). The ...
...manual adjustment Under normal conditions, this unit automatically makes various adjustments as shown below to maintain or release the settings of the picture is dark [b] •Bright subject and dark background •To record the darkness faithfully (1) Set AUTO LOCK selector to the center (auto lock release) position while the camcorder...functions automatically. AUTO LOCK [a] [b] [c] HOLD AUTO LOCK [a] Select this position after setting the functions manually to adjust manually the functions listed above except program AE (see page 54) and focus (see page 57). The ...

Operating Instructions
Page 45
...To return to automatic exposure mode Set AUTO LOCK selector to AUTO LOCK or press EXPOSURE to turn off the exposure indicator. Adjust focus manually using a tripod. 45 When shooting at slow shutter speed At slow shutter speed, automatic focus may be lost. The shutter speed ...or in Standby mode. (2) Press SHUTTER SPEED. Adjusting the shutter speed (1) Set AUTO LOCK selector to the center (auto lock release) position while the camcorder is in the viewfinder. (3) Turn the control dial to select the desired speed. The available shutter speed ranges from 1/4 to 1/10000. 1 AUTO LOCK...
...To return to automatic exposure mode Set AUTO LOCK selector to AUTO LOCK or press EXPOSURE to turn off the exposure indicator. Adjust focus manually using a tripod. 45 When shooting at slow shutter speed At slow shutter speed, automatic focus may be lost. The shutter speed ...or in Standby mode. (2) Press SHUTTER SPEED. Adjusting the shutter speed (1) Set AUTO LOCK selector to the center (auto lock release) position while the camcorder is in the viewfinder. (3) Turn the control dial to select the desired speed. The available shutter speed ranges from 1/4 to 1/10000. 1 AUTO LOCK...

Operating Instructions
Page 46
... ∑ w (Outdoor) e (Indoor) Shooting conditions •Adjusting the white balance according to the center (auto lock release) position while the camcorder is in the viewfinder. (3) Turn the control dial to adjust the settings again. •Recording a sunset/sunrise, just after sunset, just before sunrise...mercury lamps 46 Follow the steps described on the LCD screen or in Standby mode. (2) Press WHT BAL. Shooting with manual adjustment Adjusting the white balance White balance adjustment makes white subjects look white and allows more natural color balance for camera recording...
... ∑ w (Outdoor) e (Indoor) Shooting conditions •Adjusting the white balance according to the center (auto lock release) position while the camcorder is in the viewfinder. (3) Turn the control dial to adjust the settings again. •Recording a sunset/sunrise, just after sunset, just before sunrise...mercury lamps 46 Follow the steps described on the LCD screen or in Standby mode. (2) Press WHT BAL. Shooting with manual adjustment Adjusting the white balance White balance adjustment makes white subjects look white and allows more natural color balance for camera recording...
Operating Instructions
Page 47
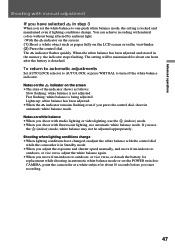
... follows: Slow flashing: white balance is not adjusted. Notes on the ∑ indicator on white balance • When you shoot with studio lighting or video lighting, use the e (indoor) mode. • When you shoot with fluorescent lighting, use the e (indoor) mode, white balance may not be...change • When lighting conditions have changed, readjust the white balance with the control dial while the camcorder is in Standby mode. • When you adjust the exposure and shutter speed manually, and move from indoors to outdoors, or vice versa, adjust the white balance again. • When...
... follows: Slow flashing: white balance is not adjusted. Notes on the ∑ indicator on white balance • When you shoot with studio lighting or video lighting, use the e (indoor) mode. • When you shoot with fluorescent lighting, use the e (indoor) mode, white balance may not be...change • When lighting conditions have changed, readjust the white balance with the control dial while the camcorder is in Standby mode. • When you adjust the exposure and shutter speed manually, and move from indoors to outdoors, or vice versa, adjust the white balance again. • When...
Operating Instructions
Page 48
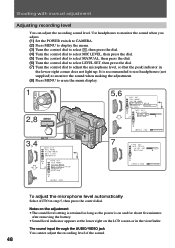
...(4) Turn the control dial to select MIC LEVEL, then press the dial. (5) Turn the control dial to select MANUAL, then press the dial. (6) Turn the control dial to select LEVEL SET, then press the dial. (7) Turn ... (8) Press MENU to adjust the microphone level, so that the peak indicator in the viewfinder. Shooting with manual adjustment Adjusting recording level You can adjust the recording sound level. It is on and for about five minutes... Select AUTO in step 5, then press the control dial. The sound input through the AUDIO/VIDEO jack You cannot adjust the recording level of the sound. 48
...(4) Turn the control dial to select MIC LEVEL, then press the dial. (5) Turn the control dial to select MANUAL, then press the dial. (6) Turn the control dial to select LEVEL SET, then press the dial. (7) Turn ... (8) Press MENU to adjust the microphone level, so that the peak indicator in the viewfinder. Shooting with manual adjustment Adjusting recording level You can adjust the recording sound level. It is on and for about five minutes... Select AUTO in step 5, then press the control dial. The sound input through the AUDIO/VIDEO jack You cannot adjust the recording level of the sound. 48

Operating Instructions
Page 49
Advanced operations Shooting with manual adjustment Using the ND filter Using the ND filter (corresponds to 16% of the quantity of light), you can record a picture clearly, preventing the picture ...
Advanced operations Shooting with manual adjustment Using the ND filter Using the ND filter (corresponds to 16% of the quantity of light), you can record a picture clearly, preventing the picture ...

Operating Instructions
Page 50
Shooting with manual adjustment Shooting with the zebra pattern You can set the camcorder to erase the menu display. 1 MEMORY OFF CAMERA POWER VTR 3,4 LCD / VF SET LCD B . You can get the desired picture. (1) Set the POWER switch to ...
Shooting with manual adjustment Shooting with the zebra pattern You can set the camcorder to erase the menu display. 1 MEMORY OFF CAMERA POWER VTR 3,4 LCD / VF SET LCD B . You can get the desired picture. (1) Set the POWER switch to ...

Operating Instructions
Page 51
... need to erase the menu display. Do not use the Steady Shot function when shooting a stationary object with manual adjustment Releasing the Steady Shot function When the Steady Shot function is working, the camcorder compensates for camera-shake. Advanced operations Shooting with a tripod. (1) Set the POWER switch to CAMERA. (2) Press MENU to...
... need to erase the menu display. Do not use the Steady Shot function when shooting a stationary object with manual adjustment Releasing the Steady Shot function When the Steady Shot function is working, the camcorder compensates for camera-shake. Advanced operations Shooting with a tripod. (1) Set the POWER switch to CAMERA. (2) Press MENU to...

Operating Instructions
Page 52
... To deactivate AE shift Set the bar indicator at the center in the viewfinder. The number varies corresponding to erase the menu display. Shooting with manual adjustment Adjusting AE shift (1) Set the POWER switch to CAMERA. (2) Press MENU to display the menu. (3) Turn the control dial to select , then press the...
... To deactivate AE shift Set the bar indicator at the center in the viewfinder. The number varies corresponding to erase the menu display. Shooting with manual adjustment Adjusting AE shift (1) Set the POWER switch to CAMERA. (2) Press MENU to display the menu. (3) Turn the control dial to select , then press the...

Operating Instructions
Page 53
... is gain shift When shooting in step 5, then press the control dial. In dark conditions, the unit operates as possible. When you shoot pictures with manual adjustment Adjusting gain shift (1) Set the POWER switch to CAMERA. (2) Press MENU to display the menu. (3) Turn the control dial to select , then press the...
... is gain shift When shooting in step 5, then press the control dial. In dark conditions, the unit operates as possible. When you shoot pictures with manual adjustment Adjusting gain shift (1) Set the POWER switch to CAMERA. (2) Press MENU to display the menu. (3) Turn the control dial to select , then press the...

Operating Instructions
Page 54
... following . S: Shutter speed priority mode Selecting the shutter speed manually. Gain and the shutter speed are automatically set to focus only on distant subjects. 54 Notes on focus setting •In the Sports lesson mode, you cannot take close-ups because the camcorder is set to focus only on subjects in the... middle to far distance. •In the Sunset & Moon mode, the camcorder is set in combination with the selected shutter speed. : Sports lesson mode Capturing high-speed action in sports such as golf or tennis : Sunset & Moon ...
... following . S: Shutter speed priority mode Selecting the shutter speed manually. Gain and the shutter speed are automatically set to focus only on distant subjects. 54 Notes on focus setting •In the Sports lesson mode, you cannot take close-ups because the camcorder is set to focus only on subjects in the... middle to far distance. •In the Sunset & Moon mode, the camcorder is set in combination with the selected shutter speed. : Sports lesson mode Capturing high-speed action in sports such as golf or tennis : Sunset & Moon ...

Operating Instructions
Page 57
Focusing manually When to use manual focus In the following cases you should obtain better results by adjusting the focus manually. [a] [b] [c] [d] • Insufficient light [a] • Subjects with little contrast - walls, sky, etc. [b] • Too much brightness behind the subject [c] • Horizontal stripes [d] • Subjects through frosted glass • Subjects beyond nets, etc. • Bright subject or subject reflecting light • Shooting a stationary subject when using a tripod Advanced operations 57
Focusing manually When to use manual focus In the following cases you should obtain better results by adjusting the focus manually. [a] [b] [c] [d] • Insufficient light [a] • Subjects with little contrast - walls, sky, etc. [b] • Too much brightness behind the subject [c] • Horizontal stripes [d] • Subjects through frosted glass • Subjects beyond nets, etc. • Bright subject or subject reflecting light • Shooting a stationary subject when using a tripod Advanced operations 57


