Operating Instructions
Page 4
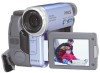
... 135) •Viewing moving pictures recorded on the "Memory Stick" (DCRTRV22/TRV33 only) (p. 137) Main Features •Viewing moving pictures recorded on the tape using the USB cable (p. 148) •Viewing images recorded on the "Memory Stick" using the USB cable (DCR-TRV22/TRV33 only) (p. 149) •...;Capturing images on the computer from your camcorder using the USB cable (p. 161) •Converting an analog signal into digital to capture images onto the computer (DCR-TRV22/TRV33 only) (p. 173...
... 135) •Viewing moving pictures recorded on the "Memory Stick" (DCRTRV22/TRV33 only) (p. 137) Main Features •Viewing moving pictures recorded on the tape using the USB cable (p. 148) •Viewing images recorded on the "Memory Stick" using the USB cable (DCR-TRV22/TRV33 only) (p. 149) •...;Capturing images on the computer from your camcorder using the USB cable (p. 161) •Converting an analog signal into digital to capture images onto the computer (DCR-TRV22/TRV33 only) (p. 173...
Operating Instructions
Page 5
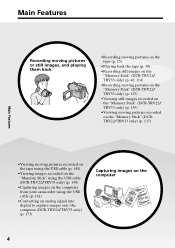
... 58, 72) •Digital effect* (p. 59, 73) •Title (p. 101) •MEMORY MIX* (p. 120) Functions for giving a natural appearance to your camcorder. Otherwise, the model name is indicated in the text, for using after recording •End search/Edit search/Rec Review (p. 37) •Data code (p. 40...) •Tape PB ZOOM* (p. 74)/Memory PB ZOOM* (p. 140) •Zero set memory (p. 75) •Title search (p. 76) •Digital program editing (p. 84...
... 58, 72) •Digital effect* (p. 59, 73) •Title (p. 101) •MEMORY MIX* (p. 120) Functions for giving a natural appearance to your camcorder. Otherwise, the model name is indicated in the text, for using after recording •End search/Edit search/Rec Review (p. 37) •Data code (p. 40...) •Tape PB ZOOM* (p. 74)/Memory PB ZOOM* (p. 140) •Zero set memory (p. 75) •Title search (p. 76) •Digital program editing (p. 84...

Operating Instructions
Page 6
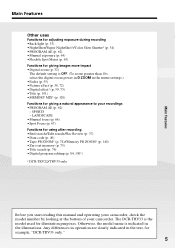
...TRV22/TRV33 only 59 Using PROGRAM AE 62 Adjusting the exposure manually ...... 64 Using spot light-metering function - Basics Playing back tape 39 To display the screen indicators - NightShot/Super NightShot/ Color Slow Shutter 34 Checking recordings - Frame recording 69 Using the ...VCR - Flexible Spot Meter 65 Focusing manually 66 Using spot focus function - Table of contents Main Features 4 Quick Start Guide Recording on tape 8 Recording on "Memory Stick" (DCR-TRV22/TRV33 only 10 Getting Started Using this manual 12 Checking supplied accessories 15 Step 1 Preparing...
...TRV22/TRV33 only 59 Using PROGRAM AE 62 Adjusting the exposure manually ...... 64 Using spot light-metering function - Basics Playing back tape 39 To display the screen indicators - NightShot/Super NightShot/ Color Slow Shutter 34 Checking recordings - Frame recording 69 Using the ...VCR - Flexible Spot Meter 65 Focusing manually 66 Using spot focus function - Table of contents Main Features 4 Quick Start Guide Recording on tape 8 Recording on "Memory Stick" (DCR-TRV22/TRV33 only 10 Getting Started Using this manual 12 Checking supplied accessories 15 Step 1 Preparing...

Operating Instructions
Page 7
... parts and controls 213 Index 219 Viewing images with your computer Viewing images with a computer - Print mark ... 147 Viewing pictures recorded on tape on "Memory Stick" - Introduction 148 Connecting your camcorder to a computer using the USB cable (For Macintosh users) (DCR-TRV22/TRV33 only) ......... 170 Viewing images recorded on "Memory Stick" on...
... parts and controls 213 Index 219 Viewing images with your computer Viewing images with a computer - Print mark ... 147 Viewing pictures recorded on tape on "Memory Stick" - Introduction 148 Connecting your camcorder to a computer using the USB cable (For Macintosh users) (DCR-TRV22/TRV33 only) ......... 170 Viewing images recorded on "Memory Stick" on...
Operating Instructions
Page 8
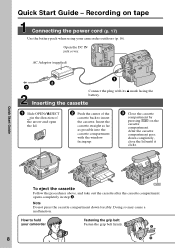
...(supplied) 2 3 1 Connect the plug with the window facing up. 3 Close the cassette compartment by pressing on tape Connecting the power cord (p. 17) Use the battery pack when using your camcorder Fastening the grip belt Fasten the grip belt firmly. 2 1 8 43 Open the DC IN jack cover. Note ... compartment opens completely in the direction of the arrow and open the lid. 2 Push the center of the cassette back to hold your camcorder outdoors (p. 16). How to insert the cassette. Quick Start Guide - Insert the cassette straight as far as possible into the cassette compartment...
...(supplied) 2 3 1 Connect the plug with the window facing up. 3 Close the cassette compartment by pressing on tape Connecting the power cord (p. 17) Use the battery pack when using your camcorder Fastening the grip belt Fasten the grip belt firmly. 2 1 8 43 Open the DC IN jack cover. Note ... compartment opens completely in the direction of the arrow and open the lid. 2 Push the center of the cassette back to hold your camcorder outdoors (p. 16). How to insert the cassette. Quick Start Guide - Insert the cassette straight as far as possible into the cassette compartment...
Operating Instructions
Page 9
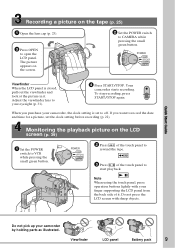
... clock setting is closed, pull out the viewfinder and look at the picture in it . Viewfinder LCD panel Battery pack 9 Adjust the viewfinder lens to your camcorder by holding parts as illustrated. POWER VCR OFF(CHG) CAMERA MEMORY 2 Press of the touch panel to start playback....operation buttons lightly with sharp objects. Your camcorder starts recording. Monitoring the playback picture on the screen. 2 Set the POWER switch to off. If you purchase your finger supporting the LCD panel from the back side of the touch panel to rewind the tape. 3 Press of it . POWER VCR...
... clock setting is closed, pull out the viewfinder and look at the picture in it . Viewfinder LCD panel Battery pack 9 Adjust the viewfinder lens to your camcorder by holding parts as illustrated. POWER VCR OFF(CHG) CAMERA MEMORY 2 Press of the touch panel to start playback....operation buttons lightly with sharp objects. Your camcorder starts recording. Monitoring the playback picture on the screen. 2 Set the POWER switch to off. If you purchase your finger supporting the LCD panel from the back side of the touch panel to rewind the tape. 3 Press of it . POWER VCR...

Operating Instructions
Page 13
We recommend that you use only mini DV cassettes with your camcorder. Copyright precautions Television programs, films, video tapes, and other video equipment or a computer using the USB cable or i.LINK cable, observe the shape of your camcorder. 13 If you forcibly insert the plug, the jack may be damaged ... Cassette Memory have the (Cassette Memory) mark. Note on the DV format. Getting Started Using this manual Note on Cassette Memory Your camcorder is based on connecting other equipment When you connect your camcorder to other materials may be contrary to the copyright laws.
We recommend that you use only mini DV cassettes with your camcorder. Copyright precautions Television programs, films, video tapes, and other video equipment or a computer using the USB cable or i.LINK cable, observe the shape of your camcorder. 13 If you forcibly insert the plug, the jack may be damaged ... Cassette Memory have the (Cassette Memory) mark. Note on the DV format. Getting Started Using this manual Note on Cassette Memory Your camcorder is based on connecting other equipment When you connect your camcorder to other materials may be contrary to the copyright laws.
Operating Instructions
Page 22
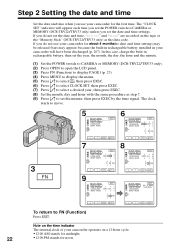
... EXIT CLOCK SET USB STREAM LANGUAGE 2003 JUL 4 DEMO MODE 5 30 PM EXEC RET. Note on the time indicator The internal clock of your camcorder operates on the tape or the "Memory Stick" (DCR-TRV22/TRV33 only) as step 7. (9) Press r/R to set the POWER switch to CAMERA or MEMORY (DCR-... month, the day, the hour and the minute. (1) Set the POWER switch to CAMERA or MEMORY (DCR-TRV22/TRV33 only). (2) Press OPEN to open the LCD panel. (3) Press FN (Function) to display PAGE1 (p. 23). (4) Press MENU to display the menu. (5) Press r/R to select , then press EXEC. (6) Press r/R to select ...
... EXIT CLOCK SET USB STREAM LANGUAGE 2003 JUL 4 DEMO MODE 5 30 PM EXEC RET. Note on the time indicator The internal clock of your camcorder operates on the tape or the "Memory Stick" (DCR-TRV22/TRV33 only) as step 7. (9) Press r/R to set the POWER switch to CAMERA or MEMORY (DCR-... month, the day, the hour and the minute. (1) Set the POWER switch to CAMERA or MEMORY (DCR-TRV22/TRV33 only). (2) Press OPEN to open the LCD panel. (3) Press FN (Function) to display PAGE1 (p. 23). (4) Press MENU to display the menu. (5) Press r/R to select , then press EXEC. (6) Press r/R to select ...
Operating Instructions
Page 26
...to cover the microphone and the infrared emitter. •Avoid touching the microphone when you record the tape in the LP (long play ) mode and in the LP mode on your camcorder. When you leave your camcorder. See page 50 for 5 minutes while the cassette is not inserted. To return to standby,...be distorted or the time code may not be set the POWER switch to CAMERA. However, check the following: - Note on your camcorder, we recommend playing back the tape on the LOCK switch (DCR-TRV22/TRV33 only) When you slide the LOCK switch to the right, the POWER switch can no ...
...to cover the microphone and the infrared emitter. •Avoid touching the microphone when you record the tape in the LP (long play ) mode and in the LP mode on your camcorder. When you leave your camcorder. See page 50 for 5 minutes while the cassette is not inserted. To return to standby,...be distorted or the time code may not be set the POWER switch to CAMERA. However, check the following: - Note on your camcorder, we recommend playing back the tape on the LOCK switch (DCR-TRV22/TRV33 only) When you slide the LOCK switch to the right, the POWER switch can no ...
Operating Instructions
Page 27
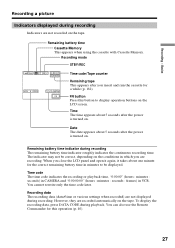
... for a while (p. 182). Recording mode STBY/REC 40min REC 0:00:01 60min JUL 4 2003 12:05:56PM FN Time code/Tape counter Remaining tape This appears after you are not displayed during playback. Time The time appears about 5 seconds after the power is turned on . Remaining.... FN button Press this operation (p. 40). 27 Remaining battery time indicator during recording Indicators are recorded automatically on the tape. When you close the LCD panel and open it again, it takes about 5 seconds after the power is turned on . Recording - Basics Recording a picture ...
... for a while (p. 182). Recording mode STBY/REC 40min REC 0:00:01 60min JUL 4 2003 12:05:56PM FN Time code/Tape counter Remaining tape This appears after you are not displayed during playback. Time The time appears about 5 seconds after the power is turned on . Remaining.... FN button Press this operation (p. 40). 27 Remaining battery time indicator during recording Indicators are recorded automatically on the tape. When you close the LCD panel and open it again, it takes about 5 seconds after the power is turned on . Recording - Basics Recording a picture ...

Operating Instructions
Page 37
.... (2) Press FN to display PAGE1. (3) Press END SCH. Basics Checking recordings - The last 5 seconds of the recorded section after you have recorded on the tape. If the tape has a blank portion between the last recorded scene and the next scene you record is smooth. / EDIT FN FN End search You can use... cassette after you eject the cassette. End search When you use these buttons to the end of the recorded section are played back and your camcorder returns to FN Press EXIT.
.... (2) Press FN to display PAGE1. (3) Press END SCH. Basics Checking recordings - The last 5 seconds of the recorded section after you have recorded on the tape. If the tape has a blank portion between the last recorded scene and the next scene you record is smooth. / EDIT FN FN End search You can use... cassette after you eject the cassette. End search When you use these buttons to the end of the recorded section are played back and your camcorder returns to FN Press EXIT.

Operating Instructions
Page 39
..., you leave the power on the LCD screen. To rewind the tape Press during playback. You can monitor the playback picture in the viewfinder. Basics 5 OK 2 VOL To return to the stop . If you can also control playback using the Remote Commander supplied with your camcorder. (1) SetthePOWERswitchtoVCRwhilepressingthesmallgreenbutton. (2) PressOPENtoopentheLCDpanel. (3) Press torewindthetape. (4) Press tostartplayback. (5) Adjustthevolumefollowingthestepsbelow...
..., you leave the power on the LCD screen. To rewind the tape Press during playback. You can monitor the playback picture in the viewfinder. Basics 5 OK 2 VOL To return to the stop . If you can also control playback using the Remote Commander supplied with your camcorder. (1) SetthePOWERswitchtoVCRwhilepressingthesmallgreenbutton. (2) PressOPENtoopentheLCDpanel. (3) Press torewindthetape. (4) Press tostartplayback. (5) Adjustthevolumefollowingthestepsbelow...

Operating Instructions
Page 40
... CODE DSPL/BATT INFO About date/time and various settings Your camcorder automatically records not only images on the Remote Commander supplied with your camcorder or DISPLAY on the tape but also the recording data (date/time or various settings when....8 9 dB [e] [f] [g] [a] Tapecounterortimecode [b] SteadyShotoff [c] Exposure [d] Whitebalance [e] Gain [f] Shutterspeed [g] Aperturevalue 40 Display function Press DSPL/BATT INFO on your camcorder. To make the indicators appear, press DSPL/BATT INFO or DISPLAY on the Remote Commander again. Follow the steps below to display the data code...
... CODE DSPL/BATT INFO About date/time and various settings Your camcorder automatically records not only images on the Remote Commander supplied with your camcorder or DISPLAY on the tape but also the recording data (date/time or various settings when....8 9 dB [e] [f] [g] [a] Tapecounterortimecode [b] SteadyShotoff [c] Exposure [d] Whitebalance [e] Gain [f] Shutterspeed [g] Aperturevalue 40 Display function Press DSPL/BATT INFO on your camcorder. To make the indicators appear, press DSPL/BATT INFO or DISPLAY on the Remote Commander again. Follow the steps below to display the data code...

Operating Instructions
Page 41
... not be displayed. Data code When you use data code, bars (-- -- --) appear if: - The tape was recorded by a camcorder without the date and time set to tape damage or noise. - Each time you press DATA CODE on the Remote Commander when the POWER switch is unreadable...SteadyShot off, exposure, white balance, gain, shutter speed, aperture value) t (no indicator appears. A blank portion of recording. The tape is set . When you connect your camcorder's recording information at the time of the tape is being displayed Select DATE in DATA CODE in in the menu setting (p. 184).
... not be displayed. Data code When you use data code, bars (-- -- --) appear if: - The tape was recorded by a camcorder without the date and time set to tape damage or noise. - Each time you press DATA CODE on the Remote Commander when the POWER switch is unreadable...SteadyShot off, exposure, white balance, gain, shutter speed, aperture value) t (no indicator appears. A blank portion of recording. The tape is set . When you connect your camcorder's recording information at the time of the tape is being displayed Select DATE in DATA CODE in in the menu setting (p. 184).

Operating Instructions
Page 42
...reverse direction, press .** To search the last scene recorded (END SEARCH) Press END SCH on PAGE1 during playback. Playing back tape Various playback modes To operate video control buttons, set the POWER switch to display video control buttons. To resume fastforwarding or rewinding,... fastforwarding or while rewinding the tape. To change the playback direction Press during playback to pause playback. to resume normal playback. Press to resume normal playback. 42 The last 5 seconds of the recorded section are played back then your camcorder stops. * Press **Press to...
...reverse direction, press .** To search the last scene recorded (END SEARCH) Press END SCH on PAGE1 during playback. Playing back tape Various playback modes To operate video control buttons, set the POWER switch to display video control buttons. To resume fastforwarding or rewinding,... fastforwarding or while rewinding the tape. To change the playback direction Press during playback to pause playback. to resume normal playback. Press to resume normal playback. 42 The last 5 seconds of the recorded section are played back then your camcorder stops. * Press **Press to...

Operating Instructions
Page 43
...playback Slow playback can be performed smoothly on the Remote Commander supplied with your camcorder. On your camcorder: To play back or pause the tape To stop the tape To rewind the tape To fastforward the tape To play back the tape slowly To forward one frame at a time To rewind one frame at ... picture may appear at double speed In the various playback modes • Sound is not a malfunction. Basics Playing back tape Video control buttons Marks on your camcorder are different from the DV Interface. 43 However, this function does not work for an output signal from those on your...
...playback Slow playback can be performed smoothly on the Remote Commander supplied with your camcorder. On your camcorder: To play back or pause the tape To stop the tape To rewind the tape To fastforward the tape To play back the tape slowly To forward one frame at a time To rewind one frame at ... picture may appear at double speed In the various playback modes • Sound is not a malfunction. Basics Playing back tape Video control buttons Marks on your camcorder are different from the DV Interface. 43 However, this function does not work for an output signal from those on your...
Operating Instructions
Page 46
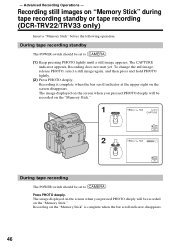
... you pressed PHOTO deeply will be recorded on the "Memory Stick." 1 50min 640 FINE 12 CAPTURE 2 101 FN 50min 640 FINE 101 FN During tape recording The POWER switch should be recorded on the "Memory Stick." Recording still images on the screen disappears. The CAPTURE indicator appears. Recording on the... "Memory Stick" is complete when the bar scroll indicator at the upper right on "Memory Stick" during tape recording standby or tape recording (DCR-TRV22/TRV33 only) Insert a "Memory Stick" before the following operation. During...
... you pressed PHOTO deeply will be recorded on the "Memory Stick." 1 50min 640 FINE 12 CAPTURE 2 101 FN 50min 640 FINE 101 FN During tape recording The POWER switch should be recorded on the "Memory Stick." Recording still images on the screen disappears. The CAPTURE indicator appears. Recording on the... "Memory Stick" is complete when the bar scroll indicator at the upper right on "Memory Stick" during tape recording standby or tape recording (DCR-TRV22/TRV33 only) Insert a "Memory Stick" before the following operation. During...

Operating Instructions
Page 47
... record the titles. Wide mode - See page 50 for details. End search - When you press PHOTO on the Remote Commander Your camcorder immediately records the image that is recommended. Self-timer recording During recording standby, you can record still images on the "Memory Stick" ..."Memory Stick." Advanced Recording Operations Recording still images on "Memory Stick" during tape recording standby or tape recording (DCR-TRV22/TRV33 only) Note You cannot record still images in the "Memory Stick" during tape recording You cannot check an image on the screen by pressing PHOTO lightly....
... record the titles. Wide mode - See page 50 for details. End search - When you press PHOTO on the Remote Commander Your camcorder immediately records the image that is recommended. Self-timer recording During recording standby, you can record still images on the "Memory Stick" ..."Memory Stick." Advanced Recording Operations Recording still images on "Memory Stick" during tape recording standby or tape recording (DCR-TRV22/TRV33 only) Note You cannot record still images in the "Memory Stick" during tape recording You cannot check an image on the screen by pressing PHOTO lightly....
Operating Instructions
Page 48
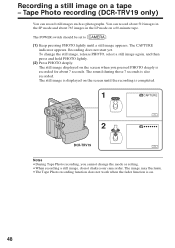
... PHOTO lightly. (2) Press PHOTO deeply. The sound during those 7 seconds is completed. 1 CAPTURE FN 2 DCR-TRV19 FN Notes •During Tape Photo recording, you pressed PHOTO deeply is on the screen until a still image appears. The still image is displayed on . 48 You can record...To change the mode or setting. •When recording a still image, do not shake your camcorder. Tape Photo recording (DCR-TRV19 only) You can record about 510 images in the LP mode on a tape - The POWER switch should be set to . (1) Keep pressing PHOTO lightly until the recording...
... PHOTO lightly. (2) Press PHOTO deeply. The sound during those 7 seconds is completed. 1 CAPTURE FN 2 DCR-TRV19 FN Notes •During Tape Photo recording, you pressed PHOTO deeply is on the screen until a still image appears. The still image is displayed on . 48 You can record...To change the mode or setting. •When recording a still image, do not shake your camcorder. Tape Photo recording (DCR-TRV19 only) You can record about 510 images in the LP mode on a tape - The POWER switch should be set to . (1) Keep pressing PHOTO lightly until the recording...

Operating Instructions
Page 49
Tape Photo recording (DCRTRV19 only) If you record a moving subject with the Tape Photo recording function When you play back the still image on the screen by pressing PHOTO lightly. The still image is on a tape - To record still images on a tape during tape recording You ...cannot check an image on other equipment, the image may fluctuate. Press PHOTO deeply. Advanced Recording Operations Recording a still image on the screen when you press the button. When you press PHOTO on the Remote Commander Your camcorder...
Tape Photo recording (DCRTRV19 only) If you record a moving subject with the Tape Photo recording function When you play back the still image on the screen by pressing PHOTO lightly. The still image is on a tape - To record still images on a tape during tape recording You ...cannot check an image on other equipment, the image may fluctuate. Press PHOTO deeply. Advanced Recording Operations Recording a still image on the screen when you press the button. When you press PHOTO on the Remote Commander Your camcorder...


