Operating Instructions
Page 4
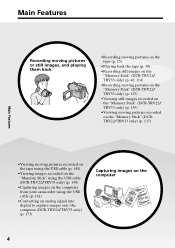
...(p. 39) •Recording still images on the "Memory Stick" (DCR-TRV22/ TRV33 only) (p. 46, 114) •Recording moving pictures on the "Memory Stick" (DCR-TRV22/ TRV33 only) (p. 125) •Viewing still images recorded on the "Memory Stick" (DCR-TRV22/ TRV33 only) (p. 135) •Viewing moving pictures recorded...USB cable (p. 148) •Viewing images recorded on the "Memory Stick" using the USB cable (DCR-TRV22/TRV33 only) (p. 149) •Capturing images on the computer from your camcorder using the USB cable (p. 161) •Converting an analog signal into digital to capture images onto ...
...(p. 39) •Recording still images on the "Memory Stick" (DCR-TRV22/ TRV33 only) (p. 46, 114) •Recording moving pictures on the "Memory Stick" (DCR-TRV22/ TRV33 only) (p. 125) •Viewing still images recorded on the "Memory Stick" (DCR-TRV22/ TRV33 only) (p. 135) •Viewing moving pictures recorded...USB cable (p. 148) •Viewing images recorded on the "Memory Stick" using the USB cable (DCR-TRV22/TRV33 only) (p. 149) •Capturing images on the computer from your camcorder using the USB cable (p. 161) •Converting an analog signal into digital to capture images onto ...
Operating Instructions
Page 5
... (p. 140) •Zero set memory (p. 75) •Title search (p. 76) •Digital program editing (p. 84, 130*) * DCR-TRV22/TRV33 only Before you start reading this manual and operating your camcorder, check the model number by looking at the bottom of your recordings •PROGRAM AE (p. 62) - Getting Started Main...;Picture effect (p. 58, 72) •Digital effect* (p. 59, 73) •Title (p. 101) •MEMORY MIX* (p. 120) Functions for giving a natural appearance to your camcorder. SPORTS - LANDSCAPE •Manual focus (p. 66) •Spot Focus (p. 67) Functions for example...
... (p. 140) •Zero set memory (p. 75) •Title search (p. 76) •Digital program editing (p. 84, 130*) * DCR-TRV22/TRV33 only Before you start reading this manual and operating your camcorder, check the model number by looking at the bottom of your recordings •PROGRAM AE (p. 62) - Getting Started Main...;Picture effect (p. 58, 72) •Digital effect* (p. 59, 73) •Title (p. 101) •MEMORY MIX* (p. 120) Functions for giving a natural appearance to your camcorder. SPORTS - LANDSCAPE •Manual focus (p. 66) •Spot Focus (p. 67) Functions for example...

Operating Instructions
Page 7
...161 Viewing images recorded on "Memory Stick" on a computer (For Windows users) (DCR-TRV22/TRV33 only) ......... 167 Connecting your camcorder to a computer using the USB cable (For Macintosh users) (DCR-TRV22/TRV33 only) ......... 170 Viewing images recorded on "Memory Stick" on a computer... Viewing a moving pictures on a computer - Signal convert function (DCR-TRV22/ TRV33 only 173 Customizing Your Camcorder Changing the menu settings 175 Troubleshooting Types of contents Getting Started "Memory Stick" Operations (DCR-TRV22/TRV33 only) Using "Memory Stick 106 Inserting/Ejecting the ...
...161 Viewing images recorded on "Memory Stick" on a computer (For Windows users) (DCR-TRV22/TRV33 only) ......... 167 Connecting your camcorder to a computer using the USB cable (For Macintosh users) (DCR-TRV22/TRV33 only) ......... 170 Viewing images recorded on "Memory Stick" on a computer... Viewing a moving pictures on a computer - Signal convert function (DCR-TRV22/ TRV33 only 173 Customizing Your Camcorder Changing the menu settings 175 Troubleshooting Types of contents Getting Started "Memory Stick" Operations (DCR-TRV22/TRV33 only) Using "Memory Stick 106 Inserting/Ejecting the ...
Operating Instructions
Page 10
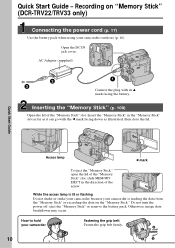
... Stick" or recording the data on "Memory Stick" (DCR-TRV22/TRV33 only) Connecting the power cord (p. 17) Use the battery pack when using your camcorder outdoors (p. 16). How to hold your camcorder is lit or flashing Do not shake or strike your camcorder because your camcorder Fastening the grip belt Fasten the grip belt firmly...
... Stick" or recording the data on "Memory Stick" (DCR-TRV22/TRV33 only) Connecting the power cord (p. 17) Use the battery pack when using your camcorder outdoors (p. 16). How to hold your camcorder is lit or flashing Do not shake or strike your camcorder because your camcorder Fastening the grip belt Fasten the grip belt firmly...
Operating Instructions
Page 12
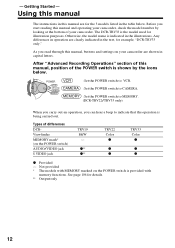
The DCR-TRV33 is the model used for details. ** Output only 12 After "Advanced Recording Operations" section of this manual, buttons and settings on your camcorder are shown in the illustrations. z** z** TRV22 Color z z z TRV33 Color z z z z Provided - Before you read through this manual, position of...functions. As you start reading this manual are clearly indicated in the text, for the 3 models listed in this manual and operating your camcorder. See page 106 for illustration purposes. POWER VCR OFF(CHG) CAMERA MEMORY : Set the POWER switch to VCR. : Set the POWER ...
The DCR-TRV33 is the model used for details. ** Output only 12 After "Advanced Recording Operations" section of this manual, buttons and settings on your camcorder are shown in the illustrations. z** z** TRV22 Color z z z TRV33 Color z z z z Provided - Before you read through this manual, position of...functions. As you start reading this manual are clearly indicated in the text, for the 3 models listed in this manual and operating your camcorder. See page 106 for illustration purposes. POWER VCR OFF(CHG) CAMERA MEMORY : Set the POWER switch to VCR. : Set the POWER ...
Operating Instructions
Page 15
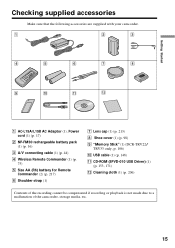
... (1) (p. 75) 5 Size AA (R6) battery for Remote Commander (2) (p. 217) 6 Shoulder strap (1) 7 Lens cap (1) (p. 213) 8 Shoe cover (1) (p. 98) 9 "Memory Stick" (1) (DCR-TRV22/ TRV33 only, p. 106) 0 USB cable (1) (p. 148) qa CD-ROM (SPVD-010 USB Driver) (1) (p. 153, 171) qs Cleaning cloth (1) (p. 206) Contents of the recording cannot... be compensated if recording or playback is not made due to a malfunction of the camcorder, storage media, etc. 15 Getting Started Checking supplied accessories Make sure that the following accessories are supplied with your...
... (1) (p. 75) 5 Size AA (R6) battery for Remote Commander (2) (p. 217) 6 Shoulder strap (1) 7 Lens cap (1) (p. 213) 8 Shoe cover (1) (p. 98) 9 "Memory Stick" (1) (DCR-TRV22/ TRV33 only, p. 106) 0 USB cable (1) (p. 148) qa CD-ROM (SPVD-010 USB Driver) (1) (p. 153, 171) qs Cleaning cloth (1) (p. 206) Contents of the recording cannot... be compensated if recording or playback is not made due to a malfunction of the camcorder, storage media, etc. 15 Getting Started Checking supplied accessories Make sure that the following accessories are supplied with your...
Operating Instructions
Page 20
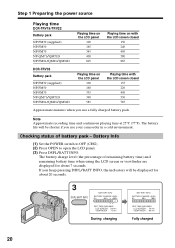
... (supplied) NP-FM50 NP-FM70 NP-QM71/QM71D NP-FM91/QM91/QM91D Playing time on the LCD panel 100 165 345 400 605 Playing time on with the LCD screen closed 150 240 495 580 865 DCR-TRV33 Battery pack NP-FM30 (supplied) NP-FM50 NP-FM70 NP-QM71/QM71D NP-FM91/QM91.../QM91D Playing time on the LCD panel 100 160 335 390 585 Playing time with the LCD screen closed 135 220 450 530 785 Approximate minutes when you use your camcorder in a cold environment...
... (supplied) NP-FM50 NP-FM70 NP-QM71/QM71D NP-FM91/QM91/QM91D Playing time on the LCD panel 100 165 345 400 605 Playing time on with the LCD screen closed 150 240 495 580 865 DCR-TRV33 Battery pack NP-FM30 (supplied) NP-FM50 NP-FM70 NP-QM71/QM71D NP-FM91/QM91.../QM91D Playing time on the LCD panel 100 160 335 390 585 Playing time with the LCD screen closed 135 220 450 530 785 Approximate minutes when you use your camcorder in a cold environment...
Operating Instructions
Page 22
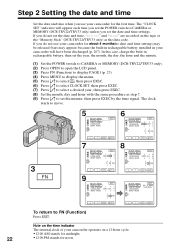
..., then set the year, the month, the day, the hour and the minute. (1) Set the POWER switch to CAMERA or MEMORY (DCR-TRV22/TRV33 only). (2) Press OPEN to open the LCD panel. (3) Press FN (Function) to display PAGE1 (p. 23). (4) Press MENU to display the menu. (5) Press r/R to select , then press EXEC. (6) ... MENU EXIT CLOCK SET USB STREAM LANGUAGE 2003 JUL 4 DEMO MODE 5 30 PM EXEC RET. If you do not use your camcorder operates on the tape or the "Memory Stick" (DCR-TRV22/TRV33 only) as step 7. (9) Press r/R to set the minute, then press EXEC by the time signal. SETUP MENU CLOCK SET...
..., then set the year, the month, the day, the hour and the minute. (1) Set the POWER switch to CAMERA or MEMORY (DCR-TRV22/TRV33 only). (2) Press OPEN to open the LCD panel. (3) Press FN (Function) to display PAGE1 (p. 23). (4) Press MENU to display the menu. (5) Press r/R to select , then press EXEC. (6) ... MENU EXIT CLOCK SET USB STREAM LANGUAGE 2003 JUL 4 DEMO MODE 5 30 PM EXEC RET. If you do not use your camcorder operates on the tape or the "Memory Stick" (DCR-TRV22/TRV33 only) as step 7. (9) Press r/R to set the minute, then press EXEC by the time signal. SETUP MENU CLOCK SET...
Operating Instructions
Page 23
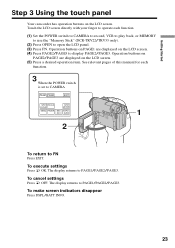
... MEMORY to use the "Memory Stick" (DCR-TRV22/TRV33 only). (2) Press OPEN to FN Press EXIT. To cancel settings Press OFF. Operation buttons on PAGE2/PAGE3 are displayed on the LCD screen. (5) Press a desired operation item....returns to PAGE1/PAGE2/PAGE3. To make screen indicators disappear Press DSPL/BATT INFO. 23 Touch the LCD screen directly with your finger to operate each function. 3 When the POWER switch is set to ...END EXPOSCH SURE 1 2 To return to open the LCD panel. (3) Press FN. Getting Started Step 3 Using the touch panel Your camcorder has operation buttons on the...
... MEMORY to use the "Memory Stick" (DCR-TRV22/TRV33 only). (2) Press OPEN to FN Press EXIT. To cancel settings Press OFF. Operation buttons on PAGE2/PAGE3 are displayed on the LCD screen. (5) Press a desired operation item....returns to PAGE1/PAGE2/PAGE3. To make screen indicators disappear Press DSPL/BATT INFO. 23 Touch the LCD screen directly with your finger to operate each function. 3 When the POWER switch is set to ...END EXPOSCH SURE 1 2 To return to open the LCD panel. (3) Press FN. Getting Started Step 3 Using the touch panel Your camcorder has operation buttons on the...

Operating Instructions
Page 24
... When the POWER switch is not on the LCD screen, touch the LCD screen lightly to make it appear. You can also operate with the touch panel (p. 70). 24 When using the touch panel, press operation buttons lightly with your camcorder. When executing each display When the POWER switch... is set to CAMERA PAGE1 PAGE2 SPOT FOCUS, MENU, FOCUS, FADER, END SCH, SPOT METER, EXPOSURE DIG EFFT*, SELFTIMER, LCD BRT, SUPER NS*, VOL, COLOR SLW S*, MEM MIX* * DCR-TRV22/TRV33 only When the POWER...
... When the POWER switch is not on the LCD screen, touch the LCD screen lightly to make it appear. You can also operate with the touch panel (p. 70). 24 When using the touch panel, press operation buttons lightly with your camcorder. When executing each display When the POWER switch... is set to CAMERA PAGE1 PAGE2 SPOT FOCUS, MENU, FOCUS, FADER, END SCH, SPOT METER, EXPOSURE DIG EFFT*, SELFTIMER, LCD BRT, SUPER NS*, VOL, COLOR SLW S*, MEM MIX* * DCR-TRV22/TRV33 only When the POWER...
Operating Instructions
Page 26
... wear. When you record in the SP and LP modes on one tape. - Note on the LOCK switch (DCR-TRV22/TRV33 only) When you record in the SP and LP modes on your camcorder during standby for details. 26 However, check the following: - Self-timer recording You can no longer be written... microphone when you change the battery pack, set the POWER switch to OFF (CHG). Select SP or LP in in the LP mode on your camcorder, we recommend playing back the tape on one tape or you slide the LOCK switch to the right, the POWER switch can record images on...
... wear. When you record in the SP and LP modes on one tape. - Note on the LOCK switch (DCR-TRV22/TRV33 only) When you record in the SP and LP modes on your camcorder during standby for details. 26 However, check the following: - Self-timer recording You can no longer be written... microphone when you change the battery pack, set the POWER switch to OFF (CHG). Select SP or LP in in the LP mode on your camcorder, we recommend playing back the tape on one tape or you slide the LOCK switch to the right, the POWER switch can record images on...

Operating Instructions
Page 47
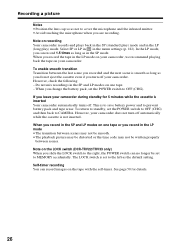
...Wide mode - Self-timer recording During recording standby, you can record still images on the screen when you press PHOTO on the Remote Commander Your camcorder immediately records the image that is recommended. Images will be 640 × 480. • If the POWER switch is set to MEMORY. ..." See page 106 for details. 47 Advanced Recording Operations Recording still images on "Memory Stick" during tape recording standby or tape recording (DCR-TRV22/TRV33 only) Note You cannot record still images in the "Memory Stick" during tape recording You cannot check an image on the screen...
...Wide mode - Self-timer recording During recording standby, you can record still images on the screen when you press PHOTO on the Remote Commander Your camcorder immediately records the image that is recommended. Images will be 640 × 480. • If the POWER switch is set to MEMORY. ..." See page 106 for details. 47 Advanced Recording Operations Recording still images on "Memory Stick" during tape recording standby or tape recording (DCR-TRV22/TRV33 only) Note You cannot record still images in the "Memory Stick" during tape recording You cannot check an image on the screen...
Operating Instructions
Page 48
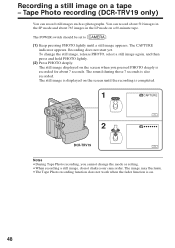
The CAPTURE indicator appears. To change the mode or setting. •When recording a still image, do not shake your camcorder. You can record still images such as photographs. The still image displayed on the screen until a still image appears. Recording does not ...lightly. (2) Press PHOTO deeply. The sound during those 7 seconds is completed. 1 CAPTURE FN 2 DCR-TRV19 FN Notes •During Tape Photo recording, you pressed PHOTO deeply is on a tape - Tape Photo recording (DCR-TRV19 only) You can record about 510 images in the LP mode on a 60-minute tape.
The CAPTURE indicator appears. To change the mode or setting. •When recording a still image, do not shake your camcorder. You can record still images such as photographs. The still image displayed on the screen until a still image appears. Recording does not ...lightly. (2) Press PHOTO deeply. The sound during those 7 seconds is completed. 1 CAPTURE FN 2 DCR-TRV19 FN Notes •During Tape Photo recording, you pressed PHOTO deeply is on a tape - Tape Photo recording (DCR-TRV19 only) You can record about 510 images in the LP mode on a 60-minute tape.
Operating Instructions
Page 52
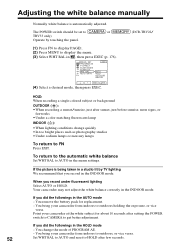
...white subject for replacement. - If you did the followings in the AUTO mode - If the picture is automatically adjusted. You bring your camcorder from indoors to outdoors, or vice versa. 52 Set WHT BAL to AUTO and reset to get better adjustment. To return to the ...PROGRAM AE P EFFECT FLASH MODE FLASH LVL WHT BAL AUTO SHTR EXIT AUTO HOLD OUTDOOR INDOOR EXEC RET. (4) Select a desired mode, then press EXEC. (DCR-TRV22/ HOLD: When recording a single-colored subject or background OUTDOOR ( ): •When recording a sunset/sunrise, just after few seconds. You remove the ...
...white subject for replacement. - If you did the followings in the AUTO mode - If the picture is automatically adjusted. You bring your camcorder from indoors to outdoors, or vice versa. 52 Set WHT BAL to AUTO and reset to get better adjustment. To return to the ...PROGRAM AE P EFFECT FLASH MODE FLASH LVL WHT BAL AUTO SHTR EXIT AUTO HOLD OUTDOOR INDOOR EXEC RET. (4) Select a desired mode, then press EXEC. (DCR-TRV22/ HOLD: When recording a single-colored subject or background OUTDOOR ( ): •When recording a sunset/sunrise, just after few seconds. You remove the ...

Operating Instructions
Page 53
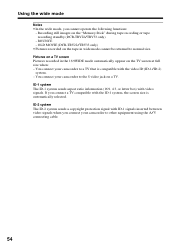
Black bands appear on a wide-screen TV [b] or a normal TV [c]* are compressed in the widthwise direction. DCR-TRV33 only - S. The picture during playing back in the 4:3 mode on the screen during recording in the 16:9WIDE mode [a]. CAMERA SET D ZOOM 16 :... in , then press EXEC (p. 177). (4) Select ON, then press EXEC. To return to . Advanced Recording Operations Using the wide mode You can watch on your camcorder [a]. [a] [b] [d] 16:9WIDE [c] The POWER switch should be set to the W (wide) side, the recording angle will not become wider than that of normal ...
Black bands appear on a wide-screen TV [b] or a normal TV [c]* are compressed in the widthwise direction. DCR-TRV33 only - S. The picture during playing back in the 4:3 mode on the screen during recording in the 16:9WIDE mode [a]. CAMERA SET D ZOOM 16 :... in , then press EXEC (p. 177). (4) Select ON, then press EXEC. To return to . Advanced Recording Operations Using the wide mode You can watch on your camcorder [a]. [a] [b] [d] 16:9WIDE [c] The POWER switch should be set to the W (wide) side, the recording angle will not become wider than that of normal ...
Operating Instructions
Page 54
...protection signal with ID-1 signals inserted between video signals when you connect your camcorder to other equipment using the A/V connecting cable. 54 You connect your camcorder to a TV that is automatically selected. OLD MOVIE (DCR-TRV22/TRV33 only) •Pictures recorded on the TV screen at full ... returned to the S video jack on the "Memory Stick" during tape recording or tape recording standby (DCR-TRV22/TRV33 only) - Recording still images on a TV. You connect your camcorder to normal size. BOUNCE - ID-1 system The ID-1 system sends aspect ratio information (16:9, 4:3, ...
...protection signal with ID-1 signals inserted between video signals when you connect your camcorder to other equipment using the A/V connecting cable. 54 You connect your camcorder to a TV that is automatically selected. OLD MOVIE (DCR-TRV22/TRV33 only) •Pictures recorded on the TV screen at full ... returned to the S video jack on the "Memory Stick" during tape recording or tape recording standby (DCR-TRV22/TRV33 only) - Recording still images on a TV. You connect your camcorder to normal size. BOUNCE - ID-1 system The ID-1 system sends aspect ratio information (16:9, 4:3, ...
Operating Instructions
Page 57
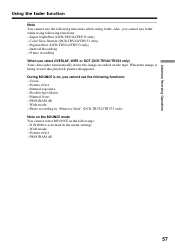
...TRV33 only) - Zoom - Also, you cannot use fader while using fader. Frame recording When you select OVERLAP, WIPE or DOT (DCR-TRV22/TRV33 only) Your camcorder automatically stores the image recorded on , you cannot use the following functions while using following functions: - Picture effect - PROGRAM AE -...Manual focus - D ZOOM is activated in the followings: - During BOUNCE is being stored, the playback picture disappears. Super NightShot (DCR-TRV22/TRV33 only) - Advanced Recording Operations Using the fader function Note You cannot use the following functions: -
...TRV33 only) - Zoom - Also, you cannot use fader while using fader. Frame recording When you select OVERLAP, WIPE or DOT (DCR-TRV22/TRV33 only) Your camcorder automatically stores the image recorded on , you cannot use the following functions while using following functions: - Picture effect - PROGRAM AE -...Manual focus - D ZOOM is activated in the followings: - During BOUNCE is being stored, the playback picture disappears. Super NightShot (DCR-TRV22/TRV33 only) - Advanced Recording Operations Using the fader function Note You cannot use the following functions: -

Operating Instructions
Page 59
... superimposed on a moving picture. OLD MOVIE You can slow down the shutter speed. Still image Moving picture 59 Your camcorder automatically sets the 16:9WIDE mode, picture effect to pictures. Digital effect (DCR-TRV22/TRV33 only) STILL You can record still images successively at regular intervals. FLASH (flash motion) You can record...
... superimposed on a moving picture. OLD MOVIE You can slow down the shutter speed. Still image Moving picture 59 Your camcorder automatically sets the 16:9WIDE mode, picture effect to pictures. Digital effect (DCR-TRV22/TRV33 only) STILL You can record still images successively at regular intervals. FLASH (flash motion) You can record...

Operating Instructions
Page 70
...FADER (only when the POWER switch is set to MEMORY (DCR-TRV22/TRV33 only) EXPO- EXPOSURE: Adjust the exposure by touching the panel. (DCR-TRV22/ (1) Turn the LCD panel over and move it back to your camcorder body with the LCD screen facing out to CAMERA EXPO- OK SURE ON Viewfinder... To make the buttons on the screen. (3) Press OK. FADER t BOUNCE t MONOTONE (no indicator) T DOT* T WIPE* T OVERLAP* * DCR-TRV22/TRV33 only ON: The LCD screen lights up. 4 When...
...FADER (only when the POWER switch is set to MEMORY (DCR-TRV22/TRV33 only) EXPO- EXPOSURE: Adjust the exposure by touching the panel. (DCR-TRV22/ (1) Turn the LCD panel over and move it back to your camcorder body with the LCD screen facing out to CAMERA EXPO- OK SURE ON Viewfinder... To make the buttons on the screen. (3) Press OK. FADER t BOUNCE t MONOTONE (no indicator) T DOT* T WIPE* T OVERLAP* * DCR-TRV22/TRV33 only ON: The LCD screen lights up. 4 When...
Operating Instructions
Page 193
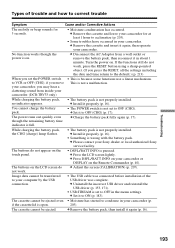
... The power runs out quickly, even though the remaining battery time indicator is on the LCD screen do not work , press the RESET button using a sharp-pointed object. (If...not work . c Charge the battery pack fully again (p. 17). c Press DSPL/BATT INFO on your camcorder. (DCR-TRV33 only) • This is set to ON (p. 183). c Remove the battery pack, then ...the cassette lid is not properly installed. c Remove the cassette and leave your Sony dealer or local authorized Sony service facility. Types of the USB driver was complete. While charging the battery ...
... The power runs out quickly, even though the remaining battery time indicator is on the LCD screen do not work , press the RESET button using a sharp-pointed object. (If...not work . c Charge the battery pack fully again (p. 17). c Press DSPL/BATT INFO on your camcorder. (DCR-TRV33 only) • This is set to ON (p. 183). c Remove the battery pack, then ...the cassette lid is not properly installed. c Remove the cassette and leave your Sony dealer or local authorized Sony service facility. Types of the USB driver was complete. While charging the battery ...


