
Operating Instructions
Page 2
... on your used rechargeable batteries to the following two conditions: (1) This device may not cause harmful interference, and (2) this Sony Handycam. RECYCLING LITHIUM-ION BATTERIES Lithium-Ion batteries are recyclable. This Class B digital apparatus complies with Part 15 of rechargeable batteries...but at the same time it is intended to alert the user to discontinue midway (fail), restart the application or disconnect and connect the USB cable again. "Memory Stick" (DCR-TRV22/ TRV33 only) This device complies with Canadian ICES-003. 2 Operation is intended to alert the...
... on your used rechargeable batteries to the following two conditions: (1) This device may not cause harmful interference, and (2) this Sony Handycam. RECYCLING LITHIUM-ION BATTERIES Lithium-Ion batteries are recyclable. This Class B digital apparatus complies with Part 15 of rechargeable batteries...but at the same time it is intended to alert the user to discontinue midway (fail), restart the application or disconnect and connect the USB cable again. "Memory Stick" (DCR-TRV22/ TRV33 only) This device complies with Canadian ICES-003. 2 Operation is intended to alert the...
Operating Instructions
Page 4
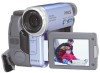
... Features •Viewing moving pictures recorded on the tape using the USB cable (p. 148) •Viewing images recorded on the "Memory Stick" using the USB cable (DCR-TRV22/TRV33 only) (p. 149) •Capturing images on the computer from your camcorder using the USB cable (p. 161) •Converting an analog signal into digital to capture...
... Features •Viewing moving pictures recorded on the tape using the USB cable (p. 148) •Viewing images recorded on the "Memory Stick" using the USB cable (DCR-TRV22/TRV33 only) (p. 149) •Capturing images on the computer from your camcorder using the USB cable (p. 161) •Converting an analog signal into digital to capture...

Operating Instructions
Page 7
... Changing the recording folder .......... 133 Viewing a still image - Digital program editing (on a computer - Introduction 148 Connecting your camcorder to a computer using the USB cable (For Macintosh users) (DCR-TRV22/TRV33 only) ......... 170 Viewing images recorded on "Memory Stick" on a computer (... on "Memory Stick" on a computer (For Windows users) (DCR-TRV22/TRV33 only) ......... 167 Connecting your camcorder to a computer using the USB cable (For Windows users 151 7 Slide show 141 Preventing accidental erasure - Memory Photo recording 114 Recording an image...
... Changing the recording folder .......... 133 Viewing a still image - Digital program editing (on a computer - Introduction 148 Connecting your camcorder to a computer using the USB cable (For Macintosh users) (DCR-TRV22/TRV33 only) ......... 170 Viewing images recorded on "Memory Stick" on a computer (... on "Memory Stick" on a computer (For Windows users) (DCR-TRV22/TRV33 only) ......... 167 Connecting your camcorder to a computer using the USB cable (For Windows users 151 7 Slide show 141 Preventing accidental erasure - Memory Photo recording 114 Recording an image...

Operating Instructions
Page 13
To view your camcorder to the copyright laws. Note on connecting other materials may be damaged...an NTSC system-based TV. If you use only mini DV cassettes with your camcorder. 13 Getting Started Using this manual Note on Cassette Memory Your camcorder is based on the country or region. You can use a cassette with Cassette... Memory have the (Cassette Memory) mark. Cassettes with Cassette Memory . Unauthorized recording of your camcorder. Note on TV color systems TV color systems differ depending on the DV format. We recommend that you forcibly ...
To view your camcorder to the copyright laws. Note on connecting other materials may be damaged...an NTSC system-based TV. If you use only mini DV cassettes with your camcorder. 13 Getting Started Using this manual Note on Cassette Memory Your camcorder is based on the country or region. You can use a cassette with Cassette... Memory have the (Cassette Memory) mark. Cassettes with Cassette Memory . Unauthorized recording of your camcorder. Note on TV color systems TV color systems differ depending on the DV format. We recommend that you forcibly ...
Operating Instructions
Page 15
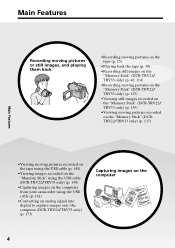
... 6 Shoulder strap (1) 7 Lens cap (1) (p. 213) 8 Shoe cover (1) (p. 98) 9 "Memory Stick" (1) (DCR-TRV22/ TRV33 only, p. 106) 0 USB cable (1) (p. 148) qa CD-ROM (SPVD-010 USB Driver) (1) (p. 153, 171) qs Cleaning cloth (1) (p. 206) Contents of the recording cannot be compensated if recording or playback is not made due... to a malfunction of the camcorder, storage media, etc. 15 Getting Started Checking supplied ...
... 6 Shoulder strap (1) 7 Lens cap (1) (p. 213) 8 Shoe cover (1) (p. 98) 9 "Memory Stick" (1) (DCR-TRV22/ TRV33 only, p. 106) 0 USB cable (1) (p. 148) qa CD-ROM (SPVD-010 USB Driver) (1) (p. 153, 171) qs Cleaning cloth (1) (p. 206) Contents of the recording cannot be compensated if recording or playback is not made due... to a malfunction of the camcorder, storage media, etc. 15 Getting Started Checking supplied ...
Operating Instructions
Page 22
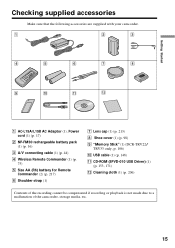
... month, the day, the hour and the minute. (1) Set the POWER switch to CAMERA or MEMORY (DCR-TRV22/TRV33 only). (2) Press OPEN to open the LCD panel. (3) Press FN (Function) to display PAGE1 (p. 23). (4) Press MENU to display the menu. (5) Press r/R to select , then press EXEC. (6) Press r/R to...step 7. (9) Press r/R to CAMERA or MEMORY (DCR-TRV22/TRV33 only) unless you do not use your camcorder for the first time. The clock starts to FN (Function) Press EXIT. SETUP MENU CLOCK SET USB STREAM LANGUAGE DEMO MODE EXIT JUL 4 2003 5:30:00PM EXEC RET. EXEC RET. Step 2 Setting the ...
... month, the day, the hour and the minute. (1) Set the POWER switch to CAMERA or MEMORY (DCR-TRV22/TRV33 only). (2) Press OPEN to open the LCD panel. (3) Press FN (Function) to display PAGE1 (p. 23). (4) Press MENU to display the menu. (5) Press r/R to select , then press EXEC. (6) Press r/R to...step 7. (9) Press r/R to CAMERA or MEMORY (DCR-TRV22/TRV33 only) unless you do not use your camcorder for the first time. The clock starts to FN (Function) Press EXIT. SETUP MENU CLOCK SET USB STREAM LANGUAGE DEMO MODE EXIT JUL 4 2003 5:30:00PM EXEC RET. EXEC RET. Step 2 Setting the ...

Operating Instructions
Page 148
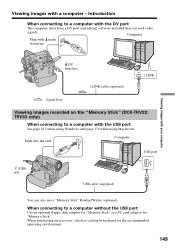
...'s ports and editing software, contact the computer manufacturer. Viewing images with the USB port, complete installation of connecting your camcorder "Memory Stick" image (DCRTRV22/TRV33 only) Camcorder connection jack USB jack DV Interface USB jack Connection cable USB cable (supplied) Computer environment requirements USB port, editing software Reference pages For For Windows Macintosh Users Users 151 - 160...
...'s ports and editing software, contact the computer manufacturer. Viewing images with the USB port, complete installation of connecting your camcorder "Memory Stick" image (DCRTRV22/TRV33 only) Camcorder connection jack USB jack DV Interface USB jack Connection cable USB cable (supplied) Computer environment requirements USB port, editing software Reference pages For For Windows Macintosh Users Users 151 - 160...
Operating Instructions
Page 149
...See page 167 when using Windows and page 170 when using Macintosh. Introduction When connecting to a computer with mark facing up. Computer USB port (USB) jack USB cable (supplied) You can read video signals. Viewing images with your computer DV Interface i.LINK cable (optional) i.LINK : Signal ...flow Viewing images recorded on the "Memory Stick" (DCR-TRV22/ TRV33 only) When connecting to a computer without the USB port Use an optional floppy disk adaptor for "Memory Stick" or a PC card adaptor for the recommended operating environment. 149 Push into the end...
...See page 167 when using Windows and page 170 when using Macintosh. Introduction When connecting to a computer with mark facing up. Computer USB port (USB) jack USB cable (supplied) You can read video signals. Viewing images with your computer DV Interface i.LINK cable (optional) i.LINK : Signal ...flow Viewing images recorded on the "Memory Stick" (DCR-TRV22/ TRV33 only) When connecting to a computer without the USB port Use an optional floppy disk adaptor for "Memory Stick" or a PC card adaptor for the recommended operating environment. 149 Push into the end...

Operating Instructions
Page 150
...TRV22/TRV33 only) •"Memory Stick" operations on your camcorder cannot be assured if a "Memory Stick" formatted on your computer is used on your camcorder, or if the "Memory Stick" in your camcorder was formatted from your computer when the USB cable was connected. •Do not compress the data ...on your camcorder, the image format will differ so a file error indicator may ...
...TRV22/TRV33 only) •"Memory Stick" operations on your camcorder cannot be assured if a "Memory Stick" formatted on your computer is used on your camcorder, or if the "Memory Stick" in your camcorder was formatted from your computer when the USB cable was connected. •Do not compress the data ...on your camcorder, the image format will differ so a file error indicator may ...
Operating Instructions
Page 151
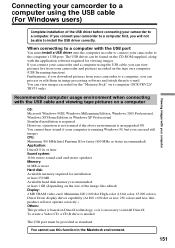
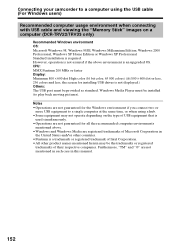
... Draw display driver capability (At 800 × 600 dot or less, 256 colors and less, this function in order to connect your camcorder to the computer's USB port. CPU: Minimum 500 MHz Intel Pentium III or faster (800 MHz or faster recommended) Application: DirectX 8.0a or later Sound system...: This product is based on DirectX technology, so it is necessary to install DirectX. Viewing images with your computer Connecting your camcorder to a computer using the USB cable, you can be found on the CD-ROM supplied, along with the application software required for installation: at least 250 MB...
... Draw display driver capability (At 800 × 600 dot or less, 256 colors and less, this function in order to connect your camcorder to the computer's USB port. CPU: Minimum 500 MHz Intel Pentium III or faster (800 MHz or faster recommended) Application: DirectX 8.0a or later Sound system...: This product is based on DirectX technology, so it is necessary to install DirectX. Viewing images with your computer Connecting your camcorder to a computer using the USB cable, you can be found on the CD-ROM supplied, along with the application software required for installation: at least 250 MB...
Operating Instructions
Page 152
... not guaranteed for all the recommended computer environments mentioned above environment is not displayed.) Others: The USB port must be provided as standard. Windows Media Player must be installed (to play back moving pictures). Connecting your camcorder to a computer using a hub. •Some equipment may be the trademarks or registered trademarks of...
... not guaranteed for all the recommended computer environments mentioned above environment is not displayed.) Others: The USB port must be provided as standard. Windows Media Player must be installed (to play back moving pictures). Connecting your camcorder to a computer using a hub. •Some equipment may be the trademarks or registered trademarks of...

Operating Instructions
Page 153
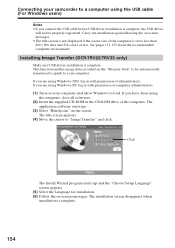
... according to "Making the computer recognize your camcorder to a computer using Windows XP, log in with permission of computer administrators. (1) Turn on a computer and allow Windows to install the USB driver. (6) Remove the CD-ROM, then restart the computer and follow the on the .... Click (5) Follow the on-screen messages to load. If you are using the USB cable (For Windows users) Installing the USB driver Start the following operation without connecting the USB cable to "USB Driver" and click. Viewing images with your computer Connecting your camcorder" on page 156.
... according to "Making the computer recognize your camcorder to a computer using Windows XP, log in with permission of computer administrators. (1) Turn on a computer and allow Windows to install the USB driver. (6) Remove the CD-ROM, then restart the computer and follow the on the .... Click (5) Follow the on-screen messages to load. If you are using the USB cable (For Windows users) Installing the USB driver Start the following operation without connecting the USB cable to "USB Driver" and click. Viewing images with your computer Connecting your camcorder" on page 156.
Operating Instructions
Page 154
See pages 151, 152 about the recommended computer environment. Installing Image Transfer (DCR-TRV22/TRV33 only) Make sure USB driver installation is complete. 154 The application software starts up and the "Choose Setup Language" screen appears. (5) Select the .... Carry out installation again following the on your computer. Connecting your camcorder to a computer using the USB cable (For Windows users) Notes •If you connect the USB cable before USB driver installation is complete, the USB driver will not be automatically transferred (copied) to your computer and ...
See pages 151, 152 about the recommended computer environment. Installing Image Transfer (DCR-TRV22/TRV33 only) Make sure USB driver installation is complete. 154 The application software starts up and the "Choose Setup Language" screen appears. (5) Select the .... Carry out installation again following the on your computer. Connecting your camcorder to a computer using the USB cable (For Windows users) Notes •If you connect the USB cable before USB driver installation is complete, the USB driver will not be automatically transferred (copied) to your computer and ...
Operating Instructions
Page 155
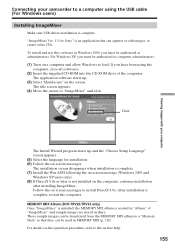
...the "Choose Setup Language" screen appears. (5) Select the language for Sony" is an application that they can capture or edit images, or ..." of the computer. For Windows XP, you have been using the USB cable (For Windows users) Installing ImageMixer Make sure USB driver installation is not installed on the computer, continue installation after installing ..."ImageMixer Ver. 1.5 for installation. (6) Follow the on-screen messages. Viewing images with your computer Connecting your camcorder to a computer using the computer, close all softwares. (2) Insert the supplied CD-ROM into the CD-ROM...
...the "Choose Setup Language" screen appears. (5) Select the language for Sony" is an application that they can capture or edit images, or ..." of the computer. For Windows XP, you have been using the USB cable (For Windows users) Installing ImageMixer Make sure USB driver installation is not installed on the computer, continue installation after installing ..."ImageMixer Ver. 1.5 for installation. (6) Follow the on-screen messages. Viewing images with your computer Connecting your camcorder to a computer using the computer, close all softwares. (2) Insert the supplied CD-ROM into the CD-ROM...

Operating Instructions
Page 156
... on -screen messages so that the Add Hardware Wizard recognizes that happens, reinstall the original application and replace WinASPI. Connecting your camcorder to a computer using the USB cable (For Windows users) Replacing WinASPI To use the ImageMixer CD writing function, you are using Windows 2000, log in with permission of administrators. Making...
... on -screen messages so that the Add Hardware Wizard recognizes that happens, reinstall the original application and replace WinASPI. Connecting your camcorder to a computer using the USB cable (For Windows users) Replacing WinASPI To use the ImageMixer CD writing function, you are using Windows 2000, log in with permission of administrators. Making...
Operating Instructions
Page 157
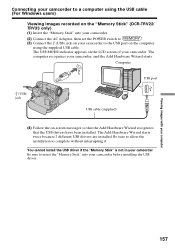
...that the Add Hardware Wizard recognizes that the USB drivers have been installed. You cannot install the USB driver if the "Memory Stick" is not in your camcorder Be sure to insert the "Memory Stick" into your camcorder. (2) Connect the AC Adaptor, then set ... . (3) Connect the (USB) jack on your camcorder to complete without interrupting it. Viewing images with your camcorder before installing the USB driver. The computer recognizes your camcorder. Computer USB port (USB) jack USB cable (supplied) (4) Follow the on the LCD screen of your camcorder, and the Add Hardware ...
...that the Add Hardware Wizard recognizes that the USB drivers have been installed. You cannot install the USB driver if the "Memory Stick" is not in your camcorder Be sure to insert the "Memory Stick" into your camcorder. (2) Connect the AC Adaptor, then set ... . (3) Connect the (USB) jack on your camcorder to complete without interrupting it. Viewing images with your camcorder before installing the USB driver. The computer recognizes your camcorder. Computer USB port (USB) jack USB cable (supplied) (4) Follow the on the LCD screen of your camcorder, and the Add Hardware ...
Operating Instructions
Page 158
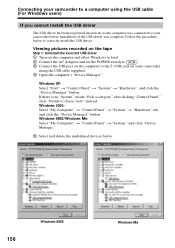
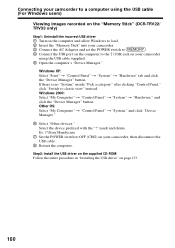
... If you cannot install the USB driver The USB driver has been registered incorrectly as the computer was connected to the (USB) jack on your camcorder before installation of the USB driver was complete. Viewing pictures recorded on the tape Step 1: Uninstall the incorrect USB driver 1 Turn on the...computer and allow Windows to load. 2 Connect the AC Adaptor and set the POWER switch to . 3 Connect the USB port on the computer to your camcorder using the USB cable supplied. 4 Open the computer's "Device Manager." Follow the procedure below . 158 Windows 98SE Windows Me If there...
... If you cannot install the USB driver The USB driver has been registered incorrectly as the computer was connected to the (USB) jack on your camcorder before installation of the USB driver was complete. Viewing pictures recorded on the tape Step 1: Uninstall the incorrect USB driver 1 Turn on the...computer and allow Windows to load. 2 Connect the AC Adaptor and set the POWER switch to . 3 Connect the USB port on the computer to your camcorder using the USB cable supplied. 4 Open the computer's "Device Manager." Follow the procedure below . 158 Windows 98SE Windows Me If there...
Operating Instructions
Page 159
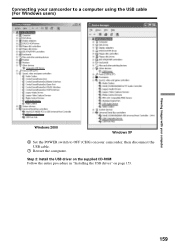
Step 2: Install the USB driver on the supplied CD-ROM Follow the entire procedure in "Installing the USB driver" on your camcorder, then disconnect the USB cable. 7 Restart the computer. Connecting your camcorder to a computer using the USB cable (For Windows users) Viewing images with your computer Windows 2000 Windows XP 6 Set the POWER switch to OFF (CHG) on page 153. 159
Step 2: Install the USB driver on the supplied CD-ROM Follow the entire procedure in "Installing the USB driver" on your camcorder, then disconnect the USB cable. 7 Restart the computer. Connecting your camcorder to a computer using the USB cable (For Windows users) Viewing images with your computer Windows 2000 Windows XP 6 Set the POWER switch to OFF (CHG) on page 153. 159
Operating Instructions
Page 160
...." 6 Select "Other devices." Ex: (?)Sony Handycam 7 Set the POWER switch to OFF (CHG) on your camcorder using the USB cable (For Windows users) Viewing images recorded on the "Memory Stick" (DCR-TRV22/ TRV33 only) Step1: Uninstall the incorrect USB driver 1 Turn on the computer and allow... "System" t "Hardware" tab and click the "Device Manager" button. Step2: Install the USB driver on the supplied CD-ROM Follow the entire procedure in "Installing the USB driver" on your camcorder, then disconnect the USB cable. 8 Restart the computer. If there is no "System" inside "Pick a category" ...
...." 6 Select "Other devices." Ex: (?)Sony Handycam 7 Set the POWER switch to OFF (CHG) on your camcorder using the USB cable (For Windows users) Viewing images recorded on the "Memory Stick" (DCR-TRV22/ TRV33 only) Step1: Uninstall the incorrect USB driver 1 Turn on the computer and allow... "System" t "Hardware" tab and click the "Device Manager" button. Step2: Install the USB driver on the supplied CD-ROM Follow the entire procedure in "Installing the USB driver" on your camcorder, then disconnect the USB cable. 8 Restart the computer. If there is no "System" inside "Pick a category" ...
Operating Instructions
Page 161
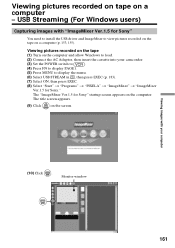
...Sony." Viewing images with "ImageMixer Ver.1.5 for Sony" You need to install the USB driver and ImageMixer to view pictures recorded on the tape on the computer. Monitor window 161 The title screen appears. (9) Click on a computer - USB Streaming (For Windows users) Capturing images with your camcorder... and allow Windows to display the menu. (6) Select USB STREAM in , then press EXEC (p. 183). (7) Select ON, then press EXEC. (8) Select "Start" t "Programs" t "PIXELA" t "ImageMixer" t "ImageMixer Ver.1.5 for Sony" startup screen appears on a computer (p. 153, 155...
...Sony." Viewing images with "ImageMixer Ver.1.5 for Sony" You need to install the USB driver and ImageMixer to view pictures recorded on the tape on the computer. Monitor window 161 The title screen appears. (9) Click on a computer - USB Streaming (For Windows users) Capturing images with your camcorder... and allow Windows to display the menu. (6) Select USB STREAM in , then press EXEC (p. 183). (7) Select ON, then press EXEC. (8) Select "Start" t "Programs" t "PIXELA" t "ImageMixer" t "ImageMixer Ver.1.5 for Sony" startup screen appears on a computer (p. 153, 155...


